
Conceptual walkthrough

Migration process overview
|
NOTE: The brief narrative here is not meant to be a substitute for the detailed step-by-step process instructions in in the MNE Scenarios Guide. Rather, the material here is intended only to familiarize you with Quest Migrator for Notes to Exchange, and the contexts in which its components are typically used. Be sure to see your Scenarios Guide for complete, step-by-step process instructions. |
This section briefly describes a typical migration scenario using Quest Migrator for Notes to Exchange to migrate to a local, proprietary Exchange target. Details and flow charts for this process appear in chapter 2 of the MNE Scenarios Guide. In this scenario, an administrator performs the migrations for a series of user groups with no user input or interaction, and we do not use the Self-Service Desktop Migrator at all.
The approach described here is appropriate for many migrations, but the configuration, circumstances and institutional priorities of any given site will dictate variations to this process. Migrator for Notes to Exchange offers many operational options that permit much flexibility in devising and implementing a suitable migration strategy. See the MNE Scenarios Guide for detailed information about how Quest tools accommodate various migration scenarios. We also include the Scenarios Guide flow charts here, to summarize the process visually.
Necessary pre-migration preparations

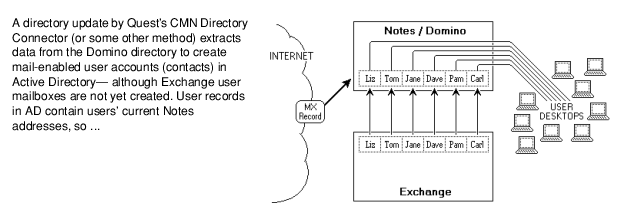
We also install Quest’s Coexistence Manager for Notes (CMN), and run its Directory Connector to perform a directory update between the source and target servers. This process creates mail-enabled accounts (contacts) in Active Directory for all Notes users. The CMN Directory Connector does not create mailboxes, but its directory update provisions new mail-enabled contacts in Active Directory, which associate users' existing Notes addresses with their corresponding new AD objects. The new objects within AD are said to be "mail-enabled" because Exchange can now accept mail addressed to these users’ Notes addresses and immediately route it to the corresponding mailboxes on the Domino server.
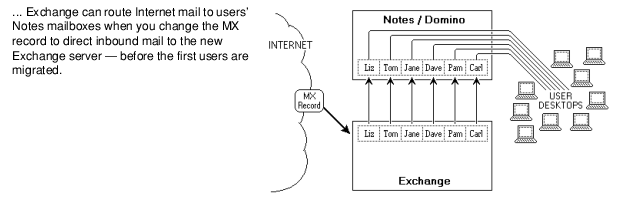
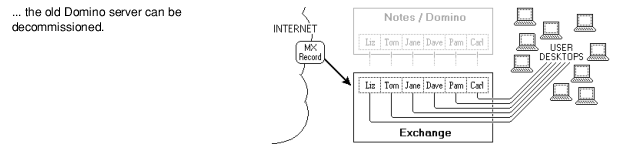
Users in this scenario will migrate in a series of collections (user groups), over a period of several weeks, so we will require an email coexistence strategy that permits mail-forwarding throughout the transition period—when some users have already been migrated to Exchange while others wait their turn back in Domino. We choose the SMTP method of mail-routing, and we prefer the single-domain approach, so we configure a smart host for each environment to facilitate that method. (All of these coexistence methods and their alternatives are summarized in MNE’s Pre-Migration Planning Guide.) When our SMTP mail-routing is configured, we modify the MX (Mail eXchange) record to direct external (Internet) mail to the Exchange environment. Since no users have yet been migrated, but all users have been provisioned and mail-enabled in AD, all inbound Internet mail is, for the time being, immediately routed back to the corresponding Notes mailboxes.
Next, we run MNE’s Notes Migration Manager to capture information about the Notes environment. From the Notes Migration Manager, we launch the Name & Address Book Discovery Wizard to find the Notes NAB files that describe the Notes directory. Next we run the Internet Domains Discovery Wizard to assemble a list of all Notes and Internet domains in use in the Notes system. The Directory Export Wizard then finds all of the users, contacts, resources, and distribution lists (groups) in the Notes environment. These discovery and export Wizards generate and save the data sets required by the MNE Wizards and features used in the migration process.
MNE provisioning, migration, and other features are applied to collections of users and distribution groups. A collection is simply a defined subset of the universe of users or groups that the Directory Export Wizard has found in the Notes/Domino environment. These collections are created and characterized in the Collection Wizard, so we run that Wizard now to define our user and group collections.
In this scenario, our Active Directory was already up and running with user accounts before we ran CMN’s Directory Connector, so the new Exchange contacts it created now coexist with existing AD user accounts for the same users. Migrator for Notes to Exchange offers a Provisioning Wizard that can consolidate such duplicates before any data is migrated. The merge process requires data that has been exported from the Notes directory, so we can now run the Provisioning Wizard to perform the merges for all of the exported Noted users.
Our users' archives and PABs are stored on their local hard drives in this scenario, so before migration the users copy them to centralized, accessible locations, where the Data Migration Wizard will be able to find them. MNE includes a PAB Replicator Wizard that automates that process for end users’ PABs. After the files are copied, the Locate Data Stores Wizard is run to identify all of the Notes mail files, archives, and PABs before migration. The administrator can then review and assess the volume of data to be migrated from the captured data within Notes Migration Manager.
Migration process (per user collection)
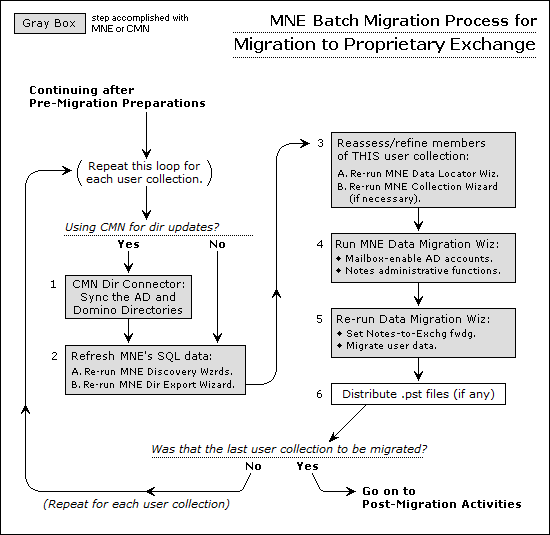
If our organization has experienced any staff additions or changes since the last run of the Directory Export Wizard, we perform two updating tasks before the next run of the Data Migration Wizard:
|
• |
Re-run the Directory Export Wizard, to update MNE’s SQL database. |
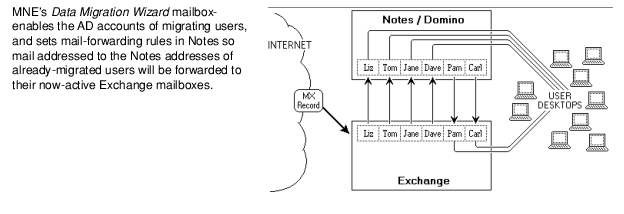
When the collection is ready, we run the Data Migration Wizard twice to perform several tasks for the users defined in the current collection. (Many admins report latency conflicts when trying to perform all of these tasks together in a single program run.) In the first run, we mailbox-enable (create mailboxes for) the users in the current collection, who were earlier provisioned as mail-enabled objects. This first run of the Data Migration Wizard also lets us perform whatever administrative functions are appropriate for our scenario. Then we run the Data Migration Wizard a second time to migrate the users’ data from Notes to Exchange, and set mail forwarding from their old Notes mailboxes to their new Exchange mailboxes.
If the Data Migration Wizard migrates any data to Outlook Personal Folder (.pst) files, then when the migration is complete for this collection we must either: