
Parent object and Parent object name
Parent object and Parent object name
The instructions on this page detail how to set a Parent object and object name in erwin Evolve Suite (CW Suite), erwin Evolve Web, and erwin Web Modeler.
To set the Parent object and object name in erwin Evolve Suite:
1.Start the erwin Evolve Suite.
2.Click Modeler.
3.Select the Model and Template that you want use to create a diagram.

4.Enter the name of the diagram in the Name box and then, click Create.

5.Drag and drop the required shapes from the palette onto the diagram surface.
6.Double click on the diagram surface or under the Home tab, click Properties.
The Diagram properties dialog box appears.

7.Click the first drop-down list box under Parent object and select the required parent object.

8.Click the second drop-down list box under Parent object and select the required parent object name.
9.Click OK.
10.Click on the Refresh icon.

You can see the same Parent object and Parent object name on the left pane.

|
|
Before setting the Parent object and Parent object name in erwin Evolve Web, first, we need to enable these options (Parent object and Parent object name) in Evolve Designer and publish them on the site. |

To enable Parent object and Parent object name in Evolve Designer [Evolve 2022.0.0 and above]:
1.Start Evolve Designer.
2.Click on a model. For example: A Foundation – Sample Model.
3.Click Site.
4.Expand Site > Object Pages.
5.Right-click on diagram and click Expand All.
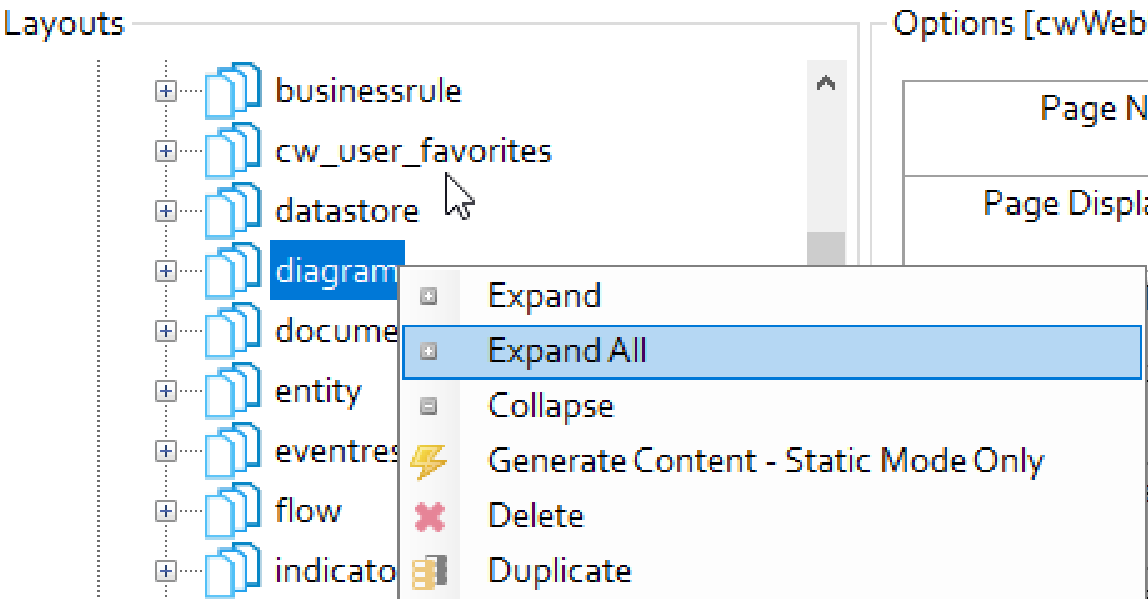
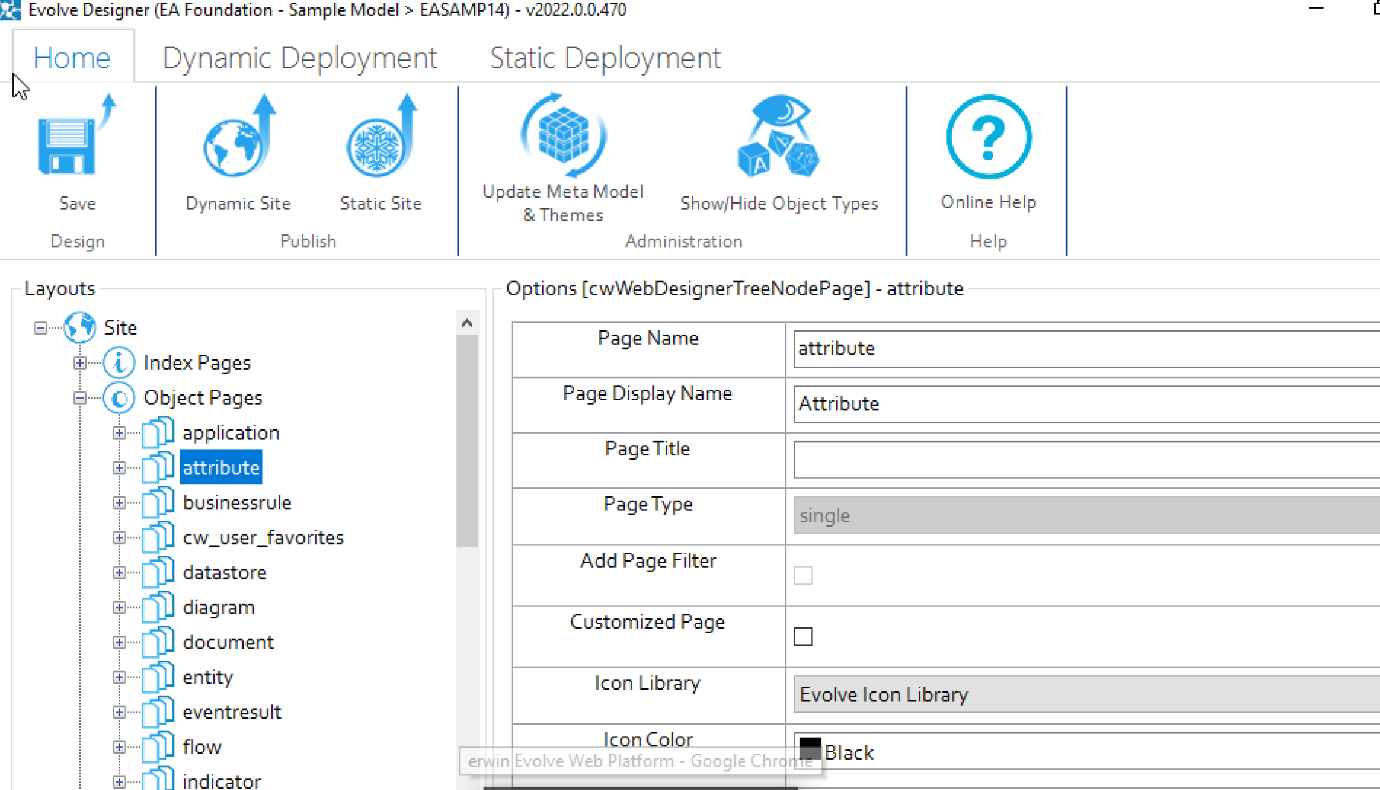
6.Click General and under Selected Properties, select Parent object and Parent object name.

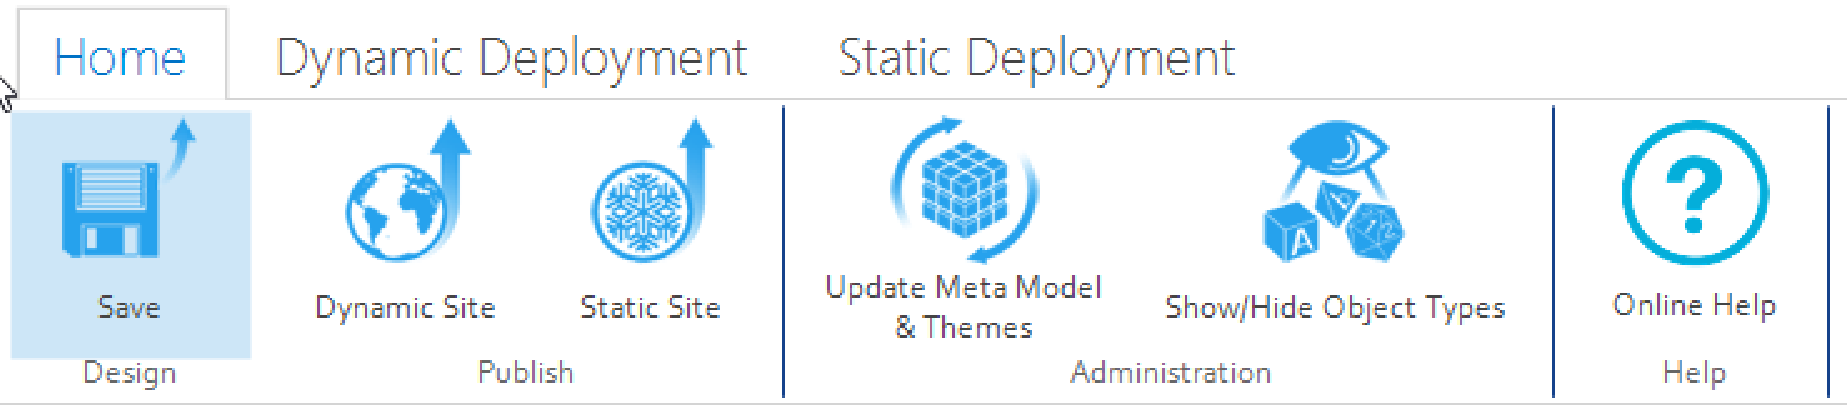
7.Click Save and then, click Dynamic Site to generate the site.
To set the Parent object and Parent object name in erwin Evolve Web:
1.Open the browser and login to erwin Evolve Web.
2.Click on model. For example: A Foundation – Sample Model.

3.Under my menu, click Diagram List.
The Diagram List appears.

4.Enter the diagram name in the Filter the content of this page box.

5.Click on the 
The diagram opens on your object page.
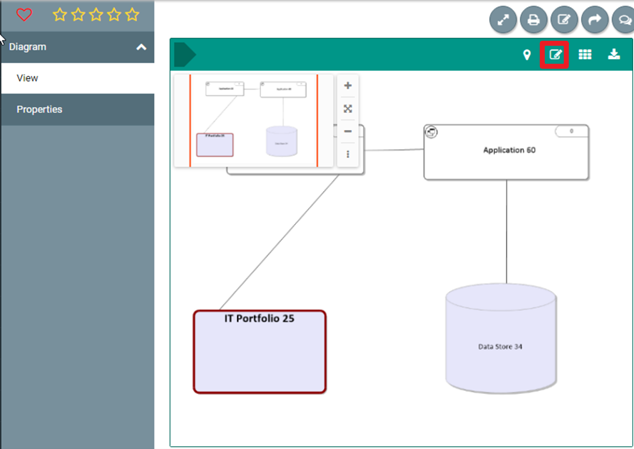
6.In the Diagram drop-down list, click Properties.

7.Click the Edit icon to edit the Parent object and Parent object name.

8.Click the Parent object drop-down list and select the required option.
9.Click the Parent object name drop-down list and select the required option.

10.Click the Save changes icon.
The Update Summary details appear on right pane.

11.Click Submit.

To set Parent object and Parent object name in erwin Web Modeler:
1.Click View.
2.Click the Edit Diagram In Web Modeler icon.

3.Click Create new draft.
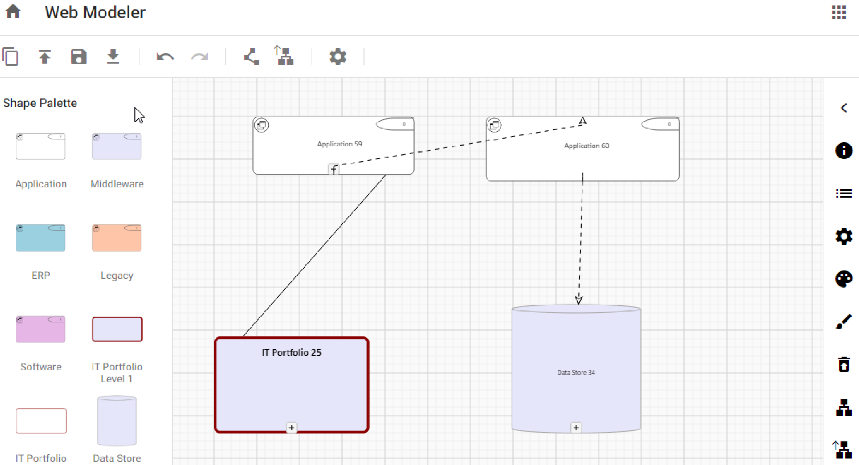
The erwin Web Modeler editor opens in a new tab with the predefined Shape Palette of the template chosen.

4.Click on the 
5.Click on the 
Parent Object Details popup opens.

6.Click the Object Type drop-down list and select the required option.
7.Click the Category drop-down list and select the required option.
8.Click the Object drop-down list and select the required option.
9.Click Save.

To publish the diagram:
1.Click the Publish Diagram icon.

2.Click Confirm Publish.
Once the diagram is published in the erwin Web Modeler, it can be accessed from the Modeler in the erwin Evolve Suite.

|
|
Diagram and Palette properties can be modified, if required, from the desktop application. |
Linking Parent Object to Child Drafts
Linking Parent Object to Child Drafts
To link parent objects to existing child draft diagrams:
1.Open the browser and login to erwin Evolve Web.
The list of available models appears.
2.Click a model. For example, EA Foundation – Sample Model.
3.Under my menu, click Diagram List.

The list of diagrams opens.
4.Enter the diagram name in the Filter the content of this page box.

6.Click the Open related object page 
The diagram opens on your object page.
7.Click the Edit Diagram In Web Modeler icon.

|
|
In the absence of the Edit Diagram In Web Modeler option, ensure that the Web Modeler is enabled with a Diagrammer license for you. |
8.Click Create new draft.

Evolve Web Modeler editor opens in a new tab with the predefined Shape Palette of the chosen template.

9.Select an object.
Options are now enabled.

10.Click the drop-down arrow on the Explode New Draft 
The Link Draft Diagrams option appears.

11.Click Link Draft Diagrams.
The Add Link to Existing Draft appears.

12.Select any child draft diagram to link with an object.
13.Click Add Link.

The child draft diagram is now linked to a parent object.

You can now see that parent object has draft child diagram available in the properties. Also, the name of the parent object is included in the child draft diagram.
Using Explode Diagram in erwin Web Modeler
Using Explode Diagram in erwin Web Modeler
The instructions on this page detail how to use the Explode Diagram feature to:
Create links from parent to child diagrams
Open existing child diagrams linked via the feature
Return to the parent diagram
To use the explode diagram feature in erwin Evolve Suite:
1.In the diagram, right-click an object.

2.Hover over Explode New.

3.Click Diagram.
The New Diagram screen appears.
- Use Name to specify the name of the diagram.
- Use Base the diagram on a template to specify template of the diagram.
- Use Create a blank diagram (based on diagramming rules) to create a new blank diagram without any templates.

4.Click OK.
The selected object is linked to a new diagram. You can explode the object to view or open the diagram.
To view an exploded diagram:
1.On a linked object that is represented on a diagram, click the 
The list of exploded diagrams appears.

2.Select a diagram from the list.
3.Click Open.
The exploded diagram opens. You can view the parent object’s details in the properties of the exploded diagram.
To view parent object or diagram of exploded diagram:
1.Under the Home tab, click Return to Parent.

2.Select a diagram and click Open.
The Parent diagram appears.
To create an exploded diagram in erwin Web Modeler [Evolve 2022.0 and above]:
1.Open the browser and login to erwin Evolve Web Platform.
The list of available model appears.
2.Click on the model, e.g., EA Foundation – Sample Model.
3.Under my menu, click Diagram List.
The list of diagrams opens.
4.Click Diagram List available under my menu.
5.Enter the diagram name in the Filter the content of this page box.
6.Click the Open related object page icon.
The diagram opens on your object page.
7.Click the Edit Diagram In Web Modeler icon.
|
|
If this icon is not present, please check you have a license for Web Modeler, that Web Modeler is enabled, and you are allocated a Diagrammer license. |
8.Click Create new draft.
Evolve Web Modeler editor opens in the new tab with the predefined Shape Palette of the template chosen.


9.Select an object.
10.Click 
The Diagram Types screen appears.
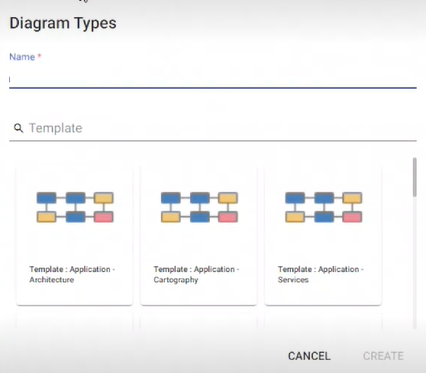
11.Enter Name and select a Template.
A blank exploded diagram is created. Now, you can drag and drop objects from the shape palette.
12.To publish the diagram, click the 
Once the diagram is published in the Web Modeler, the same diagram can be accessed from the Modeler in the desktop application.
Enable One Draft Mode
The One Draft Mode enforces only one draft per published diagram. Thus, preventing multiple drafts of the same diagram being edited at the same time.
To enable the One Draft Mode in Evolve Designer:
1.Start Evolve Designer.
2.On the Evolve Designer Models launcher dialog box, click the Configure Evolve Server button.
The Evolve Server Configuration dialog opens.

3.Under Features, select the Enable One Draft Mode check box.

4.Click Save.
5.Click Configure IIS and perform full deployment.
This enables the One Draft Mode. Once it is enabled:
The “Available drafts for this diagram” option is disabled.
Clicking the Edit Diagram In Web Modeler icon bypasses the “Available draft for this diagram” option and redirects you to erwin Web Modeler.

The “Duplicate Draft” option in erwin Web Modeler is disabled.
Clicking 
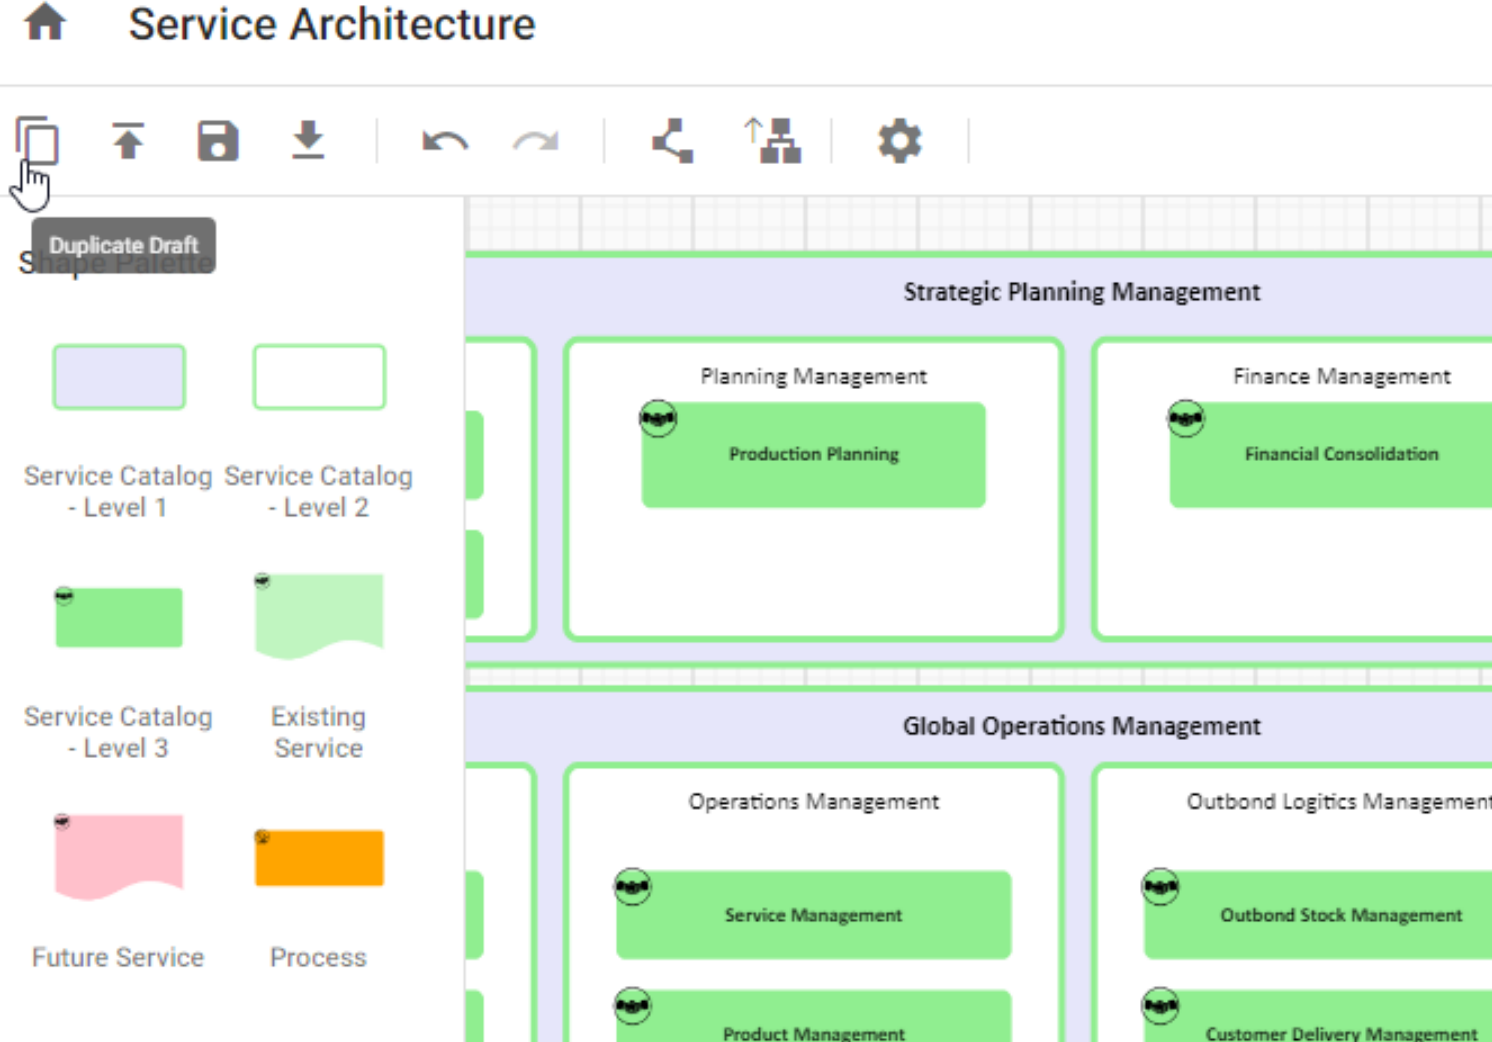

The “Create new draft” button is disabled.
If a diagram has more than one draft diagram created prior to the setting being enabled, clicking Create new draft, displays a notification, “Unable to create a draft because single draft mode is enabled.”


You can delete unwanted drafts. Once done, you will be redirected to erwin Web Modeler.
|
|
If the diagram already has a draft created, and someone modifies the published diagram via the desktop modeler, then beware that any changes made in the published diagram won't be synchronized in the draft diagrams. To see the changes, delete the unwanted drafts and create a new one. |