
Migrating from PST to a target environment
This section outlines the steps to migrate a single test PST to any supported target environment.
|
|
NOTE: The steps are specific to migrating to an Exchange 2010/2013 Personal Archive, but the steps are largely the same when migrating from source PST files to any supported target environment. |

Prerequisites
It is essential that the following steps have been completed prior to beginning the migration:
·All Modules are enabled
·Appropriate Active Directory Domains have been enabled for scanning
·The Exchange target links should be configured with a specific staging area, and with modules associated to the link.
Create a PST link
To use PST as a source for migration, a PST link needs to be created and configured:
1.Go to Configuration > Links.
2.On the PST tab click Create Link.
3.Give the link a meaningful name (for example, PST Source).
4.Specify a UNC path, in this case it can be any path, because it will not be used in the case of using PST as a source.
5.With the link still selected, click on Map Modules on the Link tab.
6.A Native Export Module should be selected underneath the Source option.
7.With the link still selected, click Create Database to create a link database.
Scan PST location(s)
The PST link needs to be configured with one or more source UNC paths to scan for PSTs, so that they can be migrated from. This can be achieved as follows:
1.Go to Configuration > Links.
2.Select the PST link that was created in the previous step.
3.On the PST tab select PST Source.
4.Click New, which is located in the center of the dialog, and enter a UNC path to scan for PSTs.
5.If required, multiple paths can be entered.
|
|
NOTE: Clicking Scan after adding a new UNC path for the module is not necessary, it will scan new paths automatically. |
Auto-assign user/owner to PST files
PST files are not assigned to users automatically after the scanning runs on the PST Export UNC path.
To automatically assign PST files to users when using the PST Export module, you must use the users primary SMTP address or email address or SAMAccount Name in the file name (in the format below), and then run the Scan on the PST Source link from the Links screen.
Here are the supported PST file name formats for auto-assignment:
·PrimarySMTPAddress_id.pst
·SAMAccountName_id.pst
For example:
·firstname.lastname@somedomain.com_1.pst
·firstinitiallastname_1.pst
|
|
NOTE: In the case when a SAM Account Name exists in multiple domains that are enabled in Archive Shuttle, PST is not assigned to an owner and you will see entry below in the PST export module log file: WARN|GetUserBySAMAccountName(PstExportScanDirectoryResultProcessor.cs:97)|More users with SAMAccountName [samaccountname], skipping auto assignment of PST owner |
Map containers - for the test archive
To migrate a test archive from one vault store to another, the source and target containers must be mapped:
1.Go to the Bulk Mapping page.
2.Change the filter for Type, so it is set to PST. This will show all the discovered PST files.
|
|
NOTE: The PSTs will show as ownerless, and will display the file path and file name. The number of items in the PST will show as zero at this stage |
3.Locate the PST you wish to use to test the migration, and select it.
4.Click on Assign Archive User and pick an Active Directory user whose mailbox will be the target of the migration.
5.With the container still selected, click Add Mappings from the navigation bar.
|
|
NOTE: A short wizard will start, which gathers information relating to the mapping for the select archive. (Multiple archives can also be selected) |
6.On the Target Container Type screen, select Exchange, and click [Next].
7.On the Choose target mailbox type screen, select Secondary (Archive) mailbox. In the second part of the dialog select Map to primary mailbox if the secondary mailbox does not exist, and then click [Next].
8.On the Target User screen, select Same User and click [Next].
9.On the Workflow Policy screen, select the PST to Exchange/Office 365(without archive deletion) option, and click [Next].
10.On the Filter Policy screen, select the Default (No Filter) option, and click [Next].
11.On the Container Mapping Settings screen, select Enabled for both Migration Status and Item Gathering Status, and click [Next].
12.Review the summary screen before clicking [Confirm].
|
|
NOTE: If the PST is not assigned an owner, it is still possible to use the Manual Mapping screen to perform a migration from PST to a target. |
Review Stage 1 Status
A few minutes after the mapping has been created, the program will instruct the appropriate modules to start the actions defined in the mapping. The progress for this stage of the migration can be reviewed by doing the following:
1.Go to the Stage 1 (Sync Data) page.
2.Type the beginning of the archive name in the Name filter. Click the Apply button at the right of the filter row.
3.Once the source archive is displayed, click Refresh from time to time to show the progress of the export of the archive and the ingesting of the data into the target Archive. Continue to click Refresh until both export and import are 100%.
If further data is added to the source archive, it will be synchronized every 24 hours to the target archive via the connection made with the mapping performed in the previous section. In addition, part of the Stage 2 Workflow is to perform a final synch. Therefore, its not necessary to ensure that export and import has reached 100% before moving on to the next steps.
Validate exported data
If there is a large amount of data to export and import, you can view the progress bars for the Stage 1 (Sync Data) move by clicking Refresh from the navigation bar on the Stage 1 (Sync Data) page of the user interface.
In addition, you can use Windows Explorer to browse the export/import storage area data on the disk.
Also at this time it will be possible to login to Outlook or Outlook Web Access as the test user. The migrated data will be present in the Personal Archive, and can be freely opened and manipulated.
|
|
NOTE: If the test user previously used the Personal Archive feature, it might be difficult to locate the migrated data. Because of this, Archive Shuttle recommends that the test user has an empty personal archive before migration. |
Enable Stage 2 Status
Before enabling Stage 2, the switch, for the test archive, the Stage 1 (Sync Data) page should be checked for issues such as failed item-export or item-import.
To enable Stage 2 for the test archive, perform the following steps:
1.Navigate to the Stage 1 (Sync Data) page.
2.Select the checkbox next to the test archive, and then click Enable Stage 2 in the navigation bar.
3.When the Stage 1 (Sync Data) page is refreshed, there should be a green and white check mark in the Stage 2 Enabled column.
Stage 2 is the switchover to the target environment. A final synchronization is performed of archived items from the source environment to the temporary PST file, before several additional migration tasks are performed.
Review Stage 2 Status
After a few minutes, the progress of the test archive migration will be visible in the Stage 2 Status page, as follows:
1.Navigate to the Stage 2 (Switch User) page.
2.Type the beginning of the archive name in the Name filter. Click the Apply button at the right of the filter row.
|
|
NOTE: If the archive is not displayed, wait one to two minutes and click Refresh in the navigation bar |
Once the source archive is displayed, you can click Refresh from time to time to show the progress of the final stages of the archive migration. By default, since the workflow policy that was selected was PST to Exchange/Office 365 (without archive deletion), the following steps will be performed:
a)Export any remaining items from the PST file
b)Import the remaining items in to the target
Verify data has been migrated
Once all of the Stage 2 operations have been completed the Stage 2 (Sync Data) for the test archive will have a green and white check mark in the Finished column.
In addition, if Outlook or Outlook Web Access is used to access the test mailbox then all of the archived items will be in the Personal Archive, and no Enterprise Vault shortcuts will remain in the source mailbox.
EAS as a source
This section explains what the requirements are for migrating away from EAS, and then covers the basic steps that should be followed to start such a migration.
Stage 1 - Synch

The first task which has to be performed is the discovery of archives in EAS. One or more of these archives are mapped and enabled for migration, Archive Shuttle Core sends a command to collect all needed metadata information from each archive. The results are reported back to Archive Shuttle Core to allow item level tracking and auditing.
The EAS module and chosen target environment import module then start to process the items from the archives. This runs continuously in the background until the administrator initiates Stage 2 ('Switch') for the archive.
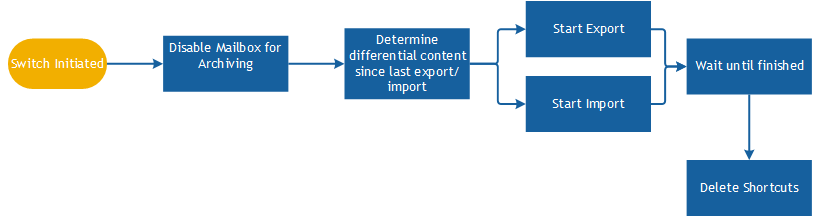
Stage 2 - Switch
EAS to Exchange or Office 365
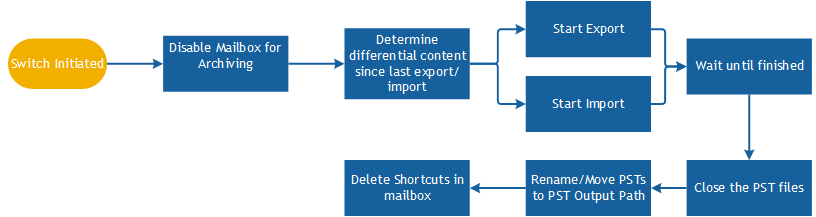
EAS to PST
Requirements
The following is a list of requirements.
|
Requirement |
Description |
|---|---|
|
Modules installed on source |
The EAS module should be installed on each the source server. |
|
Modules installed on target |
The appropriate modules should be installed on each appropriate target server involved in the migration. |
|
AD Collector module installed |
An AD Collector module should be installed so that it can collect user-level information for the migration project. |
|
Staging Area created |
One or more staging areas should be setup, of an appropriate size and should be excluded from virus scanners. |
|
Workflows reviewed |
The Stage 2 workflows should be reviewed, and if necessary, customized to meet the needs of the project. |
|
Apply appropriate failed item threshold |
It is best practice to find an appropriate failed item threshold for the project/customer and apply that at the links level. This way all mappings which are created will inherit this value. |
Basic steps
The following are the basic steps to start this type of migration.
|
Step |
Screen |
Description |
|---|---|---|
|
Enable Modules |
Modules |
All Archive Shuttle modules must be enabled, and optionally a schedule for them defined. It is important to verify that none of the modules have a red background (this indicates that Archive Shuttle Core has not had contact with the module) and that the module versions are as expected. |
|
Enable Domains |
Active Directory |
Select and enable one or more domains for synchronization. |
|
Configure Dell Archive Manager Environment |
EAS Environment |
Add a new EAS environment, specifying the following: ·Module to associate with this link ·Display name to use for this link ·EAS SQL Server Name ·EAS SQL Database Name ·SQL Table schema |
|
Assign Post Processing module to EAS Link |
Links |
Select the newly created link, and map a Shortcut Process Module to it. |
|
Map Modules to Target Link |
Links |
Ensure that the link for the migration target is added, and modules associated with it. |
|
Add Staging Area |
Links |
Ensure that the Default Staging Area is configured correctly. Depending on the migration, the free space, and the number of vault stores being used as the source for the migration, the high water mark can be adjusted upwards. |
|
Map one or more containers |
Manual Mapping/Bulk Mapping |
One or more containers can now be mapped and migration can begin. It is often easiest to use a filter on the bulk mapping screen to show only DAM as a source. |
Determining EAS archive owner(s)
Archive Shuttle must determine the owner of a mailbox archive. This section explains how this takes place.
1.We use the below query to match user to EAS archive by comparing ObjDistNam result to exchangeLegacyDN column.
SELECT t5.ROW_NUMBER, t5.USERID AS UserId, t5.USERNAME AS UserName, t5.OBJDISTNAME AS ObjDistName,
t5.ItemsCount AS ItemsCount, t5.ItemsSize
FROM(
SELECT ROW_NUMBER() OVER(ORDER BY t4.USERID) AS ROW_NUMBER, t4.USERID, t4.USERNAME, t4.OBJDISTNAME, t4.ItemsCount, t4.ItemsSize
FROM(SELECT COUNT(t3.MSGID) AS ItemsCount, SUM(t3.MSGSIZE) as ItemsSize, t0.USERID, t0.USERNAME, t0.OBJDISTNAME
FROM USERS AS t0
INNER JOIN REFER AS t1 ON(t0.USERID) = t1.USERID
INNER JOIN FOLDER AS t2 ON t1.FOLDERID = t2.FOLDERID
INNER JOIN PROFILE AS t3 ON t1.MSGID = t3.MSGID
WHERE(t1.MSGID >= 0) AND(t1.FOLDERID >= 0)
GROUP BY t0.USERID, t0.USERNAME, t0.OBJDISTNAME ) AS t4) AS t5
ORDER BY t5.ROW_NUMBER
2. If the user record is not found. The matching is executed by comparing address column in UserProxyAdress table againsts ObjDistName.
General considerations
The following general considerations should be taken into account for this type of migration:
·Ensure Shortcut Processing is configured to use EWS.
·The database server hosting EAS must be SQL Server.
Migrating from EAS to a target environment
This section outlines the steps to migrate a single test EAS to any supported target environment.
|
|
NOTE: The steps are specific to migrating to Enterprise Vault, but the steps are largely the same when migrating from source EAS to any supported target environment. |
Prerequisites
It is essential that the following steps have been completed prior to beginning the migration:
·All Modules are enabled
·Appropriate Active Directory Domains have been enabled for scanning
·The Enterprise Vault target links should be configured with a specific staging area, and with modules associated to the link.
Add an EAS environment
To use EAS as a source for migration, an EAS Environment needs to be added, and configured as follows:
1.Go to the EAS Environment page (Configuration -> EAS Environment)
2.Click Add.
3.Enter the details required to connect to the EAS Environment.
4.Go to the System Configuration page for EAS, and enter the URL to be used to connect to the EAS WebServer.
Map modules to link
The newly added EAS Environment will be added as a Link to the Links page, but modules may still need to be associated with it. This can be achieved as follows:
1.Go to Configuration > Links.
2.Select the EAS Link which was created previously.
3.Click Map Modules and check and assign the modules on the link.
Map containers - for the test archive
In order to migrate a test EAS archive to an Enterprise Vault environment, the source and target containers must be mapped. This can be done as follows:
1.Navigate to the System Configuration page
2.On the EV Import Module tab, enter the retention category ID to use for the items which will be ingested into Enterprise Vault.
3.Navigate to the Bulk Mapping page.
4.Change the filter for Type, so it is set to EAS. This will show all the discovered EAS archives.
5.Locate the archive you wish to use to test the migration, and select it.
6.With the container still selected, click Add Mappings from the navigation bar.
|
|
NOTE: A short wizard will start, which gathers information relating to the mapping for the select archive. (Multiple archives can also be selected) |
7.On the Target Container Type screen, select Enterprise Vault, and click [Next].
8.On the Choose target user type screen, select Same User, and click [Next].
9.On the New or Existing Container screen, select Create new containers and click [Next].
10.On the Choose Target Link screen, choose the appropriate Enterprise Vault target link.
11.On the Workflow Policy screen, select the EAS to Enterprise Vault (without archive deletion) option, and click [Next].
12.On the Filter Policy screen, select the Default (No Filter) option, and click [Next].
13.On the Container Mapping Settings screen, select Enabled for both Migration Status and Item Gathering Status, and click [Next].
14.Review the summary screen before clicking [Confirm].
Review Stage 1 Status
A few minutes after the mapping has been created, the program will instruct the appropriate modules to start the actions defined in the mapping. The progress for this stage of the migration can be reviewed by doing the following:
1.Navigate to the Stage 1 (Sync Data) page.
2.Type the beginning of the archive name in the Name filter. Click on the Apply button at the right of the filter row.
3.Once the source archive is displayed, click Refresh from time to time to show the progress of the export of the archive and the ingesting of the data into the target Archive. Continue to click Refresh until both export and import are 100%.
Validate exported data
If there is a large amount of data to export and import, you can view the progress bars for the Stage 1 (Sync Data) move by clicking Refresh from the navigation bar on the Stage 1 (Sync Data) page of the user interface.
In addition, you can use Windows Explorer to browse the export/import storage area data on the disk.
Enable Stage 2
Before enabling Stage 2, the switch, for the test archive, the Stage 1 (Sync Data) page should be checked for issues such as failed item-export or item-import.
To enable Stage 2 for the test archive, perform the following steps:
1.Navigate to the Stage 1 (Sync Data) page.
2.Select the checkbox next to the test archive, and then click Enable Stage 2 in the navigation bar.
3.When the Stage 1 (Sync Data) page is refreshed, there should be a green and white check mark in the Stage 2 Enabled column.
Stage 2 is the switchover to the target environment. A final synchronization is performed of archived items from the source environment to the temporary PST file, before several additional migration tasks are performed.
Review Stage 2 Status
After a few minutes, the progress of the test archive migration will be visible in the Stage 2 Status page, as follows:
1.Navigate to the Stage 2 (Switch User) page.
2.Type the beginning of the archive name in the Name filter. Click on the Apply button at the right of the filter row.
|
|
NOTE: If the archive is not displayed, wait one to two minutes and click Refresh in the navigation bar |
3.Once the source archive is displayed, you can click Refresh from time to time to show the progress of the final stages of the archive migration. By default, since the workflow policy that was selected was EAST to Enterprise Vault (without archive deletion), the following steps will be performed:
a)Disable archiving in EAS
b)Import the remaining items in to the target
c)Assign the EV archive to the end user
d)Enable the mailbox for archiving in Enterprise Vault
e)Rename the target archive
f)Update all existing EAS shortcuts in the mailbox and convert them to Enterprise Vault shortcuts.
Verify data has migrated
Once all of the Stage 2 operations have been completed the Stage 2 (Sync Data) for the test archive will have a green and white check mark in the Finished column.
In addition, if Outlook or Outlook Web Access is used to access the test mailbox then all of the archived items will be in the Personal Archive, and no Enterprise Vault shortcuts will remain in the source mailbox.
Metalogix as a source
Stage 1 - Synch
The first task which has to be performed is the discovery of archives in Metalogix. One or more of these archives are mapped and enabled for migration, Archive Shuttle Core sends a command to collect all needed metadata information from each archive. The results are reported back to Archive Shuttle Core to allow item level tracking and auditing.
The Metalogix module and chosen target environment import module then start to process the items from the archives. This runs continuously in the background until the administrator initiates Stage 2 ('Switch') for the archive.
Stage 2 - Switch
Metalogix to Exchange or Office 365
Metalogix to PST