
Management
Management section constitutes centralized dashboard where user with appropriate permissions can manage specific configuration settings in the following sections:
·File Management
Adding, editing and removing of Archive Manager for Files servers which together establish the file archive system. Additionally, with Scheduler capabilities, Archive Manager for Files jobs are easily managed in the same way as on the Scheduler tab of the Enterprise Manager (Archive Manager for Files).
·Search Management
Registering and managing search servers in the environment.
File Management
File management section under Manage Settings / Management is displayed only if Archive Manager for Files is installed and the appropriate permission is set for the user. This section allows managing Archive Manager for Files:
·Archive Servers - managing archive and retrieve servers
·Scheduler - managing scheduler jobs
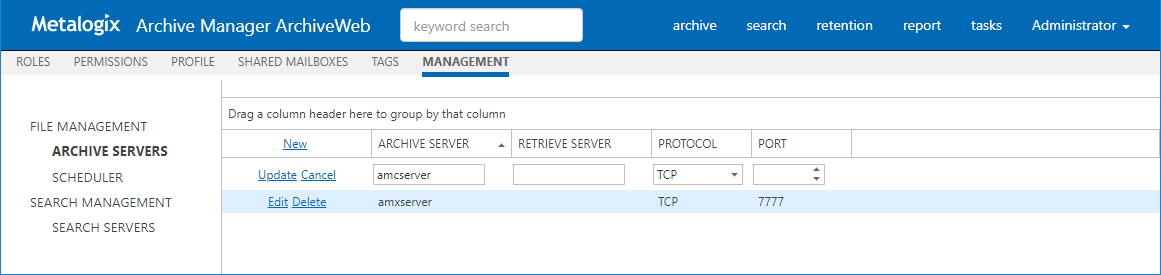
Archive Servers
After clicking the Archive Servers tab, the available Archive Manager for Files servers will be listed in the main pane.
You can change the display name, protocol or port for the given server by clicking the Edit option next to the given server.
By clicking the Delete option the respective server will be deactivated in the ArchiveWeb, i.e. it will not be accessible for the users via ArchiveWeb and it will not be possible to search it either.
To add a new Archive Manager for Files server click New option in the list header. It will add new row to the list where you can specify the File Archive Server properties. Each server (Archive Server) can be backed-up when you enter another server with installed Archive Manager for Files as a Retrieve Server. The Archive Server folders and files will be accessible via ArchiveWeb even when the server is decommissioned/inaccessible. (For more information on this feature see the Alternate Access Servers document.)
Finally click Update for the newly added server. The new server will be listed on the Files Archive tab.
Scheduler
After clicking the Scheduler tab, you can manage Archive Manager for Files jobs or preview job reports on you Archive Manager for Files server. This tab basically offers the same functionality as the Scheduler tab of the Enterprise Manager (Archive Manager for Files).

Jobs
To manage jobs user has to select a server from Server name dropdown. If any job exists (ArchiveWeb currently supports only Delete jobs) for the specified server, the grid will be populated.
For each listed job, a More actions menu appears by clicking the More actions icon "..." on a respective row. This menu contains functions for Edit, Delete, Start and Stop the job.
New job can be created by clicking New job link in the grid header.
Edit or new job pop-up window is the same (see below) and contains two tabs:
Settings - contains job description information
Folder - defines folders that will be affected by a job
NOTE: For job to process data, folders must be specified.
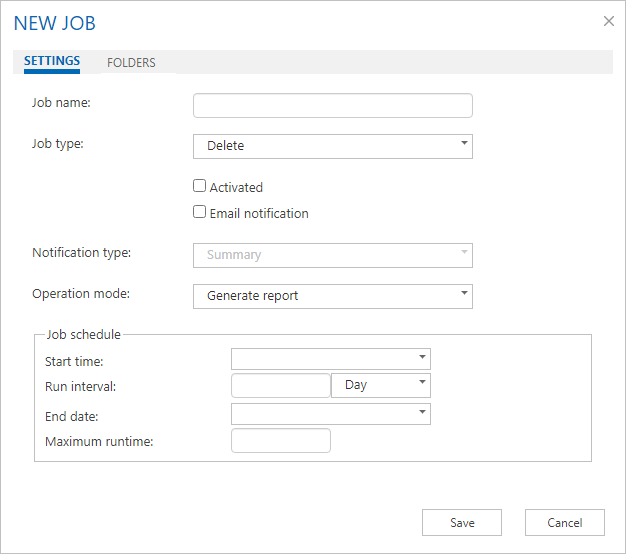
Settings tab
Job name - enter name for the job
Job type - in the dropdown select the job type (currently only Delete jobs are supported); for more information on job types see the Archive Manager for Files Administration Guide.
Activated - select the checkbox to activate the job.
Email notification - select the checkbox to send notifications about the given job as configured in the Archive Manager Administration Center on the Settings/Notification tab (for more information see the Archive Manager for Files Administration Guide)
Notification type - Summary or Detailed can be selected
Operation mode - this setting is available just for Delete job (and Synchronization job in the Archive Manager Administration Center)
Click on the Operation mode field. Then click on the down arrow and select the operation mode:
·Reporting mode - no action is being taken just a report is generated. This is useful as administrators first have a report on what is going to be done. The report can be checked and modified if necessary.
·Process report mode files from the previously generated report are processed. Administrator is able first to check and modify the list of files going to be processed (i.e. deleted or synchronized)
·Process immediately mode processing files without any report (not recommended)
The Report file field displays the path to the generated report (e.g.<installdir> \fsaPamLogs \sync \ sync.report).
Start time - specify the first day when the job should run
Run interval - specify how often the job should run
End date - specify the last day when the job should run
Maximum runtime - specify the maximum time (in hours) during which the job will be running
Folders tab
Job scope must be defined on the Folders tab. Folders for the job to process are selected by clicking in a respective check-box.
NOTE: Red check-box (
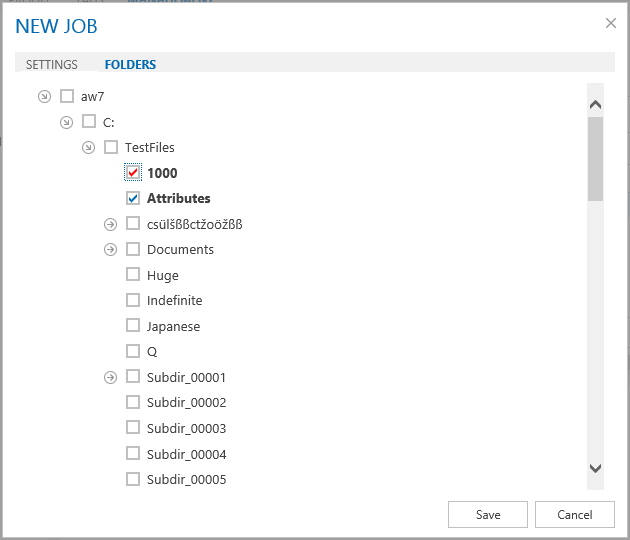
When all is configured as desired, click Save.
Reports
This section is a report viewer for jobs.
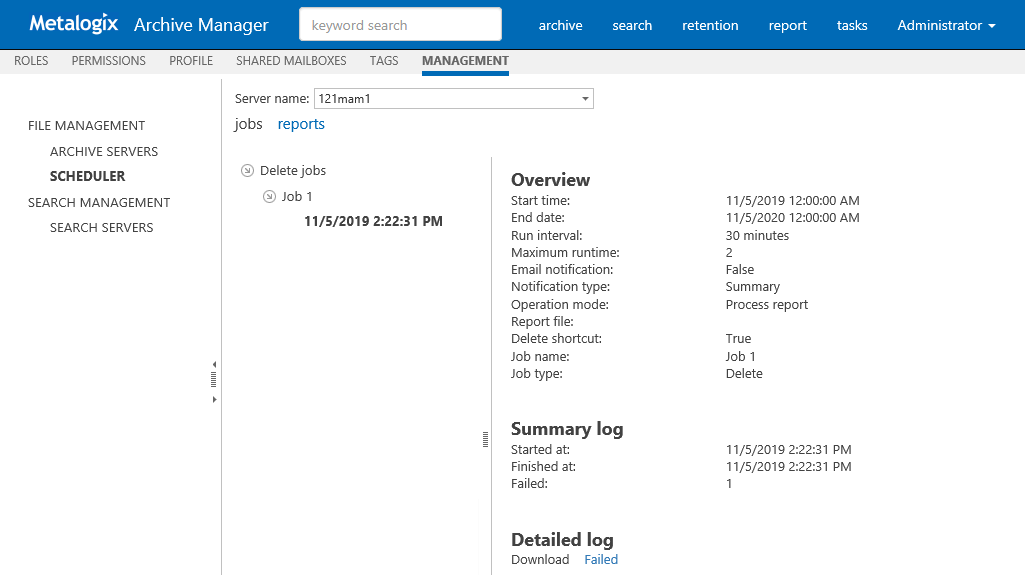
By selecting a job created/performed time the right pane will be populated by jobs information
Overview job description information
Summary log information about running
Detailed log contains links for download.
According to Operation mode (listed in overview):
·Generate report list of items to be Affected by a job
·Process report links to download Succeeded and if any Failed items
Search Management
Search Management section is displayed only if appropriate permission is set for the user. This section allows managing of Search servers installed in the environment. Specifying search servers on this tab is prerequisite of search functionality. With no search server defined, search is not available.
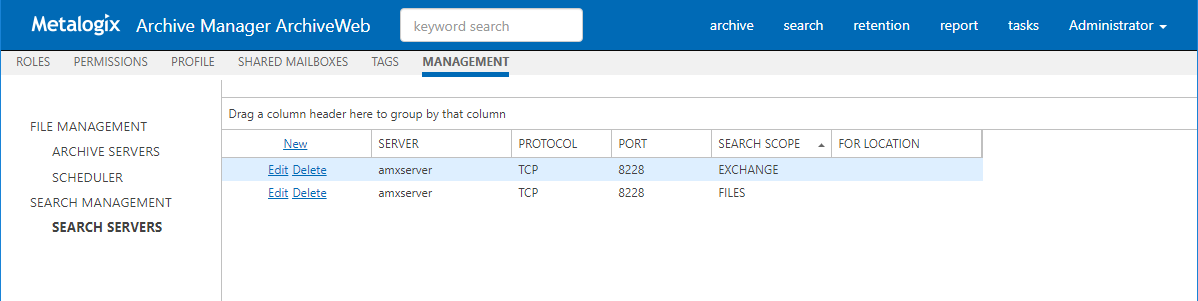
After clicking on the Search servers menu, the available Search servers will be listed in the main pane.
NOTE: If web.config file contains information about Search server(s) (this is applicable if upgrading from previous versions of ArchiveWeb) the list will be automatically populated.
By clicking the Delete option the respective Search server will be removed, i.e. it will not be used for Searches.
To add a new Search server click New option in the list header. It will add a new row to the list where you can specify the Search server properties.
NOTE: Avoid using localhost as Server Name.
By clicking the Edit option next to the given server, you can change server properties. The Search Scope marks for which Archive Manager the given search server has been installed (Archive Manager for Files/Exchange).
For Location - this property is applicable only for Archive Manager for Exchange search servers.
For a Search server you can specify a location which the respective Search server "covers" by selecting a location from a "FOR LOCATION" dropdown. This dropdown lists all locations defined in Archive Manager for Exchange in a location where the logged in user has active mailbox. (For more information on locations see the Archive Manager for Exchange Administration Guide.)
Provided there are more Archive Manager for Exchange locations in the environment and each has it own search server, the given search servers must be listed with correct location.
|
|
NOTE: If there are more locations but only one search server for locations, leave the For Location property blank. |

Federated Search
If you're using more locations, you can setup a Search service for each location. Each Search service will index items on its location.
To setup Federated search (search over more search servers) in ArchiveWeb you have to modify the Search servers (Search Management) by specifying FOR LOCATION value.
Federated search allows you to collect results from more search servers in one search request.
You can perform federated search over all available (according to permissions) search areas:
·Exchange
·Files
·Common
ArchiveWeb Interface and conventions
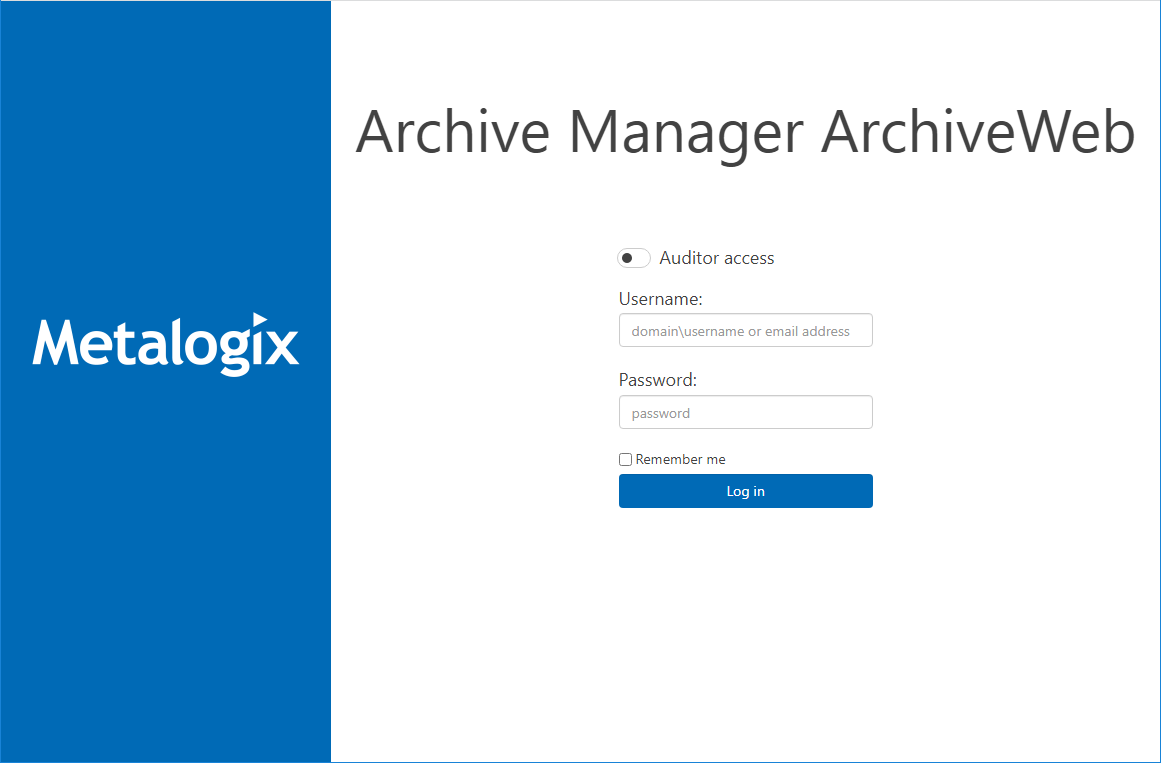
After browsing the ArchiveWeb URL (http://<ArchiveWebServerName>/archiveweb), the Login window gets displayed. Users are asked to enter their name (or domain name\user name or email address) and password. Email address should be:
·Office365 email address
·Active Directory Domain email address in format <name>@domain.com.
Please note: johnSmith@ateam.com is equivalent to ateam\johnSmith.
Default language depends on the Windows local setting of the Archive Manager server.
NOTE: When Integrated Windows authentication is turned on, the login page is skipped and the logged-in users credentials are used. This is set in C:\Program Files\ Common Files\ PAM \ Web \ ArchiveWeb \ Web.config where <authentication mode = "windows">.
After logging in correctly, the ArchiveWeb application opens. The top-page main bar contains search box (keyword searching in e-mail body, attachments, file content) and tabs archive, search, report representing the activated features of Archive Manager. Once you click one, the grey sub-bar under the main pane displays additional options.
Further, in the right upper corner you may see the logged on user. Click it to unfold the dropdown menu offering the following options:
·Manage settings option provides access to further settings based on user permissions:
·Log out option is to be used when logging off
After clicking Manage Settings, the following menu options appear on the displayed menu bar:
The Roles option is available if the user has necessary permissions. Under this option you can manage user/ArchiveWeb roles assignment based on roles (see the Roles section).
The Permissions option is available if the user has necessary permissions. Under this option you can manage user/ArchiveWeb roles assignment based on users (see the Permissions section).
The Profile option allows you to adjust ArchiveWeb layout to your liking (see the Profile Settings section).
The Shared Mailboxes option is available only when Archive Manager for Exchange is installed and configured for ArchiveWeb.
When shared mailboxes are set for a currently logged user in Archive Manager for Exchange -> Tools -> Mailbox Rights Manager the grid will be populated and a user can select which mailbox(es) the user likes to be listed in Archives mailboxes tree and in searchable mailboxes.
Under the Tags option one can create tags for archive or auditing items (see the Tags section).
The File Management option is available if the user has necessary permissions. Under this option you can manage file servers and scheduled jobs (see the "File Management" section).
The Keyword search box in the upper part of the window was designed for fast and easy searching in archives - Archive Manager for Exchange archive as well as Archive Manager for Files archive. Enter the expression and click Enter.
NOTE: Email attachments, email bodies and file contents are searched through only if Keyword search is installed.