
Profile
The Profile page helps you set the display preferences of logged in users.
In this topic:
·Steps to open the Profile page
·Steps to customize the profile
PROFILE HOMEPAGE
PROFILE SETTINGS
Steps to open the Profile page
1.Log in to ArchiveWeb.
2.Click your username from the top-right corner.
3.Select Manage settings from the dropdown.
4.Click Profile from the local menu bar and click Settings.
To create a default profile:
When the administrator or super-user changes the default settings and Home page choices the administrator or super-user must click Set as default at the bottom-right of the page. These settings will be updated in the database as serves as the most current default settings.
To set a default profile for all users:
When a default profile exists, click Set default values for all users at the bottom- right of the page. By clicking this button all user profiles stored in the database will be replaced by the latest default settings. For users who do not have a stored profile, the latest default profile will be used. Personalized shared mailboxes and tags stored in the users profile will not be replaced.
Steps to customize the profile
To customize a personal profile:
When a user makes changes to the settings or Home page tabs, the user must click Apply changes at the bottom-right of the page, to save the customized profile in the database.
To reset a profile:
The user can click Reset at the bottom-right of the page, to replace their profile with the latest default profile from the database. Personalized shared mailboxes and tags stored in users profile will not be replaced.
Under the Home Page node select which page should be displayed after you log in to ArchiveWeb.
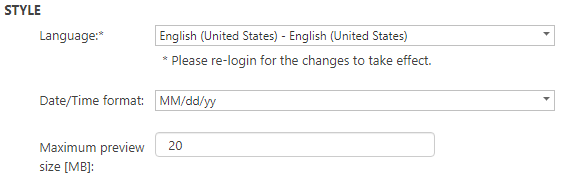
·Language - select the language for the application. The default language depends on the Windows local setting of the Archive Manager server. If you change this setting, you must log out and log in again.
·Date/Time format - select your preferred date and time format. The default value depends on regional settings of your computer and the language selected in the Profile. When profile language is changed, date/time format is changed accordingly
·Maximum preview size [MB] - sets maximum file size that can be opened in a preview-pane. Displaying large item (with size more than 20MB) can cause out-of-memory exception. Default value is 20 MB.

·Automatic refresh interval (in seconds) - determines how often the Tasks list will be refreshed. Setting small intervals may cause performance issues. The default interval is 10 seconds.
·Delete completed task - switch on this option to automatically delete completed task which do not return a value like database tasks such as Add/Remove Tag, Set/Unset legal hold flag, Mark for deletion and Extend retention time. If the option is switched off, all completed tasks will be listed.
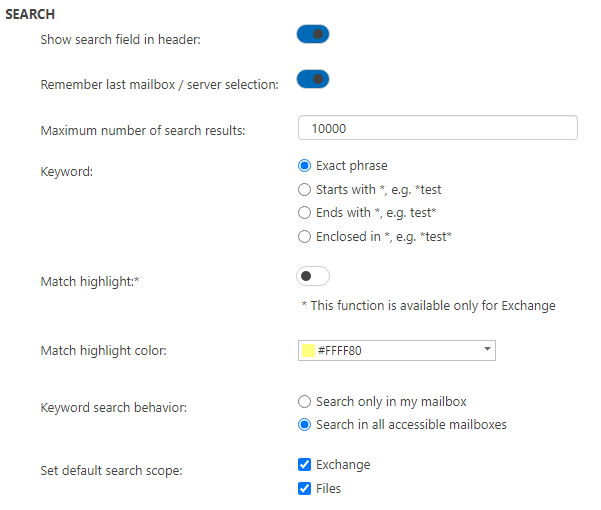
·Show search field in header - switch on this option to display the keyword search field in the page header. Switch off this option to hide the keyword search field in the page header. The Administrator can permanently hide the keyword search in the page header by adding the ShowTopSearchPanel key in the Web.config file. The default folder is C:\Program Files (x86)\Metalogix\ArchiveWeb.
<appSettings>
...
...
<add key="ShowTopSearchPanel" value="false"/>
</appSettings>
When the key value is set to false, the Show search field in header setting will not be available in the Profile page and users will not be able to display the keyword search field.
·Remember last mailbox / server selection - when Metalogix Archive Manager for Exchange is installed and this option is switch on, all mailboxes that were selected in the previous search operation are selected by default in Search > Mailboxes for subsequent search operations as long as the user has permissions to search those mailboxes. When this option is switched off, the user must select the mailboxes before a search operation. Similarly, when Metalogix Archive Manager for Exchange is installed and this option is switch on, all servers that were selected in the previous search operation are selected by default in Search > Servers for subsequent search operations as long as the user has permissions to search those servers. When this option is switched off, the user must select the servers before a search operation.
·Maximum number of search results - determines the maximum number of search results are returned from a search.
·Keyword - choose a wildcard format to use with the keyword search.
oExact phrase - no wildcards are added. The user can add a wildcard manually if needed.
oStarts with * - A wildcard is added at the beginning of a keyword e.g. *sunshine
oEnds with * - A wildcard is added at the end of a keyword e.g. sunshine*
oEnclosed in * - A wildcard is added at the beginning and end of a keyword e.g. *sunshine*
·Match highlight - switch on this option to highlight the search phrase in the search results. Available only for Metalogix Archive Manager for Exchange.
·Match highlight color - color picker to choose a color for the highlight.
·Keyword search behavior - sets the default Search scope for keyword search setting in the Search tab only for Metalogix Archive Manager for Exchange. Choose from the following options:
oSearch only in my mailbox - by default only the logged on users mailbox is pre-selected for a keyword search operation.
oSearch in all accessible mailboxes - by default all accessible mailboxes are pre-selected for a keyword search operation.
·Set default search scope - Choose the default search scope for keyword search.
oExchange - allows you to search in archived emails. Available if Metalogix Archive Manager for Exchange is installed.
oFiles - allows you to search in archived files. Available if Metalogix Archive Manager for Files is installed.

Maximum text length - the Treeview's node text will be trimmed to the number of characters specified.
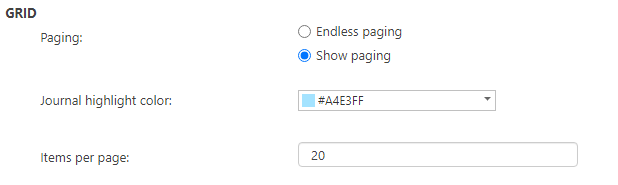
·Paging - select Endless paging to display all items on one page. Select Show paging to limit the number of items on one page.
·Journal highlight color - choose a color from the color picker control to highlight the journal items.
·Items per page - If Show paging is selected, set the number of items to be displayed per page This number applies to the full grid view.
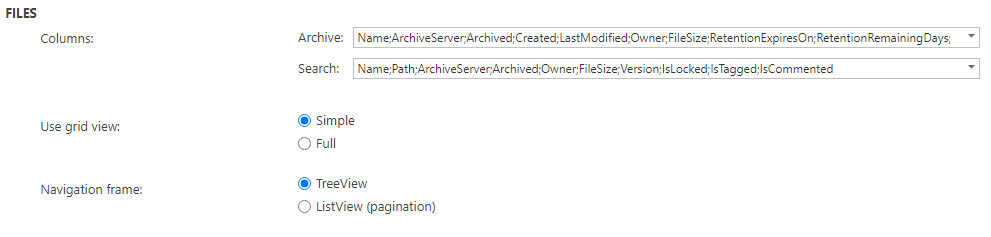
·Columns - sets the columns and the order that they are displayed in a list.
oArchive - These column headers are used in the Archive page: Select All, Name, Server, Archived date, Created date, Last modification date, Owner, File size, Retention expiry date, Retention remaining day, Retention from, Locked, Tagged, Commented
oSearch - These column headers are used in the Search results page: Select All, Name, Folder, Server, Archived date, Owner, File size, Version, Locked, Commented
·Use grid view - allows users to set the list view type.
oSimple - (default grid type) Select this option so that list operations such as custom filters, sorting and ordering are performed on items currently displayed in the list as defined by the Items per page option in the Grid settings or in the table itself (see the List view conventions section). Using Simple grid dramatically improves the list performance especially when working with a large number of items. Simple grid can be used only for Archive views.
oFull - Select this option so that list operations such as custom filters, sorting and ordering can be performed on the entire data set of the list irrespective of limits defined by the Items per page option in the Grid settings. This option is not recommended for huge data sets. Full grid can be used in Auditing and Search result lists.
·Navigation frame - allows users to display the folder structure in following formats:
oTreeView - (default). Displays file folders in a hierarchical order. Recommended for most folder structures that are not loo large.
oListView - presents file folders with pagination. Recommended for large folder structure in excess of 10,000 folders. The pagination improves navigation performance.

·Columns - sets the columns and the order that they are displayed in a list.
oScheduler - These column headers are used in the Archive page: Select All, Name, Type, Status, Start time, Run interval, End date, Maximum runtime, Notification, Operation, Activated

·Columns - sets the columns and the order that they are displayed in a list.
oReport - These column headers are used in the Archive page: Select All, Log level, Log date, Method, Computer, User, Category, Tagged
·Use grid view - allows users to set the list view type.
oSimple - (default grid type) Select this option so that list operations such as custom filters, sorting and ordering are performed on items currently displayed in the list as defined by the Items per page option in the Grid settings or in the table itself (see the List view conventions section). Using Simple grid dramatically improves the list performance especially when working with a large number of items. Simple grid can be used only for Archive views.
oFull - Select this option so that list operations such as custom filters, sorting and ordering can be performed on the entire data set of the list irrespective of limits defined by the Items per page option in the Grid settings. This option is not recommended for huge data sets. Full grid can be used in Auditing and Search result lists.
Tags
Tags are used to categorize your archived items. You can create as many categories as you want, assign them colors, and then apply them to your archived items. This make it easy to search through your tagged items and distinguish e.g. important emails, documents related a particular project, etc.
Tags are centrally managed in the Manage Settings > Tags tab.
In this topic:
Tags can be created in several ways.
Create a tab from the Tags tab
1.Log in to ArchiveWeb. Then click your user display name and select Manage Settings.

2.Click Tags from the local menu bar. All tags are listed, added, edited or deleted here.
|
|
NOTE: Managing Tags from the Settings view requires special permissions. For more information see Roles and Permissions. |

3.Click New in the list header. A new row will be added to the list view. Enter the tag properties as described below:
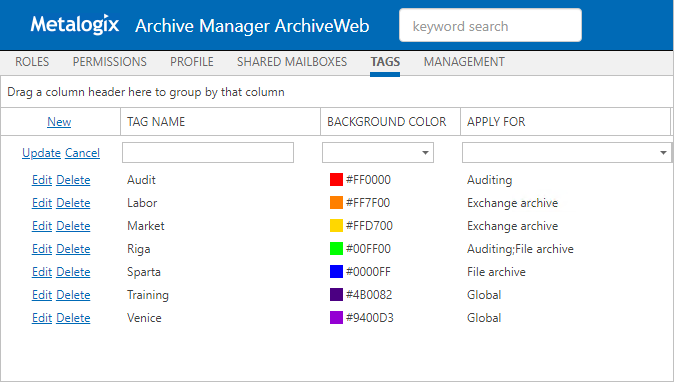
·Tag Name - enter descriptive name, e.g. Personal, Marketing or any other
·Background Color - click the dropdown and select the tag color or specify a custom color.
·Apply For - scope of the tag. Choose one or more from the following options
oGlobal - tags are available for Archive Manager for Exchange, Archive Manager for Files and Audit.
oExchange archive - tags are available for Exchange archive
oFiles archive - tags are available for File archive
oAuditing - tags are available for Archive
4.Click Update to save the changes. The new tab will be added to the tab list.
Create a Tag from the Archive > Files view or Report > Audit view
1.Log in to ArchiveWeb and open the Archive > Files view or Report > Audit view.
2.Click the + icon next to the Tags node in the navigation pane.

3.Enter the tag details in the Add New Tag dialog.
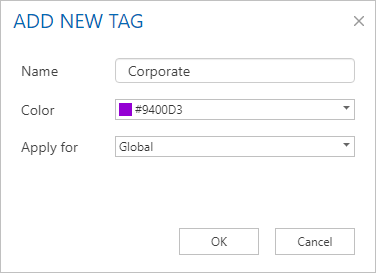
4.Click OK to save the tag.
Create a tag from item preview
1.Log in to ArchiveWeb and search for any archived items.
2.Select any item. from the preview pane click the + icon next to the Tags property.
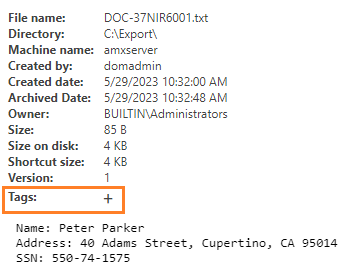
3.Click + Add new tag in the Add Tag window that opens.
4.Enter the tag details in the Add New Tag dialog.
5.Click OK to save the tag.
1.Click your user display name and select Manage Settings > Tags.
2.Click Edit for the tag that you want to change.
3.When you are done with your changes, click Update to save your changes.
4.Click your user display name and select Manage Settings > Tags.
5.Click Delete for the tag that you want to remove.
6.Click Yes in the confirmation dialog.
Steps to add and remove tags from items
Tags can be added to:
·emails - if the tag is applicable to Global or Exchange archive
·documents - if the tag is applicable to Global or File archive
·auditing items - - if the tag is applicable to Global or Audit
1.Locate the item under Archive > Exchange view or Archive > Files or Report > Auditing tab, or search for an archived item.
2.Select the item to view the item details in the preview pane.
3.To add a tag, do one of the following:
·Use the MENU option
a.Click MENU from the right upper corner in the preview pane.
b.Click Add tags. From the Add Tag window that opens, select the tags you want to add to the item, and click OK.
·Use the Tags + property in the item details
a.Click the + icon next to the Tags property.
4.In the Add Tag window that opens select one or more tags that you want to add to the item and click OK. Once the tag has been added to the items, it will be visible in the list view and preview.
5.To remove a tag, do one of the following:
·Use the MENU option
c.Click MENU from the right upper corner in the preview pane.
d.Click Remove tags. From the Remove Tag window that opens, clear the tag checkboxes that you want to remove from the item, and click OK.
·Use the Tags property in the item details
b.Click X next to the tags that you want to remove from the Tags property. Click Yes in the confirmation window that opens.
Management
Management section constitutes centralized dashboard where user with appropriate permissions can manage specific configuration settings in the following sections:
·File Management
Adding, editing and removing of Archive Manager for Files servers which together establish the file archive system. Additionally, with Scheduler capabilities, Archive Manager for Files jobs are easily managed in the same way as on the Scheduler tab of the Enterprise Manager (Archive Manager for Files).
·Search Management
Registering and managing search servers in the environment.
File Management
File management section under Manage Settings / Management is displayed only if Archive Manager for Files is installed and the appropriate permission is set for the user. This section allows managing Archive Manager for Files:
·Archive Servers - managing archive and retrieve servers
·Scheduler - managing scheduler jobs
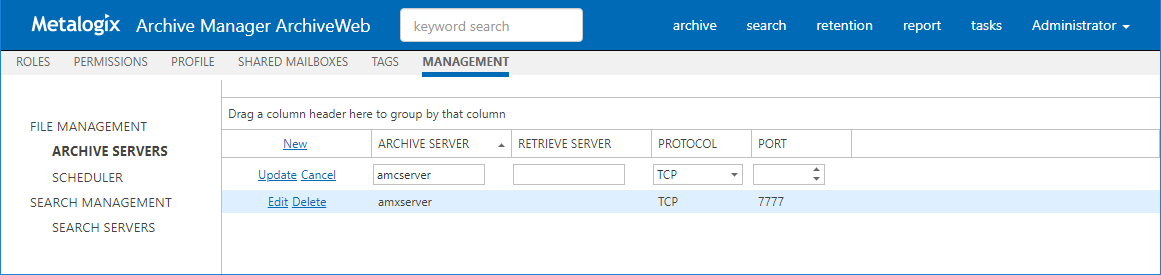
Archive Servers
After clicking the Archive Servers tab, the available Archive Manager for Files servers will be listed in the main pane.
You can change the display name, protocol or port for the given server by clicking the Edit option next to the given server.
By clicking the Delete option the respective server will be deactivated in the ArchiveWeb, i.e. it will not be accessible for the users via ArchiveWeb and it will not be possible to search it either.
To add a new Archive Manager for Files server click New option in the list header. It will add new row to the list where you can specify the File Archive Server properties. Each server (Archive Server) can be backed-up when you enter another server with installed Archive Manager for Files as a Retrieve Server. The Archive Server folders and files will be accessible via ArchiveWeb even when the server is decommissioned/inaccessible. (For more information on this feature see the Alternate Access Servers document.)
Finally click Update for the newly added server. The new server will be listed on the Files Archive tab.
Scheduler
After clicking the Scheduler tab, you can manage Archive Manager for Files jobs or preview job reports on you Archive Manager for Files server. This tab basically offers the same functionality as the Scheduler tab of the Enterprise Manager (Archive Manager for Files).
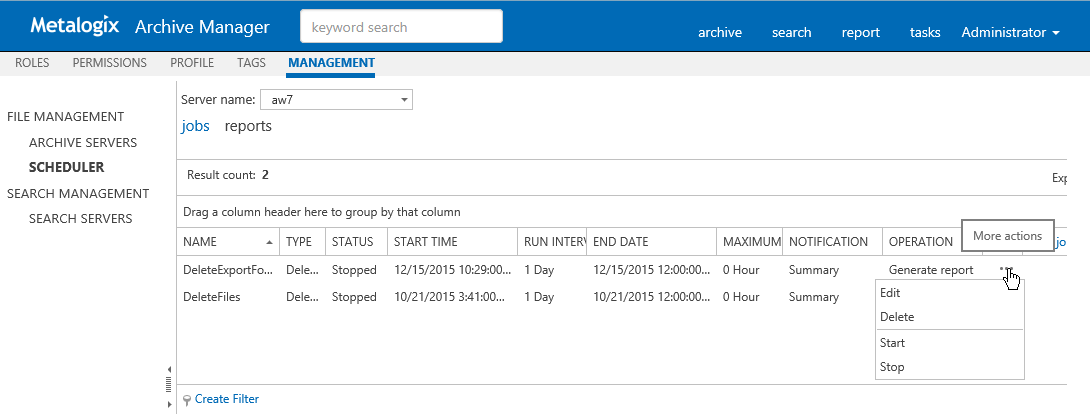
Jobs
To manage jobs user has to select a server from Server name dropdown. If any job exists (ArchiveWeb currently supports only Delete jobs) for the specified server, the grid will be populated.
For each listed job, a More actions menu appears by clicking the More actions icon "..." on a respective row. This menu contains functions for Edit, Delete, Start and Stop the job.
New job can be created by clicking New job link in the grid header.
Edit or new job pop-up window is the same (see below) and contains two tabs:
Settings - contains job description information
Folder - defines folders that will be affected by a job
NOTE: For job to process data, folders must be specified.
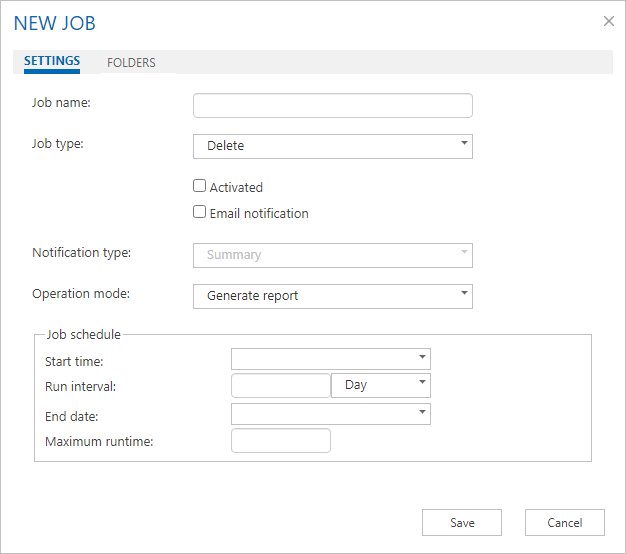
Settings tab
Job name - enter name for the job
Job type - in the dropdown select the job type (currently only Delete jobs are supported); for more information on job types see the Archive Manager for Files Administration Guide.
Activated - select the checkbox to activate the job.
Email notification - select the checkbox to send notifications about the given job as configured in the Archive Manager Administration Center on the Settings/Notification tab (for more information see the Archive Manager for Files Administration Guide)
Notification type - Summary or Detailed can be selected
Operation mode - this setting is available just for Delete job (and Synchronization job in the Archive Manager Administration Center)
Click on the Operation mode field. Then click on the down arrow and select the operation mode:
·Reporting mode - no action is being taken just a report is generated. This is useful as administrators first have a report on what is going to be done. The report can be checked and modified if necessary.
·Process report mode files from the previously generated report are processed. Administrator is able first to check and modify the list of files going to be processed (i.e. deleted or synchronized)
·Process immediately mode processing files without any report (not recommended)
The Report file field displays the path to the generated report (e.g.<installdir> \fsaPamLogs \sync \ sync.report).
Start time - specify the first day when the job should run
Run interval - specify how often the job should run
End date - specify the last day when the job should run
Maximum runtime - specify the maximum time (in hours) during which the job will be running
Folders tab
Job scope must be defined on the Folders tab. Folders for the job to process are selected by clicking in a respective check-box.
NOTE: Red check-box (
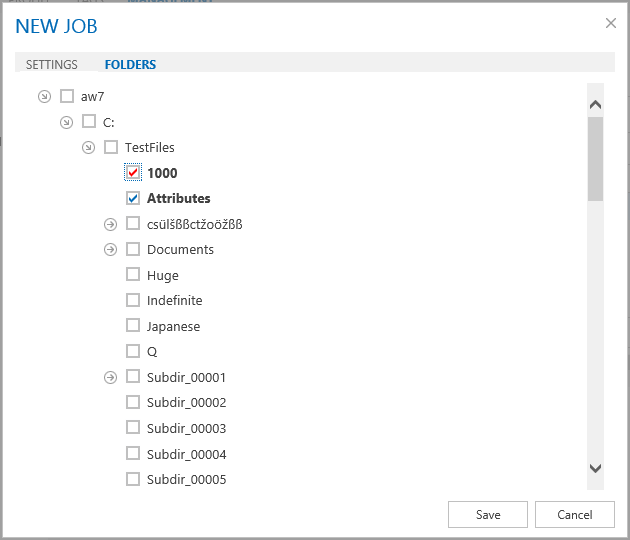
When all is configured as desired, click Save.
Reports
This section is a report viewer for jobs.
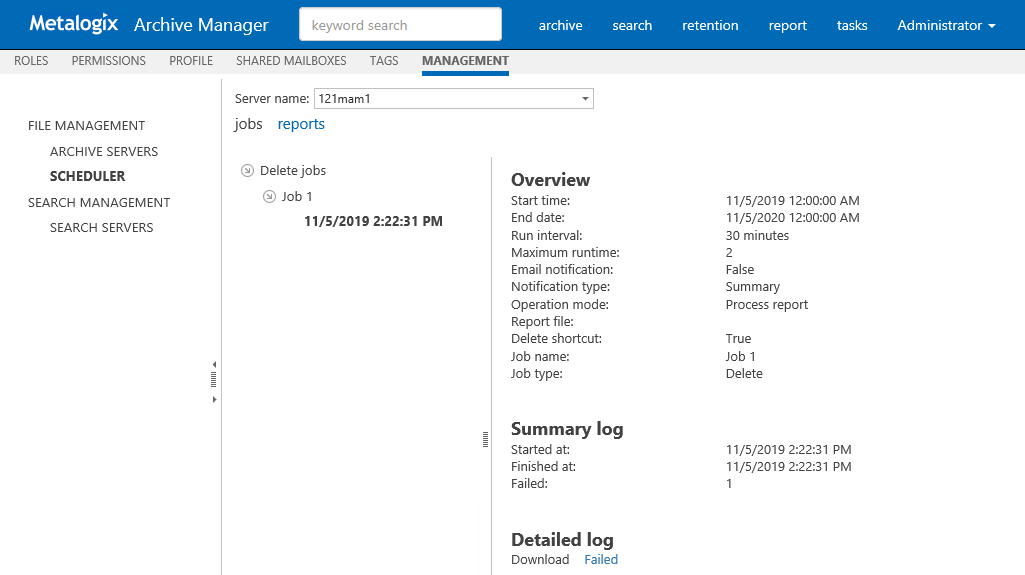
By selecting a job created/performed time the right pane will be populated by jobs information
Overview job description information
Summary log information about running
Detailed log contains links for download.
According to Operation mode (listed in overview):
·Generate report list of items to be Affected by a job
·Process report links to download Succeeded and if any Failed items