
Use Tabs to Present your Data
Tabs are used as a way of grouping and controlling the way you present different information in your Index Pages and Object Pages.
For example, on an Object Page, you might have a Tab showing the General properties of an object, then use another Tab to show a list of Associated Objects, or Diagrams that the object appears on.
On an Index Page you might want to display some charts and a Table, offering different views of the same information.
By using Tabs you can include much more information than the basic object list or object details, but all content on the page must be displayed on a Tab.
|
|
Please note that having multiple Tabs each referencing different Object Types could impact the performance of your page, so we recommend being careful about not overloading the page with content. |

What do you want to do?
Add Tabs to an Object Page
|
|
These instructions assume you do not yet have any Tabs, but you do have a clean Object Page node, with an Object Type node already set to an Object Type, and a Layout set to Object Page. |
To add Tabs to an Object Page:
1.Under the Object Page node, right-click the Object Type node and choose New Tab Controller.
A new Tab node is added to the tree.
2.Select the Tab node and use the Side drop-down to choose whether you want the tabs to be displayed Horizontally or Vertically in your page.
3.Right-click the Tab node and choose New Tab
A new Tab titled 'Tab' is added to the tree
4.Select the 'Tabo' node and edit the Tab Name to what you want to be displayed in the web page.
Repeat steps 3 to 4 to add multiple Tabs to your page.
5.Save your Site.
Add content to a Tab on an Object Page
Once you have one or more Tabs, you can choose what content to display in them. Within a Tab you can display Property Groups, or Associated Objects displayed as a list, Table, or other layout option.
When you add new content, you use the Tab itself as the parent node.
See Working with Property Groups to find out how to add Property Groups to a Tab.
See Working with Layouts and Behaviors to find out the different display options within Object Pages.
Add Tabs to an Index Page
|
|
You cannot add Tabs to an Index Page that already includes content - you must either Delete the existing content first, or create a new Index Page. |
If you want to add Tabs to an Index Page, the Tab node must be the top-level node for that page in Evolve Designer.
There are two ways to achieve this:
1.Create a new Index Page, but instead of using the Add Index Page for Object Type option, use Add Index Page
2.Use an existing Index Page, but Delete the Object Type node and everything below it - do this by right-clicking the Object Type node and choosing Delete. All previous content will be lost if you do this.
|
|
The instructions below assume you have a clean Index Page node with no other nodes beneath it. |

To add Tabs to an Index Page:
1.Right click the Index Page node and choose New Tabs Controller.
A Tabs node is added below the Index Page node.
2.Select the Tabs node and use the Side drop-down to specify whether you want the Tabs to be displayed Horizontally or Vertically on the page.
3.Right-click the Tabs node and choose New Tab.
A new Tab node is added.
4.Select the Tab node and use the Tab Name field to specify the name of the Tab as you would like it too be displayed in the web page.
5.Right-click the Tab node and choose New Object List > [object-type]
An Object Type node and a Layout node are created.
6.Save your Site.
You can now configure the content in the same way as you would for a normal Index Page without Tabs.
Add content to a Tab on an Index Page
Once you have a Tab on an Index Page, you must create an Object Type node for the Tab - until you have an Object Type node you cannot add any content.
To do this:
1.Right-click the Tab node and choose New Object List > [object-type]
An Object Type node and a Layout node are created.
Once you do have an Object Type node, you can add content just as you would for any Index Page.
See Working with Layouts and Behaviors for instructions on adding the different content types.
Add a new Tab to an existing Tabs Controller
To add a new Tab to an existing Tabs Controller:
1.Right-click on the Tabs node and choose New Tab
A new Tab is added to the bottom of the list of Tabs.
Change the order of Tabs in your page
You can change the order of Tabs in your page by dragging and dropping Tabs to the parent Tab node. When you do this, the Tab you moved is placed at the bottom of the list. By dragging and dropping Tabs in the same order you want them to appear on the page, you can make the tree show them in the correct order.
Delete a Tab
To Delete a Tab:
1.Right-click the Tab you want to delete and choose Delete.
A confirmation dialog is displayed.
2.Click Yes.
The Tab is deleted.
Use Custom Display Strings
On certain page layouts and behaviors you can now build a custom string to display the properties of your objects or associated objects.
So, instead of just showing the Name of an object, you can build a string mixing one or more property values of the object with some standard text.
For example, if you are listing Application objects, and they have a number property titled ‘Cost’, you could specify a custom string to display the Application Name, followed by the Cost – such as ‘Application 1 - $500’.
You can even show some meta data, such as the Object Type Name or Pluralname, or lookup abbreviation.
And, if you have a Custom Site which is configured to support Visual Indicators, you can display them within a Custom Display String.
A simple syntax means it’s easy to build the custom strings, using curly brackets {} to display property values and all other text being displayed as it is.
You can use custom property strings with the following layouts and behaviors:
•Accordions – including when nested
•Simple Lists
•Tables – when listing Associated Objects in a column
•List Boxes
•External Picture layout
•Visual Identity layout.
|
|
The page filter/search does not work with custom display strings and can only filter based on Name. URL property types are displayed as plain text with no hyperlink. |
What do you want to do?
To create a Custom Display String
To create a custom display string:
1.Select the Object Type or Association Type node you want to create the string for
2.Ensure all the properties you want to include in your string are selected in the Selected Properties area
3.Select the Layout node for your page
4.Enter your custom string in the Custom Display String field, for example '{name}: ({type})' to display the object's Name, followed by a colon and its Category in brackets.
Use the following syntax rules:
oUse curly brackets {} to surround Property Type scriptnames, for example {name}
oScriptnames must be entered in lower case
oAll other characters not included in curly brackets {} will be displayed as plain text
oUse {cwobjecttype} to display the Object Type Name, for example, 'Process'
oUse {cwobjecttypes} to display the Object Type Pluralname, for example, 'Processes'
oUse '_abbreviation' after a lookup scriptname to display the Abbreviation for the drop down value, for example {type_abbreviation}
oUse '_id' after a lookup scriptname to display the ID for the drop down value, for example {type_id}.
|
|
If you leave the Custom Display String field blank, your layout or behavior will default to displaying the Name. If you enter incorrect syntax, it will be rendered as text in the web page. |
1.Save your Site.
Use Visual Indicators inside a Custom Display String
If you have a Custom Site which is configured to support the use of Visual Indicators, you can display them directly in a Custom Display String.
To do this, simply insert the reference in the custom string using the following syntax:
{<property-type-scriptname>_image_mapping}
For example:
{type_image_mapping} or {validated_image_mapping}
|
|
Remember to ensure the properties you reference here are also selected in the Selected Properties area for the parent node. |
The image will be displayed within the string alongside any other properties you reference.
Static Pages in a Dynamic Site [2018.0.2+]
Static Pages in a Dynamic Site [2018.0.2+]
What does this mean?
A Dynamic Site offers a read, write access to your model, which means that content is generated as it is requested by users. This generation, whilst highly efficient, can be slow when large volumes of data are requested. Often pages which have large amounts of information, do not contain data which changes often. Such pages could therefore be pre-generated, saving much server time, and make the user's experience much more desirable.
The disadvantages to this method of generation are that the content is not modified until the page is regenerated. Also the page is not access controlled by Roles, so is available to all users.
None the less, this is often a tradeoff worth making for complex pages.
How to make a page Static?
1.Define a page in your site as usual.
2.From the page settings, tick the checkbox, 'Display as Static Page'
3.You will be warned that new content will not appear in the site, until the static page is regenerated.
|
Fig. Set a page to contain static content |

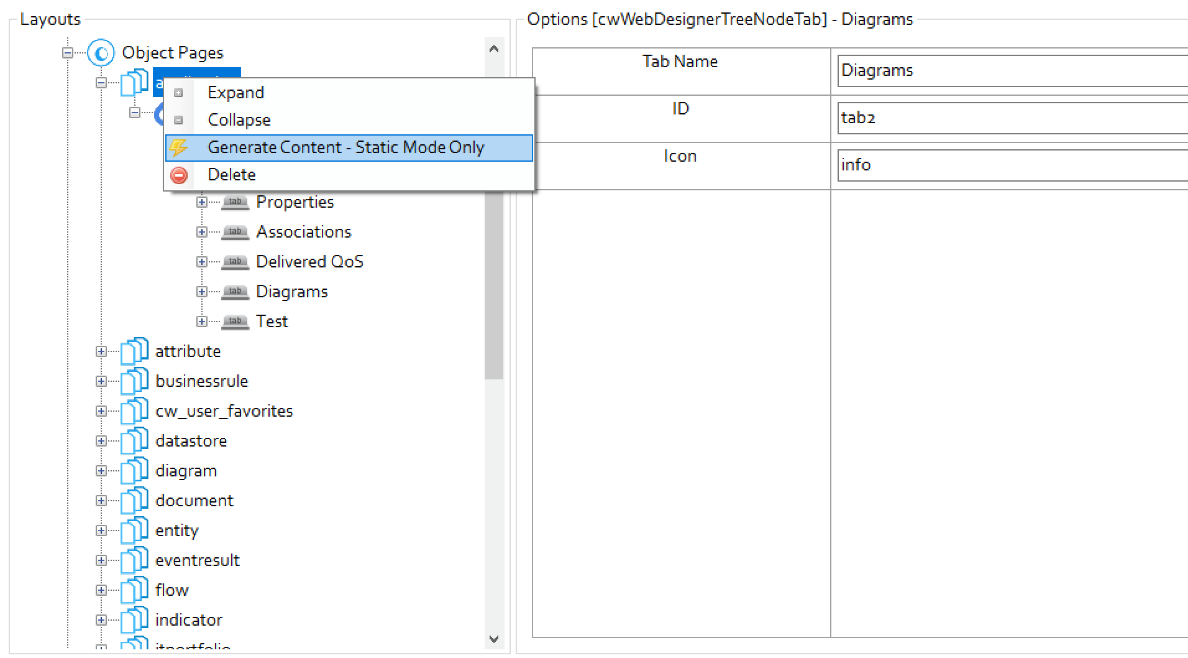
4.To generate (and regenerate) content for this page, right click on the page in tree
5.Choose the option 'Generate Content - Static Mode Only'
6.The page will be regenerated.
OR allow your end users to regenerate the page themselves with 'in-page refresh'
|
Fig. Generate Static Content |
In-Page Static Content Refresh
Allow Users to Refresh Static Pages in a Dynamic Site [2018.1.0+]
What does this mean?
As the name suggests, a Static Page is generated at a point in time, and then made available. Its content does not change. Why would you want a static page?
Sometimes a page is made static because it is a baseline, other times it is static to improve load performance, as it changes less frequently.
If the page is static for performance, it might be nice to allow a user to refresh the page themselves. So Evolve offers an In-Page refresh button.
Enabling In-page Refresh
1.First configure the page to be static
2.You will now be able to access the 'Allow refresh' options; "Disabled", "Everyone" or Roles... that exist in your site.
|
Fig. Refresh static content settings |
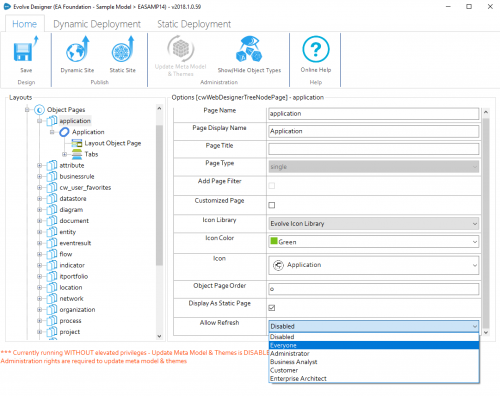
3.Choosing "Disabled", which is default, will ensure that no-one can refresh the page from the site.
Choosing "Everyone", will enable the refresh button for all users of the site.
Choosing a specific Role, will enable the refresh button for users who are members of that Role.
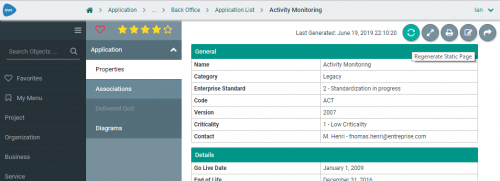
Each static page has a "Last generated" time stamp, to indicate when it was last refreshed. A user can then press the regenerate button and have the server make the refresh.
Once refreshed, the page will reload with the updated content. This content will be available for all users who subsequently visit the page.
|
Fig. Refresh static content, end user view |
Help me choose an option
•When a page is a baseline, it may be most appropriate to disable the ability for end users to refresh the content. This means the site administrator would be required to use Evolve Designer to regenerate the content when a new version is released. Often this is done with a batch run, overnight, or on another trigger. However, it may be that the page could change throughout the day, and you'd like an administrator to control when this happens. Going to Evolve Designer each time, can be time consuming, so choosing a Role that your Administrators are a member of, will ensure only they can refresh the page from within the site.
•Perhaps the page is owned by a particular department, and they like to make changes behind the scenes, and then publish them. Again using the Role restriction will ensure only the owners can update the page.
•In some environments the flexibility of allowing Everyone to refresh pages, is fine. If someone visits a page, and would like to see the most up-to-date details, they can tap refresh and everyone will now see the latest and greatest, when they visit.
Caveats
In 2018.1.0 this feature updates ALL object pages of the same type, and not just the page you are viewing. While this could be useful, it was not intended. We plan to reduce the scope in subsequent releases, to just the page you are viewing.
Also, it is not possible to make a page both static AND editable. So the page would need to be duplicated in Evolve Designer, with one page static, and one page dynamic. The dynamic page would be made available, only to roles who are contributors. In this way a contributor would see the page twice. If they were to edit, the editable version and save the changes, these changes would not be seen on the static page, until that page was also refreshed.
This feature is in an early adopter stage, and we welcome comments and suggestions for improvement.
Data Layout Options
Data Layout Options