
Introduction
This guide contains detailed information on installing the Archive Shuttle Core Server and modules and includes common installation scenarios.
Key terms
The following table introduces the terminology that is used throughout Archive Shuttle documentation, videos, and the user interface.
|
TERM |
ITEM + DESCRIPTION |
|---|---|
|
Link |
Enterprise Vault A Link is a Vault Store Exchange A Link is an Exchange database Office 365 A connection to Office 365 PST A connection to a PST Output Area Proofpoint A connection to a Proofpoint output area EAS A connection to an EAS IIS Server Metalogix A connection to a Metalogix server |
|
Container |
Enterprise Vault A Container is a Vault / Archive Exchange A Container is an Exchange mailbox Office 365 A Container is an Office 365 mailbox or Personal Archive PST A container is a PST file Proofpoint A container currently has no applicable context EAS A container is an archive relating to a user. Metalogix A container is an archive |
|
Item |
Enterprise Vault An Item is an archived Item. Exchange An Item is an item in the mailbox Office 365 An Item is an item in the mailbox or personal archive PST An item is an item inside a PST file Proofpoint An item currently has no applicable context EAS An item is a message in the archive Metalogix An item is a message in the archive |
Installing Archive Shuttle
This section describes how to install Archive Shuttle Core and the Archive Shuttle Modules.
|
|
NOTE: Some components of Archive Shuttle have the capability to perform work using MAPI or EWS. These are: ·Enterprise Vault collector module (which can collect shortcuts from mailboxes) ·Shortcut Processing module (which can fix shortcuts, or delete them) The use of MAPI for these, and other activities, is deprecated and will be removed in a future release of the product. |

Before starting the installation of Archive Shuttle, make sure that the following are available:
·Installation MSI files
·License file
·Login credentials for each of the servers where components are to be installed
|
|
NOTE: Ensure migration environments are deployed with EWS configurations. |
Archive Shuttle licensing
Archive Shuttle uses a license file that is bound to the domain name where the Archive Shuttle Core Server is installed. A license file must be obtained that covers the features and user/data amounts that are to be migrated.
The following types of Archive Shuttle license are available:
·Production license: This license has no time limits associated with it and has the amount of user licenses / data extraction licenses that have been purchased.
·Trial license: This license is time limited and allows testing the full functionality of Archive Shuttle for a limited time only. When the license expires, the software continues to run in a restricted, read-only mode, which allows for many Archive Shuttle activities to be performed except export/import of data.
Installing Archive Shuttle license files
The license file has to be installed on the Archive Shuttle Core Server.
The license file is requested during the Archive Shuttle Core installation.
License file update
The Archive Shuttle license file needs to be updated if, for example, the license expires, or more data resp. users are required to be migrated. This section explains how to replace and update the license file.
Should an updated license file be required, please contact your Quest partner or representative to acquire the file.
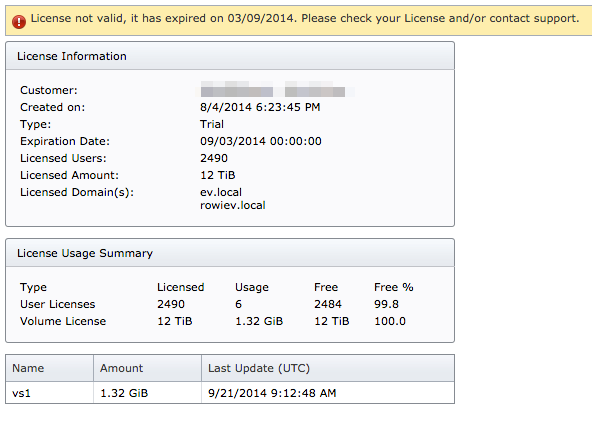
The following messages may be displayed on the System Health screen, tab Events:

and on the License screen:
To replace/update the license file, perform the following steps:
1.Obtain a new license.lic file from Quest and copy it to a temporary location on the Archive Shuttle server.
2.If the file is NOT called license.lic, rename it so that it has such name.
3.Copy the file to \Program Files\Quest\Archive Shuttle\WebServices\Bin (or an alternate location, if Archive Shuttle is installed on a different path or drive). The license also needs to be placed to \Program Files\Quest\Archive Shuttle\Service.
4.Confirm overwriting of the existing license.lic file.
5.Run an elevated command prompt.
6.Issue the command IISRESET.
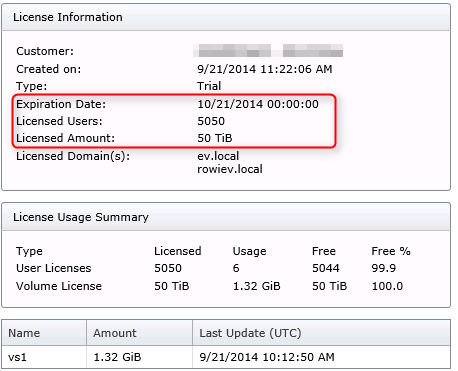
Verify that the new license has taken effect by going to the License screen. You should not get any messages about the license being expired, or consumed. It should look like this:
- Herramientas de autoservicio
- Base de conocimientos
- Notificaciones y alertas
- Soporte de productos
- Descargas de software
- Documentación técnica
- Foros de usuarios
- Tutoriales en video
- Aviso de actualizaciones de páginas web (RSS)
- Comuníquese con nosotros
- Obtenga asistencia con las licencias
- Soporte Técnico
- Ver todos