
Consoles
PST Flight Deck consoles are applications that run from the server or an Administrator, Architect, or Operators workstation. They permit the most control over a PST Flight Deck environment. There are two consoles available: The PST Flight Deck Administrator Console and the PST Flight Deck Management Console.
The PST Flight Deck Administrator Console (Admin Console) provides the most access to configure a PST Flight Deck environment. It is typically available on the Core server and is installed as an available feature by the Core installer. Access to the Admin Console is required during the initial install, setup, pilot, and ramp-up of your project, but is not typically required for the duration of your project. Alternatively, a project can be entirely managed from the Admin Console if desired.
The PST Flight Deck Management Console (Management Console) is intended to provide operators a client to use on their local workstations. The Management Console provides the options necessary to perform the daily operations of a PST Flight Deck migration without requiring access to a PST Flight Deck server. The primary difference between the two consoles is the Management Console does not have the option for the Settings menu as the Admin Console does.
With the exception of the above, both interfaces are the same. The remainder of this section will refer to both as the Console.
Navigation
In general, navigation within the Console is similar no matter where you are in the Console. The core of a Console has a Ribbon Panel, Navigation panel, and the body of the console, where the selected data is displayed.
The top of the Console contains several features and is seen below:

|
Tag |
Component |
Description |
|---|---|---|
|
1 |
File Options |
Provides the ability to display general information, launch a help file, or exit the Console |
|
2 |
Info |
Provides information related to the product, version, and license |
|
3 |
Ribbon |
Provides options related to the visible or selected items within the interface. Changes depending on location and selection within the Console |
The left side of the Console is used for navigation. The following is an example of the options available within the navigation pane of the console:

|
Tag |
Component |
Description |
|---|---|---|
|
1 |
Navigation Control |
Collapses the navigation panel |
|
2 |
Navigation sub-menus |
Options that are exposed based on the navigation menu selected |
|
3 |
Navigation sizing |
Slider to permit you to resize the navigation pane |
|
4 |
Navigation menus |
Parent navigation options that expose contextual options for a given area |
The navigation pane has menus at the bottom that act as parent containers for related options within. Selecting one of these menus will expose relevant sub-menus in the navigation pane above. The menus available are Manage, Reports, and Settings.
Managing Console Data
The Consoles have a powerful interface that permits the filtering of live data to return data you are seeking. Many areas of PST Flight Deck return a lot of data that can be too much to be useful without the ability to refine the results. The information below discusses several approaches to managing the data being returned within the grid of several options within the Console.
Columns
Additional data columns can be added to many of the grids in PST Flight Deck.
To access the additional columns of data:
1.Right-click on an existing column heading
2.Select Column Chooser
A list of available data columns will be shown. You can drag and drop from the list of columns on to the appropriate part of the user-list.
Sorting
The column headings can be clicked to change the sort order, a subsequent click on the same column heading will change the direction of the sort. Most columns support drag and drop functionality to change their position relative to the other data columns. This can make the data more presentable and readable. A data column can be removed if required by right-clicking on the column and choosing the Remove this Column option.
Filtering
It is possible to access the data filtering features in most of the Consoles grids in these ways:
1.Right click on the appropriate column heading and choose the option Filter Editor
2.Hover near the right hand corner of a column heading until the small filter icon becomes visible, and then click on it
3.By default, the filter entry row is displayed underneath the column headings. A value can be entered into any of the columns in this row and the data list will automatically be filtered according to your input. Operations can be selected by clicking the small icon (filter hint). This will show this popup:
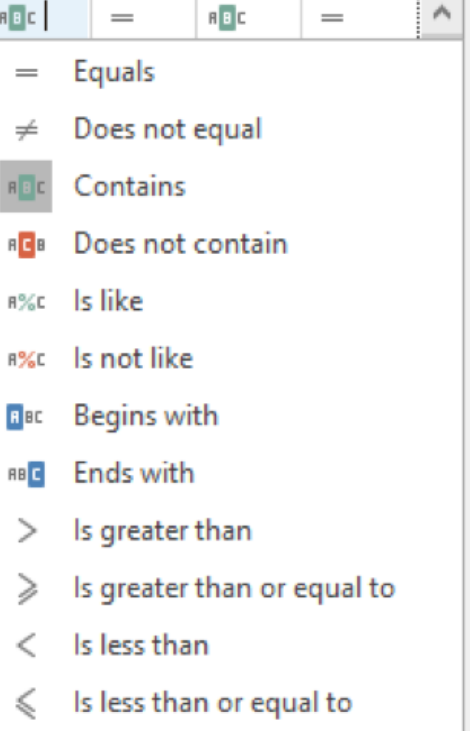
Simply click on the desired operator and it will be entered.
After a filter has been applied, an option to Edit Filter is presented in the lower right corner of a console. This can be selected to access the advanced editor for the currently applied filter, which will permit you to perform very complex queries to return specific data within a Console.
Grouping
The list of users can be grouped by one or more columns as follows:
1.Right click on an appropriate column heading and choose the option Group By This Column.
2.Right click on a column heading and choose the option Show Group By Box.
Searching
Filtering can be used to reduce the overall list, but sometimes it is necessary to search for data within a given column. You can search for particular data within a grid by right-clicking on a column heading and selecting the option Show Find Panel. Previously used searches can be selected from the dropdown list.
Saving a Layout
If you identify a filter that is useful for your migration it is possible to save it for later use. To store the customized grid click on Save in the Layout ribbon. Each saved layout can be given a unique name. Previously saved layouts can be retrieved by clicking on Load in the Layout ribbon bar. The current data list can be reset to the defaults by clicking on Reset in the Layout ribbon bar. Saved layouts can be retrieved and executed by selecting Load on the PST Flight Deck Layout ribbon and selecting the name assigned to the saved layout. You can also select Overwrite to save over a pre-existing layout or Delete to remove the saved layout.
Manage
The Manage menu is the most commonly accessed area during a migration. Most of the functionality required for an Operator to manage the PST Flight Deck migration can be found in this section. Options are grouped into sub-menus and are described below:
|
Sub-menu |
Description |
|---|---|
|
Progress |
Provides high-level statistics and trends about the current status of a migration |
|
Operations |
Provides information of interest in the daily operation of a system including performance trends and current backlog information |
|
Resources |
Provides information about CPU, memory and disk performance |
|
Users |
Provides information and options to manage the end-users in the environment |
|
Files |
Provides information and options to manage the files discovered in the environment |
|
Events |
A filterable list of events produced within the PST Flight Deck environment during a migration |
|
Owners |
Permits ownership review and management during a migration |
|
Schedule groups |
Permits the scheduling of enabled batches |
Hotkeys
Some key combinations have been included to assist in the navigation of the Manage section of the console. The areas affected are frequently navigated between during a migration project. Use of these hotkeys can enable quicker daily navigation.
|
Key combination |
Description |
|---|---|
|
ALT + U |
Navigates to the last view of the Manage > User section |
|
ALT + F |
Navigates to the last view of the Manage > File section |
|
ALT + O |
Navigates to the last view of the Manage > Owners section |
Additionally, there are shortcut keys associated with specific popup dialog boxes.
Progress
This view provides an overview of the project as a whole. The following are its features:
|
Feature |
Description |
|---|---|
|
User |
Table showing statistics related to uses and their status within the migration |
|
Project Statistics |
Graphs showing the status and trends of files and users over the past days, weeks, or months |
|
File |
Table showing statistics related to discovered files and their status within the migration |
Operations
A section designed to enable an Operator to quickly be able to tell the current health of a migration in a graphical display. The following are its features:
|
Feature |
Description |
|---|---|
|
Alerts |
Drillable badges displaying the number of actions needed or unacknowledged events |
|
Last 24 hour BITS activity |
Shows hourly activity reported for files being centralized from the Agents to PST Flight Deck for the past 24 hours |
|
Module Backlog |
Drillable bar graph showing the size or count of data backlogged per PST Flight Deck module |
|
Last 24 hour Ingest activity |
Shows hourly ingest rates over the past 24 hours |
|
BITS size last 14 days |
Line graph showing daily rates of centralized data over the past two weeks |
|
Ingest activity last 14 days |
Line graph showing daily rates of ingestion over the past two weeks |
Resources
This section permits centralized observation of resource consumption of servers running Modules within a specified location. The focus of this is to provide a point in time review of resource consumption and not a comprehensive performance monitor for the PST Flight Deck environment. Displayed is graphical output for CPU, RAM, and disk usage.
Users
This section of the Console is where most actions against users are taken. Assignment of user types, profiles, and priorities are all performed within this section. This sub-menu is where a lot of the migration monitoring and management takes place.
The grid returned under the Users sub-menu is comprised of two portions. Initially presented is a display of user information and general statistics about all the users in an AD environment. Each user who has discovered files can be expanded by clicking the plus sign (+) at the left of its row. The resultant sub-table has the same characteristics as the Files section and will be described in detail in a succeeding section of this guide. The ribbon and right-click options change depending on which section your selection is located.
The home ribbon when Users is selected has options impacting the selected user (with one exception). These options and a description of their functionality are as follows:
|
Name |
Section |
Description |
|---|---|---|
|
Refresh |
Refresh |
Refreshes data in the grid |
|
Enable Users |
Manage Users |
Permits the ability to set migration and email priority assignments to enable users for email communication or migration |
|
Actions |
Manage Users |
Contains a dropdown list of several available actions. The contents of the list are also available when right-clicking a selection in the grid |
|
Reset User |
Manage Users |
Removes all database entries for files associated with the selected user or group of users |
|
Assign Profile |
Manage Users |
Permits profile assignments to users for specialized settings |
|
Request Client Log File |
Manage Users |
Queues a request delivered at the next agent polling period for a selected user to return the PST Flight Deck Migration Agent client logs to the server for review |
|
Import Attributes |
Manage Users |
Allows importing of a specifically formatted text file, or XLSX, to assign values to fields for specific users |
|
Edit Attributes |
Manage Users |
Allows manual assignment of User Custom Field values |
|
User Log |
Manage Users |
Provides information regarding events, errors, and actions taken against the selected user through the duration of the project |
|
Progress |
Information |
Provides Active Directory information about the selected user and the status of all PST files for that user by number, volume, and current progress |
|
Inactive Users |
Information |
Provides the ability to identify users who have historically returned discovery results but have been inactive for a specified number of days |
|
Add |
Comments |
Enabled Operator to create a new comment on a user or file depending on the selection |
|
Show |
Comments |
Shows all comments associated with the selection |
|
Close All Comments |
Comments |
Closes all comments associated with the selection |
The Action menu has several options for selection. As with the home ribbon under the Users sub-menu, these options are related to the presently selected object in the grid, and changes depending on if that selection is one or many files or users. These options are also available when right-clicking on selection within the grid. The following is a list and description of the options available under the Action menu when a user is the selected object:
|
Action option |
Description |
|---|---|
|
Clear Postponement |
During an interactive migration, permits a reset of a users request to postpone the migration of their files |
|
Mark files for Migration |
Operators option to migrate a users files |
|
Mark files for Deletion |
Operators option to delete a users files |
|
Change User Type |
Operators option to specify a non-default user type for an account |
|
Manage Users Files |
Shows a filtered redirection to the owner management portion of the console showing the selected users files |
|
Set Unauthorized for Migration |
Marks a user not authorised for migration, even though they may be enabled |
|
Watch/Stop processing |
Flags or un-flags a user for watching |
|
Show users workstations |
Shows workstations that a given user has logged into |
The type of user designated by the Change User Type option can dictate the way the features of the product affect a given user. Below is a list of available types and their description:
|
Type |
Description |
|
User Account |
Default type assigned to all users |
|
Service Account |
Type to identify service accounts that may be discovering data erroneously |
|
Admin Account |
Type to identify accounts with elevated permissions that may be discovering data erroneously |
|
Group Mailbox Account |
Type to identify mailboxes belonging to a department or other group |
|
Operator |
Designated type for all PST Flight Deck Operators |
|
Leaver |
Designation for an account belonging to someone who has left the organization |
|
Helpdesk |
Designation for member of the help desk team |
|
Not in AD |
Designation for local accounts logged into workstations with a Migration Agent installed |
|
Mac OS user |
Designation for users running a version of Apples workstation operating system |
|
Cloud |
Designation for a user that is in Office 365 with an email address different from the one in Active Directory |
Files
The Files section of the console is also very commonly accessed while managing a migration. Like the Users section, it provides a lot of functionality to determine status and granular details of a migration. Actions can be executed on specific files when appropriate. The options available in the Files sub-menus home ribbon are as follows:
|
Name |
Section |
Description |
|
Refresh |
Refresh |
Refreshes the data in the grid |
|
Actions |
Manage PSTs |
Contains a dropdown list of several available actions available to take about the selection in the grid |
|
Reprocess Module |
Manage PSTs |
Opens a window to allow for removing and reprocessing modules for the selected file |
|
Reset Upload |
Manage PSTs |
Removes upload status and queues eligible files to be uploaded |
|
Import File Attributes |
Manage PSTs |
Allows importing of a specifically formatted text file, or XLSX, to assign values to fields for specific files |
|
Migration Statistics |
Information |
Shows statistics for the ingestion of a PST file |
|
Progress |
Information |
Shows the details for all modules run against a selected file |
|
Show Discovery |
Information |
Shows information on instances of discovery for a selected file |
|
Show Events |
Information |
Shows all events logged that are related to a file |
|
User log |
Information |
Provides information regarding events, errors, and actions taken against the user associated with the selected file through the duration of the project |
|
Add |
Comments |
Enables creation of a new comment on the selected file |
|
Show |
Comments |
Shows all comments associated with the selection |
|
Close All Comments |
Comments |
Closes all comments associated with the selection |
|
Continue/Delete |
Operations |
Change status of selected file or files to Deleting and removes applicable failed module |
|
Repair |
Operations |
Changes status of selected file or files to File corrupt and removes applicable failed module |
|
Continue/Unblock |
Operations |
Removed Ingestion blocked or Partial extraction status on selected files |
|
Reingest |
Operations |
Queues a file or its contents to be copied from the configured re-ingestion location to the configured upload location and sets the file to be reprocessed |
|
Continue/Migration |
Operations |
Changes status of the selected file or files to Migrating and removes applicable failed module |
|
Skip Module |
Operations |
Forces the current module to be skipped and permits a file to move on to the next phase of the workflow |
The Action menu has several options for selection. These options are also available when right-clicking on a file within the grid. The following is a list and description of the options available:
|
Action option |
Description |
|
Show User |
Changes console navigation to the Users section filtered by the user associated with the selection |
|
Change Owner |
Launches a window to specify the owner of selected file or files |
|
Change Status |
Launches a window to change the migration status of selected file or files |
|
Request Client Log File |
Queues a request to be delivered at the next agent polling period of a specific user to return the PST Flight Deck client lots to the server for review |
|
Reset Agent |
Queues a request delivered at the next agent polling period for the agent to be exited and launched again |
|
Disconnect File |
Removes the selected file from the users PST profile resulting in the file being disconnected from Outlook when next launched |
|
Scan Content |
Flags a file for the Content Scanner to review |
|
Show Workstation Files |
Change console navigation to a filtered owners section showing all files located on the same machine as the selections original location |
|
Collect Orphaned |
Permits users to receive a request to secure and transfer a PST file for centralization |
|
Report Module Stats |
Redirects view to Reports > PostProcess Stats with filter for the selected PSTFileEntryID |
|
Remove File Entry |
Removes record of the selected file from the database |
|
Re-Ingest |
Re-ingest a file |
|
Watch/Stop Watching |
Flags or un-flags a file for watching |
Watched items
The Watched items section shows all files and users that have been flagged for watching. This provides a consolidate view of key items. The home ribbon for this sub-menu and each action menu changes depending what is selected, a user or a file. The ribbons and action menu options are the same as their respective.
Events
The Events section shows all unacknowledged events that have occurred on the system since deployed. The default view of the Events grid shows the Type, Source, Event details, a count of the occurrences of the events, the level of severity of the event, and the last logged time for the event. The home ribbon for this sub-menu has the following options:
|
Name |
Description |
|---|---|
|
Refresh |
Refreshes the data appearing in the grid with the latest information from the system database |
|
Acknowledge |
Marks the selected event as acknowledged resulting in its removal from the view upon refresh |
|
Search |
Permits searching events using values in specified fields |
|
Add |
Enables creation of a new comment on a selected event |
|
Show |
Show all comments associated with the selection |
|
Close All Comments |
Closes all comments for the selected event(s) |
Owners
Managing owners is a critical part of a successful migration. The Owners section shows the results of our owner identification efforts; including owner conflicts, warning levels, all ownership related metadata, the probability that ownership has been identified, who a presently is the owner of a file, and who PST Flight Deck thinks should be the owner.
In some migrations, a lot of effort is required in the Owners section to ensure the data discovered is going where it is expected to go. Upon discovery, ownership management can begin and drastically reduce the level of effort required towards the middle and end of a migration. Owner management can also be delayed until later in the migration. If file ownership is not addressed early in the project, the files could be blocked from ingestion due to not meeting the minimum ownership probability threshold.
The options on the home ribbon for the Owners sub-menu are as follows:
|
Name |
Description |
|---|---|
|
Refresh |
Refreshes the data |
|
Recalculate Ownership |
Calculates ownership probability and conflict warning of the selection |
|
Accept Suggest User |
Assigns ownership of the selection to the user suggested |
|
Clear Operator Override |
Removes Operator assigned ownership of the selection |
|
Set Owner |
Produces window to assign ownership of the selection from a list of users |
|
Import Owners |
Option to import specifically formatted CSV file to make ownership decisions |
|
Unblock |
Enables file where ingestion has been blocked, to proceed |
|
Mark for Deletion |
Change status of selection to Deleting status |
|
Add |
Enables creation of a new comment on a selected file |
|
Show |
Shows all comments associated with the selection |
|
Close All Comments |
Close all comments for the selected files(s) |
|
Details |
Shows key pieces of information for a specific file |