Verify the following requirements are met before migrating Microsoft Teams. If these actions are not performed, discovery, provision and migration tasks will fail or some data might be lost!
The following consents must be granted before Teams migration can be started
- Migration - Basic,
- Migration - Mailbox Migration
- Migration - SharePoint
- Migration - Teams
|

|
TIP: If the consents are not granted or expired, Discover Teams action is disabled and the following notification is displayed: Grant admin consent to the following Migration sub modules on the Tenants page for both source and target tenants: Basic, SharePoint, and Teams. Open Tenants page and grant the necessary Consents and Permissions so that the product can access the source and target tenants. You will be redirected to the Microsoft web site for granting admin consent. Once admin consent is granted, you can start discovering Teams. |
|
|
IMPORTANT: The Tenant Administrator must open the OneNote application just once in the target tenant. It does not have to be opened or run by every user. If OneNote is not initialized before granting consent for Teams migration, the following error occurs: Unexpected response while attempting to register the tenant: AADSTSxxxxxx: The app needs access to a service ("https://*.onenote.com/") |
- User must be matched or migrated before using the On Demand Migration for Teams service.
- Images, media files and documents referenced in one-on-one or group chats are stored in your OneDrive for Business folder. They must be migrated using the On Demand Migration for OneDrive service, before you migrate the chats.
- Accounts joined to existing teams should be matched or migrated in the migration project.
Required permissions
| Migrate conversations |
Read all channel messages |
| |
Have full access to the Chat Service Aggregator |
| |
Have full access to the Skype Teams Service |
| |
Create chat and channel messages with anyone's identity and with any time stamp |
| Migrate private chats |
Read all chat messages |
| |
Read and write user chat messages |
| Provision groups and teams |
Read and write directory data |
| |
Read and write all groups |
| Migrate files and OneNote items |
Read and write all OneNote notebooks |
| |
Read and write items in all site collections |
| |
View and modify notes for all users |
| Migrate groups and teams membership |
Read all users' full profiles |
| |
Read or write user region |
| |
Add and remove members from all teams |
| |
Add and remove members from all channels |
Temporary Migration Manager accounts
- It is recommended to create or use source and target temporary Migration Manager accounts.
- The temporary Migration Manager accounts should be granted the Global Administrator or Teams Administrator role on the tenants for which these account are used. The temporary Migration Manager accounts in the source and target tenant should have Teams license from the Microsoft 365 admin center.
- Do not change your temporary Migration Manager accounts before completing the migration project.
- You must remove the source and target temporary Migration Manager accounts for safety reasons after the migration is completed. These accounts can be removed from teams as described in Finalizing the Migration.
The target temporary Migration Manager account is used in (but not limited to) the following scenarios:
- It creates and owns the provisioned target teams.
- It is added to all target teams and Microsoft 365 Groups as a member and an owner, and to all target private channels as an owner.
- It is used to perform the Teams migration and is displayed as the owner of all migrated conversation and chat messages and planner tasks on the target.
- It is added to all the chats (both group chats and private chats) as a participant during chats migration, and then removed from the migrated chats as soon as the chat migration is complete. All migrated chats of the target temporary Migration Manager account are hidden when the chat migration is complete.
In this topic:
|
|
NOTE: The Teams migration workspace is common for the Teams, M365 Groups and Chats migration services. See Migrating Groups for details about M365 Groups. |
Dashboard

The components of the dashboard are as described below:
Notification panel - presents relevant information and shortcuts to migration activities. The notification panel is displayed across all tabs.
Dashboard Menu - contains the following links to common activities in the migration process.
- Discover - starts the New Teams & Groups Discovery Task wizard to collect information about accounts in the source tenant. For more information see Discovering Teams and Groups
- Configure Project - starts the Edit Project wizard for Teams. Specify a default target user to use as the team owner when the existing owner has no match on the target tenant. Then click Finish to save the setting.
Dashboard Tiles
- Getting Started - displays a summary of the various actions for preparing and migrating teams. Click Quick Help to open the Quick Help dialog.
- Teams - displays a summary of the teams in various migration states. Click Show All to open the Teams List view to inspect the teams.
- M365 Groups - displays a summary of the M365 Groups in various migration states. Click Show All to open the Groups List view to inspect the groups.
- Chats - displays a summary of chats in various migration states.
- Tasks - displays the five most recent tasks that were completed in the Teams migration workspace. The title displays the total number of tasks. Click Show All to open the Tasks List view.
- Events - displays the five most recent events that were completed in the Teams migration workspace. The title displays the total number of events. Click Show All to open the Events List view.
Teams List View

The Teams List View is comprised of the following components:
Notification panel - presents relevant information and shortcuts to migration activities.
Filter panel - consists of predefined filters for the Teams List view and tabs to switch between the Teams List view and the Assessment view. See Filtering for more information about working with filters. The predefined filters are:
- Teams - returns a list of teams based on the migration state of the team.
- Teams By Size - returns a list of teams based on the size of a team. Valid ranges are More than 1GB, 100MB - 1GB, 10MB - 100MB, Less than 10MB. The dropdown also shows the nunbver of teams in the list for each range.
- SharePoint - returns a list of teams based on the nature of the SharePoint site linked to the team. Valid values are Customized and Standard.
List View Actions Menu - contains links to teams migration activities and the search box. Each action is explained in greater detail in subsequent topics. See Searching for more information about working with the search box.
List View - displays information about teams in the source and target tenants. Use the Edit Columns to show or hide columns in the list. The columns are as described below:
- Team Name - name of the team in the source tenant.
- Migration State - status of the task in the migration process. Values are as listed below:
- Discovered - team discovered in the source tenant.
- Exists in target - team in the source tenant exists in the target tenant.
- Provisioning - started provisioning team in the target tenant.
- Provisioned - team provisioned successfully in the target tenant.
- Provisioned with issues - Team provisioned in the target tenant but there were issues during provisioning.
- Provision failed - started provisioning team in the target tenant.
- Queued - team is waiting for migration service resources to be available. For more information, see How Queuing Works.
- Migrating - team migration in progress.
- Partially migrated - team migration completed but some components were not migrated.
- Partially migrated with issues - team migration completed some components were not migrated and due to issues during migration.
- Migrated - team migrated successfully to the target tenant.
- Migrated with issues - team migration completed but there were issues during migration.
- Migration failed - team could not be migrated.
- SharePoint - nature of the SharePoint site linked to the team. Values are as described below:
- <no-value> - SharePoint content has not be discovered yet.
- Standard - there is at most 1 SharePoint site and 4 Lists in the SharePoint site collection
- Customized - there are more than 1 site and 4 Lists in the SharePoint site collection
|
|
NOTE: The SharePoint status is available only after the New Teams Provisioning Task is run. |
- Channels - total number of channels in the source tenant team.
- Source Members - total number of members in the source tenant team.
- Target Members - total number of members in the target tenant team.
- Source Files (GB) - total size in GB of files across all public channels in the source tenant.
- Target Files (GB) - total size in GB of files across all public channels in the target tenant.
- Source Messages - total number of messages in the source tenant team.
- Migrated Messages - number of messages migrated to the target tenant team.
- Target Messages - total number of messages in the target tenant team.
- Source Plans - total number of plans in the source tenant team.
- Migrated Plans - number of plans migrated to the target tenant team.
- Target Plans - total number of plans in the target tenant team.
- Source Tasks - total number of tasks in the source tenant team.
- Migrated Tasks - number of tasks migrated to the target tenant team.
- Target Tasks - total number of tasks in the target tenant team.
- Source SharePoint site Url - SharePoint site URL of the source team. Available when the team is provisioned in the target tenant.
- Target SharePoint site Url - SharePoint site URL of the target team. Available when the team is provisioned in the target tenant.
- Progress (%) - migration progress indicated as a percentage.
- Last Activity - date and time of the last action performed on the team record.
- Created - date and time the team record was created.
- Last Statistics Collected Date - Date and time when the most recent statistics were collected.
- Target Team Name - name of the team in the target tenant.
- Source MailNickname - email alias of the associated Microsoft 365 Group in the source tenant.
- Target MailNickname - email alias of the associated Microsoft 365 Group in the target tenant. Available when the team is provisioned in the target tenant.
- IsArchived - indicates whether the team is archived. Archived teams can be migrated like any other team.
- Source Team URL - URL of the source team.
- Target Team URL - URL of the target team. Available when the team is provisioned in the target tenant.
- Source Group ID - unique identifier of the team or group in the source tenant.
- Target Group ID - unique identifier of the team or group in the target tenant. Available when the team is provisioned in the target tenant.
- Source SMTP Address - SMTP address of the Office 365 group of the source team.
- Target SMTP Address - SMTP address of the Office 365 group of the source team. Available when the team is provisioned in the target tenant.
- Source Team Owner UPNs - User Principal Names of the source team owners. Up to 5 names are listed.
- Target Teams Owner UPNs - User Principal Names of the target team owners. Up to 5 names are listed. Available when the team is provisioned in the target tenant.
Teams Assessment View
See the Premigration Assessment for Teams for the complete list of available reports.
Team Details
When you select a team from the List View, the Team Detail pane opens. The information in the pane is described below:
- Description - name of the team in the source tenant.
- Visibility - indicates whether the source tenant team is Public or Private.
- Is Archived - indicates whether the source tenant team is archived.
- SharePoint Customized - status of the selected account. Valid values are New, In Progress, Failed and Completed.
- Source Location - geo location of the source team. The geo location could be blank if your source tenant team is not geo-located.
- Source Url - SharePoint site URL of the source team. Available when the team is provisioned in the target tenant.
- Target Location - geo location of the target team. This value appears when the team is provisioned and will reflect the preferred location specified in the New Teams Provisioning Task wizard. The geo location could be blank if your target tenant team is not geo-located.
- Target Url - SharePoint site URL of the target team. Available when the team is provisioned in the target tenant.
- Owner count - number of owners of the source team. A team can have up to 100 owners.
- Member count - number of members in the source tenant team.
- Migrated messages count - number of messages migrated to the target tenant team.
- Archive messages count - number of archived messages in the source tenant team.
- Last Operation - the most recent operation performed on the team. Valid values are Discovered, Provisioned, and Migrated.
- Events - count of the events that occurred during one or more tasks.
- Tasks - list of tasks invoked for the selected team.
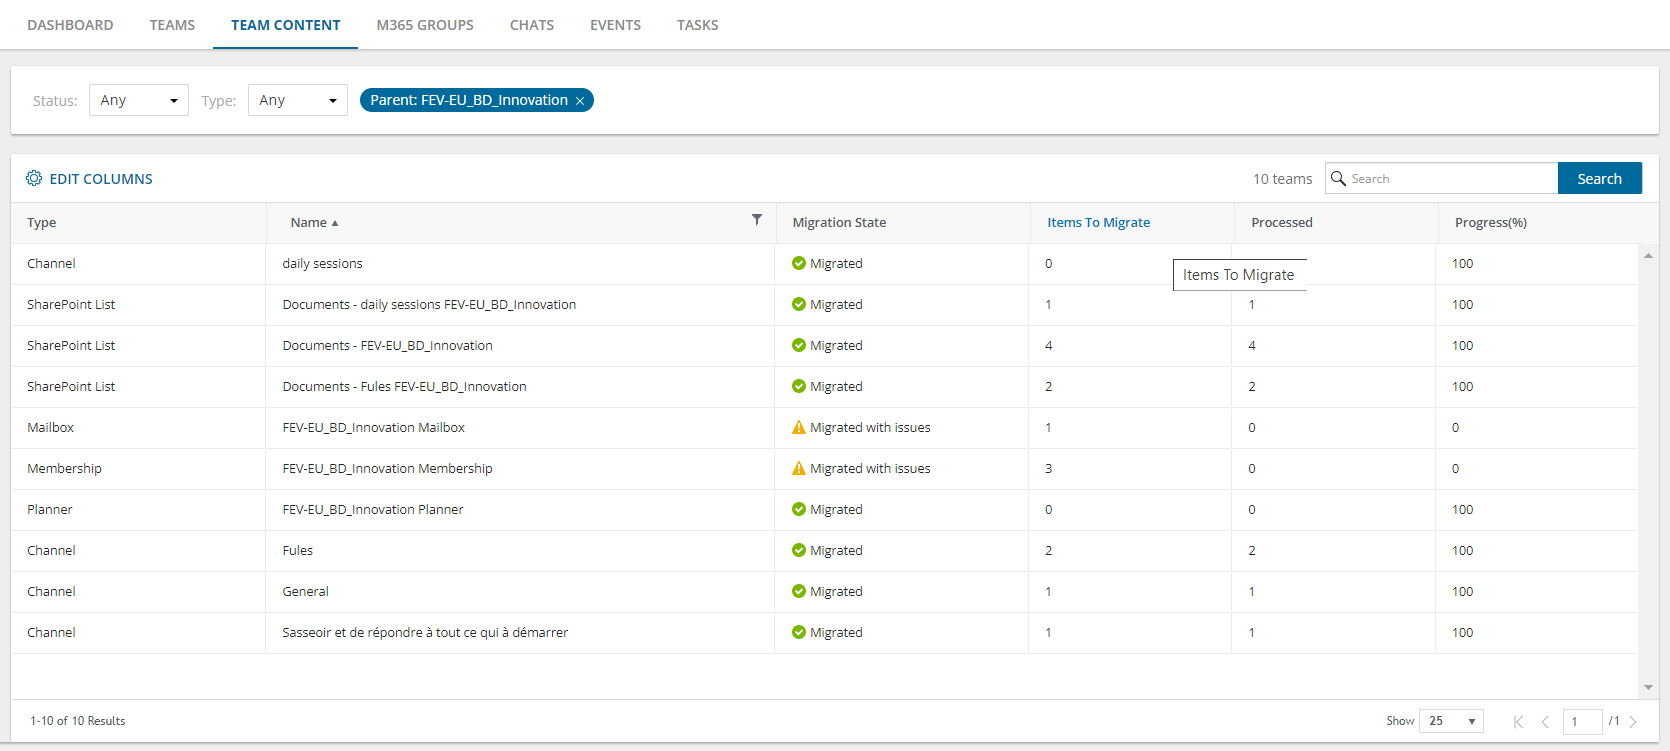
Team Content
The Team Content tab presents a list of teams and its components along with the count of child items of the object type. When you open the Team Content tab, the list view initially displays all the teams and their migration state along with the total count of the team components of each team: Channel, Planner, Mailbox, Team membership, SharePoint Content* and SharePoint Site*. For each team component you can additionally view its components and their child item counts as well.
* Example: Consider a team with multiple private channels A and B.
If you select the SharePoint Standard option in the New Teams Migration Task wizard, then the following items are displayed in the Team Content view with type "SharePoint List" after migration.
| SharePoint List |
Documents - team site name |
| SharePoint List |
Documents - private channel A site name |
SharePoint List
|
Documents - private channel B site name |
If you select the SharePoint Standard and Customized option in the New Teams Migration Task wizard, then the following items are displayed in Team Content view with type "SharePoint Site" after migration.
| SharePoint Site |
Site - team site name |
| SharePoint Site |
Site - private channel A site name |
SharePoint Site
|
Site - private channel B site name |
To display the contents of a specific team:
- Select the team to open the details pane on the right hand side.
- Click Show Content. The components of the selected team are displayed in the list view along with the migration state and child item counts for each component. In the details pane, the Show Parent link is activated and the Show Content link is deactivated.
|
|
NOTE: Components of a team can be displayed when teams are migrated through a new project created after the Jan 10, 2023 release. |
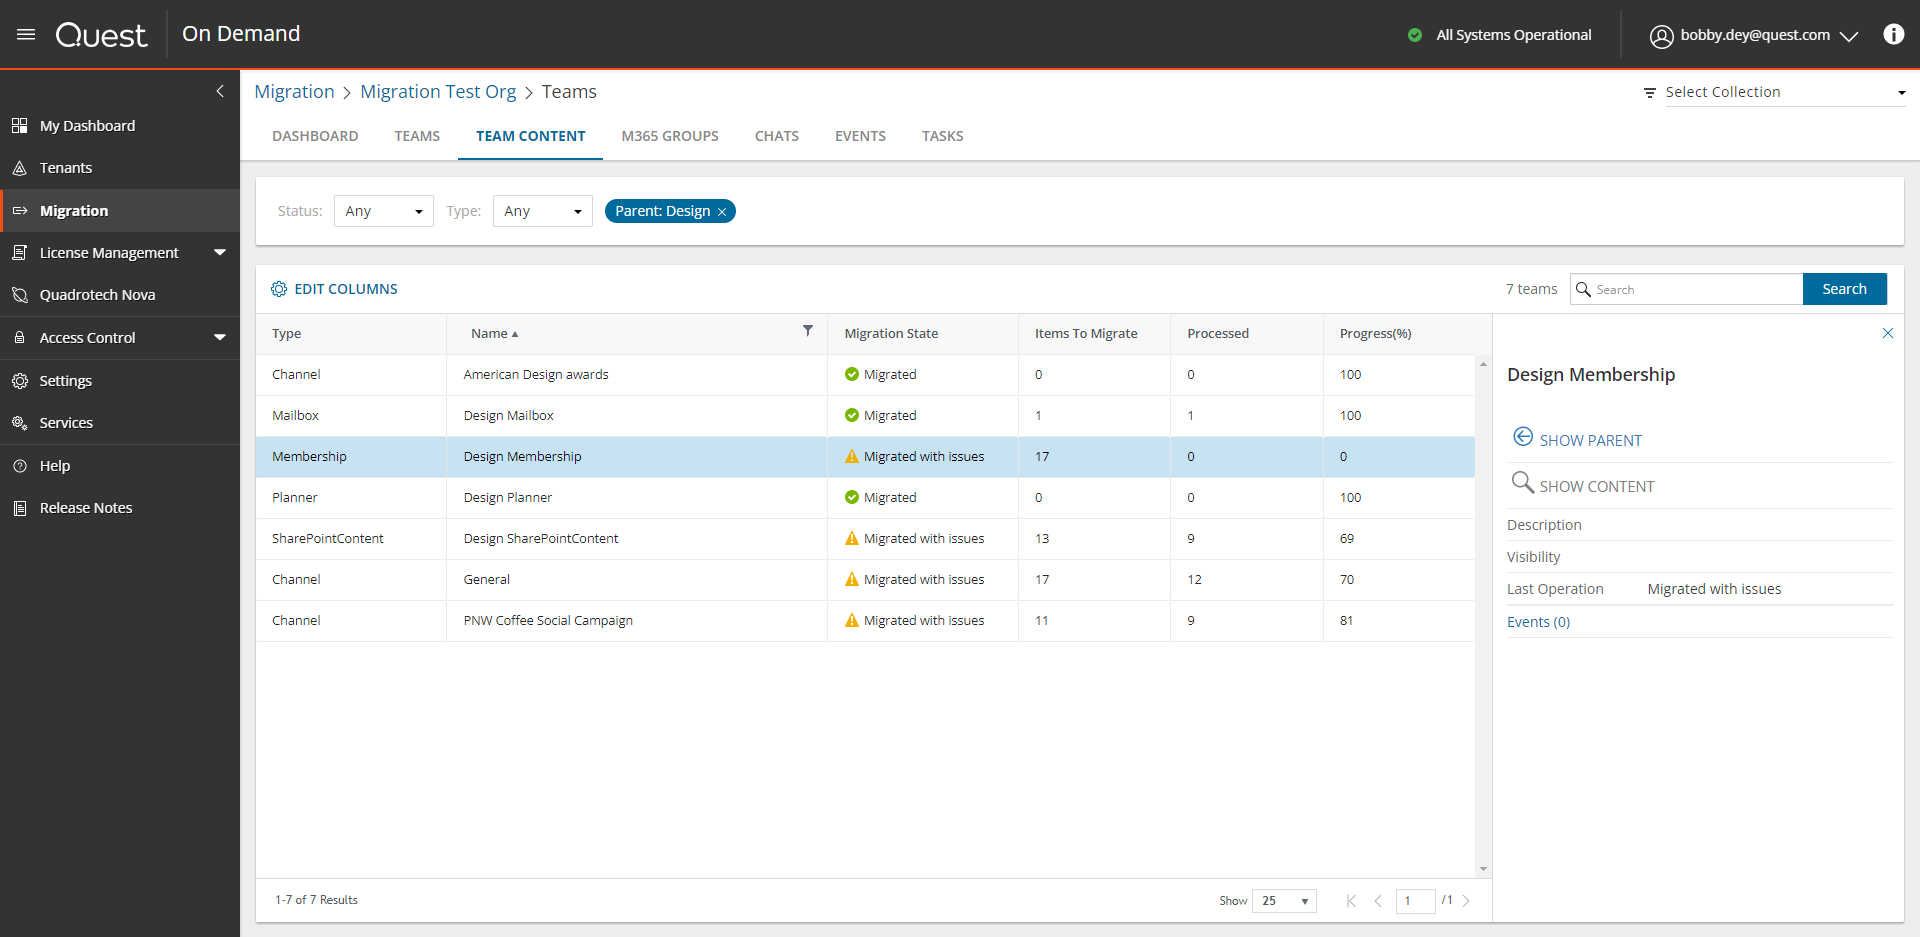
To display the parent of a specific team component:
- Select the team component to open the details pane on the right had side.
- Click Show Parent. The parent team is displayed in the list view along with the migration state and the total count of the team components. In the details pane, the Show Content link is activated and the Show Parent link is deactivated.
The components of teams are migrated when you start a migration task with the New Teams Migration Task wizard and select the team component types to migrate.
|
|
NOTE: The Events property value in the detail pane for a selected child component will be zero. |
Filter panel - consists of predefined filters for the Teams List view and tabs to switch between the Teams List view and the Assessment view. See Filtering for more information about working with filters. The predefined filters are:
- Status - migration state of the team.
- Type - object type: Team, Channel, Planner, Mailbox, team membership or SharePoint Content.
List View - displays information about teams in the source and target tenants. Use the Edit Columns List View Actions Menu to show or hide columns in the list. The columns are as described below:
- Type - object type: Team, Channel, Planner, Mailbox, membership or SharePoint Content.
- Name - name of the object
- Migration State - status of the task in the migration process. Values are as listed below:
- Discovered
- Exists in target - object in the source tenant exists in the target tenant
- Mapped
- Provisioning
- Provisioned
- Provision failed
- Migrating
- Partially migrated
- Partially migrated with issues
- Migrated
- Migrated with issues
- Migration failed
- Items to migrate - the count of child items of the object. For each team, the count indicates the total number of child components of the team. For each team components the item counts displayed are as described below:
- Planner: number of Planner tasks
- Channel: number of messages
- Mailbox: the team mailbox. The count is always 1
- Membership: number of team members
- SharePoint Content: number of sites
- Processed - the number of items considered for migration.
- Progress (%) - migration progress in percentage. If a team component is not selected for migration in the New Teams Migration Task wizard, this value does not exist for the component.
Chats List View
The Chats List View displays Chats between one or more matched users between a source and target tenant.

The Chats List View is comprised of the following components:
Notification panel - presents relevant information and shortcuts to migration activities.
Filter panel - consists of predefined filters for the Chats List view . See Filtering for more information about working with filters. The predefined filters are:
- Chats - returns a list of chats based on the migration state of the team.
- ODM Licensed - returns a list of user account with ODM license status. Values are Yes and No.
- Account Type - returns a list of user accounts based on their mailbox type. Values are Mailbox-Enabled User and Non-Mail-Enabled User.
List View Actions Menu - contains links to chat migration activities and the search box. Each action is explained in greater detail in subsequent topics. See Searching for more information about working with the search box.
List View - displays information about teams in the source and target tenants. Use the Edit Columns to show or hide columns in the list. The columns are described as below:
- User Name - name of the user account.
- Migration State - migration status of chats from discovery to successful migration. Values are Discovered, Migrating, Partially migrated, Partially migrated with Issues, Migrated, Migrated with Issues, Migration Failed.
- Account Type - indicates the mailbox type of the user account. Values are Mailbox-Enabled User and Non-Mail-Enabled User.
- ODM Licensed - indicates whether or not an On Demand Migration user account license has been consumed when the account migration task is started. Values are Yes, No, Not required.
- Account Matching -(deprecated)
- OneDrive Status - migration status of the OneDrive files for this user.
- Mailbox Status - migration status of a user's mailbox. It is a best practice to migrate a mailbox before chats are migrated for any user. Values are Discovered, Matched, Migrating, Migrated, Migrated with Issues, Migration Failed, Switched, and Migration Stopped.
- Migrated Chats - number of chats that have been migrated.
- Archived Chats - indicates whether or not the archive option is selected during a chat migration. If the value is Yes, chats belonging to this user cannot be archived again.
- Message Count (< 30 days) - number of chat messages generated by the user in the last 30 days. There is a latency of 24-48 hours from the time a message is created.
- Last Activity (< 30 days) - most recent activity in the last 30 days. This data is provided by Microsoft based on user activity in Microsoft Teams.
- Total Chats - total number of chats in the source tenant.
- Source UPN - User Principal Name (UPN) of the source account.
- Target UPN - User Principal Name (UPN) of the target account.
Every team is associated with a Microsoft 365 Group, but there are groups that are not associated with teams. In this topic, the term team means a Microsoft Team and includes its associated group, and the term group means a Microsoft 365 Group that is not associated with a team.
|
|
NOTE: This topic explains the process to discover both teams and groups. If you want to discover only teams, see Discovering Teams. If you want to discover only groups that are not related to teams, see Discovering Groups. |
In this topic:
Discovering all teams and groups
This is the simplest approach which uses the Discover tasks to inspect the source tenant and discover all the teams.
To start the Discover task:
- Log in to Quest On Demand and choose an organization if you have multiple organizations.
- From the navigation pane, click Migration to open the My Projects list.
- Create a new project or open an existing project.
- Click Teams from the project tiles, or click Open from the Teams tile to open the Teams dashboard.
- Click Discover > Discover All from the Teams dashboard.
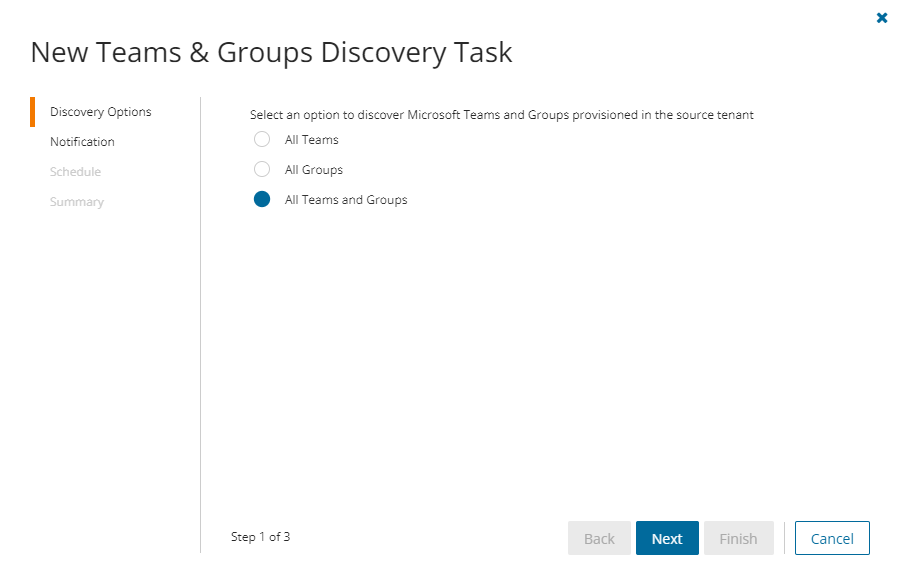
- The New Teams & Groups Discovery Task wizard opens.
- Step 1: Discovery Options
|
|
NOTE: The Azure AD administrator account will be added to the discovered Teams and Groups. |
- All Teams - select this option to discover all Microsoft Teams.
- All Groups - select this option to discover all Microsoft 365 Groups without Teams.
- All Teams and Groups - select this option to discover Microsoft 365 Groups and Teams.
- Click Next.
- Step 2: Notification
- Send notification email once the task is completed - select this option to send a notification email when a discovery task completes.
- Only in a case of failure - select this option to send the email if the discovery task fails to complete successfully.
- Recipients - enter the email address of the recipients of this email. You can specify multiple recipient email addresses separated by semicolon.
- Click Next.
- Step 3: Schedule
- Choose from one of three options to schedule the task. The scheduler will be activated only after you complete the task wizard.
- Run now - task runs immediately.
- Run later - task must be started manually.
- Schedule - task will be started at a future date and time entered in the corresponding calendar field.
- Click Next.
- Step 4: Summary
- Verify the task specifications as described below:
- Name - name of the task. You can specify a custom name. The default name is Discover.
- Source tenant - name of the tenant where the statistics will be collected.
- Target tenant - name of the target tenant in this project.
- Scheduled start - date and time when the task will start. Now indicates that the task will start immediately.
- Click Back to revise or review a previous step or click Finish to complete the task wizard and start the task as scheduled.
Discovering teams and groups from a file
This step is required if you plan to discover teams and groups using a CSV file. When you have a large set of teams and groups but you want to migrate a subset of the objects, the CSV file lets you specify the teams and groups that you want to discover and ignore the rest. You can then use this file in the New Teams & Groups Discovery Task as described in this topic to discover the teams from the source tenant.
Step 1: Preparing the CSV file
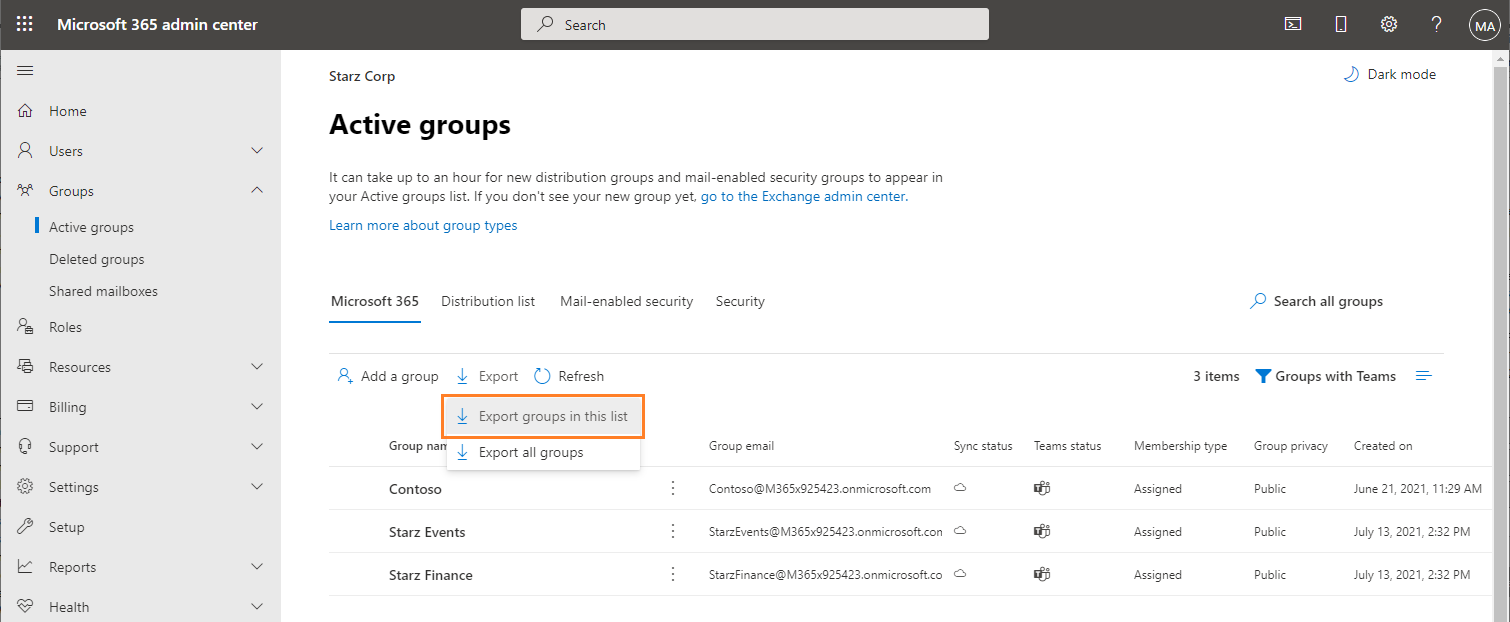
- Log in to the Microsoft 365 admin center (https://admin.microsoft.com) with the credentials of your source tenant administrator.
- From the navigation pane, click Active groups.
- Select Microsoft 365 tab in the Active Groups page
- Click Export and then click Export all groups. A Groups.csv file will be downloaded to your computer.
- Edit the CSV file and retain the Group ID and Group name columns. Then retain the teams and groups you want to discover and delete the rest.
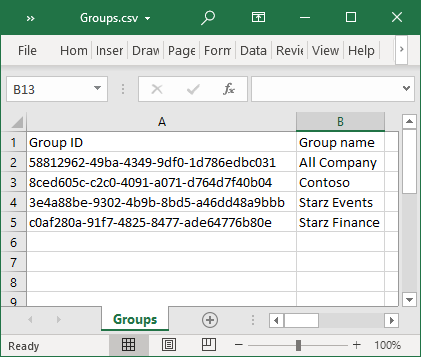
- Save the CSV file. You may rename the file if needed.
Step 2: Starting the Discover Task
- Log in to Quest On Demand and choose an organization if you have multiple organizations.
- From the navigation pane, click Migration to open the My Projects list.
- Create a new project or open an existing project.
- Click Teams from the project tiles, or click Open from the Teams tile to open the Teams dashboard.
- Click Discover > Discover from file from the Teams dashboard.
- The New Teams & Groups Discovery Task wizard opens.
- Step 1: Discovery Options
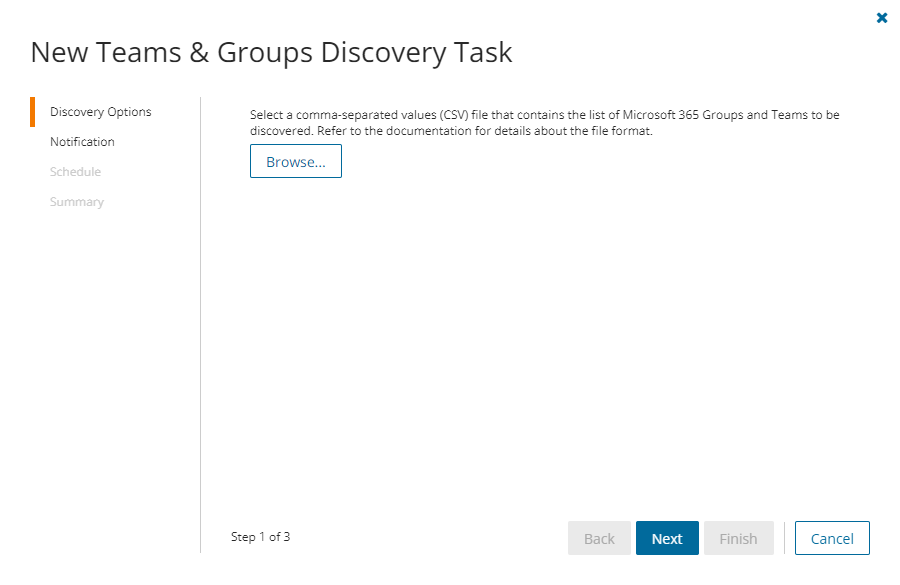
- Click Browse and select the CSV that contains the Group IDs and Group names of the teams that you want to discover.
- Click Next.
- Step 2: Notification
- Send notification email once the task is completed - select this option to send a notification email when a discovery task completes.
- Only in a case of failure - select this option to send the email if the discovery task fails to complete successfully.
- Recipients - enter the email address of the recipients of this email. You can specify multiple recipient email addresses separated by semicolon.
- Click Next.
- Step 3: Schedule
- Choose from one of three options to schedule the task. The scheduler will be activated only after you complete the task wizard.
- Run now - task runs immediately.
- Run later - task must be started manually.
- Schedule - task will be started at a future date and time entered in the corresponding calendar field.
- Click Next.
- Step 4: Summary
- Verify the task specifications as described below:
- Name - name of the task. You can specify a custom name. The default name is Discover.
- Source tenant - name of the tenant where the statistics will be collected.
- Target tenant - name of the target tenant in this project.
- Scheduled start - date and time when the task will start. Now indicates that the task will start immediately.
- Click Back to revise or review a previous step or click Finish to complete the task wizard and start the task as scheduled.
Reviewing the Discover Task
- Open the Tasks tab.
- Select the task that you want to review. The default name is Discover.
- In the task details pane that opens, the information presented is as described below:
- Type - type of the task. The type is discoverteams.
- Created - date and time when the task was created.
- Modified - date and time when the task was last updated.
- State - state of the task.
- Last Operation - the action that was most recently performed in this task.
- Schedule - date and time when the task started. Now indicates that the task started immediately after the task was created.
- Events (number) - number indicates the count of events that the task encountered. The values indicate the type of the events and the event count for each type.
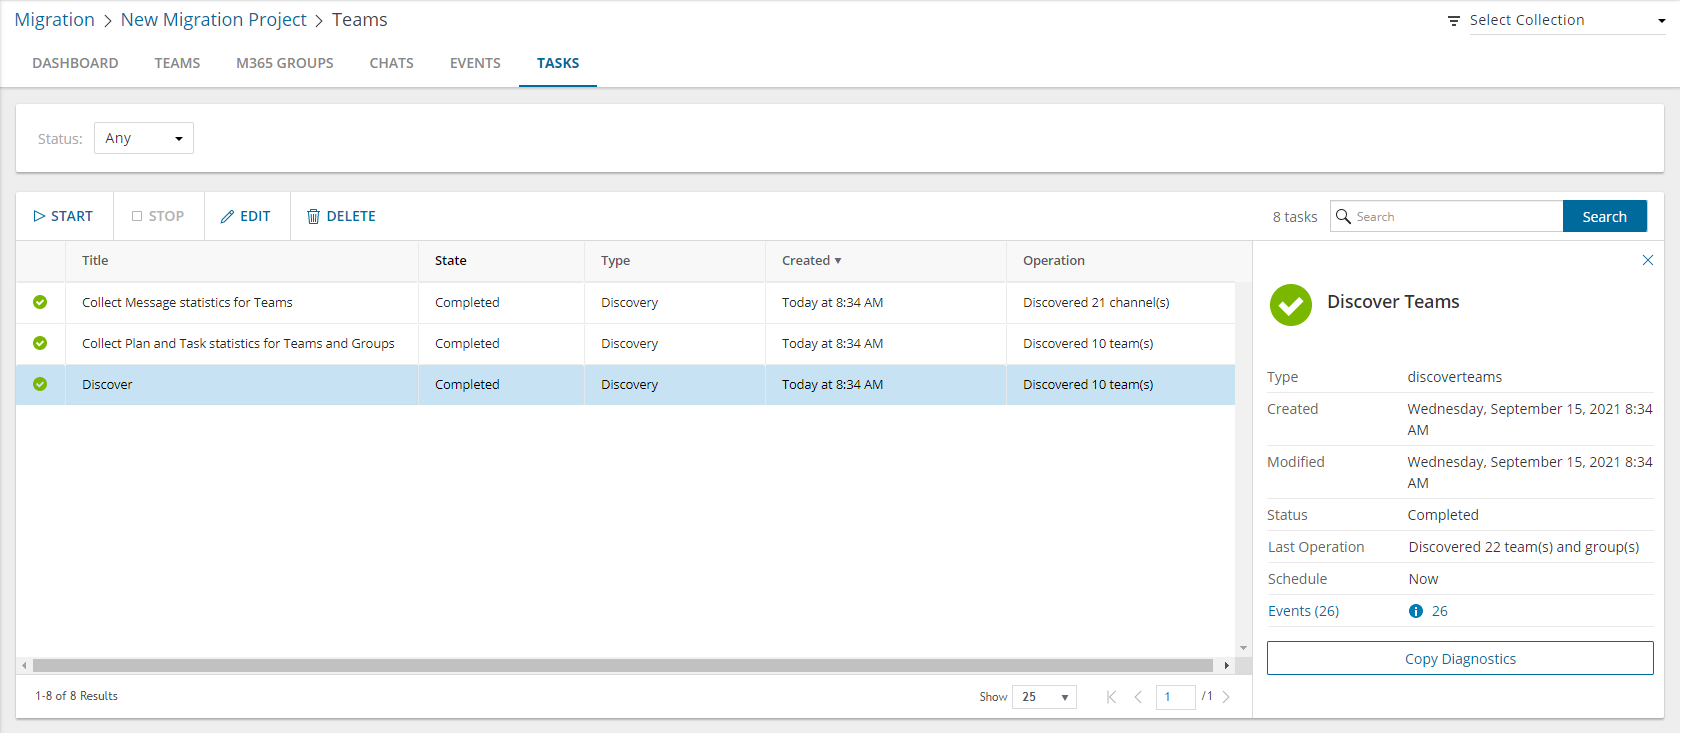
- If you select the options to collect statistics in the New Teams & Groups Discovery Task wizard, you will see additional tasks: Collect Plan and Task statistics for Teams and Groups and Collect Message statistics for Teams. Click each task to view the corresponding details in the details pane.
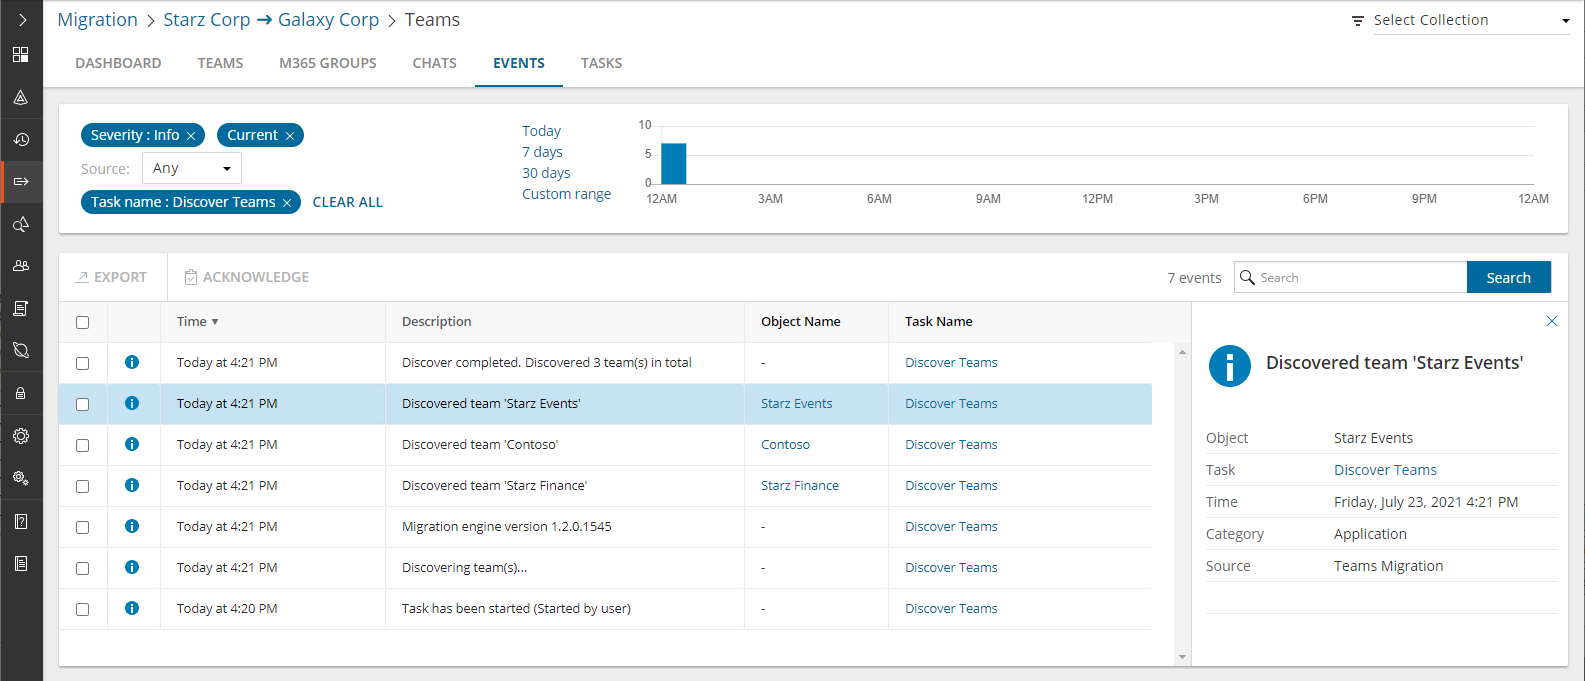
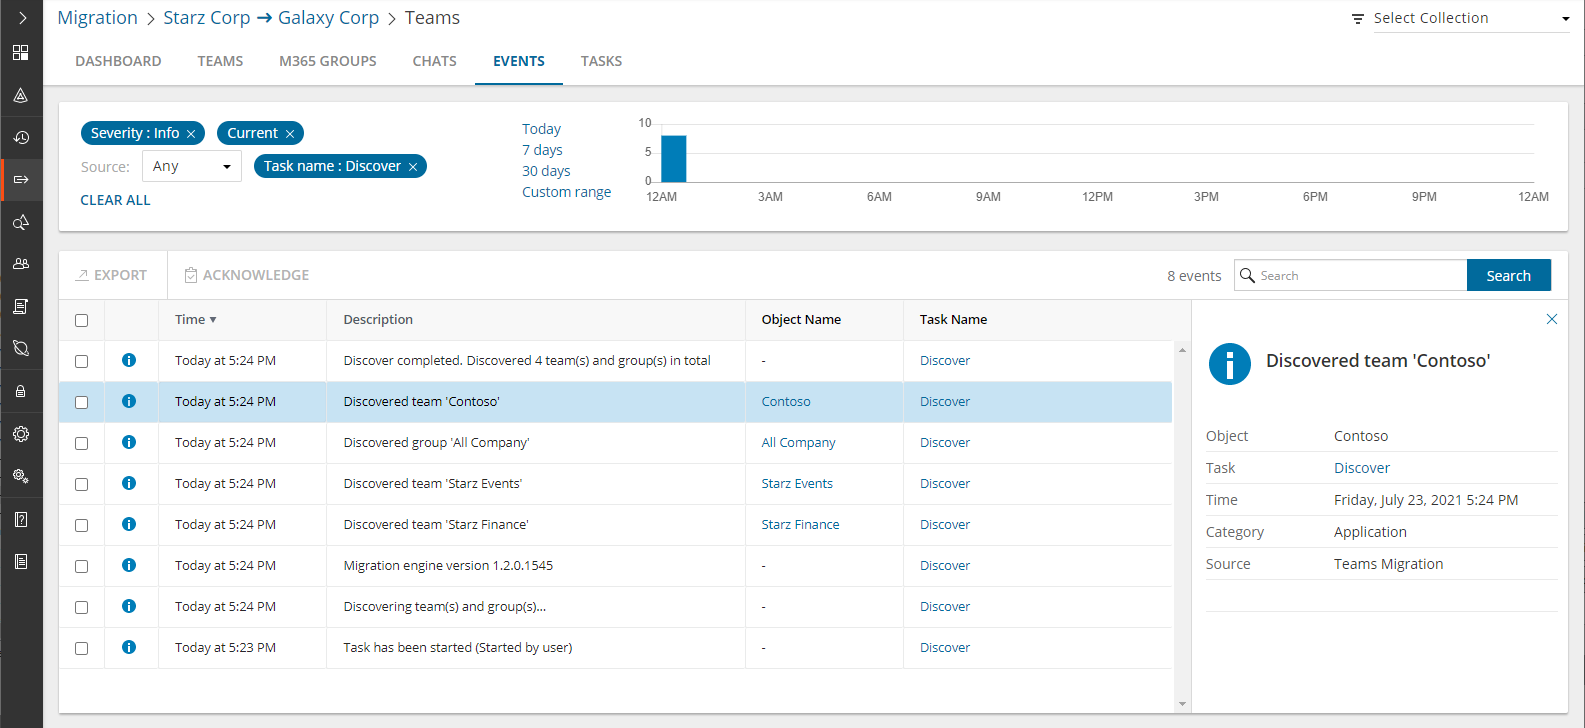
Reviewing the Discover Task Events
- Open the Tasks tab.
- Select the task that you want to review.
- In the task details pane that opens, click Events (number). The Events tab opens with a filtered list of events for the selected task.
- Select an event that you want to review. In the event details pane that opens, the information presented is as described below:
- Object - name of the team or group discovered.
- Task - name of the task.
- Time - date and time when the event occurred.
- Category - type of task. the value is Application.
- Source - name of the On Demand Migration service
In this topic:
Discovering all Teams
This is the simplest approach which uses the Discover Teams tasks to inspect the source tenant and discover all the teams.
To start the Discover Teams task:
- Log in to Quest On Demand and choose an organization if you have multiple organizations.
- From the navigation pane, click Migration to open the My Projects list.
- Create a new project or open an existing project.
- Click Teams from the project tiles, or click Open from the Teams tile to open the Teams dashboard.
- Click Discover Teams from the Teams tile in the Teams dashboard
-or-
Select the Teams tab and select the List View if not already selected. Then click Discover Teams > Discover All from the Actions menu.
- The New Teams Discovery Task wizard opens.
- Step 1: Discovery Options
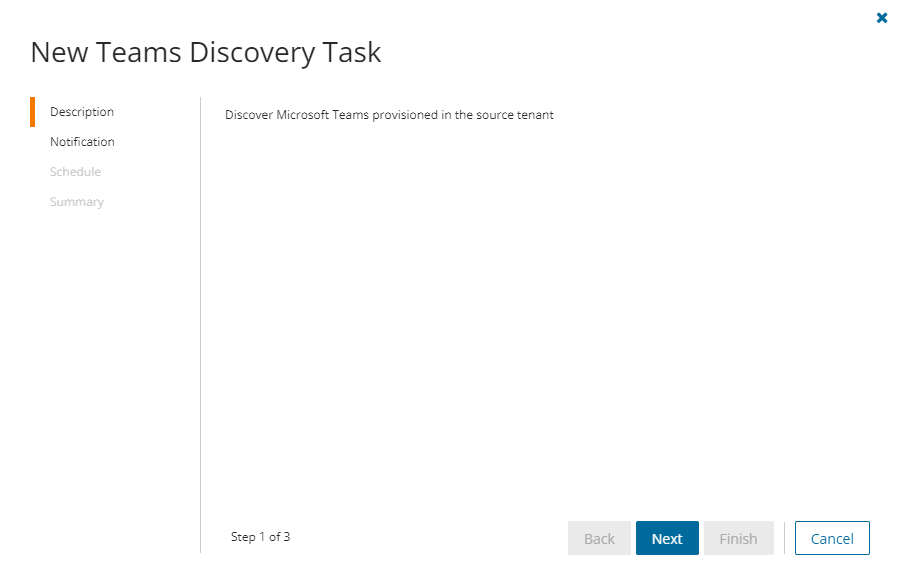
- Click Next.
- Step 2: Notification
- Send notification email once the task is completed - select this option to send a notification email when a discovery task completes.
- Only in a case of failure - select this option to send the email if the discovery task fails to complete successfully.
- Recipients - enter the email address of the recipients of this email. You can specify multiple recipient email addresses separated by semicolon.
- Click Next.
- Step 3: Schedule
- Choose from one of three options to schedule the task. The scheduler will be activated only after you complete the task wizard.
- Run now - task runs immediately.
- Run later - task must be started manually.
- Schedule - task will be started at a future date and time entered in the corresponding calendar field.
- Click Next.
- Step 4: Summary
- Verify the task specifications as described below:
- Name - name of the task. You can specify a custom name. The default name is Discover Teams.
- Source tenant - name of the tenant where the statistics will be collected.
- Target tenant - name of the target tenant in this project.
- Scheduled start - date and time when the task will start. Now indicates that the task will start immediately.
- Click Back to revise or review a previous step or click Finish to complete the task wizard and start the task as scheduled.
Discovering Teams from a file
When you have a large set of teams but you want to migrate a subset of those teams, you can start the discovery process by using a CSV file. The CSV file lets you specify the teams that you want to discover and ignore the rest. This is a two-step process:
Step 1: Preparing the CSV file
- Log in to the Microsoft 365 admin center (https://admin.microsoft.com) with the credentials of your source tenant administrator.
- From the navigation pane, click Active groups.
- Select Microsoft 365 tab in the Active Groups page
- Set the list filter to Groups with Teams.
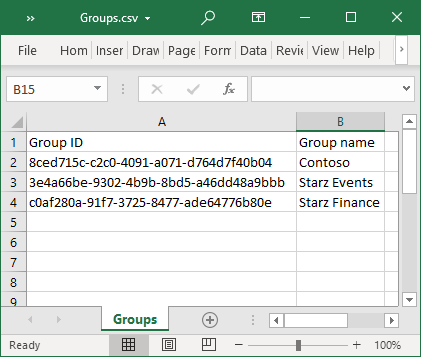
- Click Export and then click Export groups in this list. A Groups.csv file will be downloaded to your computer.
- Edit the CSV file and retain the Group ID and Group name columns. Then retain the teams you want to discover and delete the rest. If you retain a row that references a group without a team, the group will be ignored during discovery.
|
|
NOTE:
- You can download a CSV template when you start the New Teams Discovery Task wizard and click Download Example File from the Discovery Options step.
- CSV file names with non-ASCII characters are not supported.
|
- Save the CSV file. You may rename the file if needed.
Step 2: Starting the Discover Teams Task
- Log in to Quest On Demand and choose an organization if you have multiple organizations.
- From the navigation pane, click Migration to open the My Projects list.
- Create a new project or open an existing project.
- Click Teams from the project tiles, or click Open from the Teams tile to open the Teams dashboard.
- Click the Teams tab and select the List View if not already selected. Then click Discover Teams > Discover From File from the Actions menu.
- The New Teams Discovery Task wizard opens.
- Step 1: Discovery Options
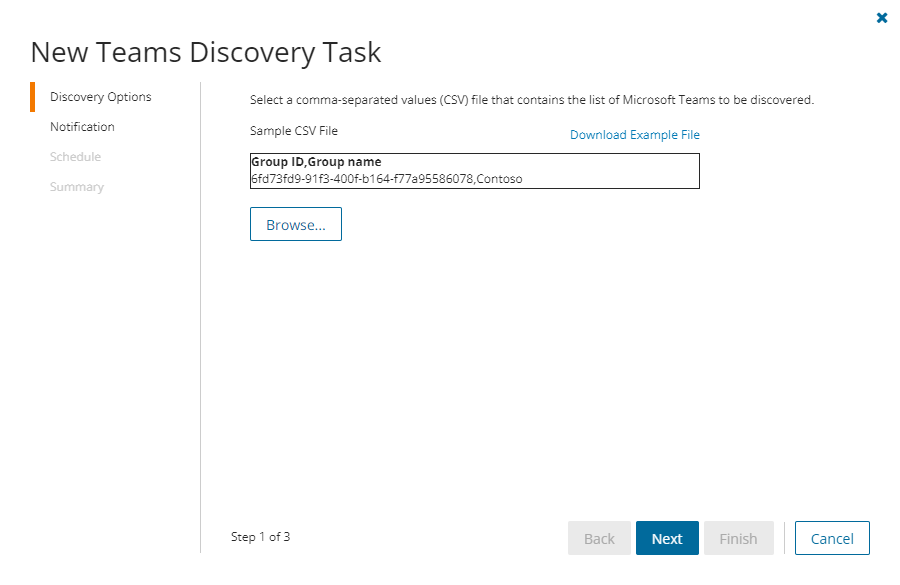
- Click Browse and select the CSV that contains the Group IDs and Group names of the teams that you want to discover.
- Click Next.
- Step 2: Notification
- Send notification email once the task is completed - select this option to send a notification email when a discovery task completes.
- Only in a case of failure - select this option to send the email if the discovery task fails to complete successfully.
- Recipients - enter the email address of the recipients of this email. You can specify multiple recipient email addresses separated by semicolon.
- Click Next.
- Step 3: Schedule
- Choose from one of three options to schedule the task. The scheduler will be activated only after you complete the task wizard.
- Run now - task runs immediately.
- Run later - task must be started manually.
- Schedule - task will be started at a future date and time entered in the corresponding calendar field.
- Click Next.
- Step 4: Summary
- Verify the task specifications as described below:
- Name - name of the task. You can specify a custom name. The default name is Discover Teams.
- Source tenant - name of the tenant where the statistics will be collected.
- Target tenant - name of the target tenant in this project.
- Scheduled start - date and time when the task will start. Now indicates that the task will start immediately.
- Click Back to revise or review a previous step or click Finish to complete the task wizard and start the task as scheduled.
Reviewing the Discover Teams Task
- Open the Tasks tab.
- Select the task that you want to review. The default name is Discover Teams.
- In the task details pane that opens, the information presented is as described below:
- Type - Type of the task. The type is discoverteams.
- Created - Date and time when the task was created.
- Modified - Date and time when the task was last updated.
- State - State of the task.
- Last Operation - The action that was most recently performed in this task.
- Schedule - Date and time when the task started. Now indicates that the task started immediately after the task was created.
- Events (number) - Number indicates the count of events that the task encountered. The values indicate the type of the events and the event count for each type.
Reviewing the Discover Teams Task Events
- Open the Tasks tab.
- Select the task that you want to review.
- In the task details pane that opens, click Events (number). The Events tab opens with a filtered list of events for the selected task.
- Select an event that you want to review. In the event details pane that opens, the information presented is as described below:
- Object - name of the team or group discovered.
- Task - name of the task.
- Time - date and time when the event occurred.
- Category - type of task. the value is Application.
- Source - name of the On Demand Migration service