
Step 8 (optional): Have an administrator sign the CMN.ntf template file
If your organization uses active mail and you do not sign the CMN.ntf file, an Exchange user opening an active mail message will have to dismiss a popup dialog box to verify that he/she trusts the unsigned database. To permanently bypass that step, have an administrator sign the CMN.ntf template file:
|
1 |
Copy the CMN.ntf template file from your CMN Mail Connector directory to the Domino server. |
|
2 |
Have an administrator sign the CMN.ntf template file. |
|
3 |
Copy the signed CMN.ntf template file to the CMN server running the Mail Connector component. |
|
4 |
Select the signed CMN.ntf template file in the CMN Mail Connector Management Console, on the Active Mail screen, with the Browse ([...]) button. |
Mail Connector Management Console
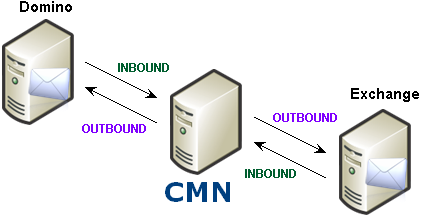
Note: The terms "Inbound" and "Outbound" as used here are relative to the Mail Connector itself, as shown in this illustration. An "Inbound" server is one from which CMN receives messages, and an "Outbound" server is one to which CMN relays messages.
Management Console screen:Mail Connector | Inbound Servers
The Inbound settings define the valid Domino and Exchange servers whose message traffic the Mail Connector will accept.
A checkbox appears near the top of the screen, above the Servers table:
|
• |
Enable hosted Exchange (if connecting with a remote "hosted" Exchange server): Tells CMN to accept transmissions from a server not defined in the table below, and to assume that the undefined server is a hosted Exchange server. |
All other (non-hosted) servers are defined in the table, where each row defines one server. You must specify at least one Inbound server each for Exchange and Domino. However, you may specify two or more for either or both. Click Add to define a new server in the table, select an existing server and click Edit to change its configuration, or click Remove to delete a server from the table.
Each server is defined by values in these columns:
|
• |
System Type: Select Microsoft Exchange or Lotus Domino (with the version number of Domino installed on this server). |
|
• |
Server Name / IP Address: The name of the server, which may be designated as the DNS name of the physical box, or by the IP address associated with the server, or by its MX record notation, which can rank physical server names by a priority usage preference. |
Management Console screen: Mail Connector | Outbound Servers
| Outbound ServersThe Outbound settings define the valid Exchange and Domino mail servers to which the Mail Connector will try to route mail. You may specify two or more servers for either or both sides—in which case CMN will distribute the outbound traffic among all of the servers defined for any single side (Exchange or Domino) in round-robin fashion.
The servers are defined in a table, where each row defines a single server. You must specify at least one server for each of Exchange and Domino. Click Add to define a new server in the table, select an existing server and click Edit to change its configuration, or click Remove to delete a server from the table.
Each server is defined by values in these columns:
|
• |
|
NOTE: If defining a remote "hosted" Exchange outbound server: Select the Microsoft Exchange value here. |
|
• |
Server Name / IP Address: The name of the server, which may be designated as the DNS name of the physical box, by the IP address associated with the server, or by MX record notation. |
|
NOTE: If defining a remote "hosted" Exchange outbound server: Enter the SMTP MTA for the Server Name / IP Address. You should be able to find the correct value in the admin interface of your hosted provider or by contacting the provider directly. |