
Creating a Linked Exchange Account
This process supports customers that require completing their AD migration before their Exchange migration by creating a linked Exchange account. This allows users to log into their mailbox that still resides in the source Domain, using their target credentials.
After an account has been migrated, the computer ReACL’d and Cutover to the target, follow these steps in order to link the target account to the Exchange mailbox still residing in the source.
- In the Migrator Pro for Active Directory Console:
- Run the Action on the migrated user accounts “Enable on Target/Disable on Source”.
- Execute Sync in Migrator Pro for Active Directory for that Directory Sync Pro for Active Directory Synchronization Profile.
- Run the “Mark as Migrated” Action on the above user accounts.
- Filter on the “Migrated” column as “True” and verify only the accounts to be actioned are in the grid.
- Export the Migrator Pro for Active Directory Grid to a CSV.
- On the Source Exchange server:
- Download the script file to a local directory and rename BT-ConvertMBX-to-Linked.ps1. The script can be obtained by contacting Support.
- Copy the updated CSV created from export of the Migrator Pro for Active Directory grid to the same local directory.
- Run the following Exchange PowerShell command – replace items in red date with actual data.
.\BT-ConvertMBX-to-Linked.ps1 –InputCsvPath c:\temp\Export.csv –OutputFolder c:\temp\outputlog –SourceDomainDC E2E-DC1.DOM1.E2E.dom –SourceDomainGC E2E-DC1.DOM1.E2E.dom –TargetDomainController QA-E2E-DC1.QA-Dom1.QA-E2E.dom
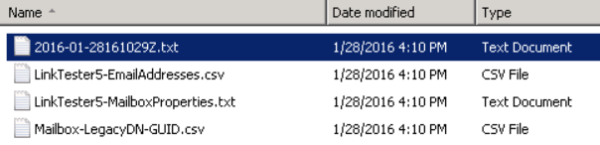
Results:
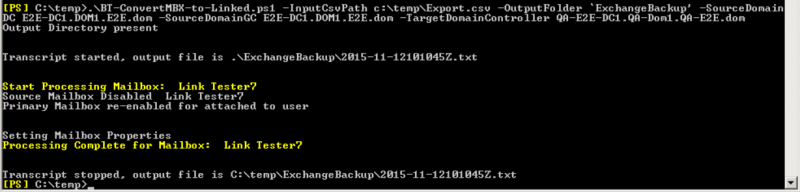
Log output will also be created in the directory specified in the PowerShell command.
Verification:
- Check the following AD attributes:
- msExchMasterAccountSid of the source account should contain the target account objectSID value.
- Check that the legacyExchangeDN on the both the source and target account has not changed.
- Check the mailbox using Outlook
- Log in to computer using target account.
- Launch Outlook.
- Outlook should launch without prompting for credentials (should us pass-through authentication).
- Check that any additional proxyaddress’ are still present on the source user mailbox.
- Spot check in Outlook for the retention of signatures, tool bar edits, etc.
Additionally:
- Once all of the above has been completed and verified, migrate the mailbox to the target Exchange and verify that it is still accessible.
Sample Admin Agent PowerShell Script
This is a sample PowerShell starter script that moves users from one OU to another. You may want to use this as a baseline on which to build your own custom scripts. Be sure to test your scripts in a non-production environment.
Param (
[System.String] $Credentials_Username = $null,
[System.String] $Credentials_Password = $null,
[System.String] $DomainController = $null,
[System.String] $TargetOU = $null
)
$WarningMessages = New-Object System.Collections.ArrayList
try
{
#Migrator Pro for Active Directory PowerShell Output Object
#This object is used to report status to the Migrator Pro for Active Directory Console
$output = New-Object BinaryTree.ADMigrator.Agent.PSHelpers.PSOutput
#Verify input parameters are not $null.
if($Credentials_Username -eq $null -OR $Credentials_Password -eq $null -OR $DomainController -eq $null -OR $TargetOU -eq $null)
{
#Write-Error will show in Migrator Pro for Active Directory Log
Write-Error 'Credentials_Username, Credentials_Password, DomainController, and TargetOU parameters are required.'
$output.ResultCode = 1
return ($output)
}
#Output object's AgentFilePath is the download directory for the local agent installation
[System.String]$downloadsDirectory = $output.DownloadsPath
#Migrator Pro for Active Directory Agent will download AdminAgent.csv file to the downloads directory before each job
#This CSV contains a list of Users to perform actions on
[System.String]$adminAgentCSVPath = Join-Path -Path $downloadsDirectory -ChildPath 'AdminAgent.csv'
#Read Credentials_Password input parameter and convert to a secure string to be used by a PSCredential object
$securePassword = $Credentials_Password | ConvertTo-SecureString -AsPlainText -Force
#Build the credential using $Credentials_Username and $securePassword
$credential = New-Object System.Management.Automation.PSCredential($Credentials_Username, $securePassword)
#Create a Remote PowerShell Session to the server $DomainController and provide PSCredential object
$session = New-PSSession -ComputerName $DomainController -Credential $credential
#Invoke-Command to ensure the ActiveDirectory modules are imported.
Invoke-Command -Session $session -ScriptBlock { Import-Module ActiveDirectory }
#Merge the remote PowerShell Session's ActiveDirectory module to the local session
Import-PSSession -Session $session -Module ActiveDirectory -AllowClobber
#Verify $adminAgentCSVPath exists
if((Test-Path $adminAgentCSVPath) -eq $false)
{
Write-Error "Admin Agent CSV does not exist at path: $adminAgentCSVPath"
#Different ResultCodes can be used to troubleshoot script errors
$output.ResultCode = 2
return ($output)
}
#Read Admin Agent CSV into $users variable
$users = Import-CSV $adminAgentCSVPath
######## Admin Agent User Script Here ########
#For each user in the list
foreach($user in $users)
{
#Move the object to the $TargetOU
Move-ADObject -Identity $user.TargetDN -TargetPath $TargetOU -Confirm:$false -Verbose
}
######## Admin Agent User Script Here ########
#ResultCode of 0 is a success, set and return
$output.ResultCode = 0
return ($output)
}
catch
{
#Generic unexpected ResultCode
$output.ResultCode = 99
#Construct generic error message and include Exception message text.
$errorMessage = $_.Exception.Message
Write-Error "ERROR: $errorMessage"
#Return $output object to Migrator Pro for Active Directory Agent for reporting to Migrator Pro for Active Directory Console
return ($output)
}
Windows 10 Offline Domain Join
Please see the Credential Cache and Offline Domain Join topic for more information.
How to Process GDPR Requests
What is a GDPR Request?
The General Data Protection Regulations (GDPR) is the new European Union (EU) data protection regulations which go into effect May 25th, 2018. Under the GDPR individuals have certain rights to their personal data. They can make requests to exercise those rights to the data controller, and the controller must respond within 1 month. It is expected that the controller will verify the identity of the requestor.
There are four primary types of GDPR requests:
- Export – Request for a copy of all personal data about an individual held by this controller and any related processors. Must be in a commonly accepted portable data format.
- Update – Request to rectify inaccurate personal data.
- Delete – Request to remove all personal data about an individual from our systems. Can be initiated by an individual or by a revocation of consent process. Includes burden of proof. (Ideally follow a Delete with an Export to show no remaining data)
- Hold – Request to halt processing of personal data but not delete that data.
How to handle GDPR Requests for Migrator Pro for Active Directory
When Migrator Pro for Active Directory is installed, the data associated with the application is hosted locally within the client’s environment. The client has full control over this data. By default, the user and configuration data is stored in the SQL database called, “DirectorySyncPro_<date>”. It is assumed the operator has the proper administrative SQL Permissions to execute the following methods outlined.
SQL Tables containing User data:
[DirectorySyncPro_<Date>].[dbo].[BT_Person]
Unique Key Look-up Columns:
[SAMAccountName]
[TargetSAMAccountName]
[TargetUserPrincipalName]
[OriginalSAMAccountName]
[OriginalUserPrincipalName]
[UserPrincipalName]
If user data is used for matching (e.g. SAMAccountName, UserPrincipalName, etc.) then those values will also appear in one of the following columns:
[MatchValue1]
[MatchValue2]
[MatchValue3]
[MatchValue4]
[DirectorySyncPro_<Date>].[dbo].[BT_Groups]
Unique Key Look-up Columns:
[MatchValue1]
[MatchValue2]
[MatchValue3]
[MatchValue4]
Be aware that data can be mapped to different Internal Fields (table columns) depending on customer specific configuration, so just about any SQL column could theoretically contain user data if so configured. For example, if SAMAccountName has been mapped to Custom001 or to any other Internal Field selectable in the mappings then that field could contain personal data. Therefore this process should be undertaken by someone knowledgeable about the schema and attribute mappings in use. It may also be helpful to work with Support when completing these requests if your administrator is not comfortable with the database.
Where does the Migrator Pro for Active Directory get its user data?
All user data within Migrator Pro for Active Directory is derived from the source Active Directory Forest configured in the product. Therefore, the authoritative source of any user related data stored in Migrator Pro for Active Directory is Active Directory. Any remediation required from a GDPR request should first be remediated in Active Directory or the source feeding Active Directory. Once that user data is updated in the source directory, running a new discovery within the product will update those values as well.
The following sections will provide guidance on fulfilling the 4 primary GDPR request types.
1. Exports – Request for a copy of all personal data about an individual held by this controller and any related processors. Must be in a commonly accepted portable data format.
For the purposes of this document, using PowerShell with the SQLPS Module is the recommended method to refine the results of the output. The administrator may export any SQL Query result to a CSV file. Below is an example script to do so. Replace the variables to conform to your environment.
Import-Module sqlps
$SQLquery='SELECT * FROM [DirectorySyncPro_<Date>].[dbo].[BT_Person]'
$result=invoke-sqlcmd -query $SQLquery -serverinstance <servername> -database <dbname>
$result |export-csv c:\temp\ExportQueryResults.csv -notypeinformation
2. Updates – Request to rectify inaccurate personal data.
As previously stated, all user data within Migrator Pro for Active Directory is derived from the source Active Directory Forest configured in the product. Therefore, the authoritative source of user data is Active Directory. Any remediation required from a GDPR request should first be remediated in Active Directory or the source feeding Active Directory and it will be pulled into the product during the next discovery process.
If editing the user data within SQL is still required, using any SQL editor such as SQL Server Management Studio, run an update command against one or more columns for one or more records. Below are examples to accomplish this. Note however, that any new discovery will update the values based on the source Active Directory.
Update multiple columns for a single record:
UPDATE [DirectorySyncPro_<Date>].[dbo].[BT_Person]
SET <Column1 Name> = <New Value1>, <Column2 Name> = <New Value2>
WHERE userPrincipalName='<Unique ID>'
UPDATE [DirectorySyncPro_<Date>].[dbo].[BT_Person]
SET <Column1 Name> = <New Value1>, <Column2 Name> = <New Value2>
WHERE userPrincipalName='<Unique ID>'
Update multiple columns for multiple records:
UPDATE [DirectorySyncPro_<Date>].[dbo].[CMTEUP_Person]
SET <Column1 Name> = <New Value1>, <Column2 Name> = <New Value2>
WHERE DistinguishedName='<Unique ID>' OR DistinguishedName='<Unique ID>'
UPDATE [DirectorySyncPro_<Date>].[dbo].[CMTEUP_PersonADData]
SET <Column1 Name> = <New Value1>, <Column2 Name> = <New Value2>
WHERE userPrincipalName='<Unique ID>' OR userPrincipalName='<Unique ID>'
Update multiple columns for multiple records using a list:
UPDATE [DirectorySyncPro_<Date>].[dbo].[BT_Person]
SET <Column1 Name> = <New Value1>, <Column2 Name> = <New Value2>
WHERE DistinguishedName IN ('<Unique ID1>', '<Unique ID2>', '<Unique ID3>')
UPDATE [DirectorySyncPro_<Date>].[dbo].[BT_Person]
SET <Column1 Name> = <New Value1>, <Column2 Name> = <New Value2>
WHERE userPrincipalName IN ('<Unique ID1>', '<Unique ID2>', '<Unique ID3>')
3. Deletes – Request to remove all personal data about an individual from our systems. Can be initiated by an individual or by a revocation of consent process. Includes burden of proof. (Ideally follow a delete with an Export to show no remaining data.)
Using any SQL editor such as SQL Server Management Studio, run a Delete command against one or more records. Below are examples to accomplish this. However, as previously stated, if the user is not deleted in the source Active Directory then during any subsequent new discovery the user will be re-populated into SQL. The only way to truly remove the data is to delete the source user or delete the entire SQL database when it is no longer required.
Delete a single record then verify:
DELETE FROM [DirectorySyncPro_<Date>].[dbo].[BT_Person]
WHERE SAMAccountName='<Unique ID1>'
SELECT * FROM [DirectorySyncPro_<Date>].[dbo].[BT_Person]
WHERE SAMAccountName='<Unique ID1>'
DELETE FROM [DirectorySyncPro_<Date>].[dbo].[BT_Person]
WHERE userPrincipalName='<Unique ID1>'
SELECT * FROM [DirectorySyncPro_<Date>].[dbo].[BT_Person]
WHERE userPrincipalName='<Unique ID1>'
Delete multiple records then verify:
DELETE FROM [DirectorySyncPro_<Date>].[dbo].[BT_Person]
WHERE SAMAccountName='<Unique ID1>' OR SAMAccountName='<Unique ID2>'
SELECT * FROM [DirectorySyncPro_<Date>].[dbo].[BT_Person]
WHERE SAMAccountName='<Unique ID1>' OR SAMAccountName='<Unique ID2>'
DELETE FROM [DirectorySyncPro_<Date>].[dbo].[BT_Person]
WHERE userPrincipalName='<Unique ID1>' OR userPrincipalName='<Unique ID2>'
SELECT * FROM [DirectorySyncPro_<Date>].[dbo].[BT_Person]
WHERE userPrincipalName='<Unique ID1>' OR userPrincipalName='<Unique ID2>'
Delete multiple records then verify:
DELETE FROM [DirectorySyncPro_<Date>].[dbo].[BT_Person]
WHERE SAMAccountName IN ('<Unique ID1>', '<Unique ID2>', '<Unique ID3>')
SELECT * FROM [DirectorySyncPro_<Date>].[dbo].[BT_Person]
WHERE SAMAccountName IN ('<Unique ID1>', '<Unique ID2>', '<Unique ID3>')
DELETE FROM [DirectorySyncPro_<Date>].[dbo].[BT_Person]
WHERE userPrincipalName IN ('<Unique ID1>', '<Unique ID2>', '<Unique ID3>')
SELECT * FROM [DirectorySyncPro_<Date>].[dbo].[BT_Person]
WHERE userPrincipalName IN ('<Unique ID1>', '<Unique ID2>', '<Unique ID3>')
4. Holds – Request to halt processing of personal data but not delete that data.
This can also be accomplished using the product interface. Halting a user from processing within Migrator Pro for Active Directory can be achieved using the Blacklist feature.