
2.1.2 Select Users to Import
2.1 Importing Users
The first step to prepare for the migration of user mail files is to create a list of the users to be migrated.
|
|
The tabs listed below provide information used by the tools in this procedure. Before proceeding, be sure that the values in the following fields are configured correctly in Configuration | Settings:
|

To begin importing users:
-
In the Import Users view, click the Import Users button; the Import Users drop-down menu displays:
Import Users View
-
Select one of the following options from the drop-down menu:

|
Option |
Description |
|
All Users |
Select all users from the Domino directory to import |
|
Select Users to Import |
Select specific users from the Domino directory to import |
|
Import Select Users from Excel |
Select an Excel file of users to import |
2.1.1 All Users
-
Click All Users from the drop-down menu
-
A message box appears indicating the number of users selected from the Domino directory for import; click Yes
-
Depending on the number of entries being processed, this could take from a few seconds to several minutes. When complete, a status message is displayed. The message confirms that all users have been imported and moved to the next step of migration (Audit Mail Files); click OK
A Person document for each user has been created and saved in the Migrator for Notes database. The list of imported users displays in the Data Pane (see Data Pane screenshot below). A Control document for each user will be created in the Access database once the Migrator for Notes migration engine queues up a user for migration:

Data Pane
-
Click Select Users to Import from the drop-down menu; the dialog box displays the People view of the Domino Directory
-
Click in the white column next to each user that you’d like to select, and then click OK:
People View Dialog Box
-
A message box appears indicating the number of users selected from the Domino Directory for import; click OK
-
Depending on the number of entries being processed, this could take from a few seconds to several minutes. When complete, a status message is displayed. The message confirms that selected users have been imported and moved to the next step (Audit) of migration; click OK
-
The list of selected imported users displays in the Data Pane; a control document for each user will be created in the SQL database when Migrator for Notes migration engine queues up the users for migration

2.1.3 Import Select Users from Excel
Migrator for Notes offers two options for importing user information from Excel. The most commonly used method is Import Select Users from Excel, which will import new users and mail-in databases (users and MIDBs that don’t already exist in the application) into the application.
A second advanced option is available, import field values from Excel, that modifies field data for users already existing in the application. This method is detailed in Appendix C: Work with Files (Import/Export).
-
Click Import Select Users from Excel from the drop-down menu; the document selection dialog box appears
-
Select the Excel file (.xls or .xlsx) and then click Open; note that Excel must be installed and properly registered with the operating system:
-
The first row of the Excel spreadsheet must include the field names used during the import. The key values “shortname” and “internetaddress” will automatically open the correct corresponding lookup views in Migrator for Notes.
-
Field names should match Migrator for Notes field names to be visible in the Migrator for Notes interface. All fields will be imported from the Excel headers and the Domino Directory even if the field does not exist on the Migrator for Notes document.
An example Excel spreadsheet with “InternetAddress” as the key column is below:
-
-
If multiple Domino directories are configured in Migrator for Notes, you are prompted to select the Domino directory to use during the import.
-
If multiple Excel sheets are present, you are prompted to select which sheet to use
-
You are prompted to choose a key column from the Excel file that will be used during the import process to locate the entries in the Domino Directory
-
If the selected key column is either ‘ShortName’ or “InternetAddress”, the import will use the appropriate view
-

-
If the key column is another value, you are prompted with the lookup view to be used in Migrator for Notes. The key value must match the header of the first sorted column in the view for the Migrator for Notes document to be found.
-
The Notes agent will search for a matching document in the Migrator for Notes lookup view. If a document cannot be located, the domino directory will be searched, and the user record imported.
|
|
Notes uses both “scripts” and “agents” as does the Migrator for Notes application, but for ease reference we’re using the term “agent”. This refers to a macro or piece of code that runs in the background of HCL Notes to “help perform repetitive tasks, such as managing documents and sending memos.” Refer to the HCL Technologies web site for more information. |

-
If a user document does not exist in the Migrator for Notes Application and a match is found in the domino directory, all fields on the user document will be imported, and the following fields will be set:
-
BTNextStep = “Stage” (e.g. Audit, Notify, Match, Migrate)
-
ADStatus = “Unmatched”
-
MailFileName = MailFile value from the directory document
-
PNAB_NOTEID = noteID value from the directory document.
-
-
If a user document exists in Migrator for Notes, the document will be updated under the following conditions:
-
If the Migrator for Notes document’s migrationStatus is “Migration completed successfully”, the document in Migrator for Notes will not be modified, and results will be reported to the file.
-
If the Migrator for Notes documents migrationStatus is "MIGRATION PENDING", "MIGRATED WITH ERRORS", "ROLLBACK REQUESTED", "ROLL FORWARD REQUESTED", "MIGRATION FAILED" the Migrator for Notes document will not be modified, and the current migration status will be reported to the output file.
-
If the Migrator for Notes documents migrationStatus is “Ready to migrate” or not set, the following fields will be set:
-
ImportFileName = file name of the Excel spreadsheet used during the import
-
LastImportRun = time the agent was run
-
Values for all fields in the excel file will be copied to the Migrator for Notes person document; if a field exists on the CMT document (copied from the domino directory document when created above) that corresponds to an existing field name, that field will be overwritten and the value from the excel spreadsheet will be set
-
2.1.4 Person Document
Whenever a user is imported, a new Person document is created in the Migrator for Notes application. These documents are populated with a variety of information which is used during user mail migration. These documents are also updated with status information after each migration task is completed (including links to cumulative and individual migration logs); therefore, they are an important control point for user mail migration. Double-click a user in the Data Pane to open the user’s Person document.
For information on the fields click on the ‘?’ help icon to display details.
|
|
The Mail-in database and Room and Resource documents hold the same information for migration. |

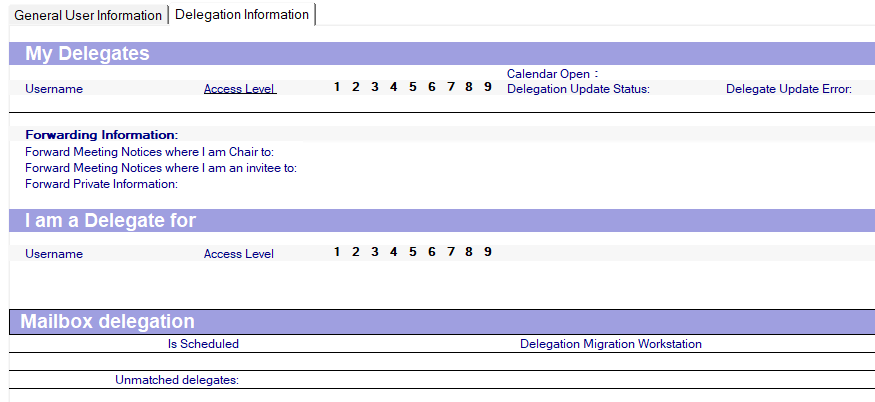
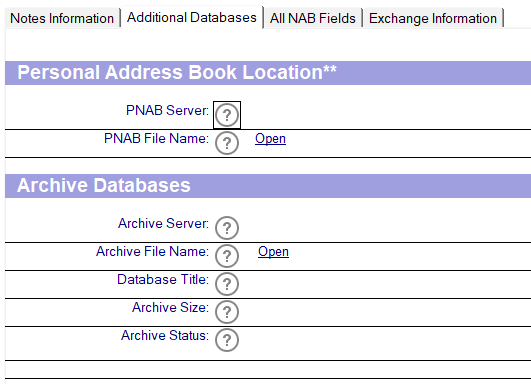
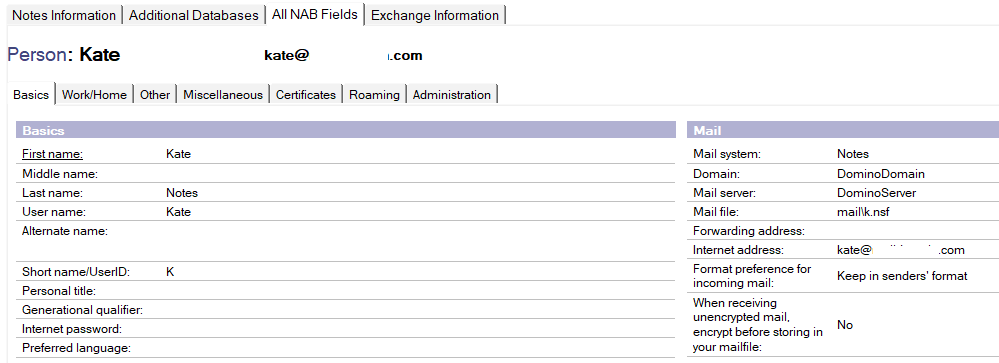
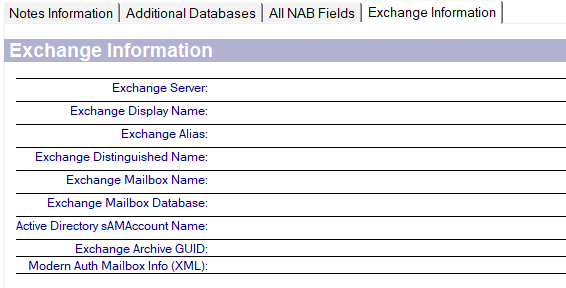
Person Document Sample
The Delegation Information tab will be populated by the Audit process and will show where other Notes accounts have been granted access to the person’s mail file.
The Additional Database tab will show personal address book and any legacy archives that would be included for the account. This is not often populated as personal contact would typically be migrated in the mail file and the legacy archive process has been superseded by the Archive Migrator for Notes process.
The All Nab Fields tab will show the person field data from the Domino Directory that was imported.
The Exchange Information tab is populated by the account matching process and will show details of the target Exchange or Office 365 mailbox details.
|
|
This tab must be populated for online migrations and the fields used will be dependent on the matching processed used so not all fields will be updated. For Modern Auth migrations the Modern Auth Mailbox Info (XML) field must contain data for the target account. |
2.1.5 Change Step To
The Change Step To button allows you to move a user back or forward to a step where you can audit, notify, match, or migrate the user.
|
|
|
-
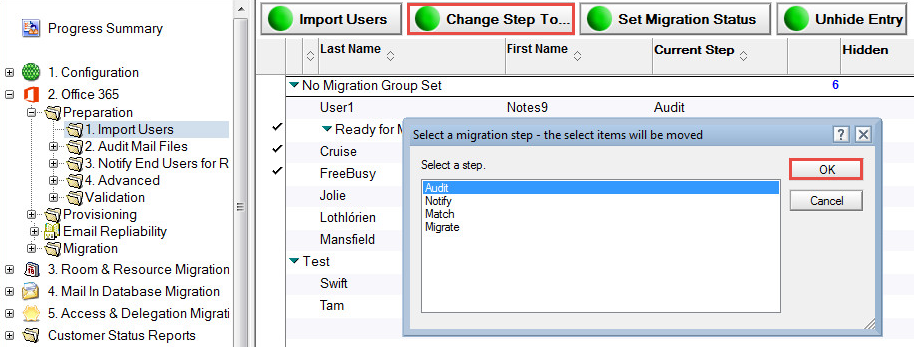
Select users (a checkmark appears next to selected users), and then click the Change Step To button; a dialog box appears:
Change Step To…Window
-
Click Audit, Notify, Match or Migrate and then click OK. The selected users are moved to the selected step; for example, if you select Audit, the selected users are moved to the Audit Mail File Data folder. Similarly, if you select Notify or Match, the selected users can be moved back and forth between steps to run the tools again.
-
You can select the Migrate option if you are ready to move those users to the final step of migration.
The Set Migration Status button is explained in the Setting Migration Status section of this document.
|
|
|

2.1.3 Import Select Users from Excel
2.1 Importing Users
The first step to prepare for the migration of user mail files is to create a list of the users to be migrated.
|
|
The tabs listed below provide information used by the tools in this procedure. Before proceeding, be sure that the values in the following fields are configured correctly in Configuration | Settings:
|
To begin importing users:
-
In the Import Users view, click the Import Users button; the Import Users drop-down menu displays:
Import Users View
-
Select one of the following options from the drop-down menu:
|
Option |
Description |
|
All Users |
Select all users from the Domino directory to import |
|
Select Users to Import |
Select specific users from the Domino directory to import |
|
Import Select Users from Excel |
Select an Excel file of users to import |
2.1.1 All Users
-
Click All Users from the drop-down menu
-
A message box appears indicating the number of users selected from the Domino directory for import; click Yes
-
Depending on the number of entries being processed, this could take from a few seconds to several minutes. When complete, a status message is displayed. The message confirms that all users have been imported and moved to the next step of migration (Audit Mail Files); click OK
A Person document for each user has been created and saved in the Migrator for Notes database. The list of imported users displays in the Data Pane (see Data Pane screenshot below). A Control document for each user will be created in the Access database once the Migrator for Notes migration engine queues up a user for migration:
Data Pane
2.1.2 Select Users to Import
-
Click Select Users to Import from the drop-down menu; the dialog box displays the People view of the Domino Directory
-
Click in the white column next to each user that you’d like to select, and then click OK:
People View Dialog Box
-
A message box appears indicating the number of users selected from the Domino Directory for import; click OK
-
Depending on the number of entries being processed, this could take from a few seconds to several minutes. When complete, a status message is displayed. The message confirms that selected users have been imported and moved to the next step (Audit) of migration; click OK
-
The list of selected imported users displays in the Data Pane; a control document for each user will be created in the SQL database when Migrator for Notes migration engine queues up the users for migration
Migrator for Notes offers two options for importing user information from Excel. The most commonly used method is Import Select Users from Excel, which will import new users and mail-in databases (users and MIDBs that don’t already exist in the application) into the application.
A second advanced option is available, import field values from Excel, that modifies field data for users already existing in the application. This method is detailed in Appendix C: Work with Files (Import/Export).
-
Click Import Select Users from Excel from the drop-down menu; the document selection dialog box appears
-
Select the Excel file (.xls or .xlsx) and then click Open; note that Excel must be installed and properly registered with the operating system:
-
The first row of the Excel spreadsheet must include the field names used during the import. The key values “shortname” and “internetaddress” will automatically open the correct corresponding lookup views in Migrator for Notes.
-
Field names should match Migrator for Notes field names to be visible in the Migrator for Notes interface. All fields will be imported from the Excel headers and the Domino Directory even if the field does not exist on the Migrator for Notes document.
An example Excel spreadsheet with “InternetAddress” as the key column is below:
-
-
If multiple Domino directories are configured in Migrator for Notes, you are prompted to select the Domino directory to use during the import.
-
If multiple Excel sheets are present, you are prompted to select which sheet to use
-
You are prompted to choose a key column from the Excel file that will be used during the import process to locate the entries in the Domino Directory
-
If the selected key column is either ‘ShortName’ or “InternetAddress”, the import will use the appropriate view
-
-
If the key column is another value, you are prompted with the lookup view to be used in Migrator for Notes. The key value must match the header of the first sorted column in the view for the Migrator for Notes document to be found.
-
The Notes agent will search for a matching document in the Migrator for Notes lookup view. If a document cannot be located, the domino directory will be searched, and the user record imported.
|
|
Notes uses both “scripts” and “agents” as does the Migrator for Notes application, but for ease reference we’re using the term “agent”. This refers to a macro or piece of code that runs in the background of HCL Notes to “help perform repetitive tasks, such as managing documents and sending memos.” Refer to the HCL Technologies web site for more information. |
-
If a user document does not exist in the Migrator for Notes Application and a match is found in the domino directory, all fields on the user document will be imported, and the following fields will be set:
-
BTNextStep = “Stage” (e.g. Audit, Notify, Match, Migrate)
-
ADStatus = “Unmatched”
-
MailFileName = MailFile value from the directory document
-
PNAB_NOTEID = noteID value from the directory document.
-
-
If a user document exists in Migrator for Notes, the document will be updated under the following conditions:
-
If the Migrator for Notes document’s migrationStatus is “Migration completed successfully”, the document in Migrator for Notes will not be modified, and results will be reported to the file.
-
If the Migrator for Notes documents migrationStatus is "MIGRATION PENDING", "MIGRATED WITH ERRORS", "ROLLBACK REQUESTED", "ROLL FORWARD REQUESTED", "MIGRATION FAILED" the Migrator for Notes document will not be modified, and the current migration status will be reported to the output file.
-
If the Migrator for Notes documents migrationStatus is “Ready to migrate” or not set, the following fields will be set:
-
ImportFileName = file name of the Excel spreadsheet used during the import
-
LastImportRun = time the agent was run
-
Values for all fields in the excel file will be copied to the Migrator for Notes person document; if a field exists on the CMT document (copied from the domino directory document when created above) that corresponds to an existing field name, that field will be overwritten and the value from the excel spreadsheet will be set
-
2.1.4 Person Document
Whenever a user is imported, a new Person document is created in the Migrator for Notes application. These documents are populated with a variety of information which is used during user mail migration. These documents are also updated with status information after each migration task is completed (including links to cumulative and individual migration logs); therefore, they are an important control point for user mail migration. Double-click a user in the Data Pane to open the user’s Person document.
For information on the fields click on the ‘?’ help icon to display details.
|
|
The Mail-in database and Room and Resource documents hold the same information for migration. |
Person Document Sample
The Delegation Information tab will be populated by the Audit process and will show where other Notes accounts have been granted access to the person’s mail file.
The Additional Database tab will show personal address book and any legacy archives that would be included for the account. This is not often populated as personal contact would typically be migrated in the mail file and the legacy archive process has been superseded by the Archive Migrator for Notes process.
The All Nab Fields tab will show the person field data from the Domino Directory that was imported.
The Exchange Information tab is populated by the account matching process and will show details of the target Exchange or Office 365 mailbox details.
|
|
This tab must be populated for online migrations and the fields used will be dependent on the matching processed used so not all fields will be updated. For Modern Auth migrations the Modern Auth Mailbox Info (XML) field must contain data for the target account. |
2.1.5 Change Step To
The Change Step To button allows you to move a user back or forward to a step where you can audit, notify, match, or migrate the user.
|
|
|
-
Select users (a checkmark appears next to selected users), and then click the Change Step To button; a dialog box appears:
Change Step To…Window
-
Click Audit, Notify, Match or Migrate and then click OK. The selected users are moved to the selected step; for example, if you select Audit, the selected users are moved to the Audit Mail File Data folder. Similarly, if you select Notify or Match, the selected users can be moved back and forth between steps to run the tools again.
-
You can select the Migrate option if you are ready to move those users to the final step of migration.
The Set Migration Status button is explained in the Setting Migration Status section of this document.
|
|
|
2.1.4 Person Document
2.1 Importing Users
The first step to prepare for the migration of user mail files is to create a list of the users to be migrated.
|
|
The tabs listed below provide information used by the tools in this procedure. Before proceeding, be sure that the values in the following fields are configured correctly in Configuration | Settings:
|
To begin importing users:
-
In the Import Users view, click the Import Users button; the Import Users drop-down menu displays:
Import Users View
-
Select one of the following options from the drop-down menu:
|
Option |
Description |
|
All Users |
Select all users from the Domino directory to import |
|
Select Users to Import |
Select specific users from the Domino directory to import |
|
Import Select Users from Excel |
Select an Excel file of users to import |
2.1.1 All Users
-
Click All Users from the drop-down menu
-
A message box appears indicating the number of users selected from the Domino directory for import; click Yes
-
Depending on the number of entries being processed, this could take from a few seconds to several minutes. When complete, a status message is displayed. The message confirms that all users have been imported and moved to the next step of migration (Audit Mail Files); click OK
A Person document for each user has been created and saved in the Migrator for Notes database. The list of imported users displays in the Data Pane (see Data Pane screenshot below). A Control document for each user will be created in the Access database once the Migrator for Notes migration engine queues up a user for migration:
Data Pane
2.1.2 Select Users to Import
-
Click Select Users to Import from the drop-down menu; the dialog box displays the People view of the Domino Directory
-
Click in the white column next to each user that you’d like to select, and then click OK:
People View Dialog Box
-
A message box appears indicating the number of users selected from the Domino Directory for import; click OK
-
Depending on the number of entries being processed, this could take from a few seconds to several minutes. When complete, a status message is displayed. The message confirms that selected users have been imported and moved to the next step (Audit) of migration; click OK
-
The list of selected imported users displays in the Data Pane; a control document for each user will be created in the SQL database when Migrator for Notes migration engine queues up the users for migration
2.1.3 Import Select Users from Excel
Migrator for Notes offers two options for importing user information from Excel. The most commonly used method is Import Select Users from Excel, which will import new users and mail-in databases (users and MIDBs that don’t already exist in the application) into the application.
A second advanced option is available, import field values from Excel, that modifies field data for users already existing in the application. This method is detailed in Appendix C: Work with Files (Import/Export).
-
Click Import Select Users from Excel from the drop-down menu; the document selection dialog box appears
-
Select the Excel file (.xls or .xlsx) and then click Open; note that Excel must be installed and properly registered with the operating system:
-
The first row of the Excel spreadsheet must include the field names used during the import. The key values “shortname” and “internetaddress” will automatically open the correct corresponding lookup views in Migrator for Notes.
-
Field names should match Migrator for Notes field names to be visible in the Migrator for Notes interface. All fields will be imported from the Excel headers and the Domino Directory even if the field does not exist on the Migrator for Notes document.
An example Excel spreadsheet with “InternetAddress” as the key column is below:
-
-
If multiple Domino directories are configured in Migrator for Notes, you are prompted to select the Domino directory to use during the import.
-
If multiple Excel sheets are present, you are prompted to select which sheet to use
-
You are prompted to choose a key column from the Excel file that will be used during the import process to locate the entries in the Domino Directory
-
If the selected key column is either ‘ShortName’ or “InternetAddress”, the import will use the appropriate view
-
-
If the key column is another value, you are prompted with the lookup view to be used in Migrator for Notes. The key value must match the header of the first sorted column in the view for the Migrator for Notes document to be found.
-
The Notes agent will search for a matching document in the Migrator for Notes lookup view. If a document cannot be located, the domino directory will be searched, and the user record imported.
|
|
Notes uses both “scripts” and “agents” as does the Migrator for Notes application, but for ease reference we’re using the term “agent”. This refers to a macro or piece of code that runs in the background of HCL Notes to “help perform repetitive tasks, such as managing documents and sending memos.” Refer to the HCL Technologies web site for more information. |
-
If a user document does not exist in the Migrator for Notes Application and a match is found in the domino directory, all fields on the user document will be imported, and the following fields will be set:
-
BTNextStep = “Stage” (e.g. Audit, Notify, Match, Migrate)
-
ADStatus = “Unmatched”
-
MailFileName = MailFile value from the directory document
-
PNAB_NOTEID = noteID value from the directory document.
-
-
If a user document exists in Migrator for Notes, the document will be updated under the following conditions:
-
If the Migrator for Notes document’s migrationStatus is “Migration completed successfully”, the document in Migrator for Notes will not be modified, and results will be reported to the file.
-
If the Migrator for Notes documents migrationStatus is "MIGRATION PENDING", "MIGRATED WITH ERRORS", "ROLLBACK REQUESTED", "ROLL FORWARD REQUESTED", "MIGRATION FAILED" the Migrator for Notes document will not be modified, and the current migration status will be reported to the output file.
-
If the Migrator for Notes documents migrationStatus is “Ready to migrate” or not set, the following fields will be set:
-
ImportFileName = file name of the Excel spreadsheet used during the import
-
LastImportRun = time the agent was run
-
Values for all fields in the excel file will be copied to the Migrator for Notes person document; if a field exists on the CMT document (copied from the domino directory document when created above) that corresponds to an existing field name, that field will be overwritten and the value from the excel spreadsheet will be set
-
Whenever a user is imported, a new Person document is created in the Migrator for Notes application. These documents are populated with a variety of information which is used during user mail migration. These documents are also updated with status information after each migration task is completed (including links to cumulative and individual migration logs); therefore, they are an important control point for user mail migration. Double-click a user in the Data Pane to open the user’s Person document.
For information on the fields click on the ‘?’ help icon to display details.
|
|
The Mail-in database and Room and Resource documents hold the same information for migration. |
Person Document Sample
The Delegation Information tab will be populated by the Audit process and will show where other Notes accounts have been granted access to the person’s mail file.
The Additional Database tab will show personal address book and any legacy archives that would be included for the account. This is not often populated as personal contact would typically be migrated in the mail file and the legacy archive process has been superseded by the Archive Migrator for Notes process.
The All Nab Fields tab will show the person field data from the Domino Directory that was imported.
The Exchange Information tab is populated by the account matching process and will show details of the target Exchange or Office 365 mailbox details.
|
|
This tab must be populated for online migrations and the fields used will be dependent on the matching processed used so not all fields will be updated. For Modern Auth migrations the Modern Auth Mailbox Info (XML) field must contain data for the target account. |
2.1.5 Change Step To
The Change Step To button allows you to move a user back or forward to a step where you can audit, notify, match, or migrate the user.
|
|
|
-
Select users (a checkmark appears next to selected users), and then click the Change Step To button; a dialog box appears:
Change Step To…Window
-
Click Audit, Notify, Match or Migrate and then click OK. The selected users are moved to the selected step; for example, if you select Audit, the selected users are moved to the Audit Mail File Data folder. Similarly, if you select Notify or Match, the selected users can be moved back and forth between steps to run the tools again.
-
You can select the Migrate option if you are ready to move those users to the final step of migration.
The Set Migration Status button is explained in the Setting Migration Status section of this document.
|
|
|
2.1.5 Change Step To
2.1 Importing Users
The first step to prepare for the migration of user mail files is to create a list of the users to be migrated.
|
|
The tabs listed below provide information used by the tools in this procedure. Before proceeding, be sure that the values in the following fields are configured correctly in Configuration | Settings:
|
To begin importing users:
-
In the Import Users view, click the Import Users button; the Import Users drop-down menu displays:
Import Users View
-
Select one of the following options from the drop-down menu:
|
Option |
Description |
|
All Users |
Select all users from the Domino directory to import |
|
Select Users to Import |
Select specific users from the Domino directory to import |
|
Import Select Users from Excel |
Select an Excel file of users to import |
2.1.1 All Users
-
Click All Users from the drop-down menu
-
A message box appears indicating the number of users selected from the Domino directory for import; click Yes
-
Depending on the number of entries being processed, this could take from a few seconds to several minutes. When complete, a status message is displayed. The message confirms that all users have been imported and moved to the next step of migration (Audit Mail Files); click OK
A Person document for each user has been created and saved in the Migrator for Notes database. The list of imported users displays in the Data Pane (see Data Pane screenshot below). A Control document for each user will be created in the Access database once the Migrator for Notes migration engine queues up a user for migration:
Data Pane
2.1.2 Select Users to Import
-
Click Select Users to Import from the drop-down menu; the dialog box displays the People view of the Domino Directory
-
Click in the white column next to each user that you’d like to select, and then click OK:
People View Dialog Box
-
A message box appears indicating the number of users selected from the Domino Directory for import; click OK
-
Depending on the number of entries being processed, this could take from a few seconds to several minutes. When complete, a status message is displayed. The message confirms that selected users have been imported and moved to the next step (Audit) of migration; click OK
-
The list of selected imported users displays in the Data Pane; a control document for each user will be created in the SQL database when Migrator for Notes migration engine queues up the users for migration
2.1.3 Import Select Users from Excel
Migrator for Notes offers two options for importing user information from Excel. The most commonly used method is Import Select Users from Excel, which will import new users and mail-in databases (users and MIDBs that don’t already exist in the application) into the application.
A second advanced option is available, import field values from Excel, that modifies field data for users already existing in the application. This method is detailed in Appendix C: Work with Files (Import/Export).
-
Click Import Select Users from Excel from the drop-down menu; the document selection dialog box appears
-
Select the Excel file (.xls or .xlsx) and then click Open; note that Excel must be installed and properly registered with the operating system:
-
The first row of the Excel spreadsheet must include the field names used during the import. The key values “shortname” and “internetaddress” will automatically open the correct corresponding lookup views in Migrator for Notes.
-
Field names should match Migrator for Notes field names to be visible in the Migrator for Notes interface. All fields will be imported from the Excel headers and the Domino Directory even if the field does not exist on the Migrator for Notes document.
An example Excel spreadsheet with “InternetAddress” as the key column is below:
-
-
If multiple Domino directories are configured in Migrator for Notes, you are prompted to select the Domino directory to use during the import.
-
If multiple Excel sheets are present, you are prompted to select which sheet to use
-
You are prompted to choose a key column from the Excel file that will be used during the import process to locate the entries in the Domino Directory
-
If the selected key column is either ‘ShortName’ or “InternetAddress”, the import will use the appropriate view
-
-
If the key column is another value, you are prompted with the lookup view to be used in Migrator for Notes. The key value must match the header of the first sorted column in the view for the Migrator for Notes document to be found.
-
The Notes agent will search for a matching document in the Migrator for Notes lookup view. If a document cannot be located, the domino directory will be searched, and the user record imported.
|
|
Notes uses both “scripts” and “agents” as does the Migrator for Notes application, but for ease reference we’re using the term “agent”. This refers to a macro or piece of code that runs in the background of HCL Notes to “help perform repetitive tasks, such as managing documents and sending memos.” Refer to the HCL Technologies web site for more information. |
-
If a user document does not exist in the Migrator for Notes Application and a match is found in the domino directory, all fields on the user document will be imported, and the following fields will be set:
-
BTNextStep = “Stage” (e.g. Audit, Notify, Match, Migrate)
-
ADStatus = “Unmatched”
-
MailFileName = MailFile value from the directory document
-
PNAB_NOTEID = noteID value from the directory document.
-
-
If a user document exists in Migrator for Notes, the document will be updated under the following conditions:
-
If the Migrator for Notes document’s migrationStatus is “Migration completed successfully”, the document in Migrator for Notes will not be modified, and results will be reported to the file.
-
If the Migrator for Notes documents migrationStatus is "MIGRATION PENDING", "MIGRATED WITH ERRORS", "ROLLBACK REQUESTED", "ROLL FORWARD REQUESTED", "MIGRATION FAILED" the Migrator for Notes document will not be modified, and the current migration status will be reported to the output file.
-
If the Migrator for Notes documents migrationStatus is “Ready to migrate” or not set, the following fields will be set:
-
ImportFileName = file name of the Excel spreadsheet used during the import
-
LastImportRun = time the agent was run
-
Values for all fields in the excel file will be copied to the Migrator for Notes person document; if a field exists on the CMT document (copied from the domino directory document when created above) that corresponds to an existing field name, that field will be overwritten and the value from the excel spreadsheet will be set
-
2.1.4 Person Document
Whenever a user is imported, a new Person document is created in the Migrator for Notes application. These documents are populated with a variety of information which is used during user mail migration. These documents are also updated with status information after each migration task is completed (including links to cumulative and individual migration logs); therefore, they are an important control point for user mail migration. Double-click a user in the Data Pane to open the user’s Person document.
For information on the fields click on the ‘?’ help icon to display details.
|
|
The Mail-in database and Room and Resource documents hold the same information for migration. |
Person Document Sample
The Delegation Information tab will be populated by the Audit process and will show where other Notes accounts have been granted access to the person’s mail file.
The Additional Database tab will show personal address book and any legacy archives that would be included for the account. This is not often populated as personal contact would typically be migrated in the mail file and the legacy archive process has been superseded by the Archive Migrator for Notes process.
The All Nab Fields tab will show the person field data from the Domino Directory that was imported.
The Exchange Information tab is populated by the account matching process and will show details of the target Exchange or Office 365 mailbox details.
|
|
This tab must be populated for online migrations and the fields used will be dependent on the matching processed used so not all fields will be updated. For Modern Auth migrations the Modern Auth Mailbox Info (XML) field must contain data for the target account. |
The Change Step To button allows you to move a user back or forward to a step where you can audit, notify, match, or migrate the user.
|
|
|
-
Select users (a checkmark appears next to selected users), and then click the Change Step To button; a dialog box appears:
Change Step To…Window
-
Click Audit, Notify, Match or Migrate and then click OK. The selected users are moved to the selected step; for example, if you select Audit, the selected users are moved to the Audit Mail File Data folder. Similarly, if you select Notify or Match, the selected users can be moved back and forth between steps to run the tools again.
-
You can select the Migrate option if you are ready to move those users to the final step of migration.
The Set Migration Status button is explained in the Setting Migration Status section of this document.
|
|
|