
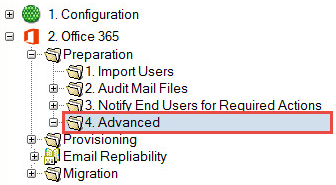
2.4.1 User Migration Actions
2.4 Setting Advanced Options
The Advanced view provides some additional tools, such as setting migration status, sending, or inserting migration messages, which prepare and manage your data for migration.
-
Click Advanced in the Navigation Pane.
Advanced View
To select user migration actions:
-
Select users and click the User Migration Actions button
-
The User Migration Actions drop-down menu displays:
Advanced View

The following table describes the function of each menu option:
|
Option |
Description |
|
Send Migration Message to Selected User(s) |
Allows you to send an email notification using predefined or customized message templates to selected users. |
|
Insert Migration Message into Selected User(s) Inbox |
Allows you to simply insert a migration message into a user’s inbox. The Insert Migration Message option is used when mail cannot be delivered to the user's Notes inbox. This option is also used if the user has already been migrated and their mail is now being delivered to Outlook, but post-migration, they need to sync contacts or to copy archives that were missed before the migration. In these cases, messages are delivered to Outlook rather than Notes, but don’t work. Running this agent drops the selected migration messages directly into the Notes inbox (or Notes archive inbox) for the mail file specified on the selected document, rather than mailing it. |
|
Send Rules Email to Selected User(s) |
Allows you to send Rules Email to Selected Users. |
|
Send Encrypted Summary Email to Selected User(s) |
Allows you to send a summary of all the encrypted items in an email to selected users. |
|
Fix Contacts & Group Members |
Allows you to look for personal contacts whose mail address format is NOT SMTP (usually accounts imported from the Domino Directory). It will search the Email Repliability for a matching Person document, and if found, replace the mail address with the internet address from Domino. Likewise, it will convert personal group members from Notes Name format to SMTP for members that can be matched in the Email Repliability.
The Migrator for Notes Email Repliability should be imported (and updated) prior to running the Fix Contacts processing.
Double-byte characters of Display Names are not processed correctly when converting to the Notes Canonical Name if Fix Contacts & Groups Members has not been run prior to migration.
This action will modify the source mail file data so a backup of the users’ email files should be verified prior to processing these updates.
Additionally, this action can be processed in advance of user accounts being set for migration under the Migration | 1.Set Migration Profile step but end users are likely to make changes while still using Notes so these actions should be performed immediately prior to migration. Processing performed by the action will be logged in a text file on the Migration Controller Server in a sub folder of the Log Folder specified on the Settings | User Provisioning tab. |
|
Fix Folders |
Allows you to fix folders appending a “-Migrated” to the end of any non-system created folder that has a reserved system name (ex: Inbox, Drafts, etc). While Lotus Notes will allow these folders to be created, Exchange will not.
This action will modify the source mail file data so a backup of the users’ email files should be verified prior to processing these updates.
Additionally, this action can be processed in advance of user accounts being set for migration under the Migration | 1.Set Migration Profile step but end users are likely to make changes while still using Notes so these actions should be performed immediately prior to migration.
Processing performed by the action will be logged in a text file on the Migration Controller Server in a sub folder of the Log Folder specified on the Settings | User Provisioning tab. |
|
Fix Chat |
Allows you to fix HTML formatting in Sametime Chat transcripts stored in the user’s mail file. This will perform a search of the mail file for Sametime Chat documents and will then edit and save the document in the Notes user interface.
Note: This does not need to be run if the user does not save Sametime Chat transcripts, the Settings are configured for Rich Text, or if the chat documents are migrating with correct HTML formatting. |
|
Maintain Transitional Calendar Workflow |
Allows you to populate BTCache.nsf recurrence pattern information for repeat meetings to ensure that calendar workflow functions as intended regardless of the migration status of the chairperson and invitees. This assumes that Notes Integration is fully configured. When this option is run, the number of errors, start and completion status, and messages that could not be found in the destination database are listed in the MTCW Error Report section of the person document. |
|
Audit workflow and delegation |
Refer to Auditing Mail Files section |
|
Audit Mail File & Personal Data for Selected Users |
Refer to Auditing Mail Files section |
To send a migration message to selected users:
-
Select users and then select User Migration Actions | Send Migration Message to Selected User(s):
-
The Message Templates dialog box displays; select a message template and then click OK:


To insert a migration message into selected users’ inbox:
-
Select users and then select User Migration Actions | Insert Migration Message into Selected User(s) Inbox:
-
The Message Templates dialog box displays; select a message template and then click OK

To send a rules email to the selected users:
-
Select user(s), and then select User Migration Actions | Send Rules Email to Selected User(s):
For this option to work, you should enable the Audit Domino Mail Rules field in the Domino Settings document. Then, when you run the audit, the number of mail rules will be listed in each user’s Person document. They can then be sent to the end users to recreate their mail rules using Outlook formats post migration.
Settings | Required Settings tab | Domino tab


Person Document
-
A message box appears and confirms that mail rules have been sent to the selected number of users; click OK to continue
To send an encrypted email summary to the selected users:
-
Select user(s), and then select User Migration Actions | Send Encrypted Email Summary to Selected User(s):
For this option to work, you should enable the Audit Domino Encrypted Items field in the Domino Settings; then, when you run the audit, the number of encrypted items will be listed in each user’s Person document:
Settings | Required Settings tab | Domino tab
-
A message box appears and confirms that an encrypted item has been sent to the selected number of users; click OK to continue


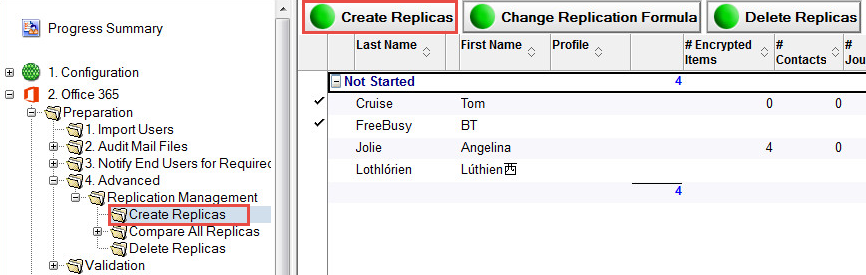
2.4.2 Replication Management
Advanced also includes the ability to manage mail file replicas.
|
|
Replication is not required for migration and can be skipped if the centralization of source data onto Domino staging servers is not required. |

To manage replication:
-
Expand the Advanced view and then click Replication Management | Create Replicas:
Create Replicas View
-
To create replicas, select one or more entries in the Data Pane and click the Create Replicas button. Options to change the replication formula and delete replicas are also available in this view. These replicas will be created on the server and folder specified in the Replica Settings
-
Click Compare All Replicas in the Navigation Pane; the replica comparison will allow you to compare the user’s home mail database and the staging replica
-
Select an option form the Verify Actions drop-down menu; a Quick Push Replication option is also available; click the Help button for more information about the replica comparison view
-
Compare All Replicas View

|
|
|


The table below described the function of each option in the Verify Actions dropdown menu:
|
Option |
Description |
|---|---|
|
Run Replica Comparison For Selected Users |
Allows you to select users and compare the mail files to the staging replicas. |
|
Send Replica Command For Selected Users |
Allows you to select users and send replica command for the users. You will be prompted for the type of replication and to select the Domino servers.
*This assumes that you are familiar with Domino replication. |
|
Replicate Unread Table |
This allows read and unread marks to be synchronized when your staging server is in a different Domino Domain to the home mail server(s). As this may take several hours to complete, it should be run 1-2 days prior to migration. |
|
Set Verification Flag for Selected Users |
Once you have validated that all the expected data has been replicated to the staging server, you can set the Verification flag. This will cause the document to appear in the Validated Replicas view, and not in the Non-Validated Replicas view, for easier administration |
|
Remove Verification Flag for Selected Users |
Allows you to select users and remove the verification flag for them. |
-
Click Validated Replicas or Non-Validated Replicas; the Validated Replicas view displays users that have been marked as verified; the Non-Validated Replicas view displays users that have not been verified:
Validated Replicas View
-
This view gives you the ability to refresh the view, set migration status, verify actions, and quick push replication; click the Help button for more information about the replica comparison view; Quick Push Replication uses the information defined in the Replica Settings to initiate a push from the mail file to the staging replica
-
Click Delete Replicas:
Delete Replicas View
-
To delete replicas, select one or more entries and click the Delete Replicas button


2.4.2 Replication Management
2.4 Setting Advanced Options
The Advanced view provides some additional tools, such as setting migration status, sending, or inserting migration messages, which prepare and manage your data for migration.
-
Click Advanced in the Navigation Pane.
Advanced View
2.4.1 User Migration Actions
To select user migration actions:
-
Select users and click the User Migration Actions button
-
The User Migration Actions drop-down menu displays:
Advanced View
The following table describes the function of each menu option:
|
Option |
Description |
|
Send Migration Message to Selected User(s) |
Allows you to send an email notification using predefined or customized message templates to selected users. |
|
Insert Migration Message into Selected User(s) Inbox |
Allows you to simply insert a migration message into a user’s inbox. The Insert Migration Message option is used when mail cannot be delivered to the user's Notes inbox. This option is also used if the user has already been migrated and their mail is now being delivered to Outlook, but post-migration, they need to sync contacts or to copy archives that were missed before the migration. In these cases, messages are delivered to Outlook rather than Notes, but don’t work. Running this agent drops the selected migration messages directly into the Notes inbox (or Notes archive inbox) for the mail file specified on the selected document, rather than mailing it. |
|
Send Rules Email to Selected User(s) |
Allows you to send Rules Email to Selected Users. |
|
Send Encrypted Summary Email to Selected User(s) |
Allows you to send a summary of all the encrypted items in an email to selected users. |
|
Fix Contacts & Group Members |
Allows you to look for personal contacts whose mail address format is NOT SMTP (usually accounts imported from the Domino Directory). It will search the Email Repliability for a matching Person document, and if found, replace the mail address with the internet address from Domino. Likewise, it will convert personal group members from Notes Name format to SMTP for members that can be matched in the Email Repliability.
The Migrator for Notes Email Repliability should be imported (and updated) prior to running the Fix Contacts processing.
Double-byte characters of Display Names are not processed correctly when converting to the Notes Canonical Name if Fix Contacts & Groups Members has not been run prior to migration.
This action will modify the source mail file data so a backup of the users’ email files should be verified prior to processing these updates.
Additionally, this action can be processed in advance of user accounts being set for migration under the Migration | 1.Set Migration Profile step but end users are likely to make changes while still using Notes so these actions should be performed immediately prior to migration. Processing performed by the action will be logged in a text file on the Migration Controller Server in a sub folder of the Log Folder specified on the Settings | User Provisioning tab. |
|
Fix Folders |
Allows you to fix folders appending a “-Migrated” to the end of any non-system created folder that has a reserved system name (ex: Inbox, Drafts, etc). While Lotus Notes will allow these folders to be created, Exchange will not.
This action will modify the source mail file data so a backup of the users’ email files should be verified prior to processing these updates.
Additionally, this action can be processed in advance of user accounts being set for migration under the Migration | 1.Set Migration Profile step but end users are likely to make changes while still using Notes so these actions should be performed immediately prior to migration.
Processing performed by the action will be logged in a text file on the Migration Controller Server in a sub folder of the Log Folder specified on the Settings | User Provisioning tab. |
|
Fix Chat |
Allows you to fix HTML formatting in Sametime Chat transcripts stored in the user’s mail file. This will perform a search of the mail file for Sametime Chat documents and will then edit and save the document in the Notes user interface.
Note: This does not need to be run if the user does not save Sametime Chat transcripts, the Settings are configured for Rich Text, or if the chat documents are migrating with correct HTML formatting. |
|
Maintain Transitional Calendar Workflow |
Allows you to populate BTCache.nsf recurrence pattern information for repeat meetings to ensure that calendar workflow functions as intended regardless of the migration status of the chairperson and invitees. This assumes that Notes Integration is fully configured. When this option is run, the number of errors, start and completion status, and messages that could not be found in the destination database are listed in the MTCW Error Report section of the person document. |
|
Audit workflow and delegation |
Refer to Auditing Mail Files section |
|
Audit Mail File & Personal Data for Selected Users |
Refer to Auditing Mail Files section |
To send a migration message to selected users:
-
Select users and then select User Migration Actions | Send Migration Message to Selected User(s):
-
The Message Templates dialog box displays; select a message template and then click OK:
To insert a migration message into selected users’ inbox:
-
Select users and then select User Migration Actions | Insert Migration Message into Selected User(s) Inbox:
-
The Message Templates dialog box displays; select a message template and then click OK
To send a rules email to the selected users:
-
Select user(s), and then select User Migration Actions | Send Rules Email to Selected User(s):
For this option to work, you should enable the Audit Domino Mail Rules field in the Domino Settings document. Then, when you run the audit, the number of mail rules will be listed in each user’s Person document. They can then be sent to the end users to recreate their mail rules using Outlook formats post migration.
Settings | Required Settings tab | Domino tab
Person Document
-
A message box appears and confirms that mail rules have been sent to the selected number of users; click OK to continue
To send an encrypted email summary to the selected users:
-
Select user(s), and then select User Migration Actions | Send Encrypted Email Summary to Selected User(s):
For this option to work, you should enable the Audit Domino Encrypted Items field in the Domino Settings; then, when you run the audit, the number of encrypted items will be listed in each user’s Person document:
Settings | Required Settings tab | Domino tab
-
A message box appears and confirms that an encrypted item has been sent to the selected number of users; click OK to continue
2.4.2 Replication Management
Advanced also includes the ability to manage mail file replicas.
|
|
Replication is not required for migration and can be skipped if the centralization of source data onto Domino staging servers is not required. |
To manage replication:
-
Expand the Advanced view and then click Replication Management | Create Replicas:
Create Replicas View
-
To create replicas, select one or more entries in the Data Pane and click the Create Replicas button. Options to change the replication formula and delete replicas are also available in this view. These replicas will be created on the server and folder specified in the Replica Settings
-
Click Compare All Replicas in the Navigation Pane; the replica comparison will allow you to compare the user’s home mail database and the staging replica
-
Select an option form the Verify Actions drop-down menu; a Quick Push Replication option is also available; click the Help button for more information about the replica comparison view
-
Compare All Replicas View
|
|
|
The table below described the function of each option in the Verify Actions dropdown menu:
|
Option |
Description |
|---|---|
|
Run Replica Comparison For Selected Users |
Allows you to select users and compare the mail files to the staging replicas. |
|
Send Replica Command For Selected Users |
Allows you to select users and send replica command for the users. You will be prompted for the type of replication and to select the Domino servers.
*This assumes that you are familiar with Domino replication. |
|
Replicate Unread Table |
This allows read and unread marks to be synchronized when your staging server is in a different Domino Domain to the home mail server(s). As this may take several hours to complete, it should be run 1-2 days prior to migration. |
|
Set Verification Flag for Selected Users |
Once you have validated that all the expected data has been replicated to the staging server, you can set the Verification flag. This will cause the document to appear in the Validated Replicas view, and not in the Non-Validated Replicas view, for easier administration |
|
Remove Verification Flag for Selected Users |
Allows you to select users and remove the verification flag for them. |
-
Click Validated Replicas or Non-Validated Replicas; the Validated Replicas view displays users that have been marked as verified; the Non-Validated Replicas view displays users that have not been verified:
Validated Replicas View
-
This view gives you the ability to refresh the view, set migration status, verify actions, and quick push replication; click the Help button for more information about the replica comparison view; Quick Push Replication uses the information defined in the Replica Settings to initiate a push from the mail file to the staging replica
-
Click Delete Replicas:
Delete Replicas View
-
To delete replicas, select one or more entries and click the Delete Replicas button
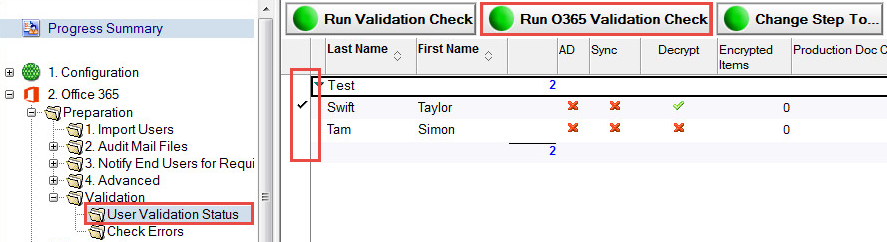
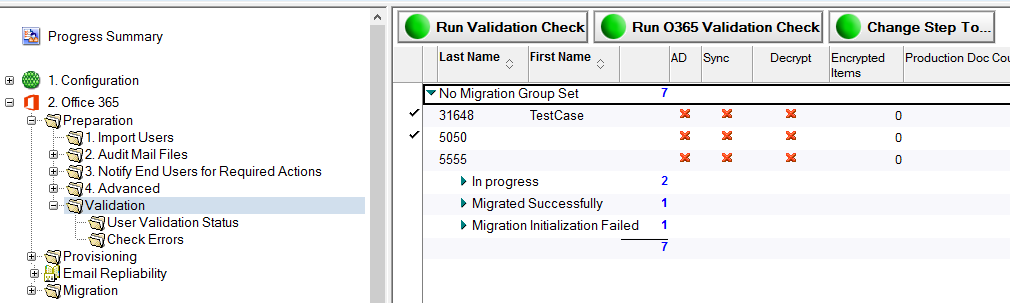
2.5 Validation
Validation allows you to verify that a user mail-enabled object exists in Office 365 based on matching SMTP addresses.
To validate:
-
Expand the Validation | User Validation Status view
-
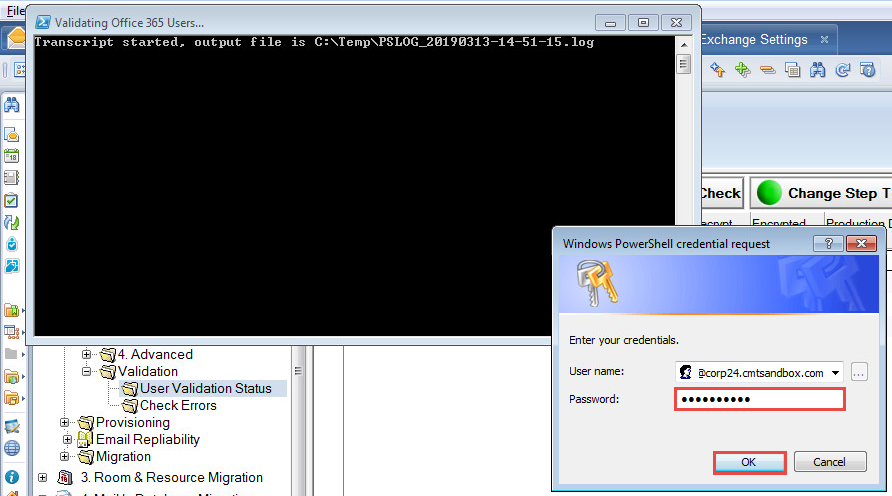
Select one or more entries and click the Run O365 Validation Check button:
User Validation Status View
-
Click Yes on the Validate Users in Office 365 box:
-
Enter your password in the Windows PowerShell credential request window:
-
Click Check Errors in the Navigation pain to view errors; it is recommended to resolve any errors before moving to the next step:
Check Errors View


|
|
If you cannot resolve the errors or need assistance determining why an error occurred, contact Product Support. |
|
|
For Office 365 migrations the Run Validation Check can be skipped. The option can still be used but as it performs AD validation this is not necessary if the Run O365 Validation Check is successful. |
Section 3. User Provisioning
This section is intended to provide the steps necessary to successfully provision a user in Office 365.
User Provisioning
The Migrator for Notes application provides for the automatic creation of Office 365 Exchange Online mail-enabled users from HCL Notes. This process is completed through the application of an Office 365 license that has the Exchange Online option to the accounts.
|
|
|
|
|
|
Post Migration Tools
After a user’s Exchange account has been created, there are several steps necessary to ensure proper mail delivery between the two email systems. The Migrator for Notes database properly sets the user's HCL Notes person document to direct mail to the user's new Exchange mailbox as well as setting access control rights on the user's HCL Notes mail file, if required.