
4.7. Configuring Rooms & Resources Settings
-
Click Rooms & Resources; this tab has two sections. Review the general description provided for both the sections.
Rooms & Resource Migration Options
The Rooms & Resource Migration Options section enables you to configure settings to determine how resources are handled during a migration:

The following table describes the values for each setting:
|
Settings |
Description |
|---|---|
|
Rooms and Resources Target |
Specify if you want the room or the resource to be migrated to a Location field, or be appended to the message body, both, or none. |
|
Room Label |
Specify the label you wish to be prefixed to the migrated room text. |
|
Resource Label |
Specify the label you wish to be prefixed to the migrated resource text. |
|
Online Label |
Specify the label you wish to be prefixed to the migrated online text. |
|
Location Detail Indicator |
Specify the text you wish to appear when room or resource text is not included in the Location field. |
|
Room Resource Separator |
Specify a string that separates the location, room, resource, or online values that are included on the Location field. |
Rooms & Resource Settings
Configure these settings if you want to migrate Rooms and Resources. The first step of the process involves importing Rooms and Resources into the Migrator for Notes database. Lotus Notes stores multiple Rooms/Resources in a single database. Migrator for Notes allows you to import and create a separate .nsf for selected Room/Resource and copy its corresponding calendar into the newly created .nsf. Once all the Rooms/Resources that you want to migrate have been separately imported, you can export them to Migrator for Notes migration engine and migrate them.

The following table describes the correct values for each setting.
|
Settings |
Description |
|---|---|
|
Rooms and Resources Import View |
Specify the view in the Domino directory that Migrator for Notes will use for importing the different Rooms and Resources. Use the Rooms Resources view unless there is a custom view that you have created. |
|
Target Server |
Specify the Domino server that Migrator for Notes will use when creating separate .nsfs for each Room/Resource. This must not be blank. |
|
Target Path |
Specify the destination path where separate .nsfs will be created for selected Rooms/Resources.
The path is relative if the destination is a Domino server. If the destination is a file server, full path must be specified. |
|
Database Template |
Specify the template that will be used to create the new room or resource database to migrate. This should be a valid mail file template name for the Domino version in use and included in the supported template types. |
|
Set Subject to Chair |
Set this to ‘Yes’ to enable overwriting the booking subject when importing rooms and resources. This will set the subject to the booking Chair for migration to Outlook (removing the booking subject entirely). This does not impact the existing Notes room and resource bookings. Selecting ‘No’ will retain the original booking subject for migration. |
|
Subject Prefix |
This is used if the subject for imported booking will be overwritten with the booking Chair name. The text used will be prefixed in the imported booking subject. |
Rooms & Resource Migration Options
4.7. Configuring Rooms & Resources Settings
-
Click Rooms & Resources; this tab has two sections. Review the general description provided for both the sections.
The Rooms & Resource Migration Options section enables you to configure settings to determine how resources are handled during a migration:
The following table describes the values for each setting:
|
Settings |
Description |
|---|---|
|
Rooms and Resources Target |
Specify if you want the room or the resource to be migrated to a Location field, or be appended to the message body, both, or none. |
|
Room Label |
Specify the label you wish to be prefixed to the migrated room text. |
|
Resource Label |
Specify the label you wish to be prefixed to the migrated resource text. |
|
Online Label |
Specify the label you wish to be prefixed to the migrated online text. |
|
Location Detail Indicator |
Specify the text you wish to appear when room or resource text is not included in the Location field. |
|
Room Resource Separator |
Specify a string that separates the location, room, resource, or online values that are included on the Location field. |
Rooms & Resource Settings
Configure these settings if you want to migrate Rooms and Resources. The first step of the process involves importing Rooms and Resources into the Migrator for Notes database. Lotus Notes stores multiple Rooms/Resources in a single database. Migrator for Notes allows you to import and create a separate .nsf for selected Room/Resource and copy its corresponding calendar into the newly created .nsf. Once all the Rooms/Resources that you want to migrate have been separately imported, you can export them to Migrator for Notes migration engine and migrate them.
The following table describes the correct values for each setting.
|
Settings |
Description |
|---|---|
|
Rooms and Resources Import View |
Specify the view in the Domino directory that Migrator for Notes will use for importing the different Rooms and Resources. Use the Rooms Resources view unless there is a custom view that you have created. |
|
Target Server |
Specify the Domino server that Migrator for Notes will use when creating separate .nsfs for each Room/Resource. This must not be blank. |
|
Target Path |
Specify the destination path where separate .nsfs will be created for selected Rooms/Resources.
The path is relative if the destination is a Domino server. If the destination is a file server, full path must be specified. |
|
Database Template |
Specify the template that will be used to create the new room or resource database to migrate. This should be a valid mail file template name for the Domino version in use and included in the supported template types. |
|
Set Subject to Chair |
Set this to ‘Yes’ to enable overwriting the booking subject when importing rooms and resources. This will set the subject to the booking Chair for migration to Outlook (removing the booking subject entirely). This does not impact the existing Notes room and resource bookings. Selecting ‘No’ will retain the original booking subject for migration. |
|
Subject Prefix |
This is used if the subject for imported booking will be overwritten with the booking Chair name. The text used will be prefixed in the imported booking subject. |
Rooms & Resource Settings
4.7. Configuring Rooms & Resources Settings
-
Click Rooms & Resources; this tab has two sections. Review the general description provided for both the sections.
Rooms & Resource Migration Options
The Rooms & Resource Migration Options section enables you to configure settings to determine how resources are handled during a migration:
The following table describes the values for each setting:
|
Settings |
Description |
|---|---|
|
Rooms and Resources Target |
Specify if you want the room or the resource to be migrated to a Location field, or be appended to the message body, both, or none. |
|
Room Label |
Specify the label you wish to be prefixed to the migrated room text. |
|
Resource Label |
Specify the label you wish to be prefixed to the migrated resource text. |
|
Online Label |
Specify the label you wish to be prefixed to the migrated online text. |
|
Location Detail Indicator |
Specify the text you wish to appear when room or resource text is not included in the Location field. |
|
Room Resource Separator |
Specify a string that separates the location, room, resource, or online values that are included on the Location field. |
Configure these settings if you want to migrate Rooms and Resources. The first step of the process involves importing Rooms and Resources into the Migrator for Notes database. Lotus Notes stores multiple Rooms/Resources in a single database. Migrator for Notes allows you to import and create a separate .nsf for selected Room/Resource and copy its corresponding calendar into the newly created .nsf. Once all the Rooms/Resources that you want to migrate have been separately imported, you can export them to Migrator for Notes migration engine and migrate them.
The following table describes the correct values for each setting.
|
Settings |
Description |
|---|---|
|
Rooms and Resources Import View |
Specify the view in the Domino directory that Migrator for Notes will use for importing the different Rooms and Resources. Use the Rooms Resources view unless there is a custom view that you have created. |
|
Target Server |
Specify the Domino server that Migrator for Notes will use when creating separate .nsfs for each Room/Resource. This must not be blank. |
|
Target Path |
Specify the destination path where separate .nsfs will be created for selected Rooms/Resources.
The path is relative if the destination is a Domino server. If the destination is a file server, full path must be specified. |
|
Database Template |
Specify the template that will be used to create the new room or resource database to migrate. This should be a valid mail file template name for the Domino version in use and included in the supported template types. |
|
Set Subject to Chair |
Set this to ‘Yes’ to enable overwriting the booking subject when importing rooms and resources. This will set the subject to the booking Chair for migration to Outlook (removing the booking subject entirely). This does not impact the existing Notes room and resource bookings. Selecting ‘No’ will retain the original booking subject for migration. |
|
Subject Prefix |
This is used if the subject for imported booking will be overwritten with the booking Chair name. The text used will be prefixed in the imported booking subject. |
4.8. Configuring Replica Settings
The Replica Settings are used when using a Domino staging server. A staging server is often used when the Domino mail servers are not on the same LAN as Exchange and/or the migration environment to mitigate migration throughput degradation due to the network. Staging servers are also used if you will be using replication formulas to filter the data intended for migration.
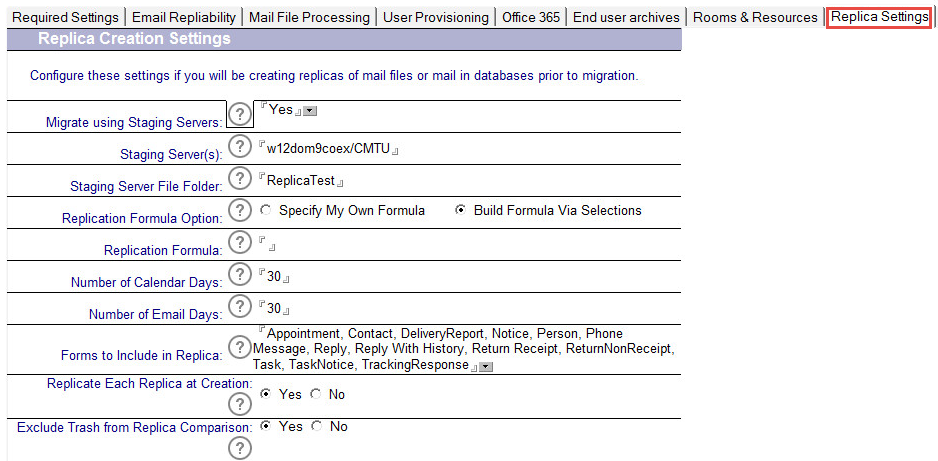
The following table describes the values for each setting:
|
Settings |
Description |
|---|---|
|
Staging Server(s) |
The Name of each of the staging servers to be used for creating replicas separated by a new line or a comma. For Example: Stage01/Contoso |
|
Staging Server File Folder |
The folder name in which to place the newly created replicas. |
|
Replication Formula Option |
Specify My Own Formula: Use the field below to specify your own selection formula. Be sure to enter the ENTIRE formula, starting with SELECT (e.g. SELECT @All to replicate all Notes items).
Build Formula Via Selections: The number of calendar and email days and select the forms to include in the replica and a replication formula will be built for you. |
|
Replication Formula |
If you are specifying your own replication formula, enter it here. *Note: You must be familiar with Notes formula language. |
|
Number of Calendar Days |
If you selected Build Formula Via Selections enter the number of calendar days to include in the replica. You will be prompted for a date upon replica creation and it will use this date and the number you specify to calculate the number of calendar days to include. |
|
Number of Email Days |
If you selected Build Formula Via Selections enter the number of email days to include in the replica. You will be prompted for a date upon replica creation and it will use this date and the number you specify to calculate the number of email days to include. |
|
Forms to include in Replica |
Select or enter all of the different forms to be included in the replication formula. If the form name is not listed here, it will NOT be included in the replication formula and will not be in the replica. |
|
Replicate Each Replica at Creation |
Selecting “Yes” will replicate each newly created replica as it is created. It will also cause the agent to run very slowly depending on the replica settings. It is recommended to use this as a one-off replica creation rather than for the entire list of users/mail-in databases. |
|
Exclude Trash from Replica Comparison |
Set to Yes to exclude Trash (Soft Deletion) document counts from the replica comparison total document counts. Set to No for default processing to count all documents. |