
Your Report URLs
Installing SQL Server Reporting Services
|
|
These instructions are for existing SQL Server installs where reporting services are being added. Migrator Pro for Active Directory reporting is supported on SSRS 2012 and 2014. SSRS 2016 is not supported at this time. |

-
Load the ISO into the DVD drive.
-
Open My Computer.
-
Double-click on the DVD drive to run the SQL Server Installation Center dialog.
-
Select Installation from the left.
-
Select New installation or add features to an existing installation.
-
Click the OK button on the Setup Support Rules page if everything passed.
-
Click the Install button on the SQL Setup Files page.
-
Click the Next button on the Setup Support Rules page if everything passed.
-
Select Add features to an existing instance of SQL Server (verify your instance is shown).
-
Click the Next button.
-
Check the Reporting Services box and click the Next button.
-
Click the Next button on Installation Rules.
-
Click the Next button on Disk Space Requirements.
-
Click in the Account Name field and select NT AUTHORITY\NETWORK SERVICE.
-
Click the Next button.
-
Click the Next button on the Reporting Services Configuration to Install, but do not configure the report server option.
-
Click the Next button.
-
Click the Next button on Installation Configuration Rules page if everything passed.
-
Click the Install button on the Ready to Install page.
-
If you have a green checkmark on the 'Complete' page, click the Close button.
-
Close the SQL Server Installation Center dialog.
Configuring SQL Server Reporting Services
-
Click Start > All Programs > Microsoft SQL Server > Configuration Tools.
-
Click on Reporting Services Configuration Manager.
-
Click the Connect button.
-
Select Service Account from the left.
-
Verify Network Service is set for the built-in account.
-
-
Select Database from the left.
-
Click the Change Database button.
-
Verify 'Create a new report server database' is selected and click the Next button.
-
Set your security type and click the Next button.
-
Leave the defaults. Verify 'Report Server Mode' is set to 'Native' (Reporting will fail to work if not in Native Mode)
-
Click the Next button.
-
Click the Next button.
-
Click the Next button and it will begin to configure the database.
-
Click the Finish button.
-
-
Select Web Service URL from the left pane.
-
Click the Apply button.
-
-
Select Report Manager URL from the left pane.
-
Click the Apply button.
-
-
Click the Exit button.
Browseable URL
http://<servername>/Reports
Or
http://<servername>/Reports_InstanceName (if SQL Server is installed as an instance)
Web Service URL
http://<servername>/ReportServer
Or
http://<servername>/ReportServer_InstanceName (if SQL Server is installed as an instance)
Verifying the Report Server URL
The Report Server URL is needed when installing the Reporting feature. Use the following steps to verify the correct URL to use.
-
Open Reporting Services Configuration Manager.
-
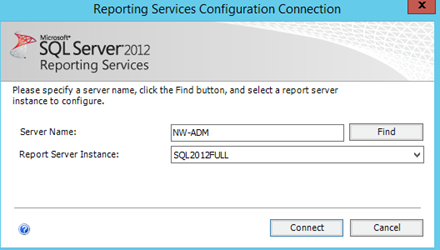
Provide the SQL Server Name and Report Server Instance name and click Connect.
-
In the left folder navigation, select Web Service URL.
-
The Report Server URL appears in the Report Server Web Service URLs section.

Verifying the Report Server URL
Installing SQL Server Reporting Services
|
|
These instructions are for existing SQL Server installs where reporting services are being added. Migrator Pro for Active Directory reporting is supported on SSRS 2012 and 2014. SSRS 2016 is not supported at this time. |
-
Load the ISO into the DVD drive.
-
Open My Computer.
-
Double-click on the DVD drive to run the SQL Server Installation Center dialog.
-
Select Installation from the left.
-
Select New installation or add features to an existing installation.
-
Click the OK button on the Setup Support Rules page if everything passed.
-
Click the Install button on the SQL Setup Files page.
-
Click the Next button on the Setup Support Rules page if everything passed.
-
Select Add features to an existing instance of SQL Server (verify your instance is shown).
-
Click the Next button.
-
Check the Reporting Services box and click the Next button.
-
Click the Next button on Installation Rules.
-
Click the Next button on Disk Space Requirements.
-
Click in the Account Name field and select NT AUTHORITY\NETWORK SERVICE.
-
Click the Next button.
-
Click the Next button on the Reporting Services Configuration to Install, but do not configure the report server option.
-
Click the Next button.
-
Click the Next button on Installation Configuration Rules page if everything passed.
-
Click the Install button on the Ready to Install page.
-
If you have a green checkmark on the 'Complete' page, click the Close button.
-
Close the SQL Server Installation Center dialog.
Configuring SQL Server Reporting Services
-
Click Start > All Programs > Microsoft SQL Server > Configuration Tools.
-
Click on Reporting Services Configuration Manager.
-
Click the Connect button.
-
Select Service Account from the left.
-
Verify Network Service is set for the built-in account.
-
-
Select Database from the left.
-
Click the Change Database button.
-
Verify 'Create a new report server database' is selected and click the Next button.
-
Set your security type and click the Next button.
-
Leave the defaults. Verify 'Report Server Mode' is set to 'Native' (Reporting will fail to work if not in Native Mode)
-
Click the Next button.
-
Click the Next button.
-
Click the Next button and it will begin to configure the database.
-
Click the Finish button.
-
-
Select Web Service URL from the left pane.
-
Click the Apply button.
-
-
Select Report Manager URL from the left pane.
-
Click the Apply button.
-
-
Click the Exit button.
Browseable URL
http://<servername>/Reports
Or
http://<servername>/Reports_InstanceName (if SQL Server is installed as an instance)
Web Service URL
http://<servername>/ReportServer
Or
http://<servername>/ReportServer_InstanceName (if SQL Server is installed as an instance)
Verifying the Report Server URL
The Report Server URL is needed when installing the Reporting feature. Use the following steps to verify the correct URL to use.
-
Open Reporting Services Configuration Manager.
-
Provide the SQL Server Name and Report Server Instance name and click Connect.
-
In the left folder navigation, select Web Service URL.
-
The Report Server URL appears in the Report Server Web Service URLs section.