
Starting DSGUI
Linux / Solaris / AIX
In order to start the Graphical User Interface of VDS run "bin/dsgui" from /opt/dell/vds/std/ directory with the following command:
bin/dsgui
In order for DSGUI to run with its complete functionality it is important that you change into the /opt/dell/vds/std/ directory first, as DSGUI will not be able to find the dsproxy binary if the GUI has been loaded from a different path.
Windows
You can launch DSGUI using the VDS shortcut in your Start Menu (under Dell > VDS > RX.X.X). You can also run dsgui.bat in the root of the installation directory to launch DSGUI.
DSGUI main window
When you open the DSGUI application, you will notice that the application window is divided into several parts:
-
The Menu
-
The Toolbar
-
The Configuration Selector
-
The Navigator
-
The Configuration Panel
-
The Message Output Area
Each of these parts will now be discussed in a fair amount of detail to ensure that there is no confusion, as they will be referred to frequently throughout this manual.
Fig-4: DSGUI Main Window

The Menu
Fig-5: The Menu

The menu section follows the standard File Menu format familiar to most GUI users. Each of the menu options relates directly to the different types of actions that can be performed within DSGUI. As with most menu systems of this type, certain options will appear greyed out until they are relevant or available for use. For instance, if no configuration has been loaded or created, the Save Config and Close Config options are not available as they are not relevant at this point.
Many of the core functions available in the File Menu are also available on the Toolbar (see below), which can be used as a shortcut to invoke some of the more frequently used options. The Menu is organized into several sections as subsections that give access to the different commands:
-
File
-
New
-
New Local Config: Creates a new configuration on the local server.
-
New Remote Config: Creates a new configuration in a remote server using the remote administration.
-
-
Open
-
Open Local Config: Opens an existing configuration from the local server.
-
Open Remote Config: Opens an existing configuration stored in a remote server through the remote administration tool.
-
-
Recent Configurations: Lists the five most recent configurations that you have opened in DSGUI.
-
Close Configuration: Closes currently selected configuration.
-
Close All Configurations: Closes all open configurations.
-
Save: Saves recent changes in the selected configuration.
-
Save As
-
Save Config Locally As: Saves current configuration on the local server with a different name.
-
Save Config Remotely As: Saves current configuration on a remote server using the remote administration tool with a different name.
-
-
Remove Configuration: Deletes the current configuration from the local or remote server. This option is only available if the configuration instance is not running. When clicked, a confirmation prompt will be shown before the operation is completed. It is important to note that this option will delete the configuration directory from the filesystem, removing any logs and scripts in the process.
-
Export Configuration: Creates a zipped archive of all configuration files, scripts and log files, and saves locally to the file system. This zip file can be unzipped in the configuration directory for any server system, or can be imported using the Import Configuration option. Note that it is possible to exclude passwords and log files from an exported configuration, to help ensure that your infrastructure is kept secure.
-
Import Configuration: Imports a zipped archive of a configuration folder and installs it locally. It is important to note that if the instance will be run on a remote system, the configuration file will need to be opened, and then Saved Remotely.
-
Generate Support Bundle: This action is designed to collect all information that may be helpful to investigate any problem with the instance: Its output is a zip file that should be sent to Support. In the window it is possible to specify the different items to be included, as well as a range of dates. Usually the more information that is collected the better, but in certain cases it can result in a file too large to be handled easily.
-
Preferences: Opens Preferences dialog (Preferences )
-
Evaluation
-
Check Evaluation Information: Presents a dialog displaying the information stored in the evaluation.key file (if any).
-
Update Evaluation Information: Allows you to install an evaluation key to update your evaluation version information.
-
-
Quit: Exits DSGUI
-
-
Entry: Context based menu depending on the selected node (equivalent to right clicking on an entry).
-
New Listener / Stage / DataSource / Database Connection: Creates a new node in the configuration tree.
-
Move Up: Moves selected tree item up in the structure.
-
Move Down: Moves selected tree item down in the structure.
-
Delete : Deletes selected item from the configuration tree.
-
New Generic Entry: Adds a new custom entry to the selected manual stage within the configuration tree (useful for custom configuration options).
-
Launch LDAP browser: Launch LDAP browser to the selected listener or DataSource.
-
New Virtual Entry: Add a new virtual entry for a Virtual Tree within a listener.
-
New Virtual Mount Point: Add a virtual mount point root for a Virtual Tree within a listener.
-
Rename Node: Allows you to rename a node within a Virtual Tree attached to a listener
-
Add Hooks: Add a hook to a listener or manual processing stage.
-
New Condition: Add a condition to a Hook within a manual processing stage.
-
Add Plugin: Adds a plugin to an automatic processing stage.
-
-
Extras
-
Show LDIF: Opens a new window with the configuration LDIF file corresponding to the currently selected configuration.
-
LDAP Browser: Opens the built-in LDAP browser.
-
Manage DSGUI Extensions: Allows you to import, enable and disable plugins or extensions (see Plugins).
-
-
Process: Process related commands
-
Run: Starts an instance of VDS using the currently selected configuration.
-
Normal Restart: Stops and restarts an instance of VDS using the currently selected configuration.
-
Restart With Dump: It will generate a core dump and restart the instance (for debugging purposes)
-
Forceful Stop: Kills the currently running process without checking if all processing has been completed.
-
Graceful Shutdown: Sends a "graceful shutdown" signal (see Graceful shutdown ) to the instance of VDS using the currently selected configuration.
-
Hide / Show Log Window: Hides (if shown) or shows (if hidden) the log window of the currently selected configuration.
-
-
Help
-
About: Shows product / version number details.
-
Help Contents: Opens the HTML based User Manual at the front page. Note that a PDF version of this manual is available within the docs folder at the root of your installation.
-
Help: Opens the HTML based User Manual at the page relevant to the selected element in the Navigation tree.
-
Getting Started: Opens the Dell One Identity Virtual Directory Server Getting Started Guide in an HTML browser. Note that a PDF version of this manual is available within the docs folder at the root of your installation.
-
The Toolbar
Fig-6: The Toolbar

The toolbar allows you to quickly access commonly used commands. Each icon is assigned to a function using commonly used pictograms. As with the File Menu, if a command is not available it is greyed out. Hovering the mouse over any of the buttons in the toolbar will provide a small blue popup text description of the button's functionality. The options available from the toolbar (from the left to the right) are:
- New Local Config
-
Create a new configuration in the local server.
- New Config Selector
-
Displays a menu that allows you to create a new local or a remote configuration.
- Open Local Config
-
Opens a configuration file from the local server.
- Open Config Selector
-
Displays a menu that allows you to open an existing local or remote configuration.
- Save
-
Save the current configuration with the same name in the same place (local or remote server).
- Save As
-
Save the configuration file under a new name in the local server.
- Save Config As Selector
-
Displays a menu that allows you to save the current configuration locally or remotely with a new name.
- Close
-
Close the selected configuration.
- Show LDIF
-
Show the configuration file for the current instance.
- Preferences
-
Opens the preferences dialog (Preferences ).
- LDAP Browser
-
Opens an LDAP Browser Window. You can have several of these open at the same time.
- Hide / Show Log Window
-
Hides (if shown) or shows (if hidden) the log window of the currently selected configuration.
- Run
-
Starts the VDS server process, with the selected configuration.
- Restart
-
Provides the option to restart a running instance of a configuration (useful if you have made a few changes and have saved them).
- Restart Selector
-
Displays a menu that allows you to select the method for restarting the current running server instance. You can do the former normal restart or additionally generating a core dump (for debugging purposes)
- Stop
-
This button will basically kill the currently running server process. If you wish to choose which Stop method to use, you can use the Stop Selector.
- Stop Selector
-
Displays a menu that allows you to select the method for stopping the current running server instance. You can stop it just by killing it (Forceful Stop) or by sending a "Graceful Shutdown" signal to it (if Administration port is enabled).
The Configuration Selector
An instance of DSGUI can handle several different configurations at the same time. Each opened configuration will have it's own tab in this section, labelled with the configuration name as well as the configuration location (name@host), and can be selected by clicking on the tab.
All the menu actions unless otherwise specified apply to the currently selected configuration. The selected configuration will be indicated by highlighting its tab in light blue, while the rest of the tabs will be white.
The Navigator
Fig-7: The Navigator

Under the Configuration Selector, the window is split into two parts. The part on the left is the Navigator. It is arranged as a hierarchical tree viewer. When you click on any node in the tree, the panel on the right is updated with a configuration panel that allows you to set preferences for the node that you have selected.
Select items by clicking on them with the main (usually the left) mouse button. When you select items, you will usually see the configuration panel area change to display the properties for the currently selected item.
Nodes that have child nodes within the configuration tree can be collapsed, so that these subnodes are not displayed. Usually, when a configuration opens, only the primary nodes of the configuration are visible. To view subnodes, expand the configuration tree at the primary node that you wish to view, by clicking on the expansion icon to the left of the node icon / name, or double-click on the node name.
Clicking with the secondary (usually the right) mouse button on an item will make a small context menu pop up from which you can select several actions related to the item that you have selected. Often, this menu will allow you to add additional items, move items up or down, delete items, etc. Most commands in this menu are self-explanatory.
Items within the navigator that may require additional configuration, such as processing Stages that are not attached to a configured Listener, are usually highlighted in red as a visual cue that although the entry exists within the configuration it may not function correctly within a running instance.
The "New Generic Entry" Pop-up Menu Item
When you right-click VDS at the top of the navigator and bring up the pop-up context menu, you will be presented with a menu item that will allow you to create a "New Generic Entry". This will create a generic item within your configuration. Note that you will also be provided with the New Generic Entry option, when right clicking on a manual stage. This allows you to store configuration entries that are specific to a stage, together with that stage within the configuration.
Generic Entries are used to create a "data holding" item that can be accessed by processing scripts at runtime and are generally used to store configuration options specific to running scripts.)") which details how Generic Entries can be used in conjunction with your custom scripts.
which details how Generic Entries can be used in conjunction with your custom scripts.
Since the actual configuration file is in LDIF format, the "New Generic Entry" allows you to create a generic LDIF entry at that part within the config file. In order to create the entry, you will need to specify a Relative DN for it. For instance, you may assign a New Generic Entry with the RDN of "ou=CustomEntry".
Fig-8: A Generic Entry within the configuration

Once a new entry has been created, you will be able to assign any number of attributes, along with their respective values, for the new entry. For many users, this facility is not required, however, you may want to do this in order to create a special configuration entry that only your custom-written scriptlet understands. This entry will be available for use by your scriptlets by selecting it within the Param field when creating a condition entry within a manual processing Stage.
This is an advanced topic, and although we will touch on it briefly within this manual, you should also refer to the Dell One Identity Virtual Directory Server Developer's Reference Manual and the Dell One Identity Virtual Directory Server Scripting Guide for further information.
The Configuration Panel
Fig-9: The Configuration Panel

The Configuration Panel can be found in the area of the window on the right hand side of the application. This area is used to display the available settings or configuration options for the item that has been selected from the configuration tree within the Navigator.
Configuration Panels allow you to view and change properties of the currently selected item. Whenever you have made changes to the configuration options in this area of the screen, you will need to click the "OK" button before you select another node in the configuration tree. If you fail to do this, DSGUI will ask you whether you want to save your changes to the current item before moving on to the newly selected item. By clicking the "Cancel" button, you can undo the latest changes and restore the item's properties to the ones that were set when you initially selected the item in the Navigator.
Note that these changes are not saved to disk, they are only saved in memory. In order to save the changes to disk, you will need to save the entire configuration by selecting the Save Config button from the Toolbar, or selecting the Save Config option within the File Menu. If you attempt to run the instance of VDS without having saved your changes, DSGUI will give you the option of actually saving the configuration before you run the instance. If you choose not to save the configuration, VDS will still run the instance, but with the last saved configuration. It is important to note that if DSGUI is closed for some reason without your saving the configuration to disk, all of your changes will be lost.
The Message Output Area
Fig-10: Message Output Area

The Message Output Area is located in the lower part of the DSGUI window, and automatically pops up each time you start a configuration. The Message Output Area will display a tabbed set of logging windows, displaying output from both STDOUT and STDERR. Additionally, it is possible to display the content of any logging file that the configuration is generating by opening the file in a separate tab.
When a local configuration is started, the output (both STDOUT and STDERR exits) of the running process will be collected and displayed in this area.
The log data displayed in the Message Output area is read directly from the log files stored for the configuration. For remote instances, DSGUI automatically begins a dialog with the Remote Administration Server, when the instance is started, in order to keep the logging information updated. Note that if you have a lot of logging options enabled, this can generate a large amount of network traffic between DSGUI and the remote instance of dsproxy.
You can find a more detailed explanation on how DSGUI handles logging in the section titled Logging .
Preferences
The preferences browser allows you to configure all of the default settings that influence the behavior of VDS. When you start DSGUI for the first time, all preferences will be set to their default values. When you make changes to the preferences, you can then save them so that they will be remembered for each subsequent restart of DSGUI. The preferences are stored in a file called .dsgui-VDS-X.X.ldif within your home directory in Unix environments (e.g. /home/johndoe/.dsgui-VDS-X.X.ldif) or in your %USERPROFILE% directory within Windows environments (e.g. C: and Settings Doe\.dsgui-VDS-X.X.ldif).
When you select "Preferences" from the "File" Menu or click on the "Preferences" button in the toolbar, the preferences window will be opened. This window is divided into several sections.
Fig-11: Preferences Window

On the left side, a tree contains all of the different sections available for editing within the preferences file. Sections can be selected by clicking on them within the tree. Once a section has been selected, the configuration panel on the right hand side will display all of the parameters that can be set for the selected section.
Remember to save your preferences if you change them. You can save your preferences at any time by selecting the Save entry from the File menu in the preferences editor.
Environment
Within the environment section, you can define the following items:
- Save preferences on dsgui exit
-
This checkbox can be used to ensure that preferences are always saved when you exit DSGUI. This is particularly useful if you are likely to define new LDAP Browser Connection information, or if you are likely to define new Remote Administration Server connections.
- Preferences File
-
Full path to the preferences file that will be loaded each time you start DSGUI. This file is used to store all of the preference options that are set for DSGUI. As already mentioned, the preference file is stored within your home directory in Unix environments or in %USERPROFILE% directory in Windows environments. This field is not editable and is only displayed for informational purposes.
- Configurations Directory
-
Path to where local configurations will be stored.
- CA Store
-
Path to the CA (Certification Authorities) certificates store file that will be used in communications with remote administration instances running on remote servers. By default the JRE CA store, that is bundled with VDS, is used. However, this can be changed to match your own running requirements.
- CA Store Password
-
Password to use for the CA Store files. The default password is "changeit" and should be changed to something more secure if you plan on setting up your own CA infrastructure.
- Use Custom Help Browser
-
Use an alternate web browser to view the help files for the product.
How to set up certificates for communication with Remote Administration Server instances
By default, DSGUI will use the CA (Certification Authorities) certificates file of the JRE that is being used to run DSGUI, typically the one that comes bundled with VDS. The CA file of the JRE (cacerts) includes a standard set of CA certificates, however, it is possible to choose an alternative CA file to secure communication with remote VDS Administration Servers. DSGUI will automatically store the CA certificates of any of the servers you instruct it to connect to.
A "Test Certificates File" button on the panel will allow you to ensure that your CA Store is correctly configured and will give you the option to use the default JRE CA store (or to use a new empty one). If the CA Store is correctly configured, the button will list all of the certificates within the store. The following actions are initiated when the button is pressed:
- Password Checking
-
The CA Store Password is checked. If the passwords do not match you will be informed and processing will be aborted. You will need to enter the correct password for the store into the CA Store Password field. If you do not know the password, you will need to create a new CA Store by specifying a new CA Store Path before clicking on the "Test Certificates File" button again.
- Store Checking
-
If the file, that is specified in the CA Store field, does not exist you will be asked if you want to copy JRE's cacerts certificates to this new store file. If you confirm, please bear in mind that the password that is currently specified in the CA Store Password field will be used for the new CA Store. If you do not want to copy the CA certificates (the most secure option) DSGUI will start with an empty CA store, until you add certs from the Remote Administration Servers that you choose to use.
- List Store Contents
-
Finally, if the store is not empty, and the password to the store is correct, the list of available CA certificates will be shown.
Once you are satisfied with your store, you can use the "Test Certificates File" button to check your certificates, as described above.
To connect to a Remote Administration Server, you will need to add the configuration for each Administration Server to DSGUI, either using File->Preferences->Admin Server Preferences-> Add, or by trying to create or access a remote instance using "New Administration Server" in the "Server Selection" dialog.
See ( Admin Server Preferences ) Frequently Used Remote Administration Instances for information about adding Remote Administration Servers to DSGUI.
Fig-12: Environment Preferences

Specifying a custom web browser for the Help Manual
By default, clicking on any Help button in DSGUI will open your default web browser to a locally hosted URL, which makes use of a set of GET variables to determine which page to show within the Help system. The Help pages require JavaScript to be enabled within your browser. If you wish to use an alternate web browser to display help pages, you can change the browser here in the Environment Preferences.
- Use Custom Help Browser
-
This checkbox will allow you to specify the path to an alternate browser, which will be invoked when a Help button is clicked. In the field following the checkbox, you should provide the full path to the web browser application that you intend to use. In general, you should follow the browser path with a quoted "%u". This will cause the browser to be invoked with the full URL to the help page required, and this URL will be quoted to ensure that it opens to the correct destination. Some browsers may not require this additional option.
Warning
The Warning preferences node allows you to disable particular warning messages that will be displayed in the DSGUI application where a configuration entry may not be created in the expected manner. By default, all warning messages are enabled, however this may become irritating if there is some reason for you to create a configuration which does not conform to the usual approach. In these cases, you are able to disable the warning message when it appears.
The table in this panel displays the warning messages that you are able to enable or disable. The column on the right will display 'yes' for enabled messages, and 'no' for disabled messages. You can change these settings at any time and save your preferences.
Fig-13: Warnings Preferences

Recent Config
The Recent Config preferences node allows you to view the paths to recently opened configurations and to clear Recent Configurations from DSGUI's history.
Fig-14: Recent Configs Preferences

Editing
The preferences in the Editing section define the settings for editing DirectoryScript programs with an editor when configuring a manual stage.
While we have included its own internal editor to edit scripts, we have provided an option here to allow more advanced users to choose a preferred external editor. You will need to specify the path to the application that you wish to use if you decide to make use of this option. It is important to note, that when using an external editor, new functions will not be automatically generated when you open a file. When using an external editor, the editor must be capable of being called from the command line with a filename or filepath as the only argument.
Further options are available here if you choose to make use of the internal editor. These include a font selector (which allows you to choose the font type and font size) and the option to choose the number of spaces that will be used for each tab stop.
Running
The Running preferences contain the parameters used by DSGUI to start the dsproxy program, which is the actual VDS proxy server process. You can run dsproxy by either clicking the respective icon on the main DSGUI toolbar, or by selecting Run from the Process menu. Except for the last two options on this panel, the options specify the Default parameters that will be used to fill the field in the "Global Parameters" section of each new configuration created with this specific copy of DSGUI. After these settings have been applied to a new configuration, the configuration will make use of its own store "running" options specified within the Global Parameters section of the configuration. In this way, these preferences serve only to provide a default template for future configurations of VDS.
Fig-15: Running Preferences

The Running Preferences configuration panel contains the following options:
- Default Options
-
It stores the list of optional parameters that will be passed to the dsproxy process on startup. For a complete description of the possible parameters accepted by VDS engine please refer to the Dell One Identity Virtual Directory Server Administrator's Reference Manual.
- Default STDOUT Redirection
-
Path, relative to the configuration directory, where STDOUT output of the running process will be sent to.
- Default STDERR Redirection
-
Path, relative to the configuration directory, where STDERR output of the running process will be sent to.
- Delete logs on start
-
Defines if the running process should delete both STDOUT and STDERR outputs each time it is restarted.
- Size of Log Buffers (KB)
-
Maximum size of data "chunk" that will be exchanged between DSGUI and a Remote Administration instance when reading the contents of log files.
- Remote Status Check Interval (ms)
-
Amount of time between successive status check requests sent by DSGUI to the Remote Administration server when managing a remote instance.
LDAP Browser Preferences
DSGUI is capable of integrating with any external LDAP Browser that you choose to make use of. By default, VDS is packaged with the standalone LDAP Browser, however using the options provided here, you may change the browser to any external browser that you prefer. If no external browser is configured, DSGUI will fallback to a very simple internal browser, which does not support any write functionality and has limited search capabilities.
- External Browser
-
This field expects the path to the external browser application that you wish to use as your LDAP Browser. By default, the path to the startup script for the bundled LDAP Browser should be specified here, however you may change this to point to any other browser of your preference. Note that if this field is left empty, DSGUI will fallback to its own internal browser which has very limited functionality.
- Open Args
-
When the LDAP Browser is opened, you are able to use this field to specify command line arguments that should be passed to the browser when it is opened, if your browser supports this facility. In most cases, you will more than likely leave this field blank as you will only require the browser to open in its default state. Note that if you wish to specify parameters here, you can use the key below these fields to determine what variables are available to you to pass on to the browser.
- Connection Args
-
At particular points in DSGUI, such as when a listener or output node is selected and a destination address and port is specified, when you click on the LDAP Browser menu or toolbar option, the browser can be configured to actually open a connection to the expected location. If your browser supports command line arguments to initiate a connection, you are able to specify these within this field. Where these fields are populated by DSGUI, the appropriate command line argument will be passed to the browser when it is opened. The settings that are presented in this field by default apply to the bundled LDAP Browser. Note that if you wish to specify parameters here, you can use the key below these fields to determine what variables are available to you to pass on to the browser.
Fig-16: LDAP Browser Preferences

Frequently Used Servers
Note that the settings in this section will only apply if you have not specified a path to any external LDAP Browser (including the bundled LDAP Browser). In this case, a low-level and very simplistic browser with limited functionality will become available, and the following settings will apply to this internal browser.
Within this section you can configure a "shortlist" of frequently accessed LDAP directory servers. This list will then be available from the combo box in the server selector. Instead of having to enter the same values over and over again, it makes sense to create shortcuts for LDAP servers that you intend to access frequently.
In order to create a new entry, click the "Add" button. The LDAP Server Selector window will pop up and will allow you to define the settings for a new server. More information on the LDAP Server Selector can be found in the section titled, LDAP Server Selector.
You can also delete entries from the shortlist by selecting them and clicking the Delete button. In order to modify a server's definition, select the server and click the Edit button.
Sometimes it is convenient to copy an existing definition and subsequently edit it instead of entering all parameters from scratch. For this purpose you can use the Duplicate button that will create a copy of the currently selected entry. Once this is done, you can then select the new entry and click the Edit button in order to rename the copied entry and to modify the the copied parameters as you require.
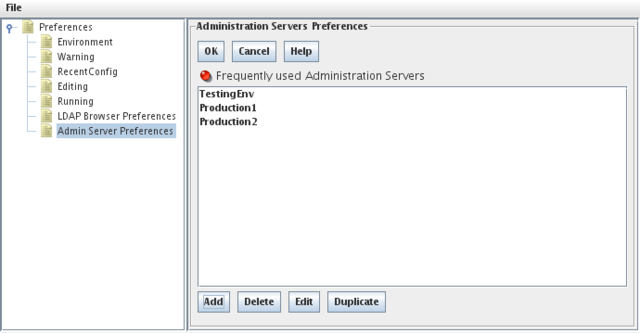
Admin Server Preferences
Frequently Used Remote Administration Instances
This panel allows you to configure a "shortlist" of frequently accessed Remote Administration Server (RAS) instances. The instances configured here will then be available each time you wish to connect to a remote server using DSGUI. Using the Remote Administration Server will allow you to connect to remote instances of VDS to perform a variety of operations, including opening and editing a configuration, as well as starting a configuration remotely. In an environment where you are likely to have multiple systems running VDS, it is worthwhile specifying the RAS details required to connect to them within this panel, in order to save yourself from repeatedly entering the connection information.
Fig-17: RAS Servers List
In order to create a new entry, click the "Add" button. The Remote Admin Selector will appear and will prompt you to provide the details that define the settings for this server. You will be required to enter the following fields:
Fig-18: Remote Admin Selector
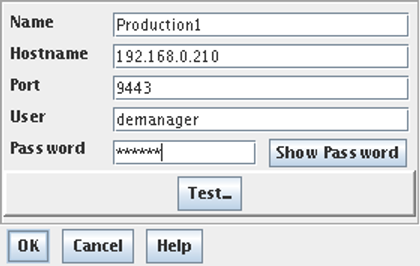
- Name
-
A name to identify the RAS configuration (optional).
- Hostname
-
Remote host where the RAS is installed.
- Port
-
Port on which the remote administration server is listening (default 9443).
- User
-
Credentials for connecting to the Remote Administration Server (default demanager).
- Password
-
Password for the credentials.
You can also delete entries by selecting them and clicking the Delete button. In order to modify a server's definition, select the server and click the Edit button.
Sometimes it is convenient to copy an existing definition and subsequently edit it instead of entering all of the parameters from scratch. For this purpose, you can use the Duplicate button, which will create a copy of the currently selected entry. Once this is done, you can select the new entry and click the Edit button in order to rename the copied entry and modify the parameters to meet your requirements.
In order to work with a remote administration instance you must press the Test button at least once to properly configure and test the communication channel. When you press Test the following actions will take place:
- Check RAS configuration
-
If the needed fields have not been completed or contain invalid information the process will be aborted.
- Check existence of server certificate in CA store
-
If the newly configured RAS provides a certificate not present in the trusted CA store it will be added to it.
- Connect to RAS
-
A connection to the RAS will be opened and a list of the roots provided by the server will be displayed.
Remember that if you do not test the configuration of each new RAS (or if you change the CA certificates) the certificate provided by the RAS may not be trusted and the connection will fail until it has been tested.
LDAP Browser
VDS is packaged to include an LDAP Browser. This feature-rich standalone browser provides a range of powerful features, including:
-
LDAP v2 and V3 support
-
SSL support to connect to LDAPS systems
-
An intuitive LDAP Tree Browser
-
The ability to create, delete and modify entries within an LDAP Tree
-
Browse the schema of an LDAP server
-
View the Root DSE for an LDAP server
-
Perform advanced search queries, and save frequent searches
-
Create bookmarks to particular entries within a tree
-
Open multiple simultaneous connections and switch between them using tabs
-
Export LDIF data for entries within any branch
-
Support for command-line switches to open the browser with particular connection parameters
-
Integration with VDS
As a standalone browser, the LDAP Browser includes its own thorough documentation, which can be found within the /doc folder at the root of your installation. Please refer to the LDAP Browser User Manual for any further help with this browser.
VDS is designed to be able to work with any external browser of your choosing. While we recommend that you use the bundled LDAP Browser, due to its ability to integrate with DSGUI, you may wish to change the browser that is initiated by DSGUI to suit your own requirements. You may do this by setting the path to an alternate browser in the LDAP Browser Preferences.
DSGUI also includes a very simple built-in read-only LDAP Browser. If no path is specified for an LDAP Browser within the LDAP Browser preferences, VDS will drop back to using the internal LDAP Browser. This internal browser will be discussed in more detail shortly.
Starting the LDAP Browser
You can start the configured LDAP browser by either selecting the LDAP Browser from the Extras Menu in the main DSGUI window, or by clicking on the LDAP browser icon on the toolbar.
If you have selected either a Listener or Output node within your configuration, and this node has an IP address, port number or BIND credentials specified, and your browser supports command line parameters, the browser will open a connection to the specified parameters automatically. This functionality is controlled by specifying the appropriate parameters within the LDAP Browser Preferences.
The Internal LDAP Browser
If you have not specified a path to an external LDAP Browser in the LDAP Browser Preferences, DSGUI will automatically fallback to using a very simple internal browser. This browser has very limited functionality and only supports read-only operations. If DSGUI is configured to use the internal browser and you click on the LDAP Browser button in the toolbar, or the LDAP Browser option in the Extras Menu, the LDAP Server Selector window will open. You can use the LDAP Server Selector to either select a pre-configured server or to provide the details for the server that you wish to connect to.
LDAP Server Selector
The Server selector allows you to select a predefined server configuration shortcut, or enter the details required to connect to a server. If you plan on connecting to a specific server frequently, you should either configure the details of the server in the Preferences, or opt to save the details for the server when you are prompted. Server details that have been saved within the DSGUI Preferences, or from previous sessions, will be available for easy selection using the combo box shortlist in the LDAP Server selector. Alternatively, you can input new parameters, or change parameters from a previously selected shortcut.
Fig-19: LDAP Server Selector Panel

If you select a server shortcut from the combo-box, the properties for the server will be populated in the field-entry boxes on the Server Connection Properties panel. Otherwise you will need to fill out these details from scratch. The parameters are as follows:
- Name
-
A shortcut name for the server. If you are not working with shortcuts, or do not intend to save the server details that you are working with, you can leave this field blank.
- Hostname
-
The host name or IP address of the server.
- Port
-
The port number on which the server listens. For LDAP, this is usually 389, unless you have a different set-up.
- Root Suffix
-
The root of the Directory Server, or the tree on which you want the browser to work on. You can fetch a list of trees that are contained by the LDAP server by clicking on the Suffixes... button below.
- Bind DN
-
The distinguished name that should be used to authenticate the LDAP Browser to the LDAP server that you are connecting to.
- Password
-
The password that LDAP Browser should use when authenticating.
There are also two buttons available that can assist you while filling in the Server Connection Properties, as well as making sure you can actually connect to your server:
- Suffixes
-
When you click the Suffixes button, the LDAP Server Selector will connect to the server and fetch a list of suffixes (trees) that this
server contains. To do this, you will need to specify at least the host name and the port. If your LDAP server is configured to require authentication to list the contained suffixes, you may also need to enter a Bind DN and a password before this will work. When the LDAP Server Selector has connected to the server and fetched the contained suffixes, you will be presented with a dialog in which you can select one of the contained trees. By clicking on the "OK" button in the list of contained trees, the selected tree will then be taken into the "Root Suffix" field.
- Test
-
As the name implies, the Test button will test connectivity to the server, and therefore check whether all of your parameters work to properly start the LDAP Browser. Testing will connect to the hostname and port specified, attempt to BIND either anonymously or using the credentials provided, and finally read the Root Suffix that has been specified. If any error is returned while carrying out these steps, you will be informed about the error and can then take appropriate action.
The Internal Browser Window
The internal LDAP browser is a separate window that will load outside of the main DSGUI window. It consists of a split panel with two sides: the Navigator on the left side and the Entry Viewer on the right side.
Fig-20: The Internal LDAP Browser
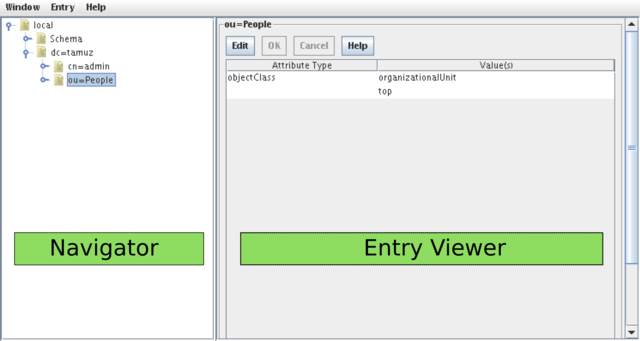
You can use the Navigator to browse through your LDAP trees. Nodes will expand and contract as their handles are clicked. When you select a node, the Entry Viewer/Editor will display the node's contents, as long as you have the appropriate permission. Regular LDAP entries will be displayed as attribute/value pairs on the Entry Viewer. There are several special nodes that may need some explanation:
- The root entry of the tree
-
This node represents the server object that you have configured and connected to. When you select it with the left mouse button, a blank panel will load in the Entry Viewer, as there are naturally no entries associated directly with the server node. However, clicking on this node with the secondary mouse button (usually the right button) will display a pop-up menu which will provide you with options to reconfigure the connection properties, to reconnect, or to refresh the entire tree in the LDAP Browser.
- Schema
-
This node represents the schema of your LDAP server. The node will expand into Attributes, Object Classes, Matching Rules and Syntaxes.
- Attributes
-
This node will expand to reveal a list of all defined attributes in the schema. Each Attribute, when selected will display the following parameters in the Entry Viewer: Name, Description, a list of aliases and the "obsolete" and "single-value" flag.
- Object Classes
-
All object classes defined in the schema can be found under this node. The Entry Viewer for object classes will display a list of required attributes and a list of optional attributes.
- Matching Rules
-
All Matching Rules defined in the schema are under this node. The Entry Viewer for these nodes will display the name, OID, description and the "obsolete" flag.
- Syntaxes
-
All Syntaxes defined in the schema are visible under this node. The Entry Viewer for these nodes will display the name, OID and description.
Finally, the Root Suffix that you have connected to with the LDAP Browser will be displayed as an expandable node, from which you can view all of the child entries for that suffix.
You are able to refresh each of these nodes (as well as all child nodes) by clicking with the secondary (usually the right) mouse button on the node in the Navigator.