
Content Migrator
The Content Migrator job moves BLOBs for various circumstances, including:
·Those that were externalized asynchronously to their final endpoint. See Creating a New Storage Profile for information on asynchronous endpoint operations.
·Those that are queued up for migration as a result of an archiving rule condition being met. See the Archiving section for information on setting up archiving rules.
·Those that were marked as a record where Records Management is configured. See Records Managment for configuring rules.
·Large File uploads, if the timer job is configured to process them.
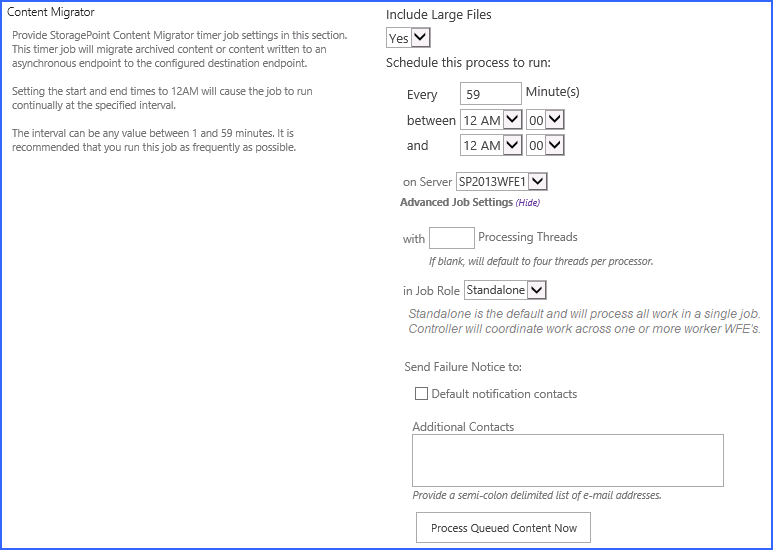
1.Select whether Large File Uploads will be processed using the system cache in the Include Large Files dropdown. If No is selected, the large file upload will use a system folder to stage the upload.
2.Enter a number between 1 and 59 to represent the frequency, in minutes, for this job to run in the Every field.
3.Enter the timeframe using the between and and fields in which this process should take place. Leaving the time at 12 AM in both fields will cause the process to run continuously at the interval specified.
4.(Optional) In the on Server field, select a WFE for this process to run.
5.(Optional) Click the Show link to see the advanced job settings.
6.(Optional) Enter the Number of Processing Threads to use during job execution. It will default to one thread per processor core if no value is supplied.
7.(Optional) Configure job roles. See Controller and Worker Configuration for more information.
8.(Optional) Under the Send Failure Notice To: header:
a.Check the Default Notification Contacts box to have an email sent to the email address entered in General Settings. Note that for this feature to work, the Default Notification field on General Settings must contain a valid email address.
b.In the Additional Contacts box, enter a semi-colon delimited list of other email addresses that should receive the notification.
9.Click Save at the bottom of the page to save the settings or click Process Queued Content Now to begin migrating BLOBs at the specified interval.
Self-healing Content Migrator Job
One of the tools used to keep storage requirements to a minimum is the Self-healing Content Migrator job. What this means is that the Content Migrator timer job has logic to analyze whether migrate tasks are being completed. If it is detected that the system cache has items that are not being properly processed, an Unused BLOB Cleanup timer job and a BLOB Health Analyzer timer job will automatically be scheduled to run at 2:00 am. These jobs will automatically be scheduled to run once a week. The Content Migrator job will rank the profiles in terms of most unprocessed items, and schedule up to three profiles per night for the timer jobs. Eventually, all profiles could be processed if needed.
Endpoint Capacity Monitor
The Endpoint Capacity Monitor is a job that analyzes configured endpoints for available free space. It will ignore endpoints that use adapters that do not support free space querying. The capacity thresholds that were defined for notification and for taking the endpoint off line will be used. If a threshold is reached, the capacity monitor will make a note of it and tag that endpoint to send out an alert or be taken offline the next time someone attempts to externalize content to that endpoint.
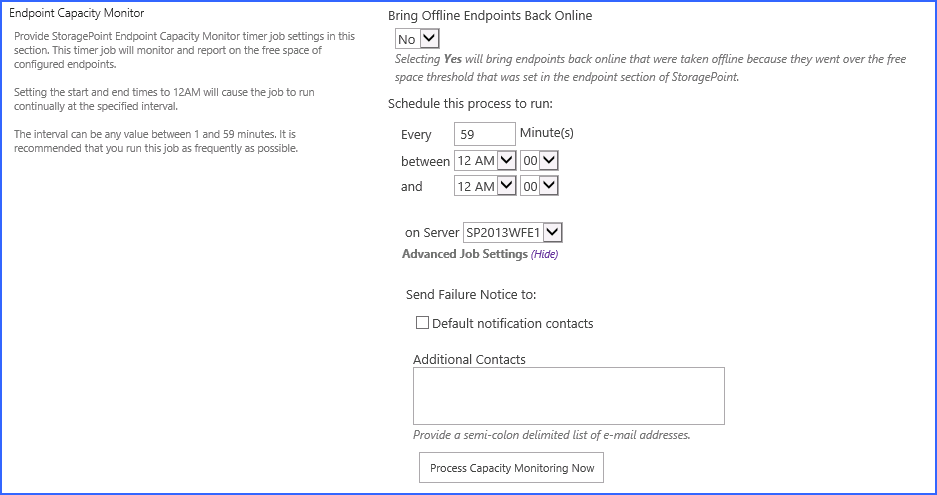
1.For the Bring Offline Endpoints Back Online field, selecting Yes will enable the endpoint to automatically return to an Online status if action is taken to correct the capacity issues or errors. No means that the administrator will have to manually bring the endpoint back online. See Managing Storage and Backup Endpoints for more information.
2.Enter a number between 1 and 59 to represent the frequency, in minutes, for this job to run in the Every field.
3.Enter the timeframe using the between and and fields in which this process should take place. Leaving the time at 12AM in both fields will cause the process to run continuously at the interval specified.
4.(Optional) In the on Server field, select a WFE for this process to run.
5.(Optional) Click the Show link to see the advanced job settings.
6.(Optional) Under the Send Failure Notice To: header:
a.Check the Default Notification Contacts box to have an email sent to the email address entered in General Settings. Note that for this feature to work, the Default Notification field on General Settings must contain a valid email address.
b.In the Additional Contacts box, enter a semi-colon delimited list of other email addresses that should receive the notification.
7.Click Save at the bottom of the page to save the settings or click Process Capacity Monitoring Now to analyze the endpoints immediately.
Breadcrumb Recovery Optimizer
The Breadcrumb Recovery Optimizer job is used to collapse the breadcrumb links after a content database is recovered from a disaster. This will ensure that the BLOB reference in the database points to the actual BLOB and not a link to a BLOB. While content will still be retrievable if this step is not taken, the end user will incur some overhead when the BLOB reference in the recovered content database points to a breadcrumb link. After a recovery has been performed on a system where the Use Breadcrumbs option is set to Yes, it is very important that the Breadcrumb Recovery Optimizer be run before the next scheduled Unused Blob Cleanup. This job does not need to be run at all if the Use Breadcrumbs option is set to No on the General Settings page.
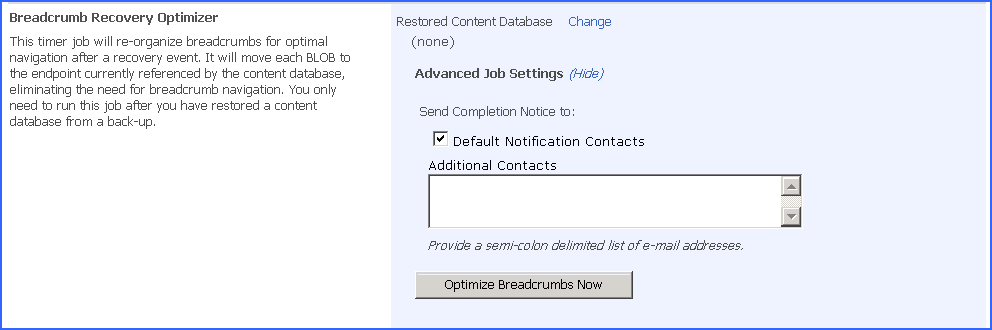
1.Click the Change link to select the Content Database.
2.On the Select Content Database window, change the web application if necessary and click the name of the content database. Click OK.
3.(Optional) Click the Show link to see the advanced job settings.
4.(Optional) Under the Send Completion Notice To: header:
a.Check the Default Notification Contacts box to have an email sent to the email address entered in General Settings. Note that for this feature to work, the Default Notification field on General Settings must contain a valid email address.
b.In the Additional Contacts box, enter a semi-colon delimited list of other email addresses that should receive the notification.
5.Click Optimize Breadcrumbs Now to begin collapsing breadcrumbs immediately.