
Installing ControlPoint Files
It is recommended that you temporarily disable virus checkers on all Web front end servers in the farm as they can slow the solution deployment enough to trigger timeout errors.
To install ControlPoint Files:
REMINDER: If UAC enabled on your server, you may have to "Run as Administrator."
1Unzip the downloaded zip file then launch the installer (Metalogix ControlPoint Installer.exe).
NOTE: Make sure you keep the entire downloaded folder intact as there are files that are required by the installer.
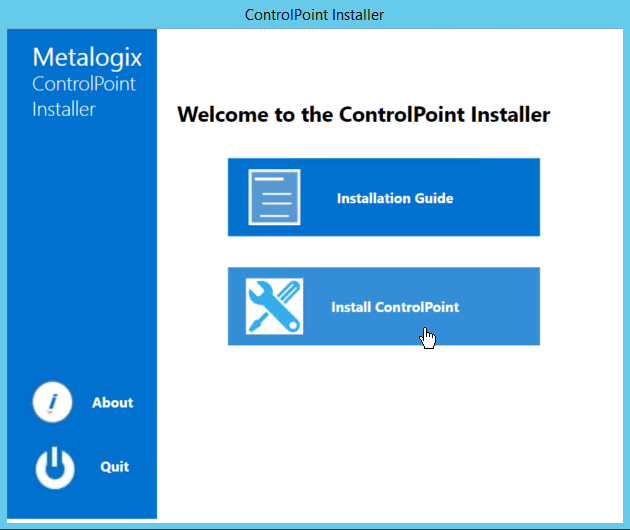
A splash screen displays, followed by the ControlPoint Installer Welcome screen.
2Click Install ControlPoint.
The License Agreement dialog displays.
3Read the license agreement. Click I accept the terms of the license agreement, then click [Next].
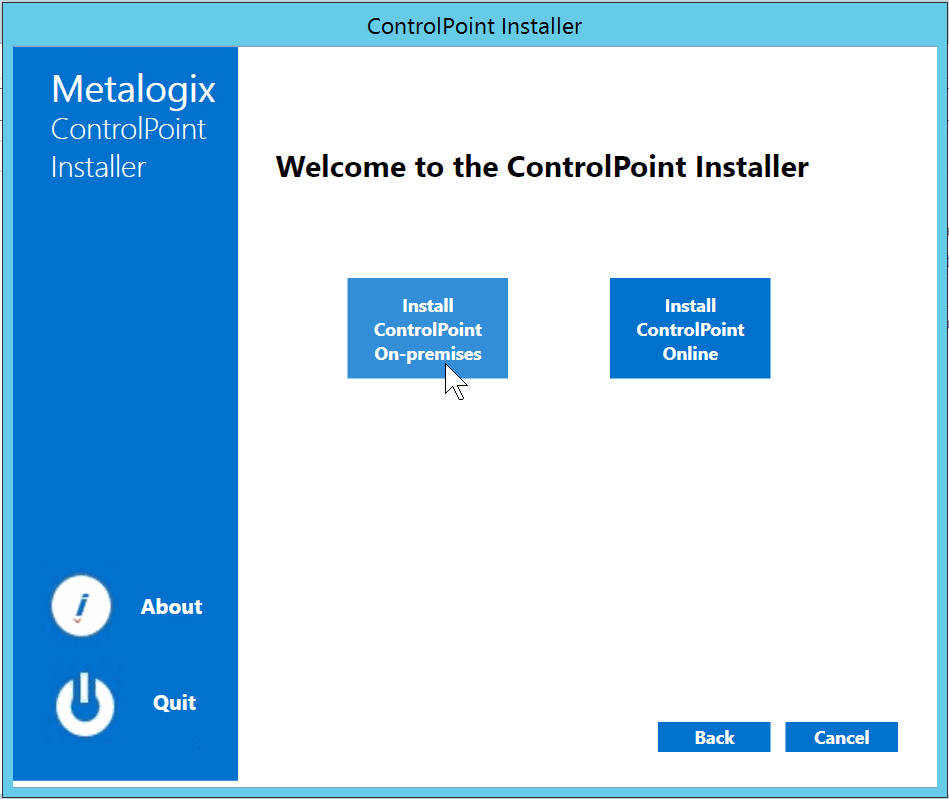
4Click Install ControlPoint On-premises.
5 When the Metalogix ControlPoint InstallShield Welcome dialog displays, click [Next].
The InstallShield Wizard specifies a default install directory (C:\Program Files\Metalogix\ControlPoint), but you can click [BROWSE] and select a different one.
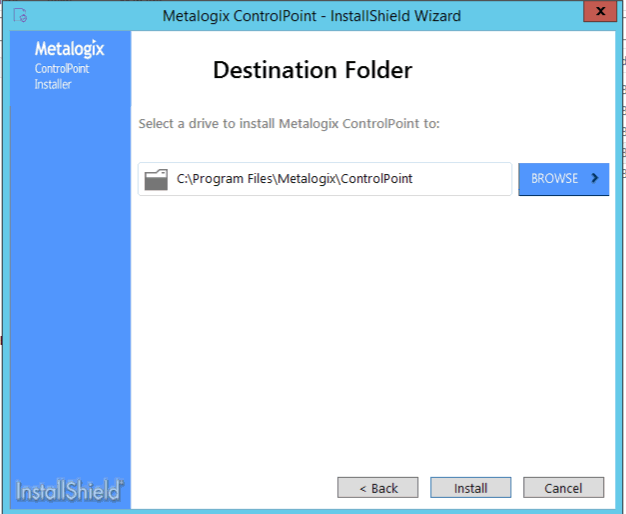
NOTE: This directory is where the installer will place the files needed to complete the installation. If you choose to change the default directory, you should not use the SharePoint hive.
6Click [Install].
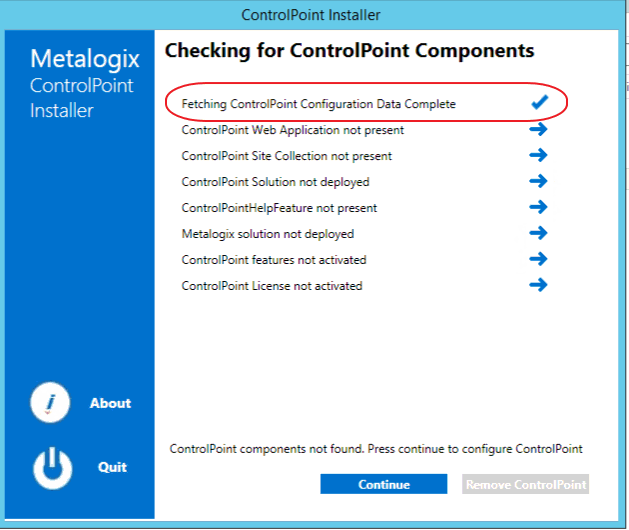
The installer checks for ControlPoint Components. Note that, for a first time installation, only Fetching ControlPoint Configuration Data will display a check mark. All other options will display a right-pointing arrow.
The Configuration Wizard installs the ControlPoint files to the specified Destination Folder. When completed, a pop-up displays asking whether you want to configure ControlPoint.
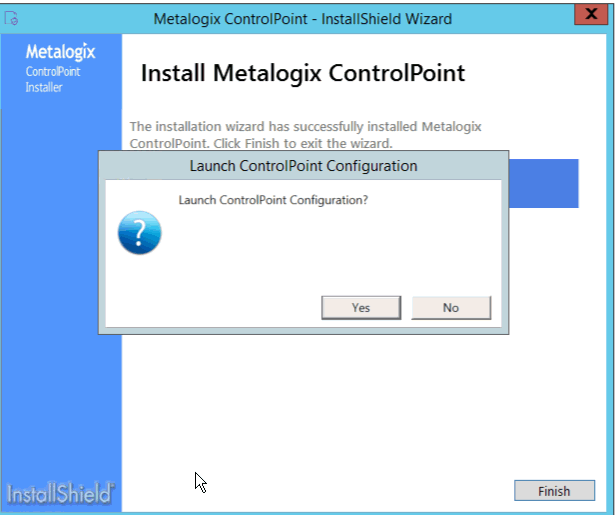
NOTE: If you want to configure the ControlPoint application at a later time, click [No]. You can launch the ControlPoint Configuration Wizard from the Start menu or a Desktop shortcut.
7Click [Finish].
Next Steps
It is strongly recommended that you perform a pre-installation validation check before Configuring the ControlPoint Application and Deploying SharePoint Solutions.
Performing a Pre-Installation Validation Check
After installing ControlPoint files, but before configuring ControlPoint for the first time, it is strongly recommended that you run the ControlPoint Install Check, which is located in the following folder: C:\Program Files\Metalogix\ControlPoint\Support\PreinstallValidation. When you run this utility (by double-clicking ControlPointInstallCheck.exe), you are prompted to enter the following information:
·ControlPoint Service Account name and password
·SharePoint Content Database Server name
·ControlPoint Service Database Server name.
NOTE: If UAC is enabled, it may be necessary to Run as Administrator.
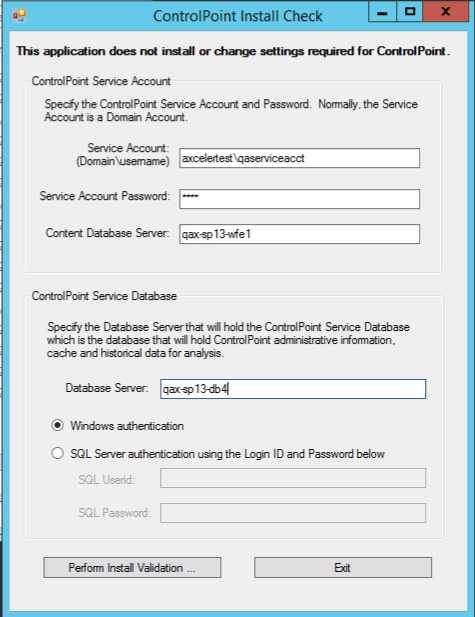
When you click [Perform Install Validation], the utility verifies that key system requirements are met. At the conclusion of the verification check, a summary of results displays.
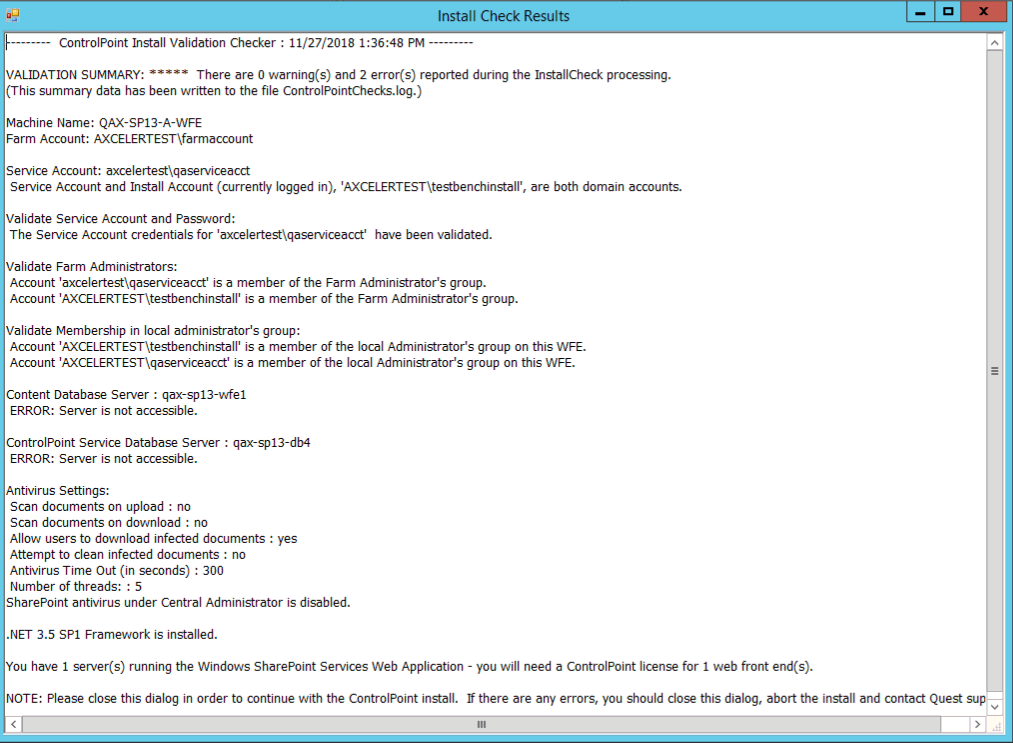
If any errors are reported in the Validation Summary, you can correct them before attempting to configure ControlPoint.
Configuring the ControlPoint Application and Deploying SharePoint Solutions
After ControlPoint file are installed the application must be configured.
Summary of ControlPoint Configuration Process
The ControlPoint Configuration Wizard carries out the following tasks:
A.Validates License: Checks the validity of the license key you enter as well as the terms of the license.
B.Creates ControlPoint Service database: Creates the ControlPoint Service database (xcAdmin) on the selected database server. This database is where administrative information and cached data used for analysis and reporting is collected. (Note that in a multi-farm installation, this database is shared among farms.)
C.Creates ControlPoint Web application (if applicable): If you choose to have the installer create a new Web application to host the ControlPoint Configuration site collection, installs the ControlPoint Web application within SharePoint, which includes the creation of a content database for the Web application.
D.Creates ControlPoint Site Collection: Creates the ControlPoint Configuration Site Collection within the ControlPoint Web application or an existing Web application (depending on the option you choose), and assigns an initial Site Collection Administrator.
NOTE: If you change the host name, the Configuration Wizard will also create the bindings in IIS, create alternate access mappings in Central Administration, and update the ControlPoint Setting 'Inbound ControlPoint Url' to use the host header.
E.Deploys ControlPoint WSPs to your SharePoint farm: Installs the ControlPoint application features, which includes:
§installation of ControlPoint menus and the ControlPoint Settings list into the ControlPoint Configuration Site, and
§creation of the IIS Virtual Directory on the Web front-end server.
NOTE: As is the case with other SharePoint Solution deployments, upon completion all running application pools will be recycled.
F. Activates License: Activates your ControlPoint license.
G. Windows Service Configuration (optional): If you elect to use server-side Windows Services, installs and configures the service(s) you selected.
To configure the ControlPoint application:
1Use the information in the following table to determine the appropriate action to take.
|
If ... |
Then ... |
|---|---|
|
you are starting directly from the ControlPoint installer (that is, after performing the install you chose to Launch ControlPoint Configuration |
go to the next step. |
|
after installing ControlPoint you chose to configure at a later time (that is, after performing the install you chose not to Launch ControlPoint Configuration. |
double-click the ControlPoint Configuration desktop icon. |
The installer checks your environment for the presence of installed components.
NOTE: For a first time installation, once the compononents check is complete only the Fetching ControlPoint Configuration Data box should be checked (

2Click [Continue].
3Enter the license key provided by Quest.
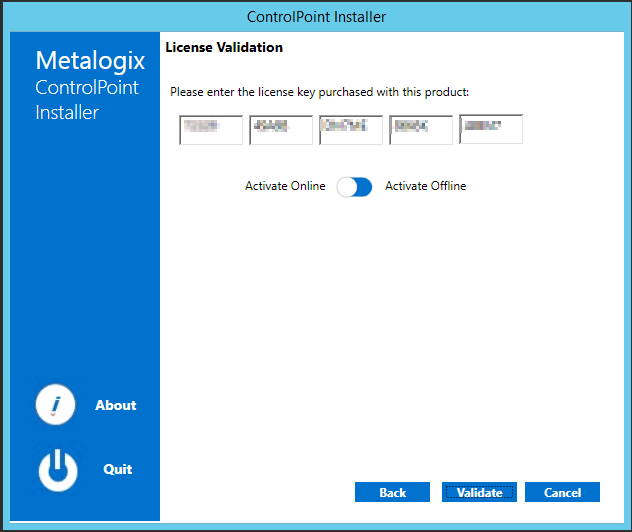
4Use the information in the following to determine the appropriate License Validation option to select.
NOTE: Most systems can use the Online activation method as long as the system has internet access. If you are unable to use the online activation method due to security settings or lack of internet access, the Offline activation option can be used. This option will still require some internet access, but allows for the authentication to be done from another machine that is not as restricted by security or has a connection to the internet.
|
If you want to validate the license... |
Then ... |
|---|---|
|
online |
accept the default option (Activate Online). |
|
offline |
a)Select Activate Offline. The Offline Activation window displays. You can either Copy Activation Data To Clipboard or use the Save Activation Data To File option to save the key into a text file (in case it needs to be copied to another machine). b)From a machine that has internet access, go to https://support.quest.com/offline-activation. c)Follow the instructions on the Offline Activation web page to activate your license, using the Upload activation data option. NOTE: Remember to save the Activation File to a location that is accessible by the machine on which you are installing ControlPoint. d)Return to the ControlPoint Installer License Validation dialog. e)Use the Step 3: Browser Activation Response File option to select the file returned by Quest. |
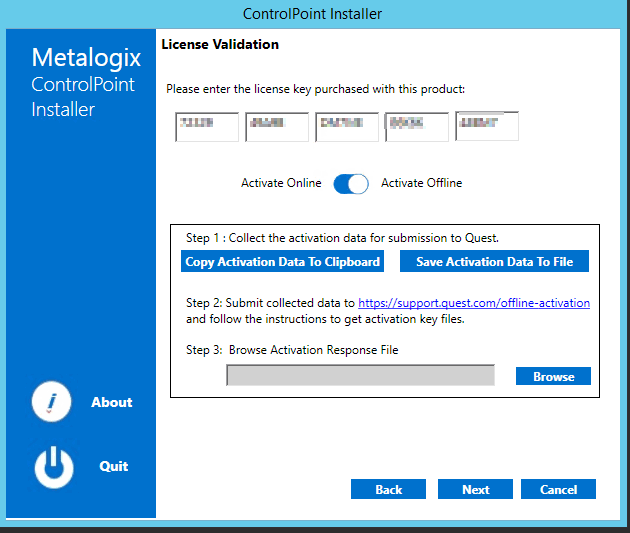
5Click [Validate].
If the license is validated successfully a License Validation pop-up displays the terms and current status of the license.
6Dismiss the pop-up and click [Next].
The System Prerequisite check begins. Any item that fails the check is identified by a red X.
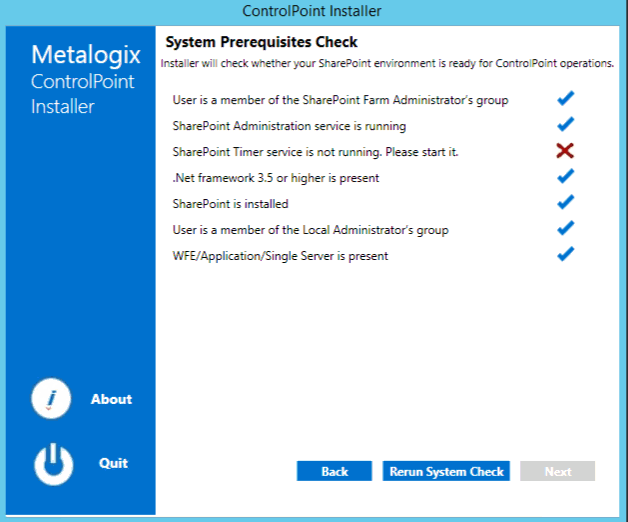
NOTE: If you fix the problem immediately, you can then Rerun the System Check. If you choose to Quit and fix the problem at a later time, the next time you launch the ControlPoint Configuration Wizard, it will start from the beginning.
7When all system prerequisites checks have completed successfully, click [Next] to display the Create the ControlPoint Service (xcAdmin) Database dialog.
8Specify the Database Server where you want to place the ControlPoint Service (xcAdmin) database:
§enter the server name
OR
§click [Browse] to choose a different database server
If you are installing on an additional farm in a multi-farm installation, make sure you specify the server on which the xcAdmin database has been created for the first farm. (If the database you specified has already been created, you will be asked whether you want to use it.)
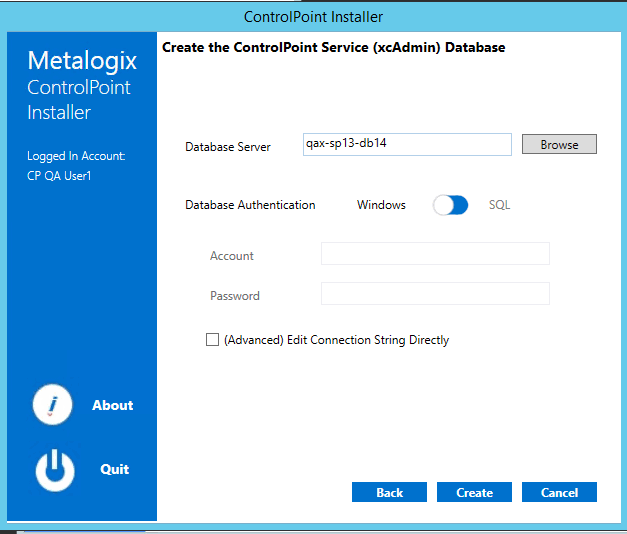
NOTE: If you are using SQL Express for development or evaluation purposes, the Database Server instance name is typically entered as <server_machine_name>\SQLExpress.
9Specify the authentication method you want to use. (If you select SQL Server authentication, you will be prompted to enter the Account and Password.)
10If you want to view, update, and/or test the xcAdmin database connection string:
a)Click the (Advanced) Edit Connection String Directly box.
NOTE: If you are choosing to reuse an existing xcAdmin database, you will be unable to update the connection string and the field will be disabled. If you need to update the connection string after completing the installation, do so via the ControlPoint Setting SQL Server Connection String for xcAdmin Database. Refer to the ControlPoint Administration Guide for details.
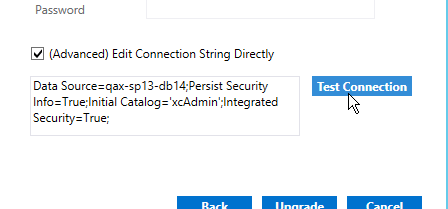
IMPORTANT: Update the connection string only if your SQL connection requires the addition of one or more custom keywords. For example, if you are using authentication with encryption and a self-signed server certificate, you would need to add Encrypt=yes;TrustServerCertificate to the string. Refer to the Microsoft article Using Connection String Keywords with SQL Server Native Client for more information.
b)Click [Test Connection].
Note that, if the connection is not successful, the parameter that caused it to fail will be identified.
11Click [Create] (or if you are using an existing xcAdmin database, [Update]).
12After the installer has created the new database (or updated an existing database), click [Next].
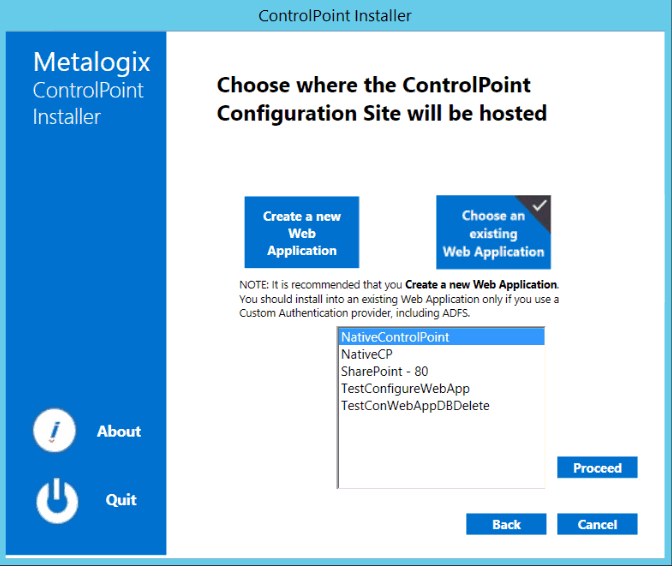
13Use the information in the following table to determine the appropriate action to take to Choose where the ControlPoint Configuration Site will be hosted.
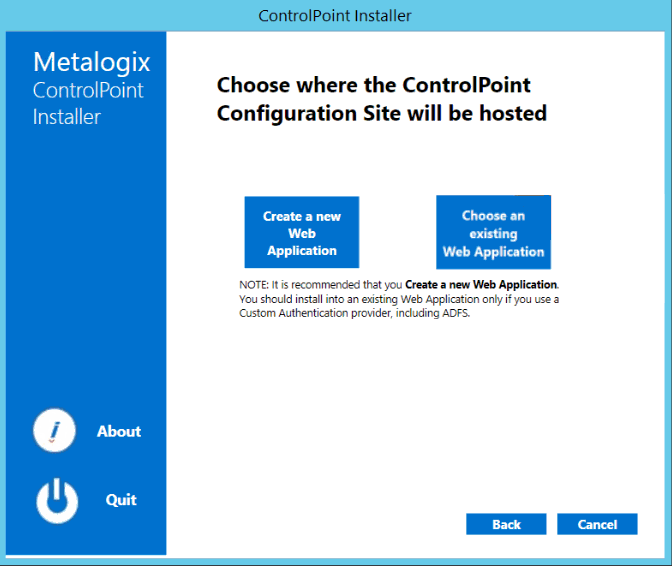
NOTE: It is recommended that you always Create a new Web Application, unless special circumstances apply.
|
If you want to ... |
Then ... |
|---|---|
|
create a new Web application to host the ControlPoint Configuration Site Collection
|
a)Select Create a new Web Application. b)For Host Name, if different from the default (the machine name), enter the host header (alias) that will be used. NOTE: If a host header is entered, the installer will create both the alternate access mappings in Central Administration and bindings in IIS. c)For Port, either §accept the default value (1818) OR §enter a different, unused Port number. (It is strongly recommended that you not install ControlPoint on Port 80, as you will encounter complications during setup. If you are using host headers and want to redirect ControlPoint to a port that is currently in use (including Port 80), you can do so after completing the installation. d)If different than the default (the currently logged in account), specify the Service Account under which you want the ControlPoint Web application to run. REMINDER: If your databases reside on a different server, then the Service Account must be a domain account. e)For Content Database Name, either §accept the default value (WSS_CONTENT_CONTROLPOINT) OR §enter a different content database name f)Specify a ControlPoint Configuration Site Collection Administrator account and Service Account, and enter the Service Account Password. g)If the server is configured for SSL and you want it to be used to access ControlPoint, for Use SSL? select Yes, then select a Trusted Certificate. |
|
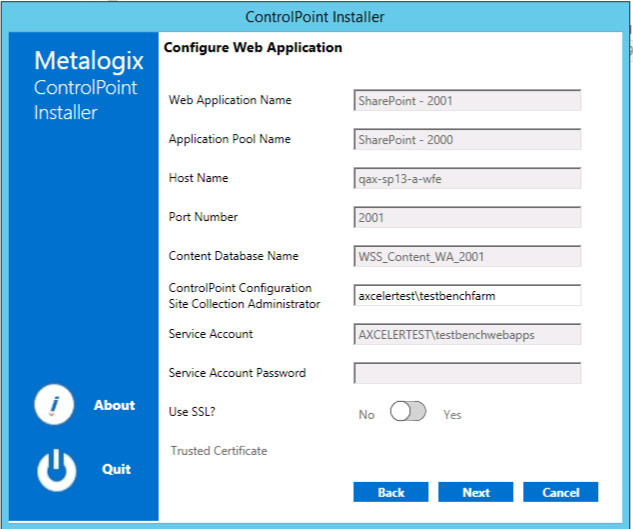
create the ControlPoint Configuration Site Collection in an existing Web application |
a)Select Choose an existing Web Application. b)Select an existing Web application from the list, then click [Proceed]. The Configure Web Application dialog is populated with the configuration settings for the selected server. (Note that ControlPoint uses the selected Web application's Application Pool identity acount as the Service Account). c)Specify a ControlPoint Configuration Site Collection Administrator account. d)If the server is configured for SSL and you want it to be used to access ControlPoint, for Use SSL? select Yes, then select a Trusted Certificate. |

14Click [Next].
15Click [Start Deployment].
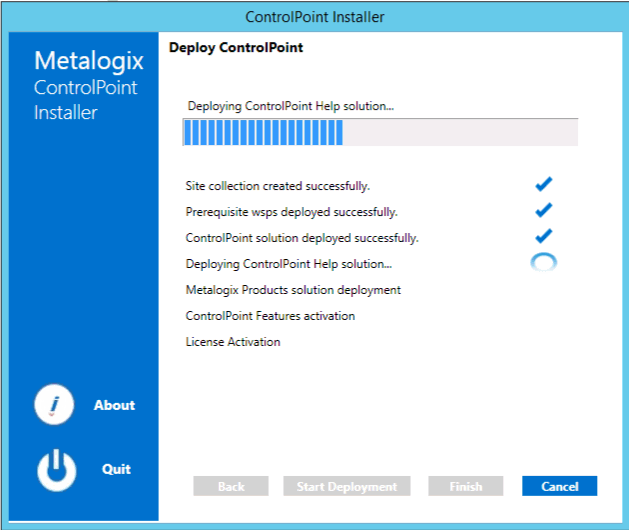
16When the deployment has completed, click [Finish].
The Configure Services dialog displays, asking if you want to configure services.
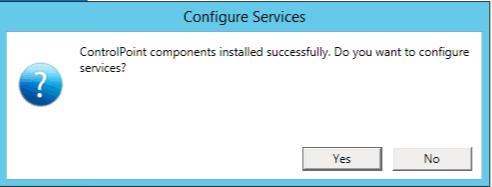
17If you want to configure services immediately, click [Yes] and continue with Configuring ControlPoint Services.
NOTE: You can also configure services at a later time by launching the Configuration Wizard from the server on which ControlPoint is installed.
Configuring ControlPoint Services
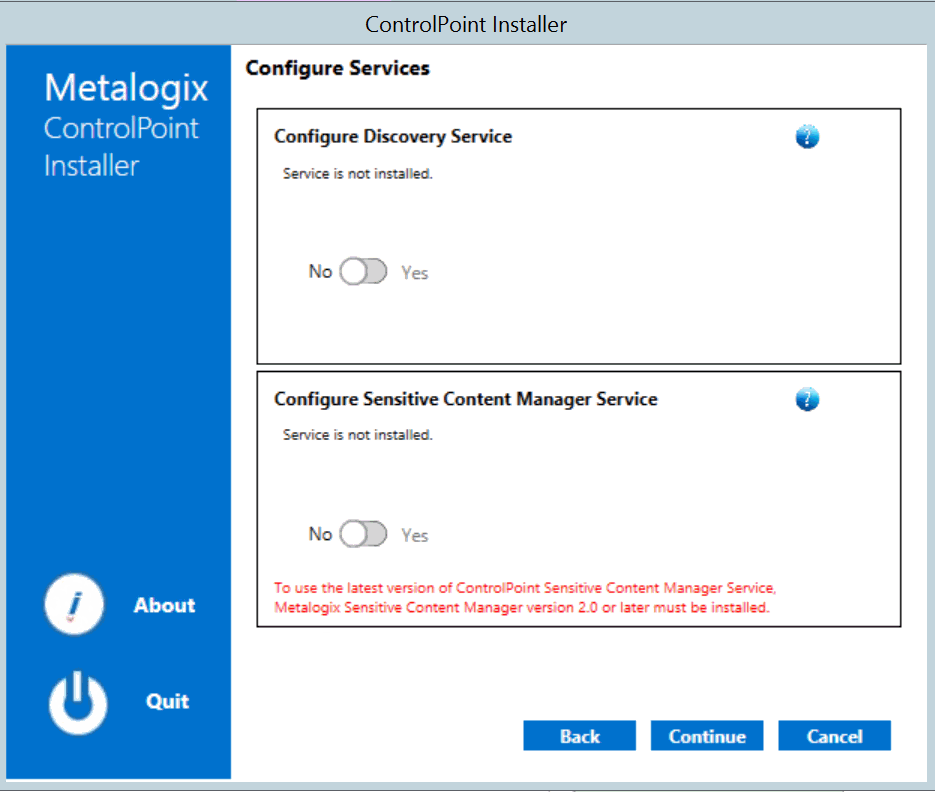
Toward the end of ControlPoint configuration process you have the option to configure the following Windows service(s):
·The ControlPoint Discovery Service, which collects data and stores it in the ControlPoint Services (xcAdmin) database cache for use in ControlPoint data analysis and reporting.
AND/OR
·If Sensitive Content Manager is installed in your environment, ControlPoint Sensitive Content Manager (SCM) Services will allow you to use it within ControlPoint:
§as a means of checking for:
oContent Analysis (CA) jobs ready to be uploaded from ControlPoint to Sensitive Content Manager for scanning.
AND
oScan results ready to be downloaded from Sensitive Content Manager to ControlPoint for further action.
AND
§Because they support multi-threading, SCM Services are especially suited to very large content analysis jobs.
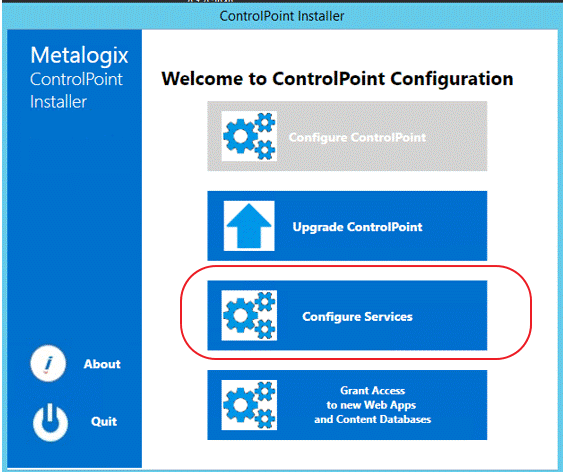
NOTE: If you want to configure services at a later time, you can do so by launching the Configuration Wizard from the server on which ControlPoint is installed (using the same used to install the ControlPoint application). After you have verified the Wizard has finished checking installed components, select Configure Services.
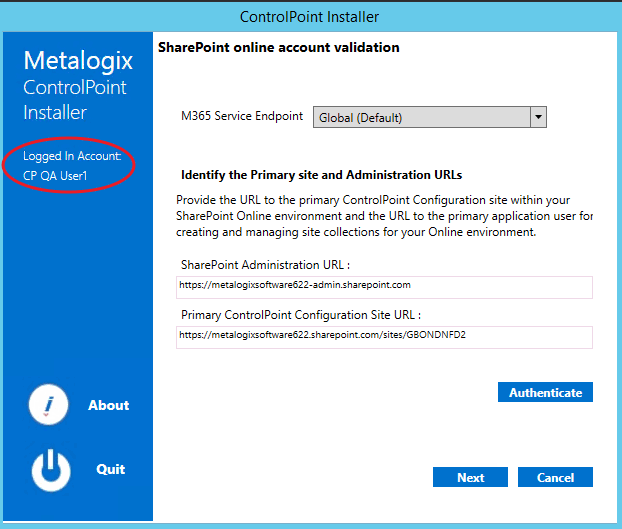
If you do choose to perform this action at later time, you will be prompted to complete the SharePoint online account validation dialog and authenticate using the Office 365 account used at the time ControlPoint was installed (which must be a Global Administrator for the tenant).
To configure ControlPoint Services:
1On the Configure Services dialog, select the service(s) you want to configure.
IMPORTANT:
§The Service Account must meet all of the requirements of the ControlPoint Service Account, as well as permission to Run as a Service.
§Keep in mind that the latest version of ControlPoint Sensitive Content Manager Service will only work with version 2.0 or later of Metalogix Sensitive Content Manager.
2Select the service(s) you want to configure.
3Click [Continue].
4Click [Start Deployment].
The installer deploys the selected Windows service(s).
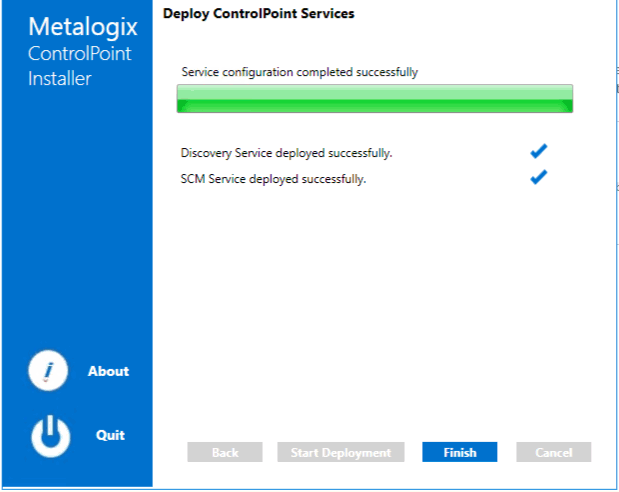
5When the services have been successfully deployed, click [Finish].
Additional Setup Requirement for the ControlPoint Discovery Service
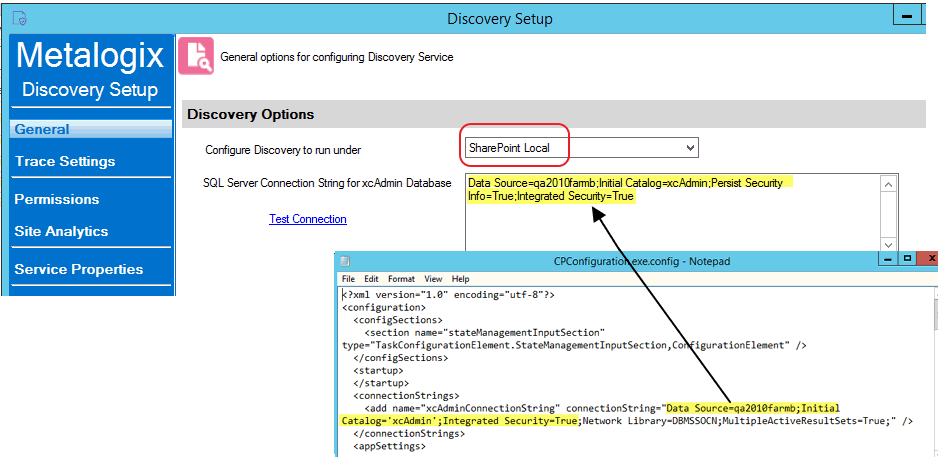
Before you can use the ControlPoint Discovery Service for the first time, you must also perform the following configuration tasks on the General tab of the Discovery Setup application (located, by default, in the folder C:\Program Files\Metalogix\ControlPoint\ControlPointFeatures\Services\Discovery):
·For Configure Discovery to run under, select SharePoint Local, and
·Add the SQL Server Connection String for xcAdmin Database.
NOTE: You can copy the Connection String from the file CPConfiguration.exe.config, located, by default, in the folder C:\Program Files\Metalogix\ControlPoint\ControlPointFeatures. Use the portion of the string that starts with the words Data Source and ends with Integrated Security = <value>.
You can also change a service's default settings from its Setup application. Refer to the ControlPoint Administration Guide for complete details.