
Updating Site Collection Settings After a Migration
|
Navigation: Copying SharePoint Objects as a Separate Action > Updating Site Collection Settings After a Migration |
Metalogix Content Matrix can update the Site Collection Administrators site collection quotas after the initial migration.
NOTE: The account that is running Metalogix Content Matrix must already be a Site Collection Administrator.
To update Site Collection Settings:
1.In the Explorer View, select the site collection whose settings you want to update.
2.Right-click and choose Change Site Collection Settings > Admin and Quota Settings.
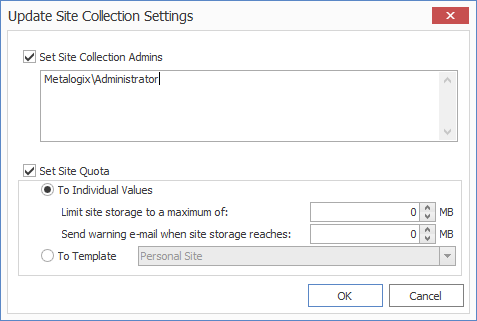
3.To update the list of Site Collection Administrators, check the Set Site Collection Admins box.
NOTE: The current list of Site Collection administrators is listed in the window below the check-box. To add a user to the list, manually enter the domain/username in the window. Multiple users can be added by using a semicolon (";") to separate each user account.
Metalogix Content Matrix does not validate these users, so if the user does not exist, or if there are any spelling error, they will not be detected.
Removing all users from the Site Collection Administrators collection, including the account that is currently logged into Metalogix Content Matrix, can cause issues, since once the change has been updated the migrating account, as well as other accounts, would no longer have permissions to perform any actions (or migrations) on that Site Collection. It is highly recommended that at least one account (the migrating account) is left in the Site Collection Administrators collection.
4.To update the site quota settings, check the Set Site Quota box.
§check the Set Site Quota box, and
§select the appropriate option:
§To Source Value (default) - the quota value from the source site will be used.
§To Individual Values:
·Limit site storage to a maximum of: "X" Mb - The maximum size of the new site collection., in megabytes (Mb)
·Send warning e-mail when site storage reaches: "X" Mb - The size at which to send a warning e-mail to the Site Collection Administrator, that the site collection is getting near it's set volume capacity.
·To Template - Match the same value for a site template on the target side.
NOTE: This drop down list will only display site templates that contain a site quota value.
Changing Navigation Settings After a Migration
|
Navigation: Copying SharePoint Objects as a Separate Action > Changing Navigation Settings After a Migration |
You can change both global navigation and quick launch settings for site collections and sites as a separate action.
|
|
In order to have full access to these features in an on premises target, it is recommended that the Metalogix Extensions Web Service (MEWS) be used. |
|---|

Changing Global Navigation Settings After a Migration
|
Navigation: Copying SharePoint Objects as a Separate Action > Changing Navigation Settings After a Migration > Changing Global Navigation Settings After a Migration |
Global navigation, also known as the top-bar navigation, can be changed after a migration, at either the site collection or site level.

To change global navigation settings after a migration:
1.In the Explorer View, select the site or site collection for which you want to change the global navigation.
2.Right-click and choose Change Site (or Site Collection) Settings > Global Navigation Settings.
3.If you want any changes to global navigation settings to be applied to any parent sites, check the Push changes to parent site box.
4.If you want any changes you make to global navigation settings to be applied to any child sites, check the Push changes to subsites box.
5.Select the appropriate option(s) on the Global Navigation tab- Global Inheritance options.
|
If you want the global navigation for the selected site collection/site to |
Then |
|---|---|
|
be the same as that of the parent site |
check the Display the same navigation items as the parent site box. |
|
display any navigation items that exist within any sub-site of the selected node |
check the Display the navigation items below the current site box. |
|
retain its current inheritance settings |
check the Do not change global navigation inheritance box. |
NOTE: Remaining options on the Global Navigation tab are disabled for all versions of SharePoint except SharePoint 2010.
6.Select the appropriate options on the Sorting tab.
NOTE: Any sorting options that you specify will apply to both Global and Quick Launch navigation.
a)Chose a sorting type. Use the information in the following table for guidance.
|
If ... |
Then |
|---|---|
|
you want navigation to be sorted automatically, based on the set Automatic Sorting options |
select Sort Automatically. |
|
you want to be able to sort navigation manually |
select Sort Manually. NOTES: When you select this option, the settings are changed within SharePoint, to allow for manual sorting of the navigation, and does not actually change the navigation through Metalogix Content Matrix itself. |
|
you want any existing sorting options to remain unchanged |
select Do not change sorting type. |
|
·you selected Sort Manually AND · you want any publishing pages within the site to be sorted according to Automatic Sorting settings |
check the Sort Publishing Pages Automatically box. NOTE: This option is only available if you chose to Sort Manually. |
b)If you chose to Sort Automatically or Sort Manually with the Sort Publishing Pages Automatically option enabled, complete the options in the Automatic Sorting section (Sort By: and sorting direction).
7.Select the appropriate option on the SharePoint Ribbon tab. Use the information in the following table for guidance.
|
|
These options are available for an on premises target only if you are using an Object Model connection (either local or using the Metalogix Extensions Web Service (MEWS)). |
|---|
|
If you want to... |
Select |
|---|---|
|
preserve any current settings for the SharePoint ribbon |
Do not change ribbon settings. |
|
make the Show Ribbon and Hide Ribbon commands available within the Site Actions drop down menu |
Make "Show Ribbon" and "Hide Ribbon" commands available. |
|
hide the ribbon, making ribbon commands unavailable |
Hide the ribbon commands. |
8.To run the action, click [OK].
Changing Quick Launch Settings After a Migration
|
Navigation: Copying SharePoint Objects as a Separate Action > Changing Navigation Settings After a Migration > Changing Quick Launch Settings After a Migration |
Quick Launch settings, also known as the top-bar navigation, can be changed after a migration, at either the site collection or site level.
To change Quick Launch settings after a migration:
1.In the Explorer View, select the site or site collection for which you want to change the global navigation.
2.Right-click and choose Change Site (or Site Collection) Settings > Quick Launch Settings.
3.If you want any changes you make to Quick Launch settings to be applied to any parent sites, check the Push changes to parent site box.
4.If you want any changes you make to Quick Launch settings to be applied to any child sites, check the Push changes to subsites box.
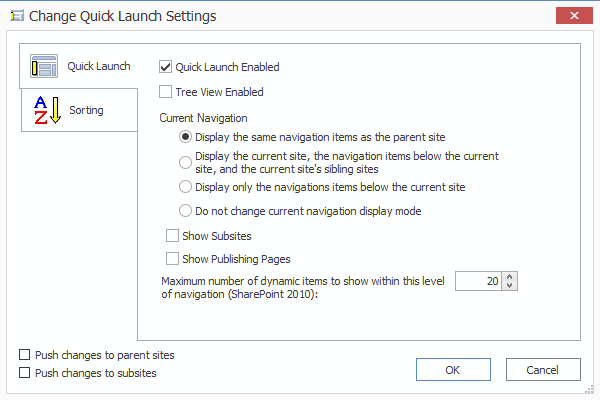
5.If you want Quick Launch Enabled on the site, make sure this box is checked.
6.If you want Tree View Enabled on the site, make sure this box is checked.
7.Select the appropriate Current Navigation option. Use the information in the following table for guidance.
|
If you want ... |
Then |
|---|---|
|
to allow the Quick Launch to display the same Quick Launch items that are displayed in the parent site |
Display the same navigation items as the parent site. |
|
the Quick Launch navigation to display navigation items that exist in both existing sub-sites and sibling sub-sites |
Display the current site, the navigation items below the current site, and the current site's sibling sites. |
|
the Quick Launch navigation to only display navigation items for its existing sub sites |
Display only the navigation items below the current site. |
|
preserve the current quick launch navigation display settings |
Do not change current navigation display mode. |
8.If you want sub-sites to be shown in the Quick Launch, check the Show Subsites box.
9.If you want Publishing pages to be shown in the Quick Launch, check the Show Publishing Pages box.
10.If you migrated to a SharePoint 2010 target and you want to set the number of dynamic items that can be displayed within that level of the Quick Launch:
§Check the Maximum number of dynamic items to show within this level of navigation (SharePoint 2010) box.
§Select the applicable number.
NOTE: This option is disabled for all versions of SharePoint except 2010.
11.Complete the appropriate options on the Sorting tab, as you would if you were Changing Global Navigation Settings After a Migration.
NOTE: Any sorting options that you specify will apply to both Global and Quick Launch navigation.