
Additional Considerations for Site Column Transformations
|
Navigation: Configuring Copying Options > Transformation Options > Transforming a Site or List Column into a Managed Metadata Columns > Additional Considerations for Site Column Transformations |
A site column can be transformed into a Managed Metadata column even if the site column's root site is not being migrated. In this case, Metalogix Content Matrix will add the Managed Metadata site column(s) to the top level site that is included in the migration, and all of the content in the scope of the migration will inherit these new site columns in place of the old ones. When applying a transformation of site columns in a migration, the site columns transformation will be applied to all of the content within the scope of the action that uses the specified site column. This includes any sites, lists, libraries and even content types that use the site column, and are within the scope of the migration.
For example, if a subsite is being migrated to the target, and this subsite contains lists and/or content types that use a site column which is inherited from the top level site, then when the sub site is migrated these inherited site columns will be replaced by new Managed Metadata site column. These new Managed Metadata site columns will use the subsite as their root site (since it was the top level site), and all of the content within the migration scope will inherit these new columns instead of using their original site columns. All the data for these columns will be converted to Managed Metadata values. Any site columns within content types (in the scope of the migration) will be converted the same way, and placed at the top level site in the migration.
NOTE: Metalogix Content Matrix can only apply this transformation to action to site columns of a certain type. The available column types include: Choice, MultiChoice, Text, Lookup, LookupMulti, Number, DateTime, Currency, Boolean, Note, and User.
Transforming List Columns into Managed Metadata Fields
|
Navigation: Configuring Copying Options > Transformation Options > Transforming a Site or List Column into a Managed Metadata Columns > Transforming List Columns into Managed Metadata Fields |
1.In the Managed Metadata Options tab, make sure you select the appropriate option(s):
§Transform specified site columns to managed metadata columns
AND/OR
§Transform specified columns in lists to managed metadata columns
2.Click the [ ] button to the right of the selected option to display the Configure List Column Transformations options window.
3.In the Explorer View section of the Configure List Column Transformations window, navigate to the top level site or list node to which the transformation(s) should be applied.
The top level node displayed in this window will be the target node that was selected for the migration. This allows users to either:
§Select the top level node and apply the transformation to content beneath it
OR
§Select a specific sub-site, list, or document library and apply the transformation to selected items.

NOTE: In the case of site column transformation, the site column will be applied to all instances of that site column from the top level node down.
4.Select the appropriate configuration option to apply: Use the information in the following table for guidance.
|
If you want to |
Then |
|---|---|
|
transform a column from the selected site or list |
Select Configure Transformation for a Column. NOTE: The Configure Transformation for a [Object] Column dialog > Transform Columns tab pre-populates the Source List field with the URL for the selected site or list. |
|
select one or more sites or lists containing the column to transform based on filter conditions |
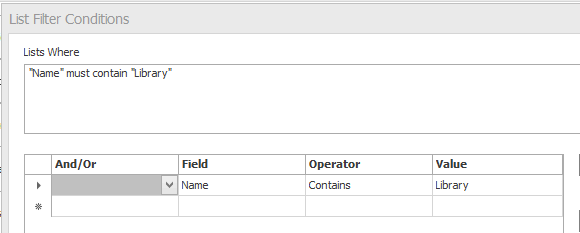
A.Select Configure Transformation using a Rule. B.Click the [ ] button and apply filter conditions For example, you can choose to transform columns for all lists that whose internal name contain the word Library. |
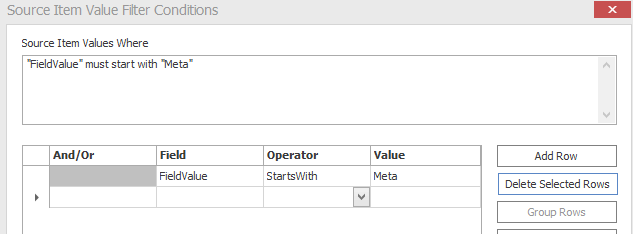
5.In the Transformation Columns tab - Source section, specify the Site Column or List Column to which you want to apply the transformation. Click the [ ] button and apply a filter to narrow the scope to which that the transformation will be applied. For example:
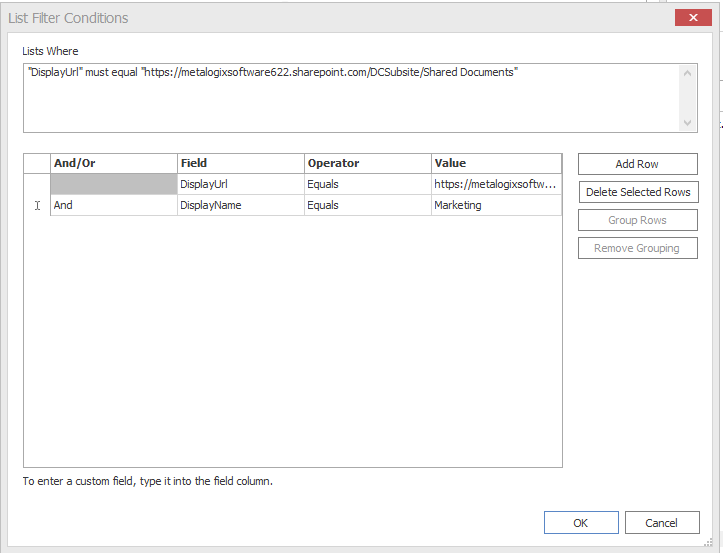
§If you set the List Filter Conditions to "DisplayName Contains Marketing" then only content that contains "Marketing" within the DisplayName column will be included in the transformation.
§If you set the Site/List Column Filter Conditions to if the value is set as "Name Contains Sales" then only columns that contain "Sales" within the Name value will be transformed into Managed Metadata columns.

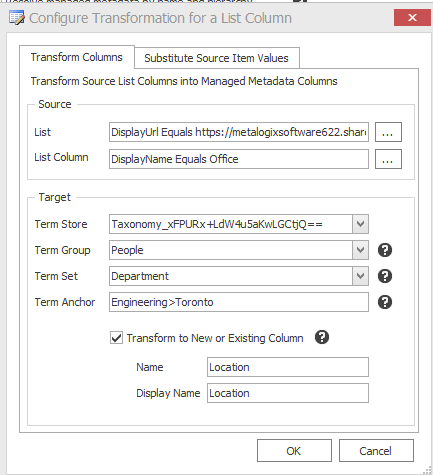
6.Complete the Transform Columns tab Target section as follows:
a)Select the Term Store to use for the new Managed Metadata field on the target from the drop-down.
This drop down menu displays all of the available Term Stores for the target node.
b)Select a Term Group from within the selected Term Store from the drop-down.
NOTE: If you want to create a new Term Group and/or Term Set instead of using a pre-existing one, you can manually enter a text value in the Term Group and/or Term Set field, and Metalogix Content Matrix will create the new group/term within the Term Store, and apply it to the transformation.
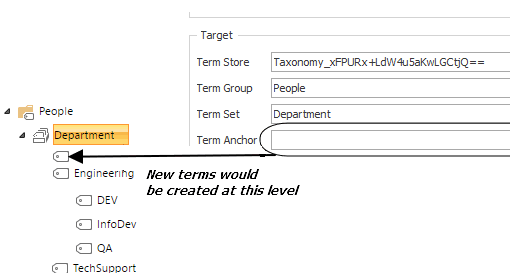
7.If you want to set an anchor point below the selected Term Set for adding new taxonomy terms, enter the Term Anchor.
EXAMPLE: The selected Term Store contains a Term Group called People, within which is a Term Set called Department.

If you do not set a Term Anchor, Metalogix Content Matrix will add new terms directly below the Department Term Set.
If you were to set the Term Anchor to Engineering, new terms would be added as child terms of the Engineering Team.
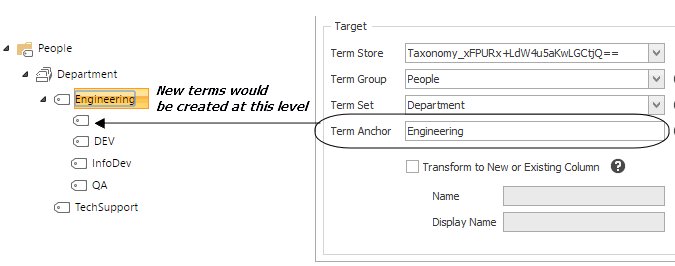
To set a Term Anchor further down in the term hierarchy, use the > sign to drill down to the desired level.
You can even create a new term as a parent for transformed terms. For example, if you want to create a new term, Toronto, as a child term of existing term DEV, you would enter the Term Anchor as Engineering>DEV>Toronto. New terms would then be added below Toronto.

8.If you want the transformation to apply to a column other than the column that corresponds to the selected source column, check the Transform to New or Existing Column box.
The following table describes how Metalogix Content Matrix handles transformations when this box is checked.
|
If |
Then |
|---|---|
|
both the Name and Display Name entered are identical to an existing column on the target |
the column on the source will be transformed into that column on the target. |
|
either the Name or the Display Name do not match an existing column on the target |
·a new column is created on the target with a new Name and Display Name, and ·the Managed Metadata transformation is applied to this new column. EXAMPLE: If there is a column on the source named "Author", and the values in this column are to be transformed into Managed Metadata values, then this option could be used to create a new column named "AuthorID". All the values from the "Author" column on the source would be copied into the "AuthorID" column on the target, and the Managed Metadata transformation is only applied to "AuthorID", leaving "Author" unchanged. |
9.If you checked the Transform to New or Existing Column box, enter the Internal Name and Display Name of the new column you want to create or the existing column you want to use.
NOTE: The Internal Name should not contain spaces. If you are transforming to an existing column, make sure you enter both the Internal Name and Display Name exactly as they appear on the target.
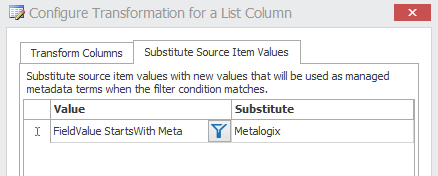
10.If you want to substitute source item values with new values that will be used as Managed Metadata terms:
b)Select the Substitute Source Item Values tab
Either:
§enter the Value you want to substitute exactly as it appears on the source
OR
§click the Filter icon (
11.Enter the Substitute value exactly as you want it to appear on the target.
12.Click [OK] to close the Configure Transformation dialog.
13.Click [OK] to close the Configure Transformation for a List Column dialog.
The new transformation now displays in the bottom (Configurations) section of the window.
NOTES:
·When a site column transformation is set, the Transform specified columns in list to Managed Metadata columns option in the Managed Metadata Options tab will now be selected as well. Because a site column is still a column in a list, the site column transformation will also be visible in the list column transformation dialog. However, you will be unable to edit the site column transformation from the Configure List Column Transformations dialog even though it is visible. The List Filter value in the "Configuration" section of this dialog will also be empty, which will help you differentiate between a list/field transformation and a site column transformation.
·If a site column transformation is being applied, and the specified site column exists within a content type, you must also check the Copy Content Types option in the Site Options tab of the configuration options. If this option is not set when applying a transformation to a site column in a content type, then not all of the columns will be available for edit in SharePoint's item edit dialog, after migration.
Using PowerShell to Create Custom Transformations
|
Navigation: Configuring Copying Options > Transformation Options > Using PowerShell to Create Custom Transformations |
When you select the Add Transformer > Invoke PowerShell script option for an Available Definition, you can use custom PowerShell scripts to create your own transformations beyond the built-in capabilities of the Metalogix Content Matrix.
Specify when you want the script to run by selecting one of the following options:
Begin Transformation The transformation script will run before the migration of the affected objects, allowing you to read and make changes to objects on the source before objects themselves migrate.
Transform The transformation script will run while the migration of the affected object(s) is in progress. For example, the user mapping between source and target would be run using the Transform option.
End Transformation The transformation script will run after the migration of affected object(s), allowing you to read and make changes to objects on the target.
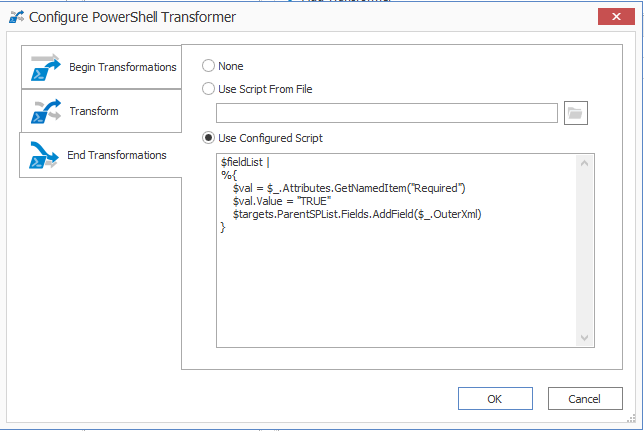
EXAMPLE: The following Transformer consists of two scripts for disabling and re-enabling the Required setting for a column list.
·The first script entered into the Begin Transformation tab sets the setting of any columns that are Required to false before copying begins.
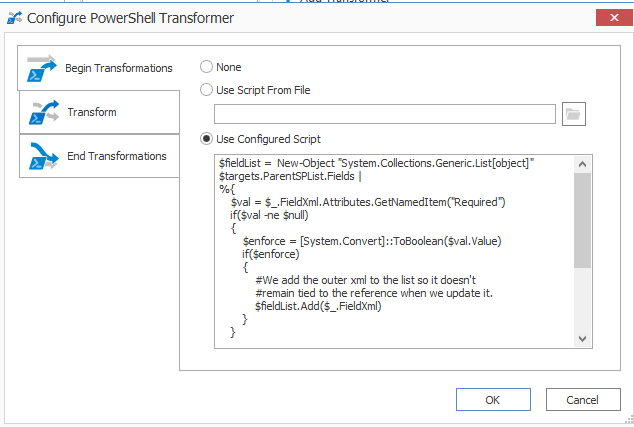
·The second script, entered into the End Transformations tab, sets the setting back to true after item migration has completed.
Saving or Running a Migration Job
When you finish configuring a migration action, you can run it immediately or save a copy of the settings to a job file, which displays in the Job List section. You can then:
·run a migration directly from the Job List section
OR
·If your environment is configured for Distributed Migration, submit a Distributed Migration job.
OR
·create a PowerShell script and schedule it to run as a Windows Scheduled Task
OR
·trigger jobs in the Content Matrix Console to run using PowerShell.
You can also save the job configuration as a template so that you can preserve and reuse settings for future migration jobs.
When the migration starts, a status dialog box will appear. The job logs can be viewed (in progress or after the migration is finished) by clicking [Details>>]. The Status section of the status box will list a live count for the number of successes, warnings, failures, etc. for the migration. The Progress section of this dialog will list any completions and the type of completion (Sites, lists, items, users, groups, etc.). A Migration Completed message will appear when finished. Click Close to exit the status dialog.