
Modifying Content Matrix Configuration and Settings
You can configure and customize a number of Metalogix Content Matrix settings, including:
·the use of encrypted SQL database connections
·default settings in configuration variable files
·resource utilization settings
Using Encrypted SQL Database Connections
When connecting to a full SQL Content Matrix Job Database, you are given the option to connect using TLS/SSL encryption.
NOTE: Content Matrix can use any version of TLS that is compatible with .NET Framework 4.7.2. The default version of TLS used by the operating system on the machine from which you are connecting will be used by Content Matrix.
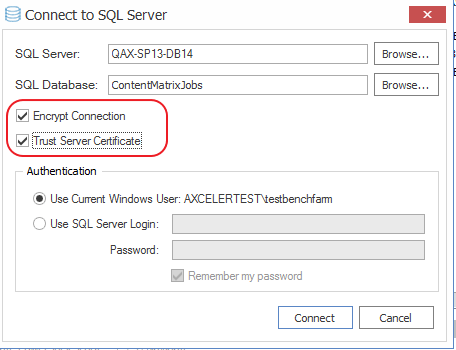
The encrypted connection can use either:
·a self-signed certificate or a trusted certificate from the third party authority (refer to the Microsoft article https://docs.microsoft.c om/en-us/sql/database-engine/configure-windows/enable-encrypted-connections-to-the-database-engine?view=sql-server-ver15 for instructions on configuring an encrypted connection using a certificate)
OR
·a SQL-generated certificate, which does not require configuration.
NOTE: If a trusted certificate is used, it is not necessary to check the Trust Server Certificate box. However, if the box is not checked and the certificate is not trusted, the following message will display:
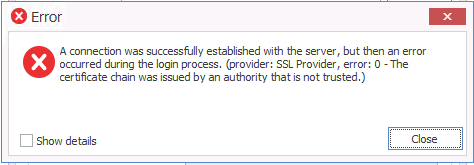
In this case, the Trust Server Certificate box must be checked in order to continue the connection.
Configuring Proxy Settings
In most cases Metalogix Content Matrix can automatically connect to SharePoint and authenticate license keys, through an environment's proxy setting, However, in some cases the proxy may need to be configured within Metalogix Content Matrix. In these cases users can specify the proxy settings though the connecting dialog.
There are two basic places where this proxy setting can be configured. The first of these is when activating a license key, and the second when connecting to SharePoint. The dialogs for these options look slightly different, and the when you are using a proxy to connect to SharePoint, you have the additional option to Import Proxy from Internet Explorer.
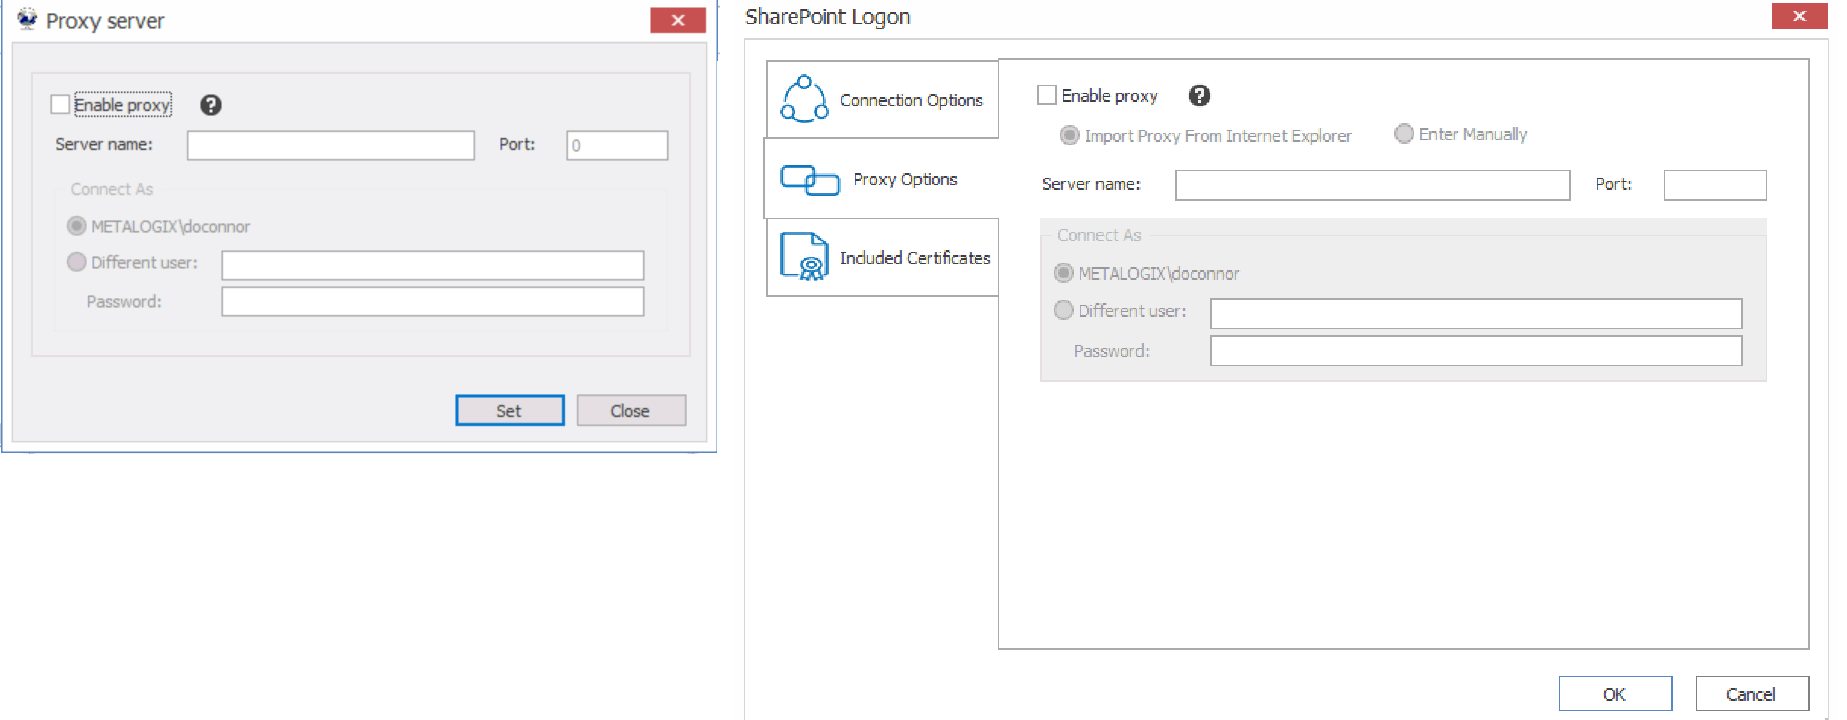
To configure proxy settings:
1.In the Proxy server dialog, check the Enable proxy box.
2.Use the information in the following table to determine the appropriate action to take.
|
If ... |
Then ... |
|---|---|
|
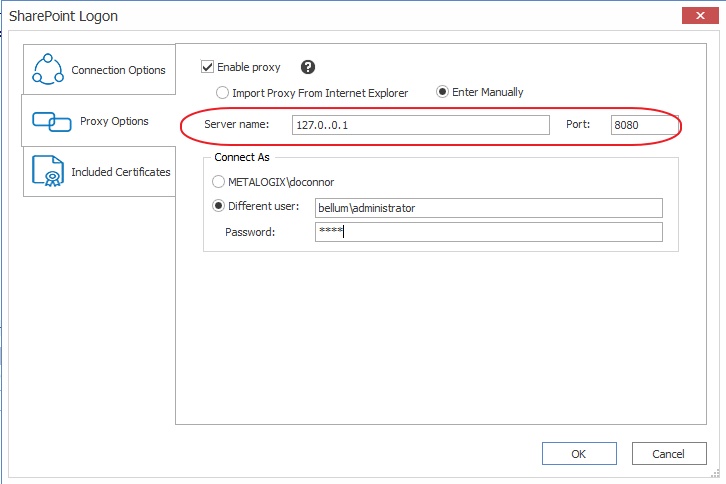
you want to manually enter proxy information |
A.Select Enter Manually. B.Enter the Server name (or IP) and Port for the proxy. C.Specify the credentials to be used when connecting to the target server. The Windows authenticated credentials of the current user will be selected by default. You can specify alternate SharePoint credentials by clicking the Different user radio button, and entering an alternate username and password. |
|
Internet Explorer has been configured to use a proxy server via a proxy auto-configuration (.PAC) file and you want to connect to SharePoint using this method |
select Import Proxy from Internet Explorer. NOTE: This option is currently available only when connecting to SharePoint. Refer to the Microsoft article Auto proxy configuration settings for Internet Explorer for more information. |

3.If you accessed the dialog from the License Activation dialog, click [Set].
NOTE: If this method does not seem to be working, you can manually configure Metalogix Content Matrix to use a proxy setting. See Manually Configuring Proxy Settings.
Manually Configuring Proxy Settings
If, for some reason, Metalogix Content Matrix cannot connect through a proxy, then the proxy settings can be configured through the Metalogix Content Matrix UI. If you are not able to configure the proxy settings through the product's UI for some reason, it can be configured manually. The below directions should help you manually configure some explicit proxy settings, enabling the product to work with your proxy.
To manually configure proxy settings:
1.Open the Metalogix Content Matrix Console and add a connection to the desired SharePoint location.
2.After a connection has been added, close Metalogix Content Matrix.
3.Open the ActiveConnections.xml file, which can be found in the following locations, in a text editor:
C:\Users\<USER>\AppData\Roaming\Metalogix\Metalogix Content Matrix Console - <Product> Edition
Within the XML file there is a <Connection /> XML element for each added connection. In order for proxy settings to be added to a connection, another element needs to be added inside the connection XML. The added element should be named Proxy, and it should have an attribute named URL. The value for this URL attribute should be the actual URL for the proxy that will be used.
For example, if we are trying to add a proxy connection to the following node:
<Connection NodeType="Metalogix.SharePoint.SPWeb, Metalogix.SharePoint, Version=1.0.0.0, Culture=neutral, PublicKeyToken=3b240fac3e39fc03" AdapterType="WS" URL=http://SharePoint2010 />
We would add: <Proxy URL="http://metalogixproxy:8000/" />. So the end result would be:
<Connection NodeType="Metalogix.SharePoint.SPWeb, Metalogix.SharePoint, Version=1.0.0.0, Culture=neutral, PublicKeyToken=3b240fac3e39fc03" AdapterType="WS" URL="http://SharePoint2010">
<Proxy URL="http://metalogixproxy:8000/" />
</Connection>
If the proxy connection requires a user name and password that differ from your normal logged in Windows credentials, then these can also be specified in the Proxy element. The attribute UserName can be used to enter a user name (in domain\user format), and an attribute named Password can be used to enter the password value.
In this case the Proxy value <Proxy URL="http://metalogixproxy:8000/" /> would become:
<Proxy URL="http://metalogixproxy:8000/" UserName="DOMAIN\ProxyUser" Password="ProxyPassword" />
4.After these values have been entered to the desired connection, save and close the ActiveConnections.xml file.
5.Re-launch Metalogix Content Matrix.
The connection using the proxy should now be configured, and the connection should be established and working.