
Incremental Migration
Metalogix Content Matrix lets you run an incremental migration (also known as a delta migration or an incremental copy) to migrate new and updated data from the source to the target. This can save time when relatively minor changes have been made to a large source environment, and you want to migrate those changes to your target environment.
Incremental migrations are based off previous migration actions. In order to create an incremental job, a non-incremental migration action must have already been run, and a job item for that action must exist in the Job List.
Incremental migrations can be run from the Metalogix Content Matrix Console UI or through a PowerShell script.
Prerequisites and Limitations of Incremental Migrations
·To run an incremental migration, a full migration must have already been run for the content you want to migrate incrementally. This is because of the following: firstly, there must be content on the target environment to compare changes on the source environment against, and secondly, incremental migrations can only be created from an existing job item in the Job List.
·The only supported connection types are Local Connection (SharePoint Object Model) and Remote Connection (Metalogix SharePoint Extensions Web Service). For more information about connection types, please see Connecting to SharePoint.
·Incremental migration works by comparing the last modified dates for each item on the source and target. Therefore, the following scenarios do not fully support incremental migration:
§If an item on the source is moved after the initial non-incremental migration action, it is considered a new item and is migrated incrementally. This will result in duplicated items.
§If an item on the source is deleted after the initial non-incremental migration action, there is no longer a last modified date on the source to compare to the target. This will result in the deletion not being detected by Metalogix Content Matrix Console, which means that the deleted item on the source remains on the target after the incremental migration action.
·Only Title and Description eRoom metadata is supported. Other metadata types are not supported because they have no equivalent object in SharePoint.
·It is a Known Issue that an incremental migration action will incorrectly duplicate eRoom objects if:
1.A set of eRoom objects is migrated non-incrementally to a subsite on the target.
2.That same set of eRoom objects is then migrated non-incrementally to a different subsite on the target.
3.An incremental migration job is then created from the non-incremental migration action that was created in step 1.
NOTE: This issue applies to all eRoom object types and migration actions that support incremental migration.
Supported Incremental Migration Actions and Objects
The following is a list of migration actions that support incremental migration:
·Paste as Document Library (except when migrating calendars, discussions, and polls)
·Paste as Site
·Paste all Items As Site
·Paste as Site Collection
·Paste as Site Collection using Nested Object Flattening
·The following object-specific migration actions:
§Paste Calendar and Paste Calendar Event
§Paste as Database
§Paste Discussion and Paste Discussion Topic
§Paste Document, Paste Container as Folder, and Paste Folder > All Items
§Paste as eRoom Link and Paste Link as Link to a Document
§Paste Note
§Paste as Poll
The following is a list of eRoom objects that support incremental migration:
·Calendars
·Databases
·Discussions (known as Discussion Boards in SharePoint)
·Documents
·Links
·Metadata (only 'Title' and 'Description')
·Notes
·Polls (known as Surveys in SharePoint)
·Rooms
To migrate eRoom Content Incrementally:
1.Ensure that a non-incremental migration action has already been run for the content you want to migrate incrementally.
2.In the Job List, select the existing job item.
3.Right-click and choose Create incremental job.
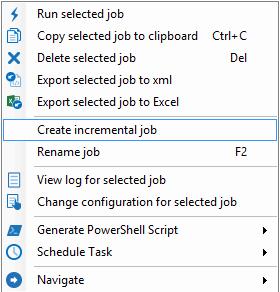
A new incremental job is added to the Job List.
4.If you want to change the configuration options for the incremental job:
§In the Job List, navigate to the incremental job:
§Right-click and choose Change configuration for selected job to display the Copy Container As... dialog.
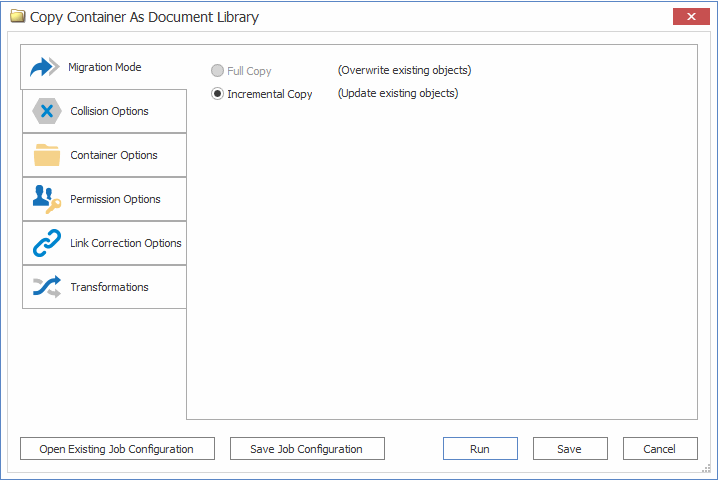
5.Change any configuration settings as you would if you were configuring copying options for a full migration.
EXCEPTIONS:
§In the Migration Mode tab, the Incremental Copy option is selected, and all other options are disabled.
§In the Collision Options tab, the Use existing content option is selected, and all other options are disabled.
Now you can save or run the action.
Using PowerShell with Content Matrix
Metalogix Content Matrix can generate PowerShell scripts to be used to migrate SharePoint content through the PowerShell command window. You can also use PowerShell to perform other actions, including:
·triggering a job in the Content Matrix Console to run
The Content Matrix PowerShell Console shortcut is added to the same Start Menu folder location where the to Metalogix Content Matrix Consoles are placed after installation. The same PowerShell console can be used for any edition, as long as the edition-specific snap-ins are used. You can also use a standard PowerShell console or PowerShell ISE.
Adding PowerShell Snap-Ins for the Application Framework
Whenever a new PowerShell session is launched, the edition-specific snap-ins must be added before you can perform a Content Matrix action.
NOTES:
· If you have more than one edition of Content Matrix, only one edition can be run per PowerShell session.
·If Content Matrix settings is changed, in order to apply new settings all PowerShell sessions must be restarted.
To add the PowerShell cmdlets for the application framework:
1.Open a Powershell ISE or PowerShell console session.
2.Add the PowerShell snap-ins by pasting in the following text:
if ( $PsVersionTable.PSVersion.Major -lt 3 ) { Write-Host "Windows PowerShell Version 3.0 or later needs to be installed in order to run Content Matrix PowerShell scripts."; exit; }
if ( (Get-PSSnapin -Name Metalogix.System.Commands -ErrorAction SilentlyContinue) -eq $null ) { add-pssnapin Metalogix.System.Commands | out-null }
if ( (Get-PSSnapin -Name Metalogix.SharePoint.Commands -ErrorAction SilentlyContinue) -eq $null ) { add-pssnapin Metalogix.SharePoint.Commands | out-null }
if ( (Get-PSSnapin -Name Metalogix.eRoom.Commands -ErrorAction SilentlyContinue) -eq $null ) { add-pssnapin Metalogix.eRoom.Commands | out-null }
if (Get-Command Set-MetalogixJobPrerequisites -ErrorAction SilentlyContinue){ Set-MetalogixJobPrerequisites -Value "Content Matrix Console - eRoom Edition" }
Using Powershell for Nested Content Reports and Pre-Migration Check
You can perform Pre-Migration Checks, Nested Contents Reports, and Nested Contents URL Length Reports through the PowerShell command window.
In order to create a PowerShell script for a Nested Contents Report or a Pre-Migration Check, Nested Contents URL Report, a report item must first exist in the Job List section.
To create a PowerShell script for Nested Content Reports and Pre-Migration Checks:
1.In the Job List section, select the report(s) want to run in PowerShell.
2.Either:
§Click the [Generate PowerShell Script] button in the Job List menu options
OR
§Right-click and choose Generate PowerShell Script.
3.Choose the appropriate option from the sub-menu to specify the security method that will be used when generating the PowerShell script . Use the information in the following table for guidance.
|
If you want to generate a PowerShell script |
Choose |
|---|---|
|
that can be used only by the currently logged in User Account on the machine it is generated on |
For Current User and Machine. NOTE: Any PowerShell scripts that are generated for scheduling through this option can only be run by the logged in user on the machine they were generated on. |
|
that can be used by any User account on the machine it is generated on |
For Current Machine. |
|
that can be used by any User account on any machine that has the certificate that is specified when the script is created |
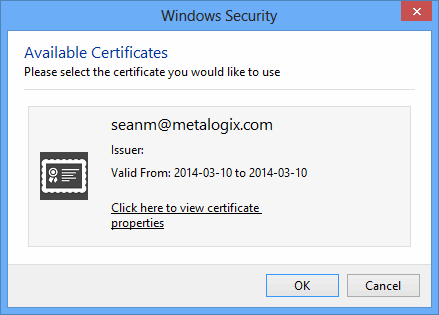
For Certificate. When you save the PowerShell script using this method you will be prompted to select a security certificate that exist on that machine. The selected certificate will be required on any system that attempts to run the script at a later date.
|
Once the applicable option is selected, Metalogix Content Matrix Console will generate a PowerShell script for the selected report, which will be written to a Notepad file. If multiple reports are selected, they will all be included in that single file.
3.To save the file as a PowerShell script:
a)In the Job List section toolbar, choose File > Save As....
b)In the Save As dialog box, navigate to the directory in which the script file is to be saved.
c)Click the Save as type drop-down menu and select All Files.
d)Enter a name for the script and append the .ps1 file extension to the file name to save it as a PowerShell script.
To run the PowerShell script:
NOTES:
· If you have more than one edition of Content Matrix, only one edition can be run per PowerShell session.
·If Content Matrix settings is changed, in order to apply new settings all PowerShell sessions must be restarted.
To add the PowerShell cmdlets for the application framework:
1.Open a Powershell ISE or PowerShell console session.
2.Add the PowerShell snap-ins by pasting in the following text:
if ( $PsVersionTable.PSVersion.Major -lt 3 ) { Write-Host "Windows PowerShell Version 3.0 or later needs to be installed in order to run Content Matrix PowerShell scripts."; exit; }
if ( (Get-PSSnapin -Name Metalogix.System.Commands -ErrorAction SilentlyContinue) -eq $null ) { add-pssnapin Metalogix.System.Commands | out-null }
if ( (Get-PSSnapin -Name Metalogix.SharePoint.Commands -ErrorAction SilentlyContinue) -eq $null ) { add-pssnapin Metalogix.SharePoint.Commands | out-null }
if ( (Get-PSSnapin -Name Metalogix.eRoom.Commands -ErrorAction SilentlyContinue) -eq $null ) { add-pssnapin Metalogix.eRoom.Commands | out-null }
if (Get-Command Set-MetalogixJobPrerequisites -ErrorAction SilentlyContinue){ Set-MetalogixJobPrerequisites -Value "Content Matrix Console - eRoom Edition" }
2.Change the active directory to the file path in which the script file is saved by using the change directory command ("cd <File path>") and then enter ".\" followed by the script name. For example, if your script is named "ResourceScript.ps1", you would enter .\ResourceScript.ps1 to run the script.
NOTE: If the active directory is different than the directory in which the script file is saved, enter the full file path of the script file relative to your current directory, and then the script file name. For example, if your prompt is at "C:\", your script is named "ResourceScript.ps1", and the script is saved on the desktop, you would enter C:\Users\<User>\Desktop\ResourceScript.ps1 to run the script.
In some cases, the Execution Policy may prevent you from executing a PowerShell script. In this case, you will likely see the following message: [Script].ps1 cannot be loaded because the execution of scripts is disabled on this system. Please see "get-help about_signing" for more details. In this case, run the following command: set-executionpolicy RemoteSigned. This will change the existing script policy to allow you to run these scripts in the specified location. However, it is advised that you check with your System Administrators before doing so to ensure that no Company Policies are being broken by this action.
All Pre-Migration Checks, Nested Contents Reports and Nested Contents URL Reports included in the PowerShell script will run, and any warnings or errors that are encountered while the script runs will be displayed in the PowerShell window.