
Exporting a Job Template
To export a job template:
1.In Metalogix Content Matrix's ribbon toolbar, switch to the Settings tab and click [Manage Job Configurations] button to display the Manage Job Configurations dialog.
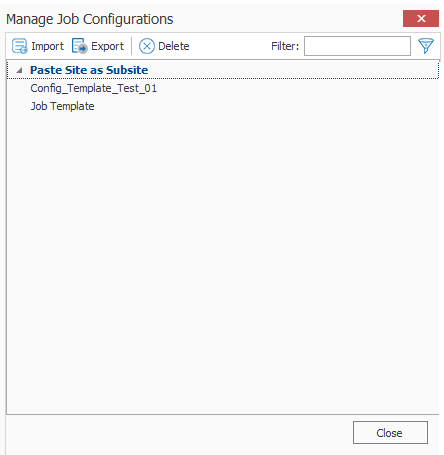
2.Select the template you want to export then click the Export button at the top of the Manage Job Configurations dialog, .
3.Navigate to the desired folder location where you want to save the job template, enter a File name, and click [Save].
4.The job template XML file will be saved to the selected folder location, and Metalogix Content Matrix will return to the Manage Job Configurations dialog. Any additional importing, exporting, or deleting of job templates can be done. Click Close to return to the main Metalogix Content Matrix window.
Now that the job templates have been exported and saved to a folder location they can be manually moved to another location as required.
Importing a Job Template
Only templates that have been created from the same Edition of Metalogix Content Matrix Console can be imported. For example, a job template from SharePoint Edition cannot be used in eRoom Edition or Public Folder Edition, it can only be imported into SharePoint Edition.
To import a job template:
1.In Metalogix Content Matrix's ribbon toolbar, switch to the Settings tab and click [Manage Job Configurations] button to display the Manage Job Configurations dialog.
2.Click the Import button at the top of the Manage Job Configurations dialog, navigate to the folder location for the template XML file, then click [Open].
The job template will be added to the list of templates in the Manage Job Configurations dialog. The template will be listed using the same Display name that was used when the task was created on the original system, and will not have its file name displayed.
The job template is now imported and can be applied to any migration.
Refreshing the Migration Jobs List
NOTE: The refresh is applied to whichever job list Metalogix Content Matrix is currently connected to.
To refresh the Job List:
1.From the Manage Queue dialog, select a job in the Job List. The row selector icon and the highlighted row indicates the selected row.
2.From the Job List menu bar, choose File > Refresh.
If the status of the job has changed, the Status value will indicate the new status of the job.
Creating and Running a PowerShell Script from the Jobs List
In order to create a PowerShell (PS) script for Content Matrix, a job list (or batch file) must first exist in the Job List section of the Content Matrix Console. Once created, it can be run from the PowerShell console or scheduled to run as a Windows Scheduled task.
NOTE: It is recommended that the connections to the source and target environments have the Remember my password check-box selected. This is to ensure that the PowerShell scripts will be able to establish a connection to both the source and target environments when they are being run. If a password is required and this check-box is not set, the migration will fail. However, users can manually enter this value into the PowerShell script itself if the option was not checked when the script was first generated.
To create a PowerShell script:
1.In Job List, and select the job (or jobs) that you want to run in PowerShell.
2.Click the Generate PowerShell Script button in the Job List tool bar, or right-click on one of the items and select Generate PowerShell Script from the context menu.
3.From the drop-down, choose the appropriate option. Use the information in the following table for guidance.
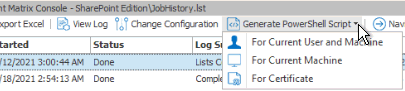
|
If you want to generate a PowerShell script for scheduling |
Choose |
|---|---|
|
that can be used only by the currently logged in User Account on the machine it is generated on |
For Current User and Machine. NOTE: Any PowerShell scripts that are generated for scheduling through this option can only be run by the logged in user on the machine they were generated on. |
|
that can be used by any User account on the machine it is generated on |
For Local Machine. |
|
that can be used by any User account on any machine that has the certificate that is specified when the script is created |
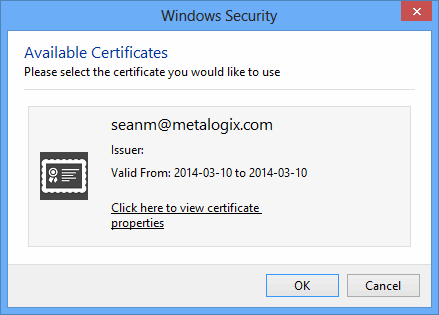
For Certificate. When you save the PowerShell script using this method you will be prompted to select a security certificate that exist on that machine. The selected certificate will be required on any system that attempts to run the script at a later date.
|
Once the PS script generation type is selected, Content Matrix Console will generate a PS script for the select Job, which will be written to a Microsoft Notepad file. If multiple jobs are selected they will all be written to the same file.
4.Choose File > Save As... and select any desired save location for the PowerShell script. Give the file any name you want, but change the file type to .PS1.
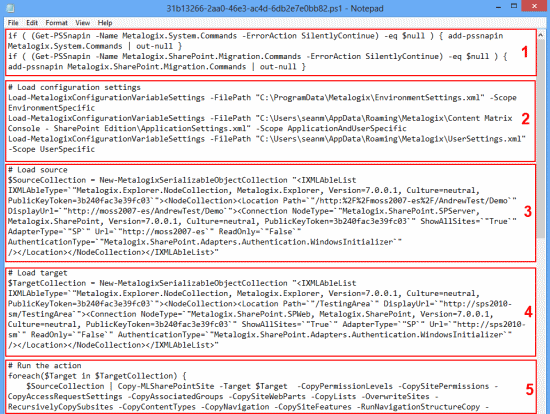
The PowerShell (PS) script itself contains five sections. They are:
·Section 1 - This first section at the top (starting with an "if" statement) runs a check in the PowerShell console to make sure that the Metalogix snap-ins have been added. If they are not found then it will add them to that instance of the PS console.
·Section 2 - Load Configuration settings - This section will find and load all of the Metalogix Content Matrix client application configuration settings into the PowerShell script. These are the client application's environmental settings and not the migration/action settings.
·Section 3 - Load source - This section will load all of the data for the source environment connection.
·Section 4 - Load target - Similar to the previous section, this will load target environment's connection information.
·Section 5 - Run the action - Last is the "Run the action" section. This last section will contain all of the other data for the migration, such as the type of migration (i.e. a site migration, list migration, item migration, etc.) and all of the settings and configurations for the migration/action that is being run. This includes things like settings for versions, content types, permissions, etc.