
Permissions Options
|
Navigation: Configuring Copying Options > Permissions Options |
For users to be migrated, they must exist on the target side Active Directory (AD), so that SharePoint can authenticate them. A good rule of thumb is if the user cannot be manually authenticated in the target SharePoint instance, then Metalogix Content Matrix will not be able to add them.
In cases where data was migrated and the referenced user cannot be authenticated, Metalogix Content Matrix will set the migrating user account into the files metadata instead, and a warning will be listed in the logs. In these cases user mappings can be set up, to map these users to another account.
You can also migrate only users from a source to a target as a separate action.
If a migration is initiated at the site collection or site level, Metalogix Content Matrix can migrate permission levels as well as permissions. This includes any default permission levels that have been modified, as well as any custom created permission levels.
Permission levels are a set of permission rights that can be assigned to a user or group as a "permission." Metalogix Content Matrix can migrate these permission levels as part of a site level migration, or they can be migrated separately through the context (right-click) menu.
For example, if there is a custom permission level on the source called "Marketing Team," that is applied to a group and some users, then this permission level would not normally be migrated, unless this option is used. If this option is not used, Metalogix Content Matrix will try to map the permissions over to the target, but will fail because the "Marketing Team" permission level does not exist, even if the users/groups exist, so we will try to match these permissions to the next closest match. If the copy Permission Levels option is used, the permission level will be created on the target SharePoint instance (otherwise it would have to be created manually). Once the permission level is created on the target, all the user/group permissions can be migrate and mapped over to the target SharePoint instance without issue.
NOTE: If a site level copy is being performed, and the Copy Child Sites recursively option is enabled (in the Site Options section), all the sites, lists, folders, and items under the selected source node will be migrated, and any enabled options for permissions copying will be applied recursively down through the migration. If Copy Child Sites recursively is not enabled, only permissions for the selected (top-level) site will be copied.
Configuring Permissions Options
|
Navigation: Configuring Copying Options > Permissions Options > Configuring Permissions Options |
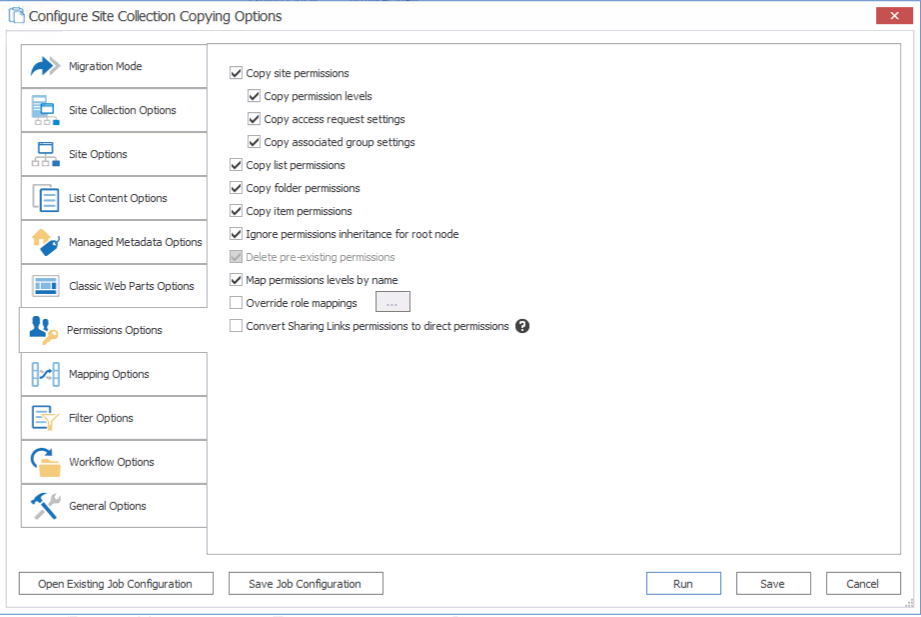
If you want to copy permissions as part of the migration, select the Permissions tab.
To configure Permissions Options:
1.If you want to Copy site permissions:
§make sure this option is selected
AND
§make sure the appropriate additional options are selected. Use the information in the following table for guidance.
|
If ... |
Then .... | ||
|---|---|---|---|
|
you want to allow any custom permission levels (roles) that exist on the source to be copied and created onto the target (includes any default permissions that have been modified, or any custom permission level that have been created) |
make sure the Copy permissions levels box is checked. | ||
|
you want to copy any access request settings (provided that the target SharePoint location is configured for sending emails) |
make sure the Copy access request settings box is checked.me
See also Migrating Access Request Settings. | ||
|
you want to copy any associated group settings for any sites that are within the scope of the migration. |
make sure the Copy associated group settings box is checked. NOTES: Associated groups are the Owners, Members, and Visitors groups that are created by default and associated to each site at its creation. |

2.If you want Copy list permissions, make sure this option is selected.
NOTE: This option is not available if you initiated a folder- or item-level migration.
3.If you want to Copy folder permissions and/or Copy item permissions, make sure each applicable option is selected.
NOTE: Copy folder permissions is not available for an item-level migration.
4.If you want the existing permissions inheritance of the root node being migrated to be ignored and have any permissions levels and permissions migrated directly for the site, make sure the Ignore permissions inheritance for root node box is checked.
5.If you are migrating permissions as a post-migration task and want to Delete pre-existing permissions on the target, check this box.
NOTE: If you are performing a full migration, this box will be checked and disabled, to ensure that any permissions that exist on the target, within the scope of the migration, are deleted so that no issues are encountered when the migration is run and the source permissions are migrated
6.If you want to copy permissions levels from the source to the target by matching names make sure Map permission levels by name is selected.
For example, if an "Admin" role exists on both the source target, the "Admin" permissions on the source will map over to the "Admin" role on the target, even if they use different levels of permissions. Any item, group, or user that has "Admin" permissions on it will still have "Admin" permissions, though the level of access might be slightly different (if the rights for the "Admin" role are different between the source and target servers).
NOTE: If this option is selected and the role does not exist on the target, it will be skipped.
7.If you chose to Map groups by name and you also want to overwrite any groups on the target, make sure the Overwrite existing groups option is selected.
NOTE: If you leave this box unchecked, users will be appended into existing groups.
8.If you want roles on the source to be mapped to different roles on the target:
a)Check the Override role mappings box.
b)Click the [ ] button.
c)Follow the procedure for Mapping Roles.
NOTE: When you use this option, any other existing permissions role mapping that is set up will be overridden.
9.If you are migrating from a SharePoint 2019 source and want to Convert Sharing Links permissions to direct permissions, check this box.
NOTE: This option is disabled if the if the source is SharePoint 2016 or earlier. See "Share With" Metadata and "Sharing Links" Access Migration for details.
Mapping Roles
|
Navigation: Configuring Copying Options > Permissions Options > Configuring Permissions Options > Mapping Roles |
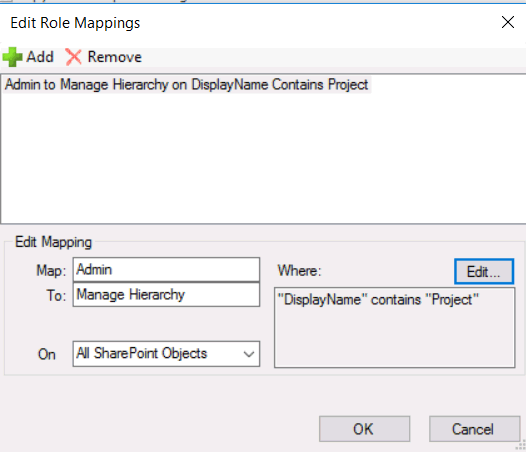
When you select Override Role Mappings and click the [...] button from the Permissions Options tab, you can set a name based mapping for permissions role mappings that will override any other existing permissions role mapping that is set up.
This option uses conditional logic so these mappings can be set for all cases, or can be set to only be used in specific cases. For example, an Override Role Mappings can be set up to map "Admin" to "Manage Hierarchy" for any nodes that start with a specific value. Or the same mapping can be set up for an entire site.
To set up a role mapping:
1.In the Edit Role Mappings dialog, click Add to add a new mapping.
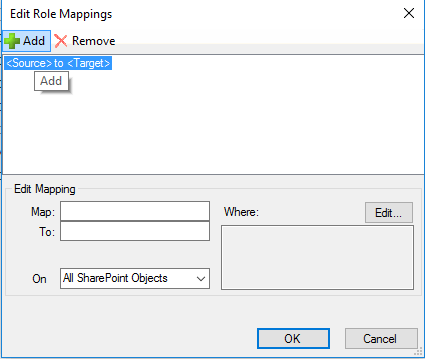
2.In the Edit Mapping section:
a)Enter the permission role from the source that you want to Map.
b)Enter the permission role in the target that you want to map To.
c)From the On drop-down, select the scope of the mapping: All SharePoint Objects, Sites, Lists and Libraries, Folders, or List Items and Documents.
3.If you want to filter the objects to which you want to apply the mapping, click [Edit] to display the Define Mapping Condition dialog and apply any filter expressions
When you close the Define Mapping Condition dialog, the filter(s) you applied will display in the Where box.
4.If you want to add another mapping, repeat Steps 1-3.
5.When you have finished mapping roles, click [OK] .
These mappings will now be used in the migration.
Mapping Options
|
Navigation: Configuring Copying Options > Mapping Options |
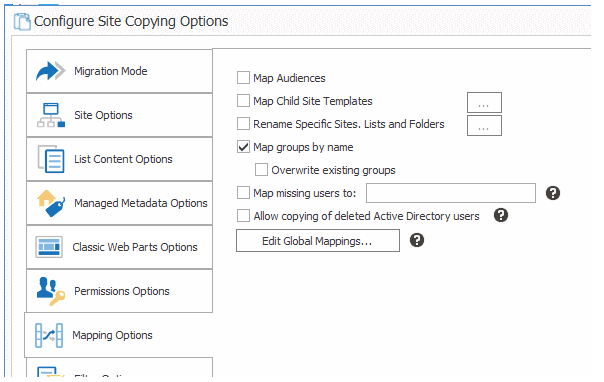
To configure Mapping options:
1.If you want to Map Audiences, check this box.
NOTE: Unlike the Copy Audiences option, the Map Audience option uses an algorithm to map the source audiences GUIDs (Globally Unique Identifier) to target audiences GUIDs. This mapping is based on the audience name, and allows Metalogix Content Matrix to maintain any audience targeting information between servers. If an audience on the source doesn't have an equivalent audience on the target, it gets mapped to the closest matching one. The mapping algorithm is used since audiences on the source and target can have different properties available to them, and they may not match exactly.
2.If you are are migrating sites and want to map child sites to different site templates on the target:
a)Check the Map Child Site Template box.
b)Click the [ ] button to display the Map Web Templates dialog.
c)Select the row containing the Source Web Template you want to map, right click, and choose the new corresponding Target Web Template.
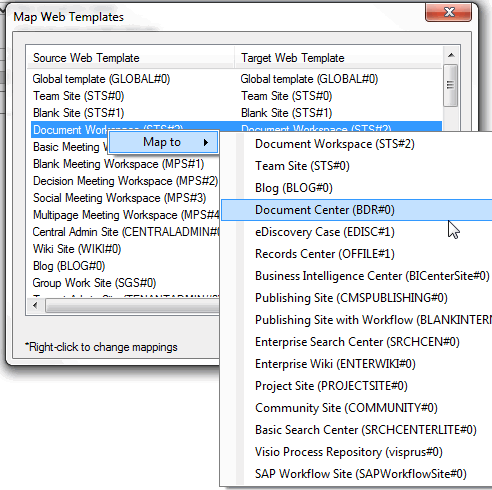
NOTES: For subsequent migrations, site template mappings will persist until changed.
This options will change the site template mapping for any sub-sites within the migration (and the mapping for any subsequent site migrations). Depending on the level at which you initiated the migration, you can change the top-level template on either the Site Collections Options tab or the Site Options tab.
3.If you want to rename any sites, lists, and/or folders at the target:
a)Check the Rename Specific Sites, Lists and Folders box.
b)Click the [ ] button to display the Rename Specific Site, Lists and Folders dialog.
c)Enter the new internal Name and Title (that is, the display name).
NOTE: A slightly different version of this feature is available depending on the level of the migration.
4.If you want groups to be mapped to the target site by name instead of by membership, check the Map groups by name box.
5.If you chose to Map groups by name and you also want to overwrite any groups on the target, check the Overwrite existing groups box.
NOTE: If you leave this box unchecked, users will be appended into existing groups.
6.If you initiated the migration from the folder or item level and want to map source columns to different target columns:
a)Check the Map list item data to different columns box.
b)Click the [ ] button to display the Column Mapping dialog.
c)Follow the procedure for Mapping Columns.
7.Once the source and target side columns have been selected, click Map. These columns will now be mapped to each other, and the mapping will populate in the bottom window.
8.When you have finished mapping columns, click [OK].
9.If you want to map missing users from the source to a specified user account:
a)Check the Map missing users to: box.
b)Enter the full account name of the user you want to map to.
NOTES:
§This text field does not authenticate, so any spelling mistakes will not be automatically corrected.
§This option does not apply to the Primary Administrator or Secondary Administrator options, when migrating a SharePoint Site Collection.
10.For migrations to SharePoint Online using the Import Pipeline, if you want to migrate the names of users who are disabled in or have been deleted from Active Directory, check the Allow copying of deleted Active Directory users box. When you select this option, the name of a disabled or deleted user will display as metadata (for example, in the Modified by column of a list/library) but will not be associated with an actual Active Directory account.
NOTES:
·If missing users are mapped to another user account, the mapping to the user account will take precedence.
·This option is disabled for migrations to SharePoint on premises.
11.If you want to map users, domains, URLs, and/or GUIDs between source and target, click [Edit Global Mappings...] to display the Specify Global Mappings... dialog. Continue with the procedure for Global Mappings.