
Managing licenses
Metalogix Backup for SharePoint activates your license key during its installation by contacting a Metalogix server. Metalogix Backup for SharePoint will periodically refresh the activation as it runs.
For customers without an Internet connection or who want to review the information that is being sent to Metalogix, offline activation is available. Installations using offline activation must be manually refreshed every 365 days.
Your license is based on the number of servers that you want to back up within your farms. If the server does not have a valid license, Metalogix Backup for SharePoint does not collect data from that server.
|
|
NOTE: Trial licenses can be activated and reused after they have expired. You can add another trial license as well. Contact your Quest sales representative for more information. |

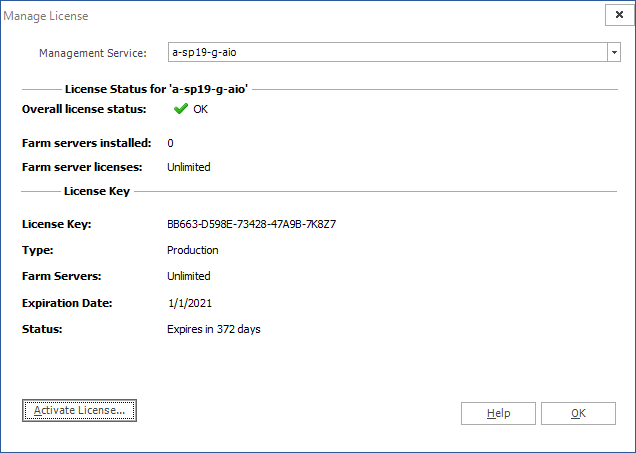
Steps to view the licensed servers
1.From the Management Console toolbar, click Help > Manage License.
or
From the Management Console workspace selector click Configuration > Configuration tab > Manage License.
2.From the Management Service drop down, select the server that hosts the management service to view the license status.
Steps to activate a License Key
The first time that you open the Metalogix Backup for SharePoint Management Console, you will be prompted to activate a license key. Follow these steps to activate your license key:
Online activation
1.In the Activate License window, enter the license key.
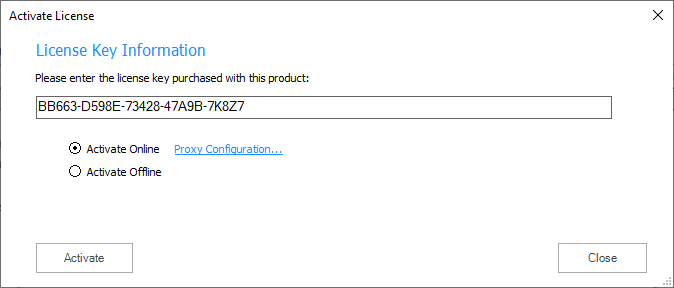
2.If you want to activate the license online, select Activate Online, and then click Activate. If your computer is behind a firewall, click the Proxy Configuration link. The Proxy Setup dialog appears.
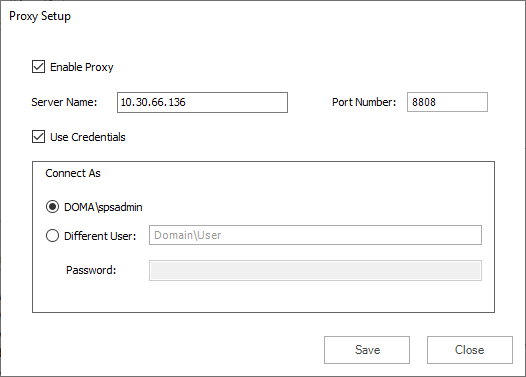
a.Select Enable Proxy.
b.In the Server Name field, enter the name of your proxy server.
c.In the Port Number field, enter the port number of the proxy server.
d.If your proxy server requires explicit login credentials, select Use Credentials.
e.Choose the credentials of the logged in user or provide credentials of another user.
f.Click Save to preserve the information, or click Close to return to the License Key Information dialog.
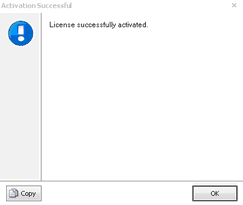
3.If the license key is validated successfully, the Metalogix Backup for SharePoint Management Console appears and the Configuration Wizard is displayed.
Offline activation is available for customers without an Internet connection or who want to review the information sent to Metalogix.
|
|
NOTE: Installations using offline activation must be manually refreshed every 365 days. |
1.In the License Key field, enter your license key.
2.Choose Activate Offline. The License Information page expands to display additional steps that are required.
3.Step 1: Collect the activation data to the clipboard or to a file
a.Select from the two options described below:
Option 1: Click Copy Activation Data to Clipboard. The activation data is saved to memory. Use this option if you plan to follow through with the subsequent steps immediately.
Option 2: Click Save Activation Data to File. The Windows File dialog appears. Use this option if you plan to activate the license at a later date.
b.Specify a file name for the activation data file.
c.Click Save to save the file to a location of your choice.
4.Step 2: Submit collected data
a.Click the URL provided. The Offline Activation web page appears.
b.Follow the instructions to get the Activation Key file (with the file extension DAT) is made available for download. Save this file to a location of your choice.
5.Step 3: Paste Activation Response
a.Click Browse. The Windows file dialog appears.
b.Locate the activation key file and click Open. The file appears in the Activation Key File field.
6.Step 4: Activate offline
a.Click the Activate button to complete the activation process.
7.Log out and log in again to access all licensed features.
Steps to update or add a license
You may need to update a license when you increase the number of servers you want to monitor and you receive another license from Quest.
1.From the Management Console toolbar, click Help > Manage License.
or
From the Management Console workspace selector click Configuration > Configuration tab > Manage License.
2.In the Manage Licenses window, click Activate License.
3.In the Activate License window, enter the license key.
4.If you want to activate the license online, select Activate Online, and then click Activate. If your computer is behind a firewall, click the Proxy Configuration link. The Proxy Setup window appears.
a.Select Enable Proxy.
b.In the Server Name field, enter the name of your proxy server.
c.In the Port Number field, enter the port number of the proxy server.
d.If your proxy server requires explicit login credentials, select Use Credentials.
e.Choose the credentials of the logged in user or provide credentials of another user.
f.Click Save to preserve the information, or click Close to return to the Activate License window.
5.If you want to activate the license offline, select Activate Offline and follow the steps outlined in the Offline Activation section.
|
|
NOTE: Offline activation is available for customers without an Internet connection or who want to review the information sent to Metalogix. Installations using offline activation must be manually refreshed every 365 days. |
6.Metalogix Backup for SharePoint displays a message with the status of your activation.
Upgrade
You can upgrade your existing Metalogix Backup for SharePoint deployment to the current version to access the new and improved features available.
|
|
NOTE: This version of Metalogix Backup for SharePoint cannot upgrade backup sets from versions earlier than 5.0. If you used a version earlier than 5.0 to create a backup set, contact Metalogix Technical Support at https://support.quest.com for assistance with upgrades. |
In this topic:
·Steps to perform a standard upgrade
·Steps to perform a custom upgrade
·Steps to upgrade the Backup Service instances
·Steps to use the Management Console wizard to upgrade all Backup Service instances
·Steps to use the installer wizard to manually upgrade a Backup Service
·Configuring the Backup Service staging location
·Upgrading the Self-Service Recovery feature
1.Ensure the computers on which you want to upgrade Metalogix Backup for SharePoint meet or exceed the product requirements. For more information see Product Requirements.
2.Ensure that the account that you use to log on to the computers that host the Metalogix Backup for SharePoint components also has administrator privileges on the repository database.
3.Identify the upgrade path your environment requires. For more information, see What upgrade options are available?
4.Temporarily disable any scheduled jobs and allow any currently running or queued backup/restore operations to complete.
5.Close all open applications on the Metalogix Backup for SharePoint component hosts.
6.Ensure that the .NET framework 4.0 is running on the target computer.
7.If you plan to use farm backups for your SharePoint 2010, 2013, 2016 or 2019 farm, use the Management Console to deploy additional Backup Service instances on every Web front end (WFE) and database server in the farm. For more information about this installation, see Installing the Backup Service manually.
8.If you deployed the Metalogix Backup for SharePoint Self Service Recovery solution, remove the Web part and use the SharePoint administration tools to retract the solution package. If you plan to use the new Self-Service Recovery feature, use the Management Console to deploy the Self-Service Recovery components manually. For more information about this installation, see Manually installing the Self-Service Recovery feature.
9.Upgrade your installation to Metalogix Backup for SharePoint by choosing the appropriate upgrade path:
a.Standard upgrade - In a single-server deployment, the Management Console, Repository database, Management Service and Backup Service are installed on the same computer. You can use the upgrade wizard to upgrade your installation to the new version of Metalogix Backup for SharePoint if you have a single-server deployment or if you are upgrading from a trial installation. See Steps to perform a standard upgrade.
b.Custom upgrade - In a distributed deployment, the components will be on different computers. See Steps to perform a custom upgrade.
Steps to perform a standard upgrade
1.Log in to the computer where you want to install Metalogix Backup for SharePoint. You should use a user account that is a member of the local administrators group on the computer. In addition, the account that you use must have the sysadmin role assigned for the SQL Server instance that hosts the Metalogix Backup for SharePoint repository database.
2.Download and unzip the upgrade files to a folder.
3.Locate and double click the Metalogix Backup for SharePoint.exe file. The installer bootstrap window opens.
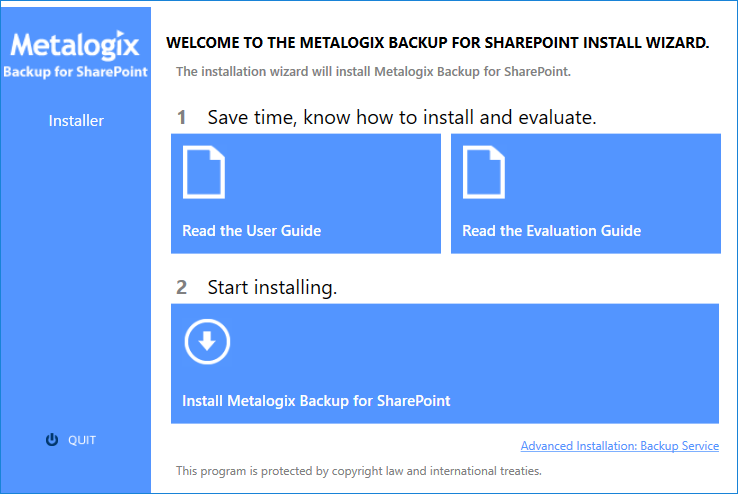
4.Click Install Metalogix Backup for SharePoint. The System Check window opens.
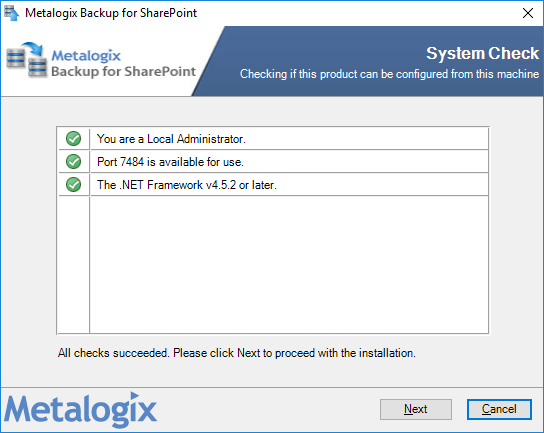
5.You must address the system check failures if any. When all checks succeed, click Next. The Upgrade Wizard for Metalogix SharePoint opens.
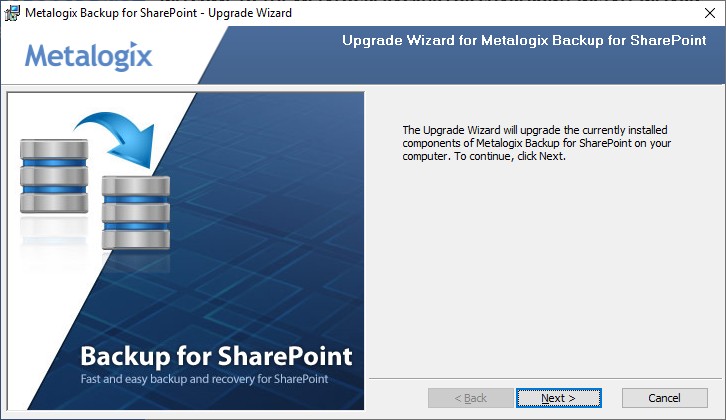
6.Click Next. The Upgrade the Metalogix Backup for SharePoint Repository window opens.

7.Click Next. The Metalogix Backup for SharePoint Management Service Account window opens.
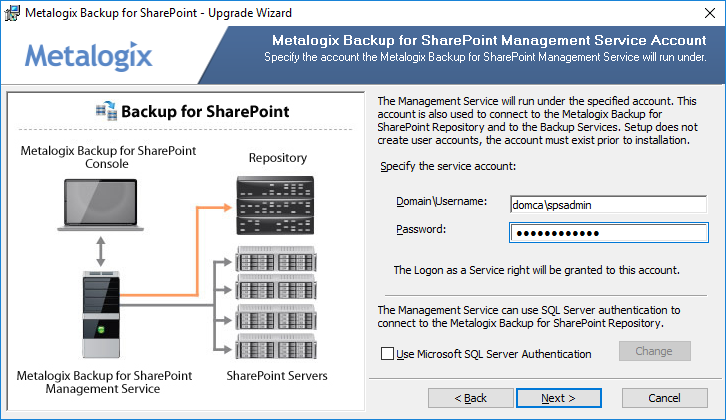
8.Click Next. The Ready to upgrade the program window opens.
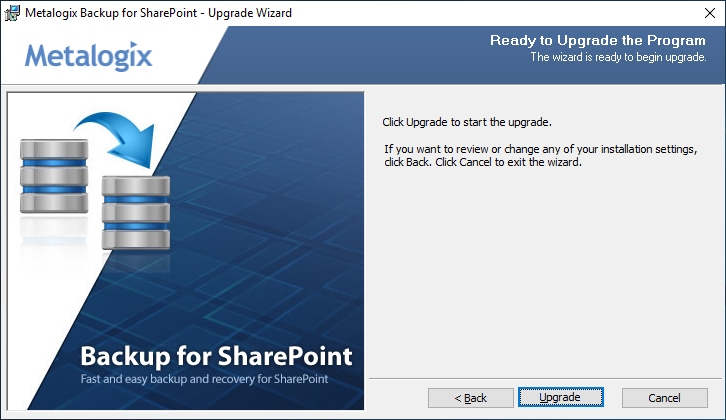
9.Click Upgrade. Wait until the Upgrade Wizard Completed window opens.
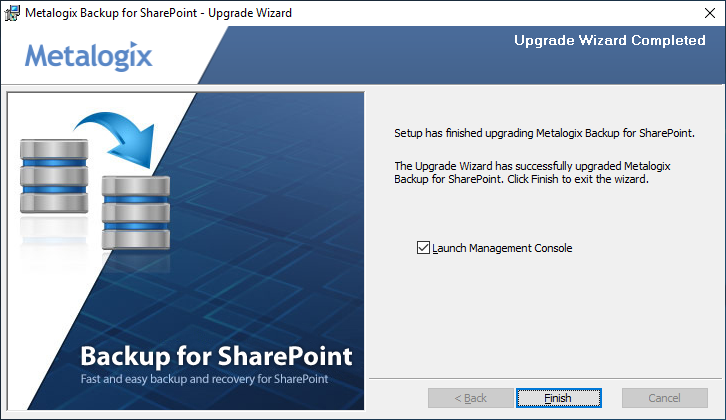
10.Select Launch Management Console and click Finish.
11.Upgrade all previously deployed Backup Service instances. See Steps to upgrade the Backup Service instances.
Steps to perform a custom upgrade
1.Perform a standard upgrade on the primary host that has the Management Service. See Steps to perform a standard upgrade.
2.Upgrade all previously deployed Backup Service instances. See Steps to upgrade the Backup Service instances.
3.Upgrade additional installations of the Management Console by running the Metalogix Backup for SharePoint upgrade wizard on each host computer.
Steps to upgrade the Backup Service instances
The Management Console, Management Service and the Backup Service require the same version otherwise no backup or restore operation can occur. You can upgrade the Backup Service in two ways:
·Use the Management Console - The first time that you open the Management Console after an upgrade, the Management Console prompts you to upgrade either the primary Backup Service or all Backup Services that lets you upgrade the services that you may have deployed on other machines. If you choose to upgrade only the primary Backup Service, you must use the Metalogix Backup for SharePoint installer on each Backup Service host to manually upgrade the secondary Backup Service instances.
|
|
CAUTION: If you choose to upgrade all backup services using the Management Console service upgrade wizard, make sure that all the services use the same windows credentials. If you have deployed additional Backup services on other host computers with different windows credentials, then the choice to upgrade all backup services using the Management Console will overwrite the windows credentials of all the services with the credentials that you specify in the upgrade wizard. If you have deployed additional Backup services on other host computers with different windows credentials, you can upgrade only the primary Backup Service using the Management Console service upgrade wizard, and then use the Metalogix Backup for SharePoint installer on each Backup Service host to manually upgrade the additional Backup Service instances. |

·Use the Metalogix Backup for SharePoint installer - You can also run the Metalogix Backup for SharePoint installer on each computer that hosts the Backup Service to manually upgrade the service. This method is particularly useful if each Backup service uses a different windows account credentials.
Steps to use the Management Console wizard to upgrade all Backup Service instances
1.Open the Management Console. The Upgrade Backup Service wizard opens when you open the Management Console for the first time after a standard upgrade.
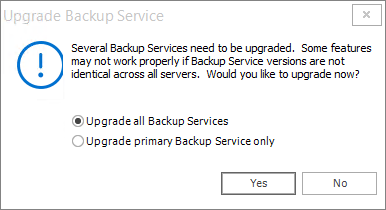
2.Choose an upgrade option as described below:
a.Upgrade all Backup Services - upgrades all Backup Services across all hosts where they are deployed.
b.Upgrade primary Backup Service only - upgrades only the primary Backup Service.
3.Click Yes. The Backup Service configuration window opens. If you select No, the Backup services will not be upgraded. You can open the wizard from the Configuration workspace in the Management console.
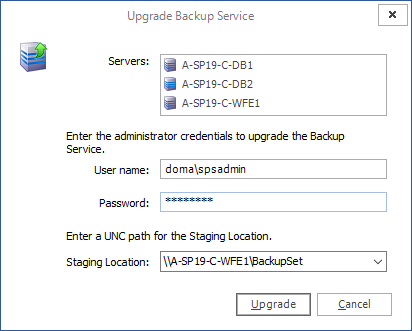
4.The Servers list displays all the servers where backup Services are installed. Enter the information as described below:
a.User name - the windows administrator account name used to run the service.
b.Password - the windows administrator account password.
c.Staging Location - enter or choose an existing UNC path. You cannot use a local path and you cannot leave this field empty.
|
|
CAUTION: All Backup Service account credentials will be upgraded with the credentials you enter. If you have deployed additional Backup Services on other host computers with different account credentials, you must upgrade only the primary Backup Service using the Management Console service upgrade wizard, and then use the Metalogix Backup for SharePoint installer on each Backup Service host to manually upgrade the additional Backup Service instances. |
5.Click Upgrade. The confirmation window opens indicating the servers where the Backup Service was upgraded.
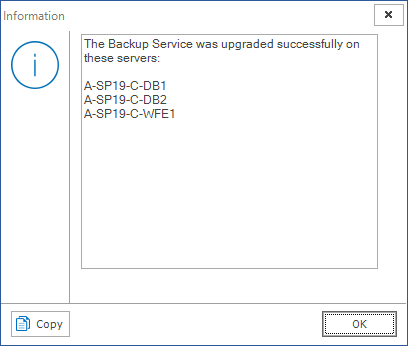
6.In the confirmation window, click OK.
Steps to use the installer wizard to manually upgrade a Backup Service
1.Log in to the computer where you want to install Metalogix Backup for SharePoint. You should use a user account that is a member of the local administrators group on the computer. In addition, the account that you use must have the sysadmin role assigned for the SQL Server instance that hosts the Metalogix Backup for SharePoint repository database.
2.Download and unzip the upgrade files to a folder.
3.Locate and double click the Metalogix Backup for SharePoint.exe file. The installer bootstrap window opens.
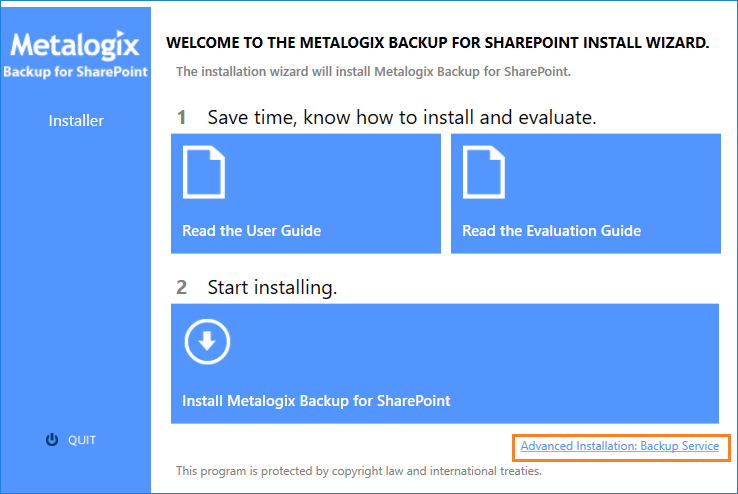
4.Click Advanced Installation: Backup Service. The System Check window opens.

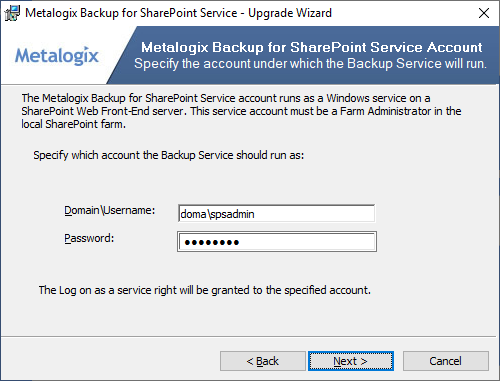
5.You must address the system check failures if any. When all checks succeed, click Next. The Metalogix Backup for SharePoint Service Account window opens.
6.Click Next. The Ready to Upgrade the Program window opens.
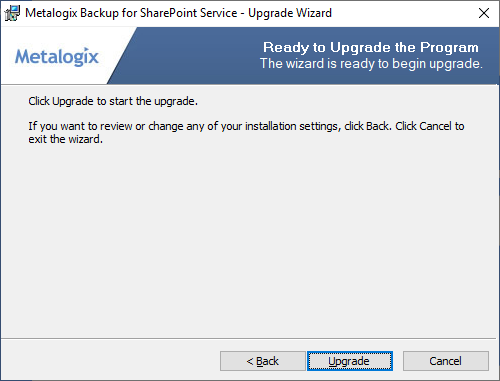
7.Click Upgrade. The Setup wizard Completed window opens.
8.Verify that the upgrade was successful and click Finish to close the wizard. Then click Quit to exit the installer bootstrap.
Configuring the Backup Service staging location
The Backup Service uses a staging location to backup SharePoint data. During installation, the default location is configured as C:\Users\<username>\AppData\Local\Temp\ which is insufficient for a successful backup operation. You must specify a UNC path for the staging location.
If you specify an invalid UNC path during and upgrade or install you will get an error as shown below when you attempt a backup operation.

The error message appears in the Result Text tab of the Operations Detail pane: The staging location must be an existing UNC path. Please review the value of the key spFileRestoreTempFileDirectory in the Backup service configuration file.
Steps to review and change the staging location
1.Log in to the computer where Metalogix Backup for SharePoint has been installed.
2.Navigate to the Backup Service installation directory C:\Program Files\Metalogix\SharePointBackupService
3.Open the PBBackupService.exe.config file with Administrator privileges.
4.Inspect the value of the row key=spFileRestoreTempFileDirectory
5.If the value indicates a local path, you must change the path to a UNC path.
6.Save the changes to the configuration file and restart the Backup Services. If there are more instances of the backup Service on other computers, you must restart them as well.
Upgrading the Self-Service Recovery feature
When you upgrade Metalogix Backup for SharePoint, you can use the Deploy SharePoint Components dialog in the Management Console to upgrade the Self-Service Recovery feature. For information about using the Deploy SharePoint Components dialog to deploy the Self-Service Recovery feature manually, see Manually installing the Self-Service Recovery feature.
Uninstall
In this chapter:
·Uninstalling the Management and Backup services
·Removing the Self Service Recovery solution
Open the SharePoint Backup console and find the following information:
a.The server where the Management service is installed from Granular Restore > Farm tab > Connect Management Service.
b.The servers where the Backup services are installed from Configuration > Fault Tolerance tab.
c.The name of the repository database and the SQL server that hosts the database from Help > Console Preferences > Management Service tab.
1.Log in to the Metalogix Backup for SharePoint server.
2.Open Windows Control Panel > Programs and Features.
3.Uninstall Metalogix Backup for SharePoint.
Uninstalling the Management and Backup services
1.Log in to each server where the Management and Backup services are installed (WFE, APP, SQL)
2.Open Windows Control Panel > Programs and Features.
3.For the Management Service, uninstall Metalogix Backup for SharePoint.
4.For the Backup Service(s), uninstall Metalogix Backup for SharePoint Service.
Removing the Self Service Recovery solution
1.Open the Management Console.
2.Choose anyone one of the following options:
OPTION 1
a.From the Management Console workspace selector click either Farm backup > Restore or Granular Restore.
b.From the Farms tab, click Deploy SSR. The Deploy SharePoint Components dialog opens.
OPTION 2
a.From the Management Console workspace selector click Configuration.
b.From the Configuration tab, click Deploy SSR. The Deploy SharePoint Components dialog opens.
c.Select the Remove the Self-Service Recovery solution option.
d.Click Update.
3.If the deployment was successfully removed, a confirmation dialog opens indicating the success of the operation.
|
|
NOTE: You can remove the SSR solution directly from SharePoint. Go to Central Administration > System Settings > Farm Management > Manage farm solutions, and retract the solution metalogixssrsolution<version>.wsp |
|
|
CAUTION: Backup your database before you uninstall. |
1.Open the Management Console.
2.Determine the SQL server host, the repository and its name from Help > Console Preferences > Management Service
3.Delete the SharePoint Backup repository database as described in the following steps. The default name is Metalogix_BackupRepository.
a.Open SQL Server Management Studio.
b.In the Object Explorer, connect to an instance of the SQL Server Database Engine, and then expand that instance.
c.Expand Databases and right-click the Metalogix_BackupRepository database, and then click Delete from the context menu.
d.In the Delete Object window, confirm the correct database object is selected.
e.Select the check box Close existing connections and then click OK.
Configuration
Once you configure Metalogix Backup for SharePoint for your environment, you can perform the following tasks:
·Opening the Management Console
·Connecting a standalone Management Console to the Management Service
·Configuring Metalogix Backup for SharePoint for your farm
·Installing the self-service recovery feature
When the Management Console connects to a particular Management Service, it determines whether you already configured the Management Service. If the Management Service is not yet configured, the Configuration wizard runs. When you run the Configuration wizard, you locate the SharePoint Web front end (WFE) servers and database servers in the farm and install the Backup Service on them. You also define the backup locations for the farm.