
Compliance
ArchiveWeb provides the ability to manage user access to archived files on a network share. Users must accept the security policy to be able to open archived files.
As an administrator or a user with the appropriate permissions, you can define a policy condition, agreement term, and reminder. You can define notification templates for Access Denied and Reminder messages and see a list of all users with the date of acceptance of conditions and status.
Users are notified by email when access to a protected archive file is denied and when the policy consent expires.
|
|
NOTE: Email notifications are sent only once. It is recommended that the administrator should send an email to all first-time users who are registered in ArchiveWeb to accept the policy agreement. |

In this topic:
·Granting compliance permissions to users
·Configuring compliance settings
·Accepting compliance agreements
A working SMTP server is needed to send notification emails to users. The SMTP server must be configured with the Archive Manager Configuration Tool.
1.Open the Archive Manager Configuration Tool from <installdir>\Program Files (x86)\Common Files\PAM\PAMConfig\PamConfig.exe.
2.From the feature panel on the left in the Configuration wizard, click Users.
3.Verify that the database and scripts are up to date.
4.Open the SMTP Configuration tab and set the properties as described below:
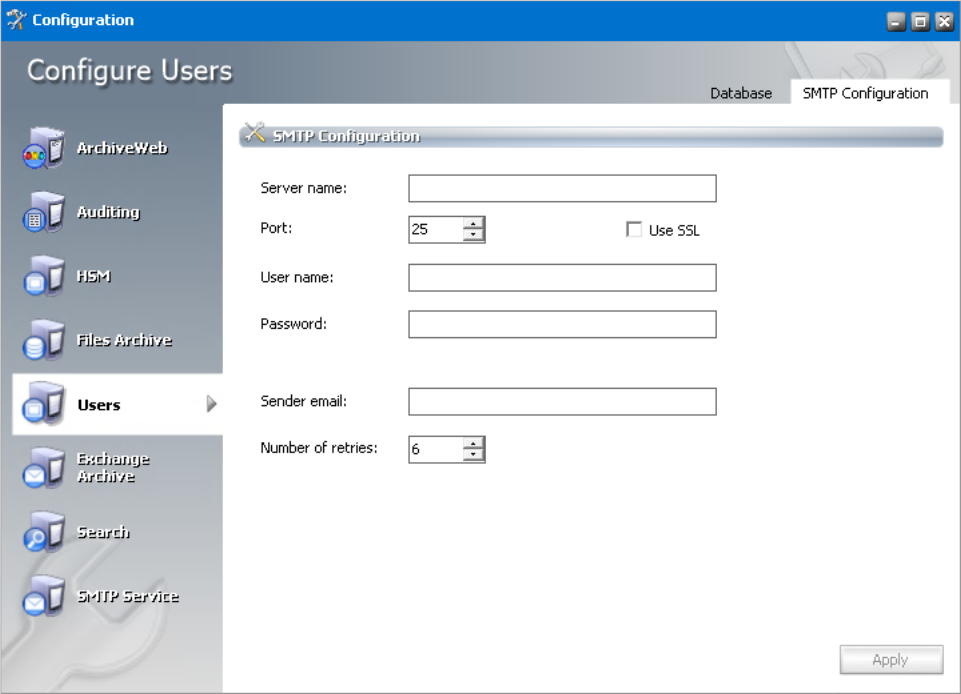
Server name - Name or IP address of the SMTP server
Port - SMTP server port
Use SSL - select the check box if the SMTP server requires an SSL connection
User name, Password - SMTP server credentials
Sender email - Email address of the sender
Number of retries - Number of times that the SMTP server will attempt to send the message
5.Click Apply and then close the window.
1.Open Archive Manager for Files
2.Connect to the Archive Manager for Files server
3.From the navigation panel, click Settings.

4.In the Other options section select the Activate compliance permissions check box and click Apply.
Granting compliance permissions to users
1.Log in to ArchiveWeb
2.From the main menu, click the username dropdown and then select Manage settings.
3.From the local toolbar, click Permissions.
4.Click 
5.Select the administrator and from the Permissions panel on the right, grant the following compliance permissions:
·Allow policy managed download
·Compliance management
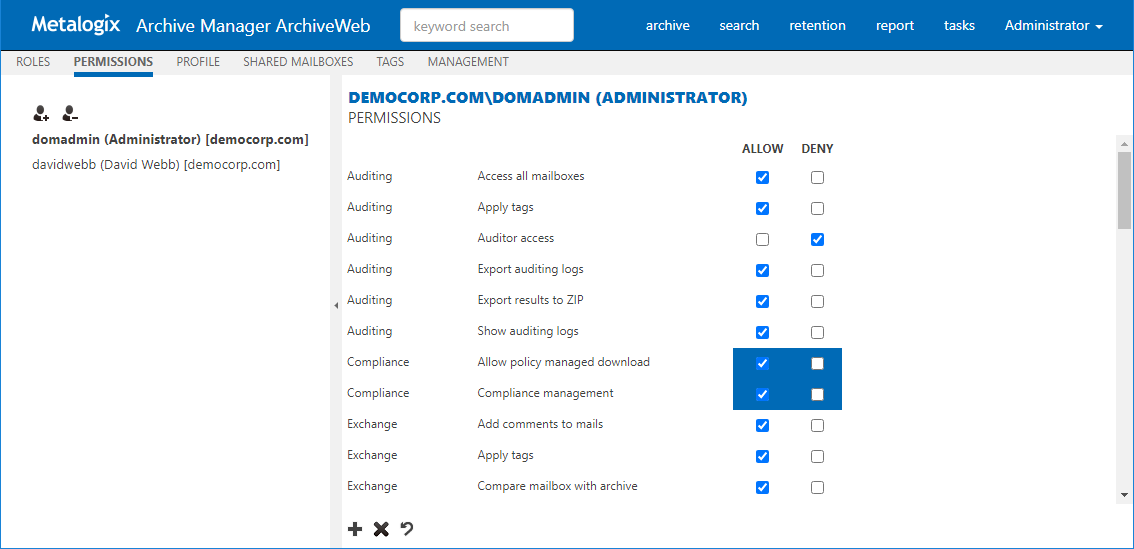
6.Add more users and grant the Allow policy managed download to grant access to archived files. Grant Compliance management if the user requires management access.
7.All users must log out and log in again to refresh compliance settings in their session of ArchiveWeb.
1.Log in to ArchiveWeb
2.From the main menu, click Compliance.
3.From the navigation panel, select Agreements.
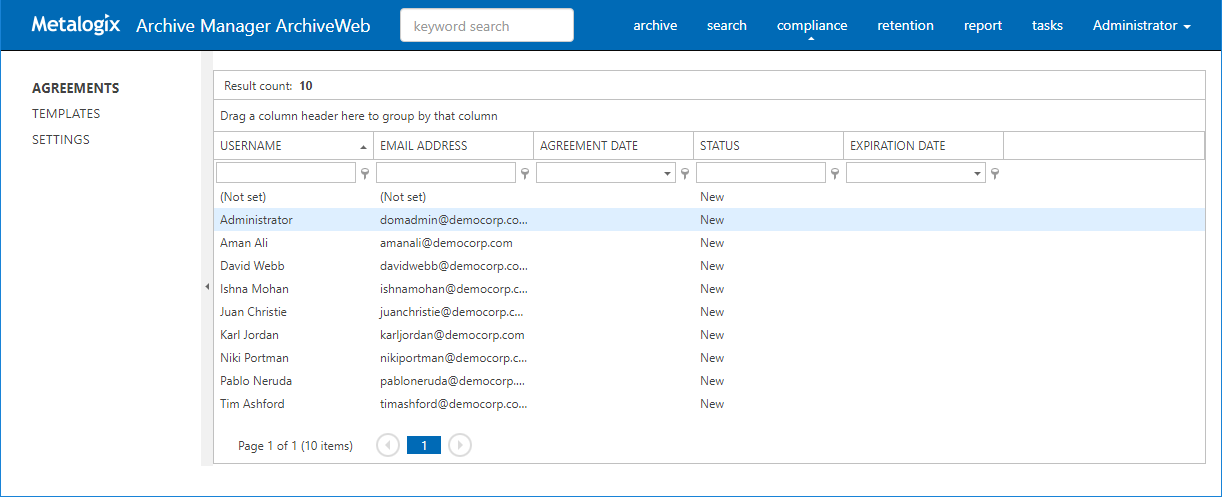
The columns are described below:
a.Username - Name of the user
b.Email address - email address of the user
c.Agreement date - date and time when the compliance policy was accepted.
d.Status - status of the compliance policy. the status value are as follows:
·Approved - User has confirmed their agreement to the policy.
·Rejected - User has declined the policy.
·New - Administrator has granted the Allow policy managed download permission, but the user has not yet accepted the policy agreement.
·Canceled - Administrator has changed the policy settings and canceled all user agreements.
·Expired - the policy term has ended.
e.Expiration date - Date and time when the compliance policy expires.
1.Log in to ArchiveWeb.
2.From the main menu, click Compliance.
3.From the navigation panel, select Templates.
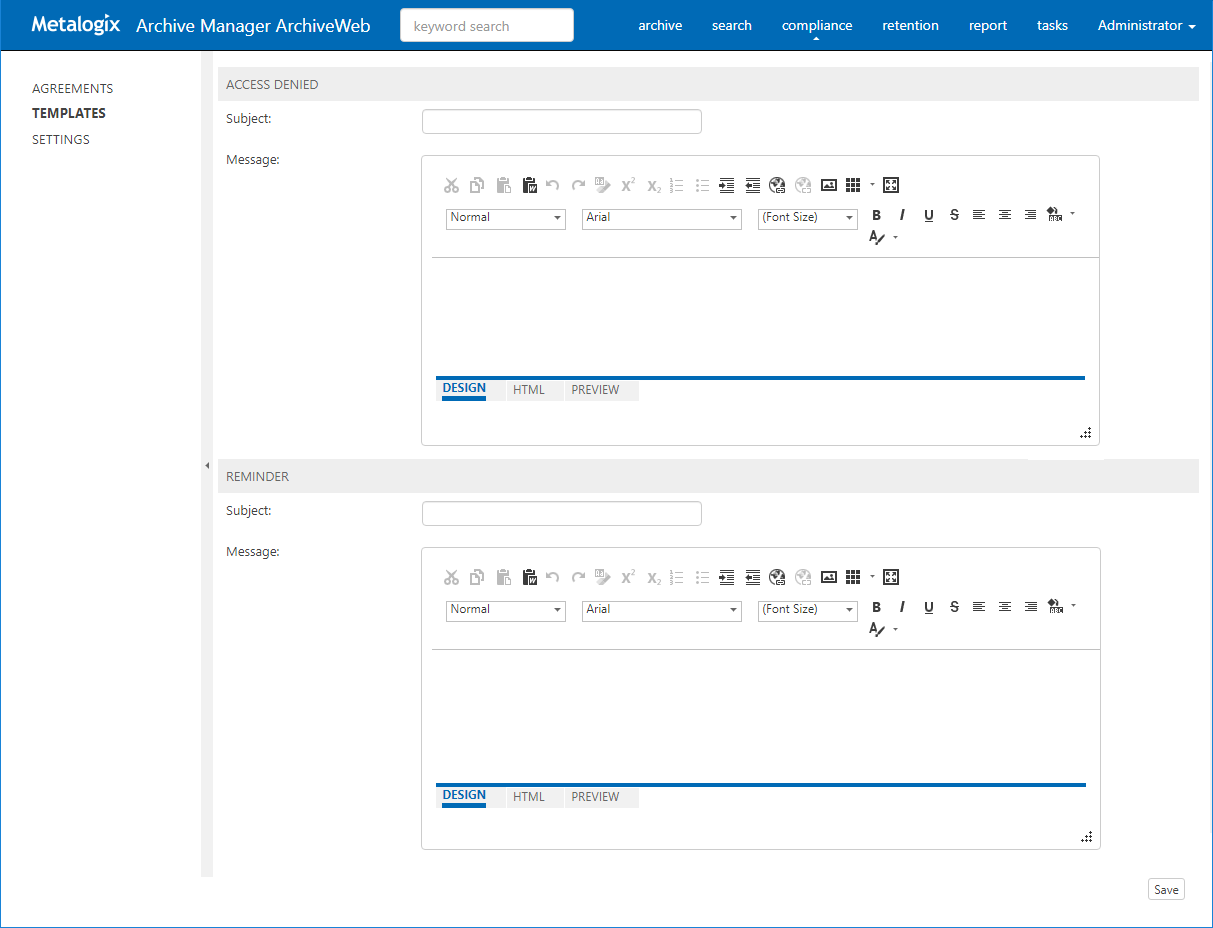
4.In the top section, prepare the template for the Access Denied message in the template editor.
5.In the bottom section, prepare the template for the Reminder message in the template editor.
6.Click Save at the bottom right corner to commit any changes.
Configuring compliance settings
1. Log in to ArchiveWeb
2.From the main menu, click Compliance.
3.From the navigation panel, select Settings.
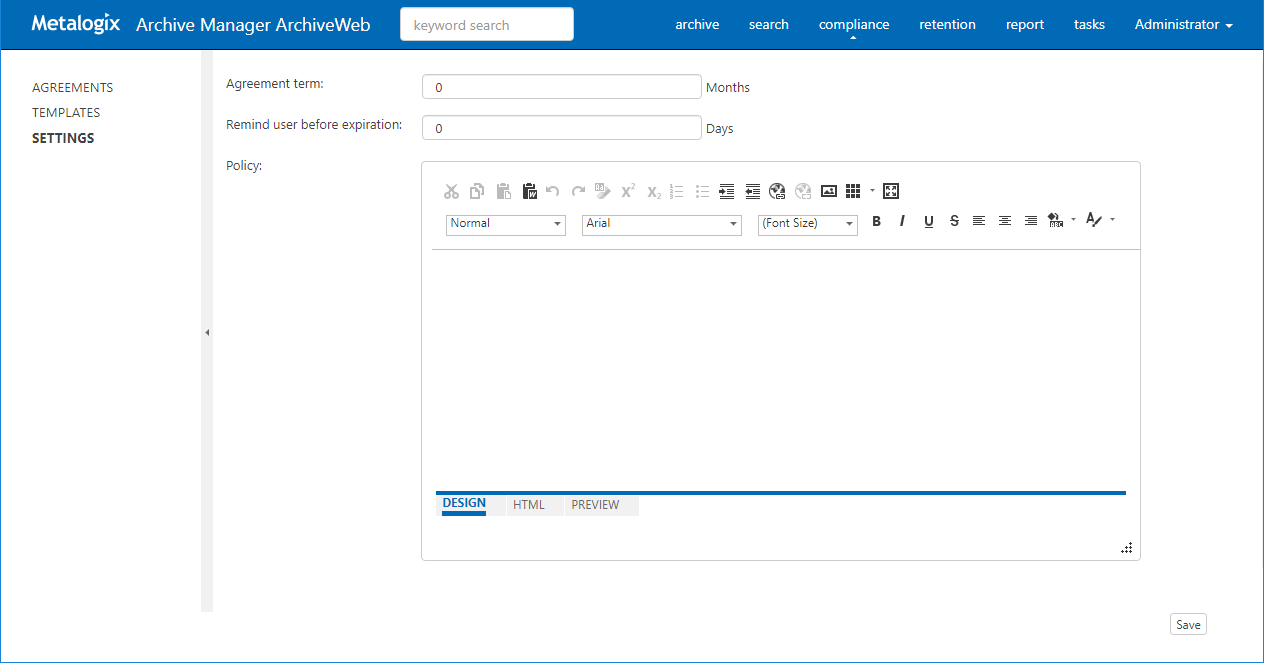
Configure the settings as described below:
a.Agreement term - Number of months during which the policy is active.
b.Remind user before expiration - Number of days before the policy expires when a reminder message will be sent to the user.
c.Policy - prepare the policy statement using the template editor.
4.Click Save at the bottom right corner to commit any changes.
5.In Cancel Agreement dialog click Yes to cancel all agreements with users. Users must accept the new policy agreement. Click No to change the policy for new users only (or when saving a policy for the first time).

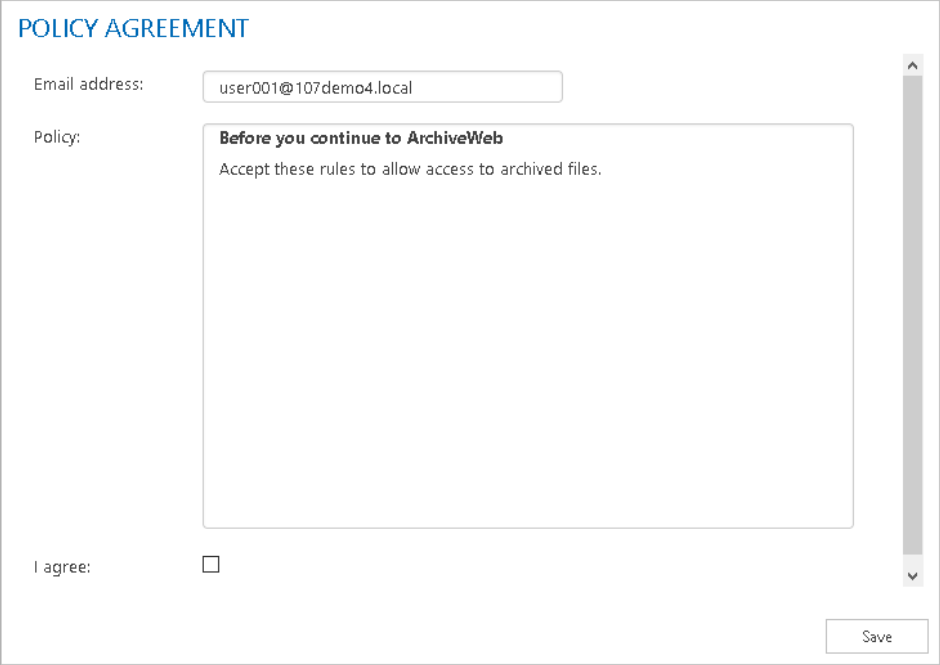
Accepting compliance agreements
When users who have been granted the Allow policy managed download permission log in to ArchiveWeb, then will see the Policy Agreement page. Users must accept the Policy Agreement to work with protected archived files. This page is also available to users from the [User name] > Manage Settings > Profile > Policy Agreement page, if they want to accept the agreement at a later time.
1.Select the check box I agree
2.Click Save at the bottom right corner to commit any changes.
ArchiveWeb Settings
As default, only the super-user specified in Archive Manager for Exchange or Archive Manager for Files (see note below) can access ArchiveWeb and all its functions. If another user/group should be able to manage roles, super-user can allow access for them in the following ways:
·in ArchiveWeb under logged on user / Manage settings / Permissions
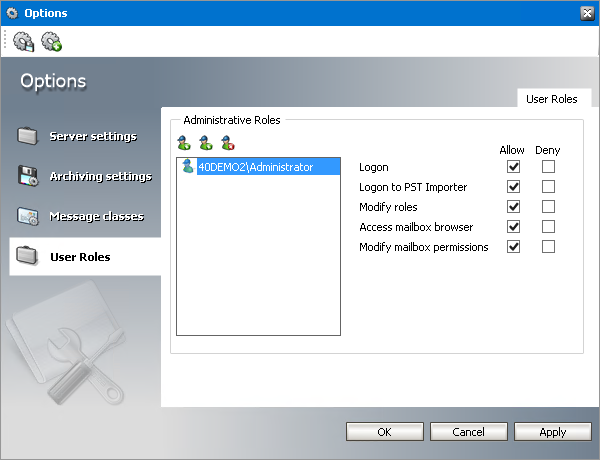
·in Archive Manager for Exchange Administration Center on the Tools / Options / User Roles the given user has to be added with Modify roles option checked
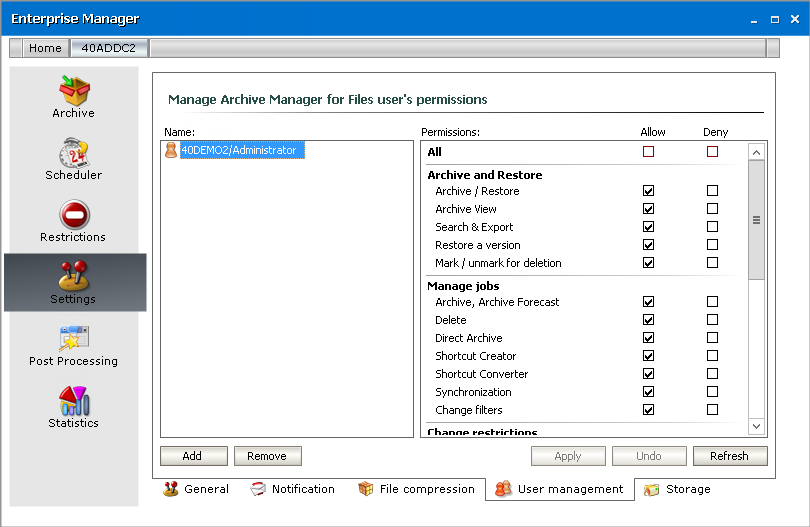
·in the Archive Manager for Files Administration Center on the Settings / User management tab the given user must have the User management permission allowed
Please note: Super-user is specified in:
·Archive Manager for Exchange Administration Center / Tools / Options / User Roles)
or
·Archive Manager for Files (Enterprise Manager / Settings / User management)
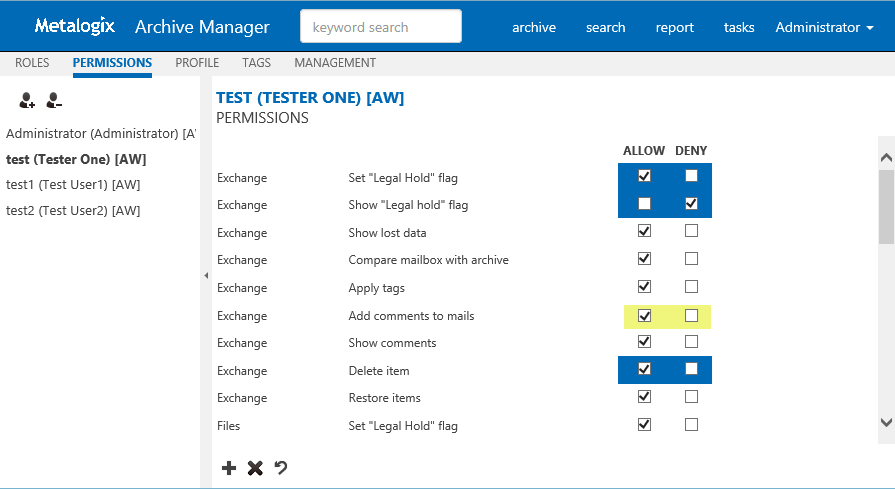
Roles and Permissions pages allow permission management on user/group level. Individual users can inherit permission or can be granted direct permissions. The priority of permissions follows this order:
1.Direct permission defined for a user (blue highlight under Permissions) on a server
2.Global direct permission defined for a user (blue highlight under Permissions)
3.Inherited permission (yellow highlight under Permissions) on a server
4.Global inherited permission (yellow highlight under Permissions)
5.Default settings (no highlight under Permissions)
All defined permissions apply only for the given instance of ArchiveWeb.
On these pages you can allow or deny access to ArchiveWeb features and menu options for individual users or groups, i.e. allow or deny roles. Under Roles, users are assigned to roles. Under Permissions, roles are assigned to users.
Roles
To display the Roles page, click the logged-on user name in the right-upper corner. Select Manage settings from the drop-down menu, then click Roles on the grey sub-bar. In the left pane select the server for which the roles should apply. Now you can assign users/groups to ArchiveWeb roles in the main pane.
List of roles is split into sections Exchange Archive features are listed under Exchange roles, search features under Search roles etc. Select a role in the list view. All users/groups with access to ArchiveWeb allowed in the Enterprise Manager are displayed under the list view. In case the desired user is not visible, click the Find users and groups icon (
If you click the Delete icon (
NOTE: Users deleted in Active Directory but still existing in Archive Manager are displayed as strikethough.
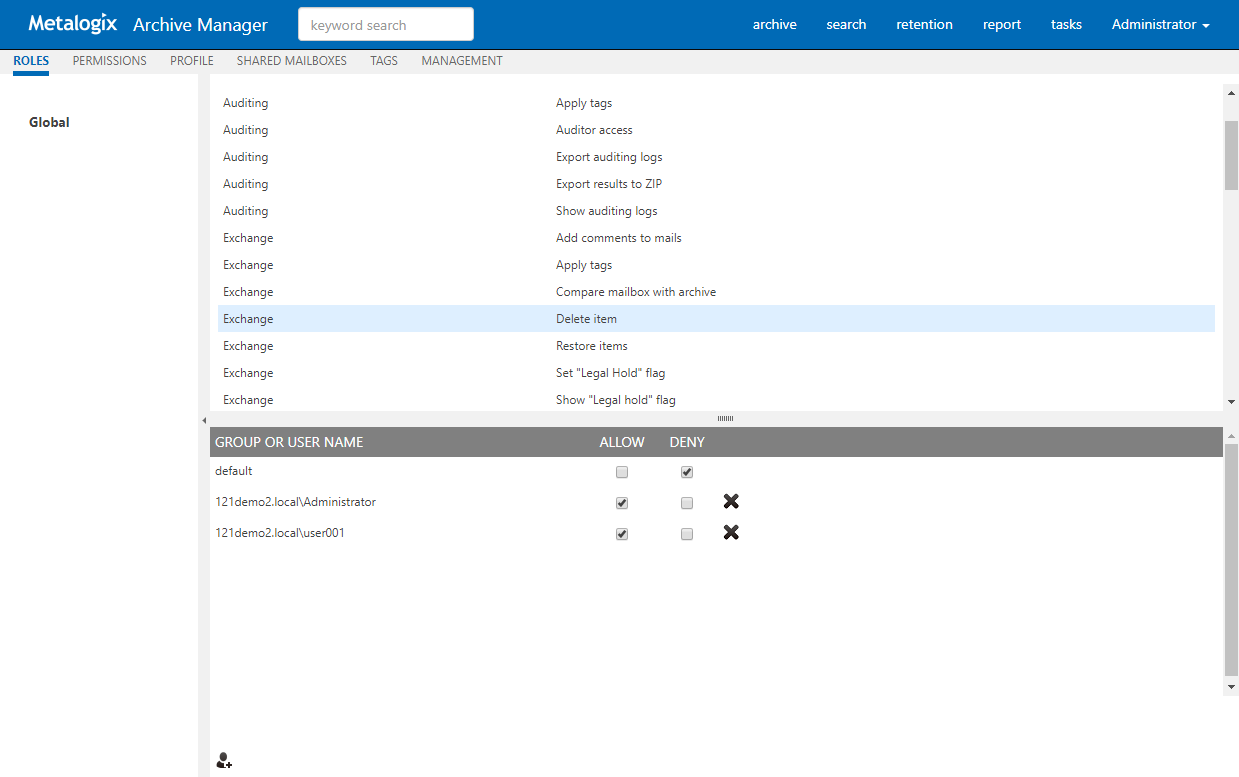
To assign users/groups to roles:
1.In the left pane the Global option is selected by default; i.e. the configured settings apply to all Archive Servers (File Archive or Exchange Archive) in the environment. Should you wish to apply settings only for a specific server, click it in the left pane; e.g. if you want to allow Legal Hold only for one File Archive Server and not for others.
2.Select the desired role in the list of roles.
3.If the desired user/group does not appear among associated users under the list view, you can add it. Click the plus sign (
4.Check the users/groups you want to manage and click OK.
5.The selected users/groups are displayed in the main pane. Manage their roles by checking Allow / Deny.
IMPORTANT NOTE:
If UseGlobalPermissionsForAllServers key is set to TRUE or this key does not exist in web.config, the Roles page lists only Global setting. In this case roles for users are set globally, i.e. role set will be applicable to all servers.
Otherwise, if the UseGlobalPermissionsForAllServers is set to FALSE, all available servers will be listed and roles can be set on any server/location. Using this option can slower login process because all accessible servers/locations needs to be searched for roles.
Permissions
To display the Permissions page, click the logged-on user name in the right-upper corner. Select Manage settings from the drop-down menu, then click Permissions on the grey sub-bar. Now you can assign ArchiveWeb permissions to users/groups in the main pane.
Super-user has ability to control access list, i.e. who is allowed to log into ArchiveWeb. Super-user has to set user and/or group who has permission to log in ArchiveWeb. The affected permission is Logon in ArchiveWeb and can be set in Manage settings in Roles and/or Permissions sites:
Default permission is ALLOWED user is allowed to log in ArchiveWeb.
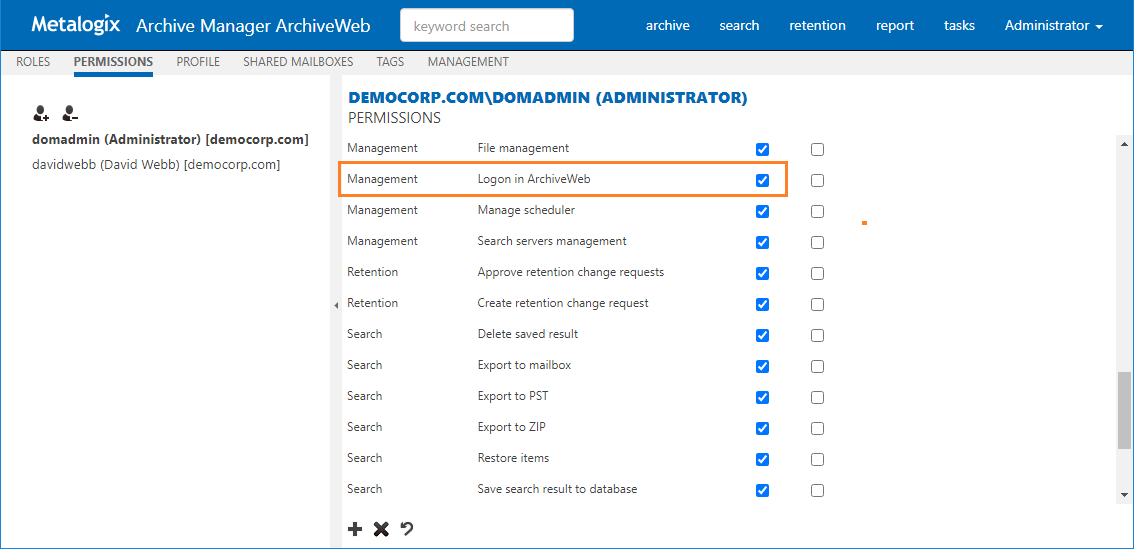
Users/groups which already have some roles assigned manually are listed on the right. Click the user/group to display and manage its roles in the right pane. List of roles in the right pane is split into sections - Exchange Archive features are listed under Exchange roles, search features under Search roles etc.
NOTE: Users deleted in Active Directory but still existing in Archive Manager are displayed as strikethough.
To assign roles to users/groups:
1.Select the desired user on the right. If the user is not listed, click the Add user or group symbol (
2.In the Find users or groups pop-up dialog choose whether youd like to search in Office 365 users or in Active Directory users.
To search in Office 365 users check Office 365 user checkbox. User can be searched by user-name, logon-name or display-name. Asterisk (*) wildcard can be used.
Note: Office 365 users need to be previously imported via Archive Manager for Exchange.

To search in Active Directory users leave Office 365 user checkbox unchecked. Enter domain name and user/group name. Asterisk (*) wildcard can be used.
When fields are filled by clicking the Search button search in desired category is invoked.Select the desired users/groups in the search results and click OK.
3.The selected user/group appears in the left pane. Select the user/group to manage its ArchiveWeb permissions in the right pane.
4.List of roles on the right is split into sections. Exchange Archive features are listed under Exchange roles, search features under Search roles etc. Further, each role can be allowed/denied on global level or on individual archive server level. Permissions which are set manually are highlighted in blue. Inherited permissions are highlighted in yellow. (More information on permission hierarchy find at the beginning of this chapter.)
To remove users/groups:
1.Click the Remove users or groups symbol (
2.In the Remove users or groups pop-up dialog select users or groups youd like to remove.
3.Click OK.
Allow all (
