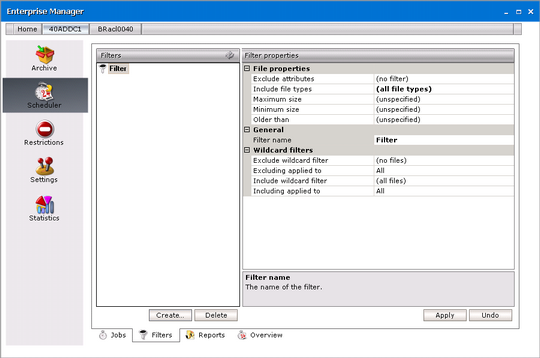
Filters tab
By using filters you may specify which of the files will be archived and in what way. Before using any filters they need to be created on the Filters tab.
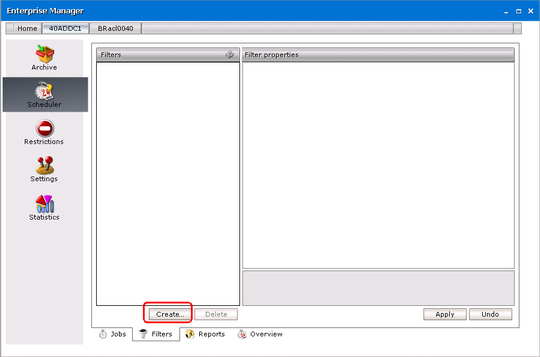
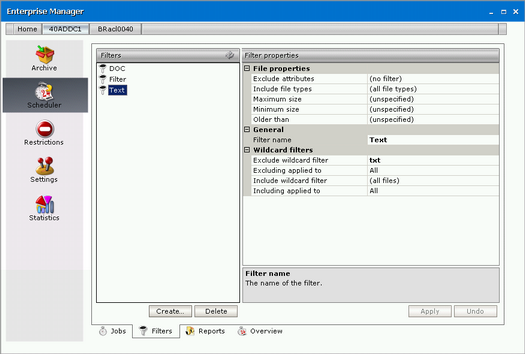
When you switch to this tab, you will see the window split in two parts. On the left, there is a list of all filters displayed (when Archive Manager for Files is running for the first time, the list is empty!). On the right you will see their properties.
How to create a filter
1.Click on the Scheduler tab.
2.Click on the Filters tab.
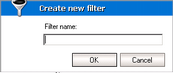
3.Click on the Create button to open the Create new filter window.
4.In the Create new filter window enter the name in the Filter name text box. Then click OK.
5.After clicking OK the following window is displayed.
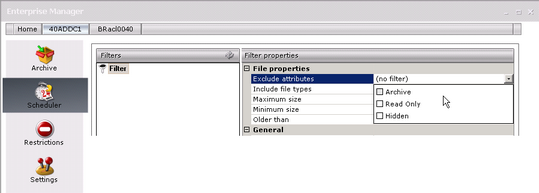
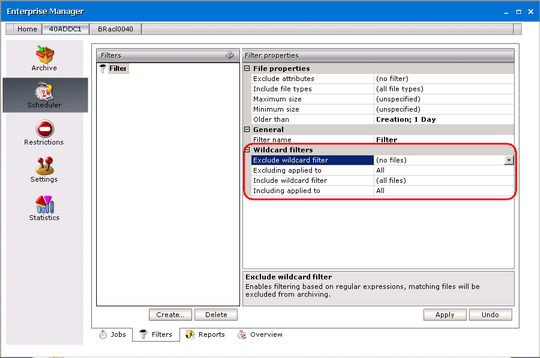
6.Click on the Exclude attributes field. Then click on the down arrow to unfold the dropdown box. Files with selected attributes will be excluded from archiving (Archive files, Read only files, Hidden files). If none of those options are selected, then all files will be archived.
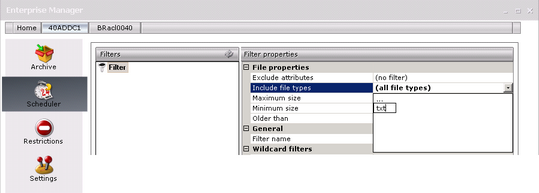
7.Click on the Include file types field. Then click on the down arrow to unfold the dropdown box. Here you may specify the type of files to archive. Simply double-click the three dots and enter the desired extension (without a dot!). Then press Enter.
NOTE: If you leave this field empty, all file types will be archived.
8.Click on the Maximum size field. In the adjacent field enter the maximum size of files (in kilobytes) to be processed.
NOTE: Should you enter Unspecified, then there are no limitations regarding the size of files to be processed.
9.Similarly, click on the Minimum size field, and in the adjacent field enter the minimum size of files (in kilobytes) to be processed.
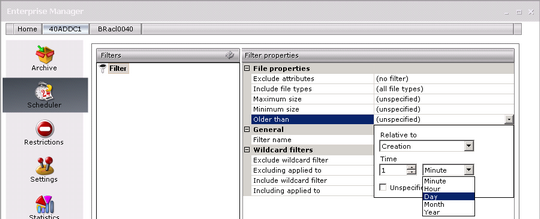
10.Click on the Older than field. Then click on the down arrow to unfold the dropdown box. You may filter files according to time of their creation, modification, and last access.
Should you enter Unspecified, then there are no limitations regarding time.
11.In the Filter name field you may change the name of the filter anytime.
12.In the Wildcard filters section you can define files or folders filtering based on the regular expression, i.e. you can define files/folders archiving based on their names.
Basically, you define expressions using wildcards and specify whether they will be applied to folder name or file name or both. It is possible to include or exclude folders/files matching the defined criteria. All steps are explained in detail further.
NOTE: It can happen that a file/folder matches criteria both for include wildcard filtering as well as exclude wildcard filtering. In that case it will NOT be archived. Exclude is stronger than include.
It is possible to define Exclude as well as Include wildcard filters. In the following lines we describe how to specify the Exclude wildcard filter. This filter defines which files/folders should be excluded from archiving (based on their names). The Include wildcard filters are defined similarly.
To define the criteria for Exclude wildcard filtering:
Click on the Exclude wildcard filter field. Then click on the downward arrow. In the pop-up dialog you will define and test the wildcards.
Write the desired expression in the Wildcard text box. Then click Add to add it to the Wildcards list. In case there are more expressions defined in the Wildcards list, the filter will be applied to the file/folder if its name matches at least one expression.
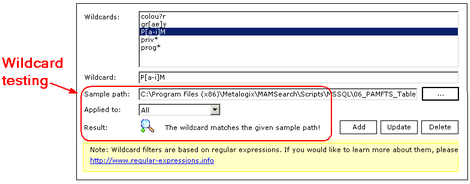
NOTE: The rest of the dialog is only for the testing purposes. You can test how the defined expression will be applied and if it will match the files/folders which you wish. Simply:
·select the expression in the list
·In the Sample path text box enter the path for which you want to apply the filter
·In the Applied to combo box choose if you want to apply the expression to file name, folder name or both
·The Result shows you if the selected expression matches the specified path, i.e. if the filter with the given wildcard applies to that path
After you have defined the expression(s) in the Exclude wildcard filter, click the Excluding applied to text box. Click the down arrow and in the drop-down box select whether you want to apply the filter to filename, folder or both.
13.To save, click Apply.
NOTE: In the case you want to delete a filter, simply select the desired filter in the list in the left pane and then click on the Delete button. But be careful when removing any filter, because if such a filter was already assigned to a job, no filter will be considered!
After having created filters on this tab, you may assign them to folders.
How to assign a filter to a folder
1.Create a filter on the Filters tab, if it is not created yet. (See the section How to create a filter)
2.Click on the Jobs tab.
NOTE: To display recently created filters, click on the Refresh button located in the upper right corner in the Filters section. Use this button especially if several Archive Manager for Files applications are running simultaneously.
3.In the Scheduler jobs section select the job which is already archiving the desired folder(s) or which you want to use for archiving the desired folder(s).
NOTE: You can only assign a filter to a folder if the folder is processed by a job. (See the section How to assign a job to a folder.)
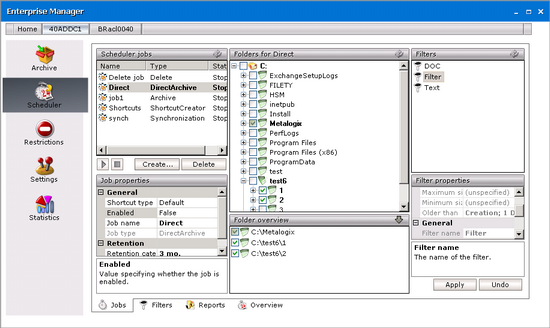
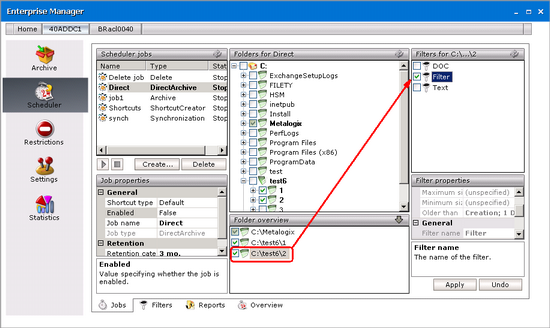
4.Click on the upward arrow on the Folder overview tab to unfold it. By unfolding the Folder overview tab you will see all folders/disks the respective job is assigned to.
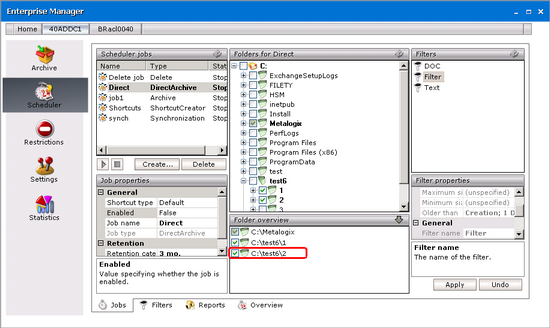
5.In the Folder overview section select the folder for which you wish to apply filter(s).
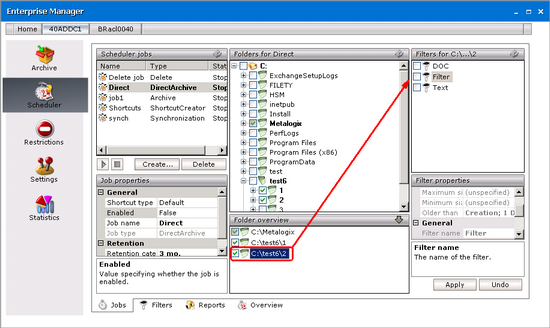
6.For the folder selected in the Folder overview section select the desired filter/filters in the Filters section.
NOTE: If multiple filters are attached to a folder, the files in it have to fulfill all the criteria in all filters. If the file does not match one of the defined criteria, it will not be processed.
Example:
I.One filter is defined to process .doc and .txt files. In this case if the file has the extension .doc or .txt, it will be archived.
II.Two filters are set for a folder, one to process only .doc files, the second one to process only .txt files. In this case processed file should have both .doc and .txt extension, which is impossible. Two such filters will cause that no file will be processed by the job in that folder. This is a wrong configuration.
7.Click Apply.
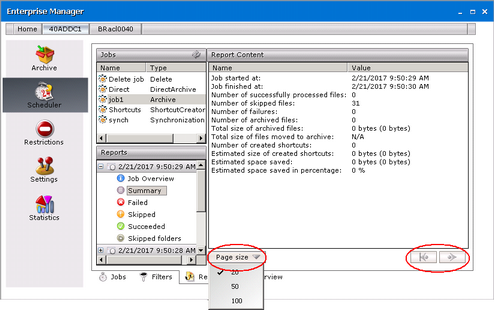
Reports tab
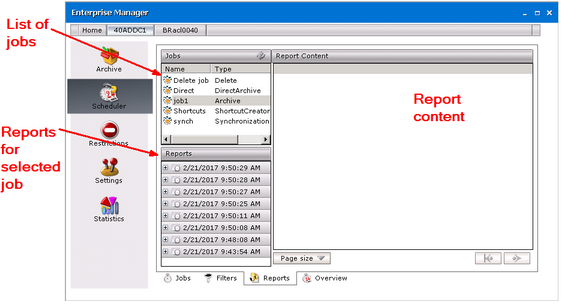
In the Jobs section of this tab you will see a list of all jobs. Select the desired job and its reports will be displayed in the Reports section. Reports on documents processed by jobs are created automatically whenever archiving by the relevant job is finished.
To display the desired report:
1.Click on the Scheduler tab then switch to the Reports tab.
2.Select the desired job on the Jobs section to list its reports.
3.In the Reports section double-click the report with the relevant date and time.
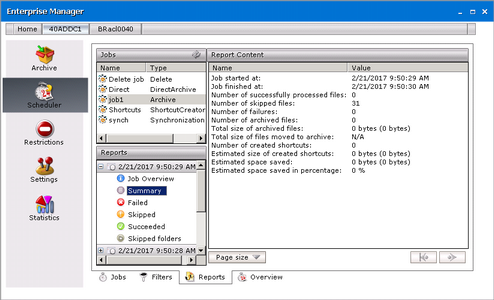
4.Now select which report data you wish to display in the Report content section. Every report includes:


NOTE: Successfully processed files include files which were just archived or archived and replaced with a shortcut, or, if there was no new version, just replaced with a shortcut depending on the settings.


5.There can be a lot of documents listed e.g. in the Succeeded section. To make the list more transparent, you can set the number of rows to be displayed per page in the Report content. To do so, unfold the Page size down-drop menu and select 20, 50 or 100. Use the arrows to switch between pages.