
File compression
On this tab the administrator may specify files, with regard to their size, which will be compressed during archiving process. It is also possible to exclude certain file types from compression.
How to set compression criteria with regard to file size
1.Click on the Settings tab.
2.Click on the File compression tab.
3.Select the Compress files by default check box. (This is crucial otherwise no compressing will take place.)
4.Select the Compress files by size check box.
5.Enter values in the Compress files if their size is between n bytes and n kilobytes boxes.
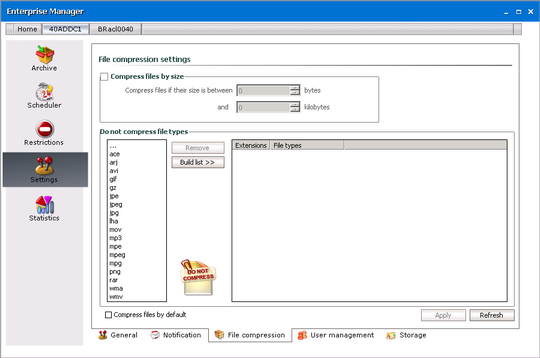
IMPORTANT: Providing that the Compress files by default check box is unselected, no compressing will take place.
How to exclude certain file types from compressing
1.Click on the Settings tab.
2.Click on the File compression tab.
3.Click on the Build list button.
4.After clicking on the Build list button, a list of all file extensions gets displayed in the right list box. Select the desired ones and then click on the Add button. After clicking on Add, the respective file extensions are moved in the Do not compress file types list box.
NOTE: The administrator may also double-click the three dots and then enter the desired file extensions (without a dot!).
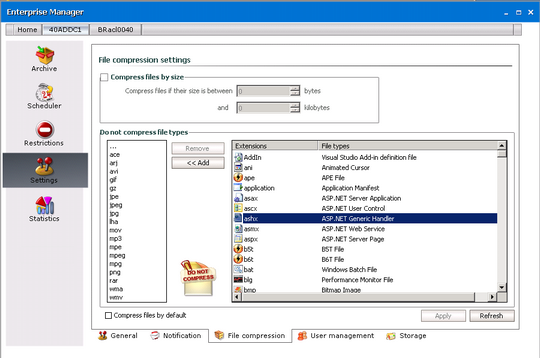
5.Click Apply to confirm.
NOTE: Should you wish to include for compressing some already excluded file types, simply select the respective file extensions in the Do not compress file types list box and then click on the Remove button.
User management
On this tab the administrator may specify users permissions for Archive Manager for Files features. This means that individual users can be given permissions to archive/retrieve files, to retrieve versions, to mark versions for deletion, to change jobs etc.
All such rights should be specified individually for each user. New user accounts can be added onto this tab (in order to manage users permissions) simply by using the Add button.
Steps to assign rights
1.Click the Settings tab.
2.Click the User management tab.
3.Select the desired user account in the left pane.
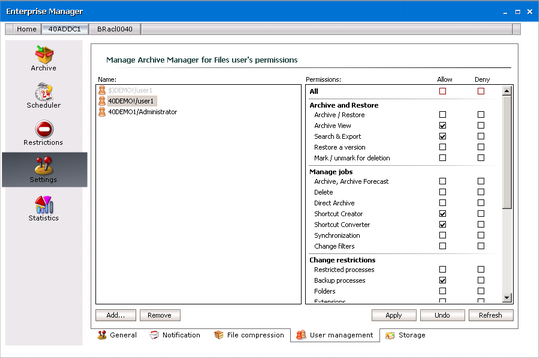
4.In the left pane select the user account whose permissions you want to manage. Then in the right pane set the permissions for the Archive Manager features for the selected user by selecting either the Allow or Deny check boxes for the corresponding feature. For example, to allow a user to mark archived files in the HSM store for deletion, select the check box under the Allow column against the Mark for deletion/Remove deletion mark from a version feature.
|
|
NOTE: To allow or deny all settings at once use the Allow All and Deny All check boxes. |

5.To confirm, click Apply. If you click Undo you will cancel all changes that have been made since you last clicked Apply.
Storage
Archive Manager for Files provides a powerful backup solution aimed at saving disk space by saving files on mass storage devices. This device can be a Network Appliance or a VNX file server. To backup your files on them you need to include these devices on the Storage tab. Further, on this tab you can also define Generic File Server (remote computer) from which you can archive files without a need to install Archive Manager for Files on it.
NetApp Cluster
NetApp devices can be used when they are added to the Storage tab. After a standard installation, this tab is visible to the administrator. To grant one or more users the ability to use the NetApp device(s) you must grant the user the rights to the Storage tab.
Metalogix Archive Manager supports the NetApp Cluster Mode environment. A NetApp cluster consists of one or more nodes grouped together to form a scalable cluster. Creating a cluster allows the nodes to pool their resources and distribute work across the cluster, while presenting administrators with a single entity to manage. Clustering also allows continuous service to end users if individual nodes go offline. Depending on the controller model, node storage consists of flash disks, capacity drives, or both. Nodes communicate with each other over a private, dedicated cluster interconnect.
To use Metalogix Archive Manager with a NetApp cluster mode environment it is necessary to create, configure and activate FPolicy. NetApp® FPolicy® is a file access notification framework that allows an administrator to monitor file access over CIFS protocol. When configured for Metalogix Archive Manager, FPolicy monitors events in the NetApp environment and sends notifications to the Metalogix Archive Manager (MAM FSA FPolicy Server) every time a user opens a stub file. Metalogix Archive Manager listens to these events and restores a file every time an 'open' request is received.
There are several steps you must perform to create an FPolicy configuration:
1.Plan your configuration.
2.Create an FPolicy external engine
3.Create an FPolicy event
4.Create an FPolicy policy.
5.Create an FPolicy scope and attach it to the FPolicy policy.
6.Activate the FPolicy policy.
Prerequisites
1.Configured and running NetApp (Cluster mode) environment with CIFS servers.
2.Installed Metalogix Archive Manager .
NetApp Fpolicy configuration steps
1.Log into NetApp Admin node console.
2.Create an FPolicy external engine.
The cluster uses the external engine to hold configuration information that it needs in order to send notification information to the FPolicy servers. It specifies the primary servers and secondary servers to which the cluster will send notifications. It also specifies FPolicy server related configuration information.
Metalogix Archive Manager requires FPolicy external engine sending notifications to MAM FSA FPolicy Server. This service is part of Metalogix Archive Manager for Files installation. Default port used by MAM FSA FPolicy Server is 7790.
Example:
vserver fpolicy policy external-engine create -vserver svm1 -engine-name policy_engine -primary-servers 10.16.1.1 -port 7790 -extern-engine-type synchronous ssl-option no-auth
|
|
NOTE: vserver svm1: svm1 - is the name of the Storage Virtual Machine with the CIFS share archived by Metalogix Archive Manager. primary-servers: 10.16.1.1 - 10.16.1.1 is the IP address of the server with Metalogix Archive Manager FSA FPolicy Server installed. port 7790 - 7790 is the port under which Metalogix Archive Manager FSA FPolicy Server listens. |
To verify the FPolicy external engine has been created you can use vserver fpolicy policy external-engine show command.

3.Create an FPolicy event.
An event describes what to monitor. An event can contain protocol, file operations, filters, and volume operation event types. In the FPolicy configuration, an event is attached to an FPolicy policy. You can attach the same event to one or more policies.
Metalogix Archive Manager requires monitoring of open file operations over offline files.
Example:
vserver fpolicy policy event create -vserver svm1 -event-name cifs_event -protocol cifs -file-operations open -filters offline-bit -volume-operation true
|
|
NOTE: vserver svm1: svm1 is the name of the Storage Virtual Machine (Data VServer) with the CIFS share archived by Metalogix Archive Manager |
To verify the FPolicy event has been created you can use vserver fpolicy policy event show command.

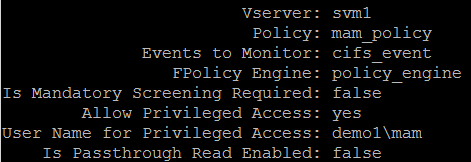
4.Create an FPolicy policy.
Fpolicy policy associates an external engine from step 2 and one or more events from step 3 to the policy.
You must create an FPolicy event name before creating an FPolicy policy. If you are using an external FPolicy server, you must also create an FPolicy engine before creating a policy.
Example:
vserver fpolicy policy create -vserver svm1 -policy-name mam_policy -events cifs_event -engine policy_engine -is-mandatory false -allow-privileged-access yes -privileged-user-name demodomain\mam -is-passthrough-read-enabled false
|
|
NOTE: vserver svm1: svm1 is the name of the Storage Virtual Machine (Data VServer) with the CIFS share archived by Metalogix Archive Manager. events cifs_event: cifs_event is the name of the Fpolicy event that was created in the Step 3. engine policy_engine: policy_engine is the name of the Fpolicy engine that was created in the Step 2. privileged-user-name: demoadmin\mam is the name of the superuser under which Metalogix Archive Managers services run. |
To verify the FPolicy policy has been created you can use vserver fpolicy policy show -instance command.
5.Create an FPolicy scope for an FPolicy policy.
A scope defines the boundaries on which the FPolicy policy will apply. The Vserver is the basic scope boundary. When you create a scope for an FPolicy policy, you must define the FPolicy policy to which it will apply and you must designate to which Vserver you want to apply the scope. There are a number of parameters that further restrict the scope within the specified Vserver. You can restrict the scope by specifying what to include in the scope. Or you can restrict the scope by specifying what to exclude from the scope.
Example:
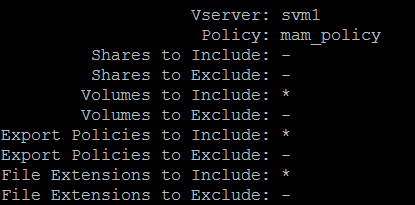
vserver fpolicy policy scope create -vserver svm1 -policy-name mam_policy -volumes-to-include * -export-policies-to-include * -file-extensions-to-include *
|
|
NOTE: vserver svm1: svm1 is the name of the Storage Virtual Machine (Data VServer) with the CIFS share archived by Metalogix Archive Manager. policy-name mam_policy: mam_policy is the name of the FPolicy policy that was created in the Step 4. |
To verify the FPolicy scope has been created you can use the vserver fpolicy scope show -instance command.
6.Activate FPolicy policy for the specified Vserver and set its sequence (priority).
The sequence is used when multiple policies have subscribed to the same file access event. To modify the sequence number of a policy, the administrator must deactivate the policy (if it is activated) and then use this command to activate it with the new sequence number. Policies that use the default engine configuration have a higher priority than policies for any other engine, regardless of the sequence number assigned to them.
Example:
vserver fpolicy enable -vserver svm1 -policy-name mam_policy -sequence-number 1
|
|
NOTE: vserver svm1: svm1 is the name of the Storage Virtual Machine (Data VServer) with the CIFS share archived by Metalogix Archive Manager. policy-name mam_policy: mam_policy is the name of the FPolicy policy that was created in the Step 4. |
To verify the FPolicy has been activated you can use the vserver fpolicy show-enabled command.

Steps to include a NetApp cluster
1.Click on the Settings tab.
2.Click on the User Management tab at the bottom of the screen.
3.From the left pane select the user name for which you want to activate the Storage tab.
4.Select the Storage management check box.
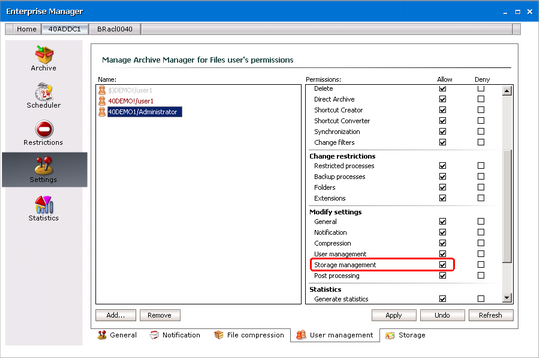
5.Click the Storage tab from the bottom of the screen.
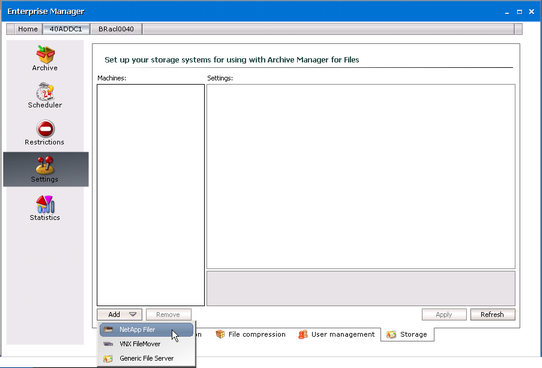
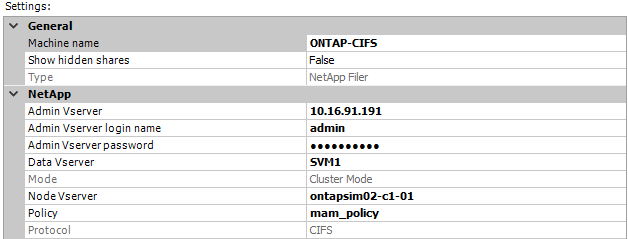
6.Click Add and then click NetApp Filer.
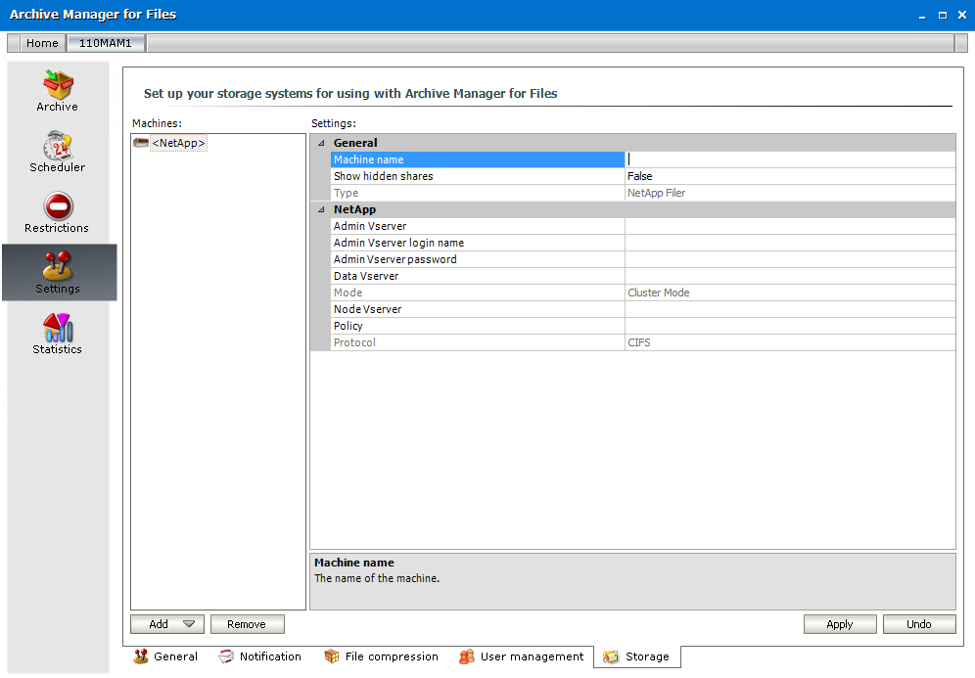
Enter the parameters for the properties as described below:
|
Field |
Description |
|
Machine name |
CIFS server name to be archived |
|
Admin Vsever |
IP adress of admin vserver |
|
Admin Vserver login name |
User name to log into admin server |
|
Admin Vserver password |
Password to log into admin server |
|
Data Vserver |
Name of Data Vserver (Storage Virtual Machine) with CIFS server. |
|
Node Vserver |
Name of Node Vserver in the NetApp cluster. |
|
Policy |
Name of the Fpolicy policy that you configured previously. See step 4 in the NetApp Fpolicy configuration steps for more details. |
|
|
NOTES: NetApp cluster consists of three types of Vservers, which help in managing the cluster and its resources, and the data access to the clients and applications. A cluster contains the following types of Vservers: ·Admin Vserver is created automatically by the cluster setup process. ·Node Vserver is created when the node joins the cluster. The Admin Vserver represents the cluster, and Node Vservers represents the individual nodes of the cluster. ·Data Vserver represents the data serving Vservers. Data Vservers are also referred to as Cluster Vservers because they are used to read and write data to and from the cluster. Unless otherwise specified the term Vserver refers to cluster (data-serving) Vserver, which applies to both Vserver with FlexVol volumes and Vserver with Infinite Volume. After the cluster setup, a cluster administrator must create Data (Cluster) Vservers and add volumes to these Vservers to facilitate data access from the cluster. A cluster must have at least one Data (Cluster) Vserver to serve data to its clients. The user account that runs the Metalogix Archive Manager services must be part of the BUILT-IN\Administrators group on the Storage Virtual Machine with the CIFS share that is to be archived. |
A sample NetApp configuration settings is shown below:
7.Click Apply.
After including a NetApp device, you may proceed with file archiving (see Archive tab or Scheduler tab to learn how to archive either manually or by applying scheduled jobs).