
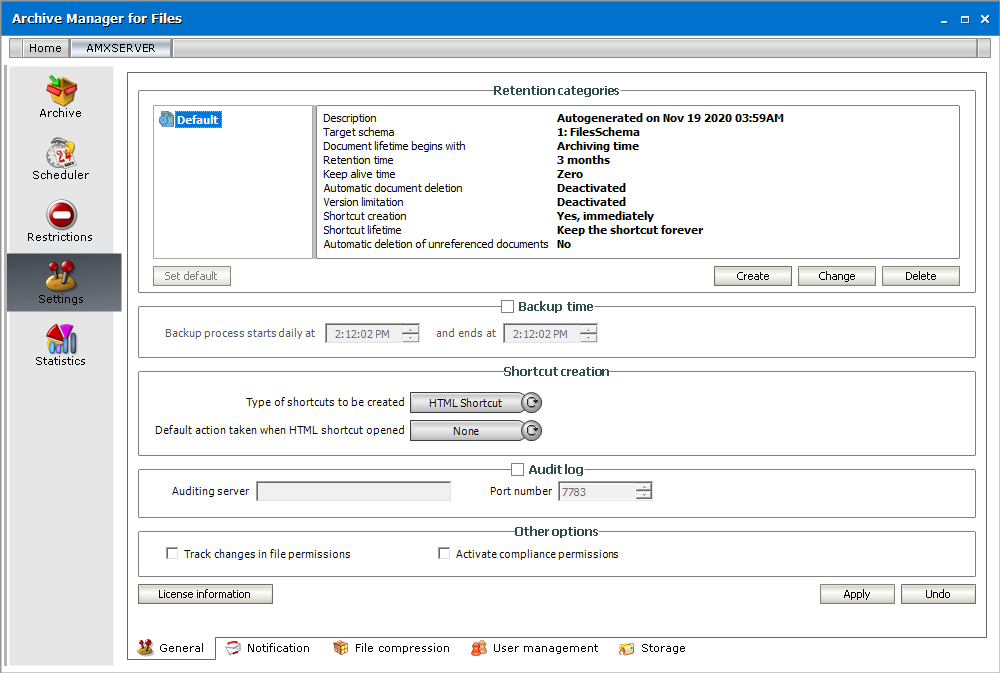
Creating a new retention category
1.On the Settings > General tab click Create in the Retention categories section. The Create retention category wizard starts and the Basic Settings window opens.
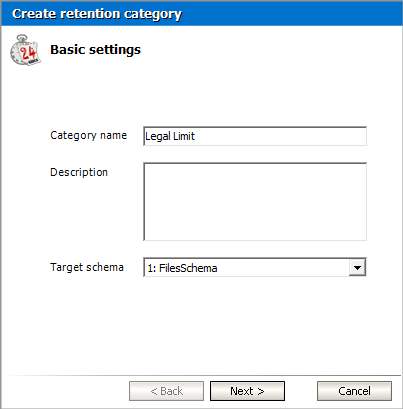
Enter the information as described below:
a.Category name - name of the retention category.
b.Description - (optional) enter a description for the retention category.
c.Target schema - select an HSM store schema from the drop down list. HSM schemas describe archive behaviors for the store that is linked to each schema. HSM schemas are configured with the configuration tool.
2.Click Next. The Document lifetime window opens.
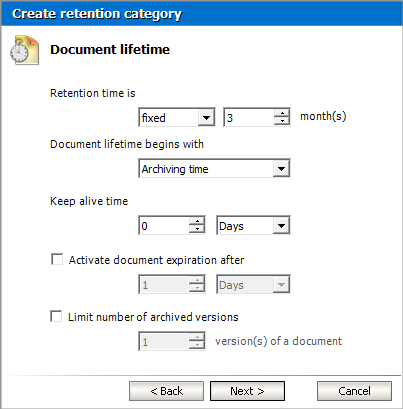
Enter the information as described below:
a.Retention time - during this period none of the documents in the HSM store can be removed from the archive. Documents can be marked for deletion before this time elapses and these documents will be deleted only after the retention time period ends. Choose from the following options:
·Fixed period - set a fixed retention time period in months.
·Indefinite period - the retention time is not set immediately but can be defined later.
·Infinite period - retention time does not end.
b.Document lifetime begins with - select the document lifetime starting point to calculate the Retention time and other time periods such as shortcut creation time, delete job start time to delete expired documents and documents marked for deletion, the file creation time, archiving time or last modification time.
c.Keep alive time - this is the time period after the retention period commences, during which the document will be retained in the HSM Store although it was marked for deletion. It is a security feature which allows administrator to reverse the deletion if necessary. It can be set in days, months, years.
d.Activate document expiration after - select the check box if you want to permanently delete archived documents whose retention time has elapsed. The expiration time specified here must be longer than the Retention time. If the expiration time is not set, documents that are not marked for deletion are retained in the archive.
e.Limit the number of archived versions - select this check box to set how many versions of a document the system should keep in the archive. For example, if you set this value to 3, then every new version that is created is archived and the oldest version is marked for deletion.
3.Click Next. The Shortcut lifetime window opens.

Enter the information as described below:
a.Keep the original document - documents will be copied to the archive and there is no change in the file system.
b.Delete the original document - documents will be moved to archive and will not remain in the file system.
c.Create shortcut - the document will be archived and replaced with a shortcut.
d.Create shortcut immediately - shortcut is created immediately after archiving of the document.
e.Delay shortcut creation by - shortcut is created after specified time calculated from the time defined in the Document lifetime begins with property in the previous step.
f.Create shortcut if the document was not used at least for - shortcut is created if the document is idle from the time when the document was last time retrieved from the archive or from the start point defined in the Document lifetime begins with property if document has not been retrieved.
4.Click Next. The Additional settings window opens.
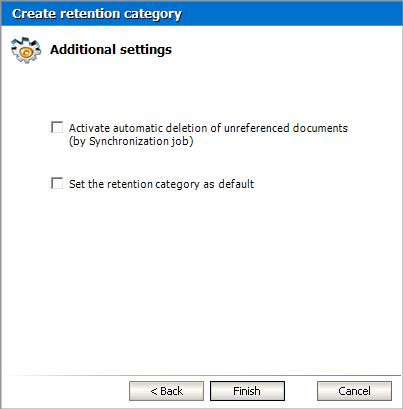
Choose the options as described below:
a.Activate automatic deletion of unreferenced documents - select this check box so that archived documents can be marked for deletion whenever the synchronization job cannot find the reference (shortcut) to the document in the file system. If the check box is not selected, the synchronization job will not mark unreferenced documents for deletion. The process for deleting unreferenced documents is as follows:
i.Documents are archived by a retention category with Activate automatic deletion of unreferenced documents checked and shortcuts are left in the file system.
ii.You delete shortcuts from file system → documents become unreferenced
iii.The Synchronization Job runs → unreferenced items are marked for deletion
iv.Items marked for deletion are deleted from archive when their Retention (and Keep alive) time elapses and the Delete job runs
b.Set the retention category as default - select this check box to automatically use this category for archiving file. If none of the retention categories is marked as default, the system context menu for manual archiving does not work.
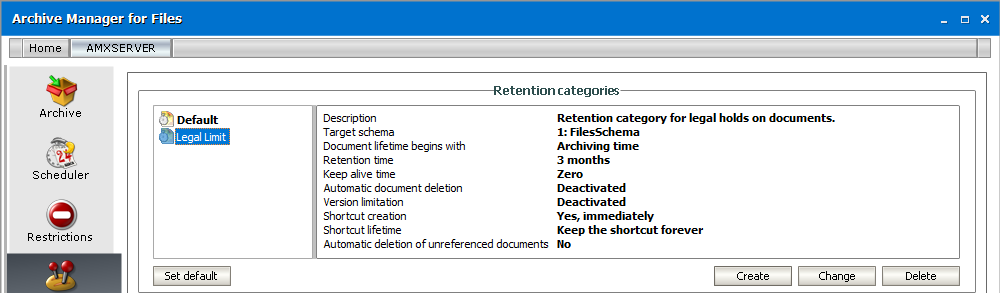
5.Click Finish. The retention category appears in the Retention categories section of the General tab.
Shortcut creation
Archive Manager for Files as an archiving tool unloads the file server(s) by archiving files to the HSM store and leaving just shortcuts in the original file location. These shortcuts can be of two types: STANDARD (fsa) and HTML.
Set your preferred settings in the Shortcut creation section of the General tab.
NOTE: These settings apply in general. However, Archive and DirectArchive job types can have its own settings regarding shortcut creation defined.
In the Type of shortcut to be created switcher you can choose from the following possibilities:
·Standard Shortcut (fsa) archived files are replaced with standard shortcuts

NOTE: If the application is unable to create shortcut (compression error), there are two ways to solve the problem:
a) In Regedit, navigate to the location below:
-HKEY_LOCAL_MACHINE\SYSTEM\CurrentControlSet\Control\FileSystem
In the right pane, right click on NtfsDisableCompression and click on Modify.
Type 0 (number zero) and click on OK. Close Regedit. Restart the computer to apply changes.
b) In Start menu:
- Administrative Tools Group Policy Management Default Domain Policy (right-click to Edit) Computer Configuration Policies Administrative Templates: Policy Definitions (ADMX Files) retrieved from the local machine System File System NTFS Do not allow compression on all NTFS volumes (right-click to Edit) choose option: Disabled
·HTML Shortcuts archived files are replaced with the HTML shortcuts which are pointing to the exact file in the archive. The shortcut has the same name as the original file, just the HTML extension is added to its original extension.

When the HTML Shortcut option is selected, the Default action taken when HTML shortcut opened switcher is activated. Specify the default action for loading of the archived documents:
oNone user will have the opportunity to decide whether to open or retrieve the file
oOpen file file will be opened from the archive
oRetrieve and open file will be retrieved and shortcut deleted
NOTE: For more information about file retrieving see Opening/Downloading the HTML shortcuts.
After you have specified your settings click Apply.
Opening/Downloading the HTML Shortcuts
When archiving files, Archive Manager copies them to another location to make a backup or replaces these files with standard or HTML shortcuts to save the storage space on the file server (see General tab). While HTML shortcuts require further settings related to the file downloading these will be described in this chapter.
Creating HTML shortcuts for the whole Archive Manager server is done on the Settings/General tab of the Archive Manager for Files. By selecting the HMTL Shortcut option in the Shortcut creation section the Default action taken when HTML shortcut opened switcher gets activated. Three options are available:
a)None
b)Open file
c)Retrieve and open
Lets explain what each option exactly means:
a)None
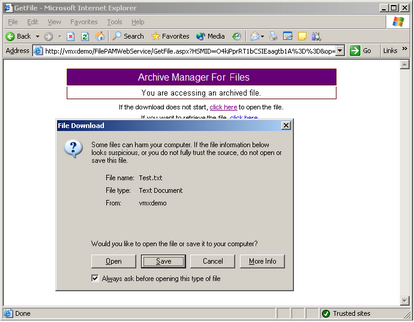
In this case you can decide whether you want to open the file or retrieve it from archive, i.e. shortcut will be deleted. When double-clicking on the HTML shortcut the current Web-browser is being opened. In the Get file window you can see two hyperlinks.
Click the first one if you want to open the file. Then click Open.
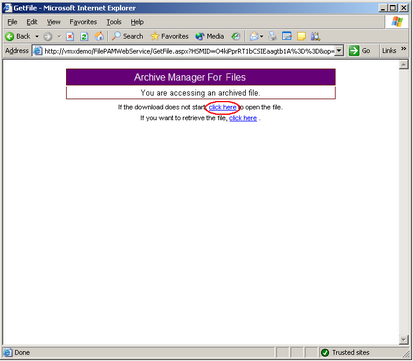
Click the second one if you want to retrieve the file. It will be retrieved to its original location. The next dialog informs you that the file was retrieved successfully. Click the link to open the file (in our example click C:\Archive folder\Test\Test.txt).
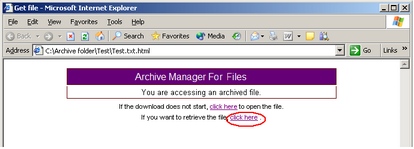
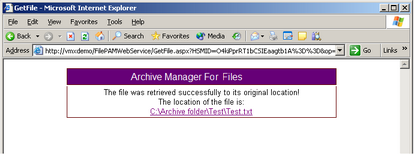
NOTE: The original location of the file can be different from the location of the HTML shortcut.
b)Open file
When double-clicking on the HTML-shortcut the current Web-browser is being opened. In the File download window click Open. The Web-browser recognizes the MIME-type of the file and opens it in its viewer application usually embedded in the Web-browser.
c)Retrieve and open file
After double-clicking the HTML shortcut the GetFile window opens. The dialog informs you that the file was retrieved to its original location and then the desired file will be opened. (Or click the link to open the file. In our example click C:\Archive folder\Test\Test.txt).

NOTE: The original location of the file can be different from the location of the HTML shortcut.
NOTE: After retrieving the HTML shortcut is deleted.
Notification
The e-mail notification feature helps you to be always informed about your scheduled jobs and receive emails with up-to-date data regarding job running. For this purpose you need to:
1.configure the notification settings on the Notification tab
2.allow notification for jobs about which you wish to be notified. This is done on the Scheduler / Jobs tab in the Job properties section. (See How to define a job.)
The notification email contains the basic Job(s) properties and a note if any errors occurred during the job running. The report is sent as an attachment.
NOTE: The e-mail notification cannot be activated for the DirectArchive job.
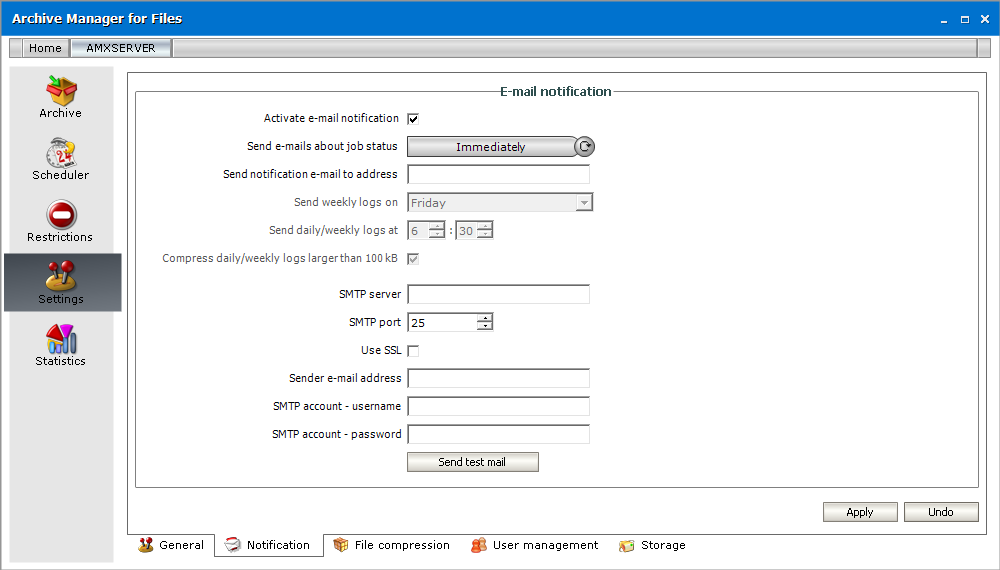
Check Activate e-mail notification check box to allow notification.
Use the Send e-mails about job status switcher to choose between Daily, Weekly or Immediate notifications. Should you choose the Immediately option, the notifications will be send just after the job stops running.
In the Send weekly logs on drop down specify the day of the week for weekly notifications and in the Send daily/weekly logs at fields set the time for daily/ weekly notifications. The notification email will be send at the specified time.
Check Compress daily/weekly logs larger than 100kB, too. Archive Manager for Files will try to pack the huge summaries with ZIP in order to reduce the size of the sent email. To do so, you will need Microsoft Visual J# Version 2.0 Redistributable Package installed on the server. If you experience any problems using this feature, e.g. the mail is not sent, please try installing the above mentioned package or simply uncheck the check box.
In the SMTP server and SMTP port that is used by you organization for outgoing emails.
Select the check box Use SSL if your email server is uses SSL.
Enter the Sender e-mail address, SMTP account - username and SMTP account - password in the respective text boxes.
To confirm, click Apply.
Finally click Send test mail to test the connection and the data you have entered. The addressee defined should receive a test mail in a few seconds depending on the SMTP server.