
Folders tab
Here you have an option to define folders (or disks) that are to be excluded from archiving. For example, if the computer you are archiving files from has a system disk, then all EXE files used by the system should be deactivated for archiving.
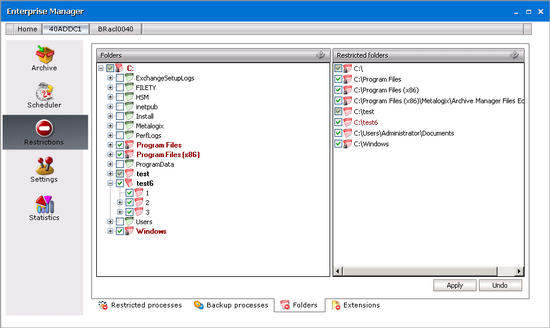
Protection against archiving can be achieved through restrictions. Folders protected against archiving by Archive Manager for Files are displayed red. When a folder (a disk) is not restricted, its icon is displayed green (see the screenshot below).
When you click on the Folders tab, you will get all disks displayed in the left, with a list of restricted folders in the right. If neither folders nor disks had been restricted from archiving then the right side (under Restricted folders) would have been empty.
NOTE: A special case includes folders (disks) restricted by default. By default restricted folders (or disks) are displayed with a red icon with a padlock attached to the icon. Restriction cannot be removed from folders restricted by default.
There are four folders restricted by default on system disks:
·C:\ disk is restricted non-recursively;
·Program Files folder is restricted recursively;
·Program Files x86 folder is restricted recursively;
·MAM4Files is restricted recursively (i.e. the relative installation path for \MAM4Files; e.g. in our case MAM4Files folder has been installed under C:\Program Files\ Metalogix \ Archive Manager Files Edition);
·Windows installation directory is restricted recursively (i.e. Windows operating system is restricted from archiving by default);
IMPORTANT NOTE: In case you place your HSM store on a local hard disk, make sure to protect it (i.e. set it to be restricted recursively from archiving). The administrator should know himself where the HSM store is placed.
RECOMMENDATION: The Documents Settings folder should be restricted for every user as well, except for the My Documents folder for each user.
Restriction can be set manually only in the left pane of this window. The right pane serves mainly to display a list of all folders restricted from archiving, either recursively or non-recursively.
Archive Manager for Files recognizes two types of restrictions, which can be set by the administrator:
·recursive; and
·non-recursive
Recursive restriction
For this type of restriction, no files under the parent folder (including all its subfolders) can be archived. To restrict a folder recursively, click on the check box next to the desired folder TWICE. It will get checked and filled with white color.
Non-recursive restriction
For this type of restriction, at least one of the subfolders down the path is allowed for archiving. To select a folder non-recursively, click ONCE on the check box next to the desired folder. It will get checked and filled with grey color.
The two main questions are:
1.How to recognize recursive selection from a non-recursive at a first glance?
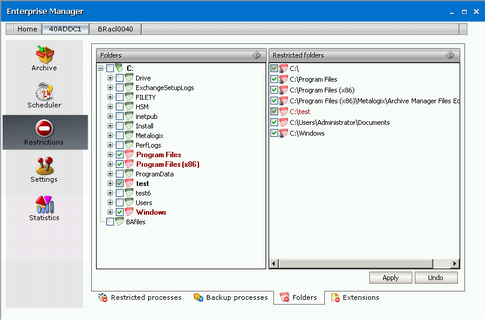
Next to each folder you will see check boxes. There are three cases:
·an empty check box (not checked) (e.g. folder Drive);
·a selected check box (checked), filled with grey color (e.g. folder test);
·a selected check box (checked), filled with no color (e.g. folder Program Files)
An empty check box indicates no selection.
A selected check box filled with grey color indicates non-recursive selection A selected check box filled with white color indicates recursive selection
2.And how to select folder either recursively or non-recursively?
The check box next to a desired folder is used as a switcher:
·when empty, then there is no selection;
·when you click on the check box once, it becomes selected and filled with grey color, and the folder becomes selected non-recursively;
·when you click on the check box for the second time, it becomes selected and filled with white color, and the folder becomes selected recursively
NOTE: To remove selection, simply keep clicking on the check box until it is empty. Please notice that restriction cannot be removed from any of by default restricted folders. NEVER REMOVE IT from your HSM store either, if it is placed on a local disk.
How to set restrictions recursively
This happens in those cases when the administrator needs to restrict a specific folder from archiving, along with all its subfolders down the path.
To restrict recursively a desired parent folder from archiving:
1.On the Restrictions tab, click on the Folders tab.
2.In the left pane (under Folders), unfold the respective disks structure down to the desired parent folder.
3.Click on the check box next to the desired parent folder TWO TIMES.
4.After clicking on the check box of the desired parent folder for the second time, all its subfolders down the path become selected and their icons turn red.
5.Save those changes by clicking on the Apply button.
NOTE: By clicking on the Undo button you will cancel all the changes that had been made since you last clicked Apply. In other words, by clicking Undo you will restore what was recently changed.
How to set restrictions non-recursively
To restrict non-recursively a desired folder:
1.On the Restrictions tab, click on the Folders tab.
2.In the left pane, unfold the tree structure of the desired disk down to the desired parent folder.
3.Click ONCE on the check box next to the desired parent folder.
4.Save those changes by clicking on the Apply button.
This includes also those cases when the administrator needs to restrict almost all subfolders of a specific parent folder from archiving, yet at least one of the subfolders should be allowed for archiving. Firstly you need to restrict the parent folder recursively, and then unselect the desired subfolder (i.e. the one for which archiving should be allowed).
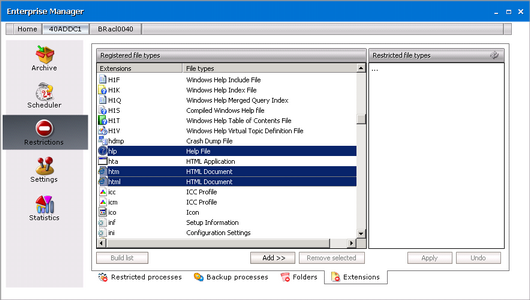
Extensions tab
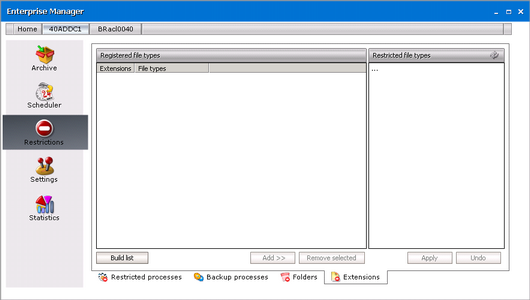
In general, on this tab you may specify all file extensions that are to be excluded from archiving. This means that none of the file types specified on this tab will be archived by Archive Manager.
When clicking on the Extensions tab for the first time, both lists Restricted file types and Registered file types are empty (see the screenshot below). The left side (under Restricted file types) can be filled in manually, but that would be inefficient and time consuming. A much easier way is to build up a list of all file types located on the computer, and subsequently exclude those that should not be archived.
How to exclude certain types from archiving
To exclude certain file types from archiving:
1.Click on the Restrictions tab.
2.Click on the Extensions tab.
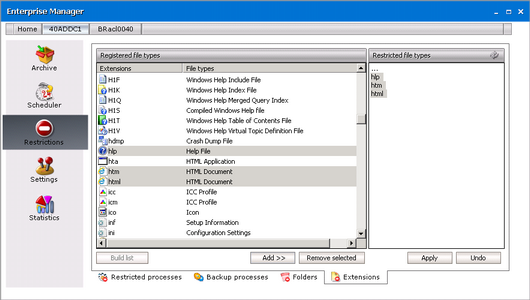
3.Click on the Build list button.
4.After clicking on the Build list button, all file types located on that computer will be displayed under Registered file types.
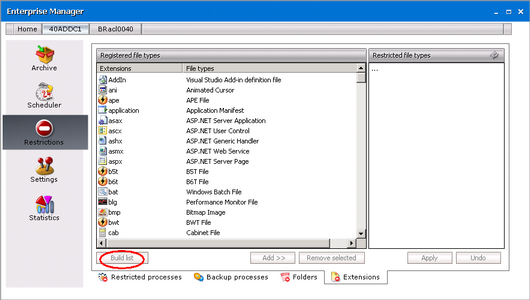
5.To add some of the registered files types among restricted ones, simply select them, and then click the Select from list button. Selected files types will be moved under Restricted file types.
NOTE: Add files types to restricted ones also by double clicking the three dots and entering extension name (without the dot!)
6.To confirm, click Apply.
NOTE: If you have decided to archive certain already restricted file types, simply select them in the Restricted file types list, and then click on the Remove selected button (see the screenshot below).
Settings
Before any archiving (either manual or automated) it is suitable to specify your settings regarding:
·retention categories (different time spans for which archived items will be kept in the HSM store even if you mark them for deletion), the backup time (the time interval allocated during the day for making the backup of the database), shortcut creation and audit log on the General tab
·email notification on the Notification tab
·compression of files on the File compression tab
·permissions for users on the User management tab
·storage system on the Storage tab
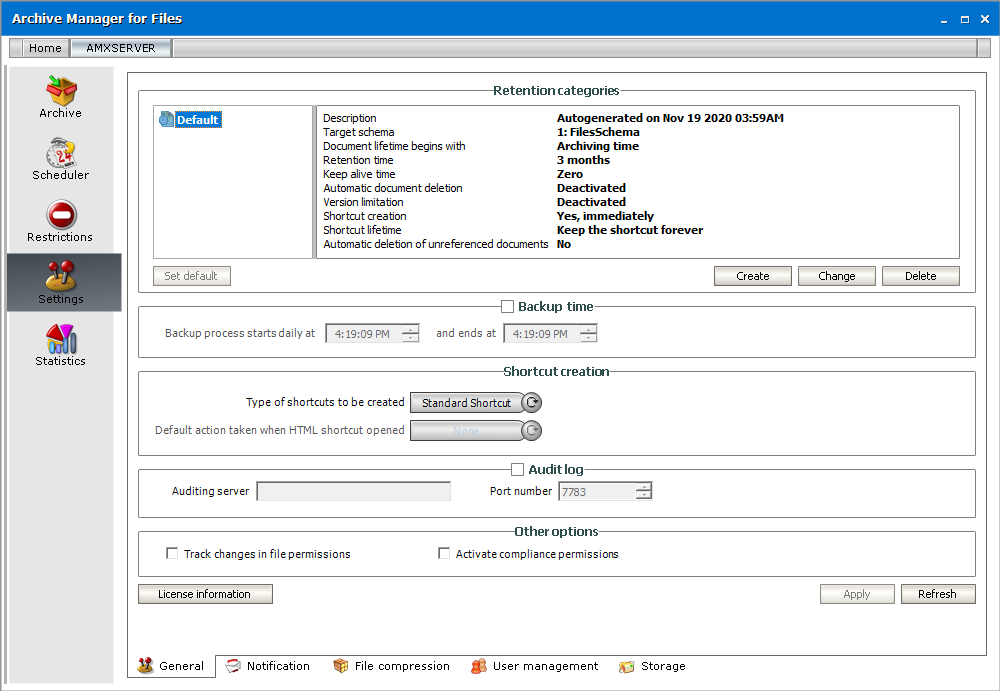
General
On this tab you may specify the backup time, audit log, shortcut creation, and different retention categories determining document lifecycle, i.e. archiving method, retention time etc. License information is also available here.
Backup time
We strongly recommend setting the Backup time first. This time is reserved for the database backup. During the backup period no information can be stored or requested; archiving process is stopped and will continue afterwards. Select the Backup time check box and then enter the desired period in the two text boxes. Please pay attention to this period, so that it is not set during working hours.
If you want to get information about license validity, click the License information button.
Audit log
If Auditing feature was installed, you need to activate it on this tab. To activate auditing, check Audit log check box. In the Auditing Server enter the name of the machine where the Auditing feature is installed and specify the Server Port (the default port is 7783).
All actions made in the Archive Manager for Files console create a log entry in the auditing database. The audit logs can be viewed in the ArchiveWeb. The Auditing tab is visible just for permitted users.
|
|
NOTE: For more information about Auditing see the Auditing Guide. |

Other options
Track changes - when selected, any file system permissions changes for the files that have been archived are also updated in the Archive Manager for Files database. Otherwise the application stores only files permissions applicable at the moment of archiving and does not perform any updating.
Activate compliance permissions - when selected, then the compliance tab, the compliance permissions and other compliance functionality are activated through ArchiveWeb. If the check box is cleared, the compliance functionality are deactivated in ArchiveWeb.
|
|
NOTE: Supported on Windows Server 2012 R2 or higher. For more information about this feature see the Compliance section in the Metalogix Archive Manager for Files - ArchiveWeb Guide. |
Retention categories
In the Retention categories section different retention categories for file archiving can be set. Various types of documents require different ways of archiving. The time for which they need to be stored and retrievable can differ as well. You can create retention category for short-term documents, retention category for long-term documents etc. In the following lines we discuss the usage of retention categories, their description and management.
The retention categories which are created here can be assigned to jobs on the Scheduler/Jobs tab. They can be also used at manual archiving (see the Archive tab section). Retention categories are defined through the following range of settings:
Settings related to documents in the archive:
·Retention time the archived document is not delete-able from the HSM Store for the defined time period. Retention time is a critical feature of Archive Manager for Files related to law regulations. Documents deleted in file system are still actually residing in the archive until this retention time expires.
·Keep-alive time it is the time period after document deletion, during which the deleted document can be turned back to the file system.
·Document expiration time the document, although not marked for deletion, is automatically deleted (by the Delete job) from the archive after the expiration of the defined time period. It is the MAXIMAL time for which the document resides in the HSM Store. This time period cannot be smaller than the retention time.
Settings related to documents/shortcuts in the file system:
·Keep the original document document is archived but it is not modified in any way (no icon, no shortcut, keeps residing in the file system). This option is used just for backup.
·Delete original document the document is REMOVED from the file system immediately after archiving; no shortcut is created; it is NOT ACCESSIBLE from the file-system; such unreferenced documents are accessible only in Archive Manager for Files / Archive tab when you click the Show deleted items icon (right upper corner) or in ArchiveWeb.
·Create shortcut the document is archived and it is replaced with a shortcut. This type of archiving saves the space on the file system and at the same time allows the user to work with the archived document just as with a non-archived one. Document can be replaced with the shortcut immediately or it is kept without changes for the defined time period and only after its expiration shortcut is created (Delay shortcut creation by option).
oDelete shortcut after a time the document shortcut is automatically removed from the file system after the expiration of the defined time period (user cannot reach it any longer in file system). However the document still resides in HSM Store.
The shortcut has its pros and cons. Shortcuts save space on the file server. However, with often accessed documents the original file is retrieved frequently and the network traffic is high. With often accessed documents we recommend keeping no shortcut on the file-server, but the file itself. It is important to balance high network traffic against fast file accessing. This task is effectively managed via Archive Manager for Files shortcut lifecycle settings:
·Create shortcut immediately shortcut is created at the time of archiving
·Delay shortcut creation document is archived but still remains also in the file system; only after time period defined under the "Document lifetime begins with" setting (when it is not eventually accessed so often any more) it is replaced by a shortcut
·Create shortcut if the document was not used at least for similar as above: document is archived but still remains also in the file system. Shortcut is created only after the document was not accessed for the defined time period.
Further settings define the shortcut lifecycle:
·Keep shortcut forever shortcut is left in the file-system
·Delete shortcut after shortcut is deleted after the defined time period; keep in mind that after the shortcut is deleted, the document in NOT accessible from the file-system
The Delete shortcut after a time feature can be used to reduce the number of redundant shortcuts left in the file system after a specific number of days, months or years.
Archived document lifecycle:

In addition to default retention category created during the installation the administrator is able to create any number of retention categories satisfying specific criteria of the enterprise. Different retention categories are then assigned to different jobs. The retention category consists of a name, a description, the above mentioned retention settings and of the HSM scheme. It is fully manageable from Archive Manager for Files.