
How to configure connection settings
To specify connection settings for a specific Archive Manager server:
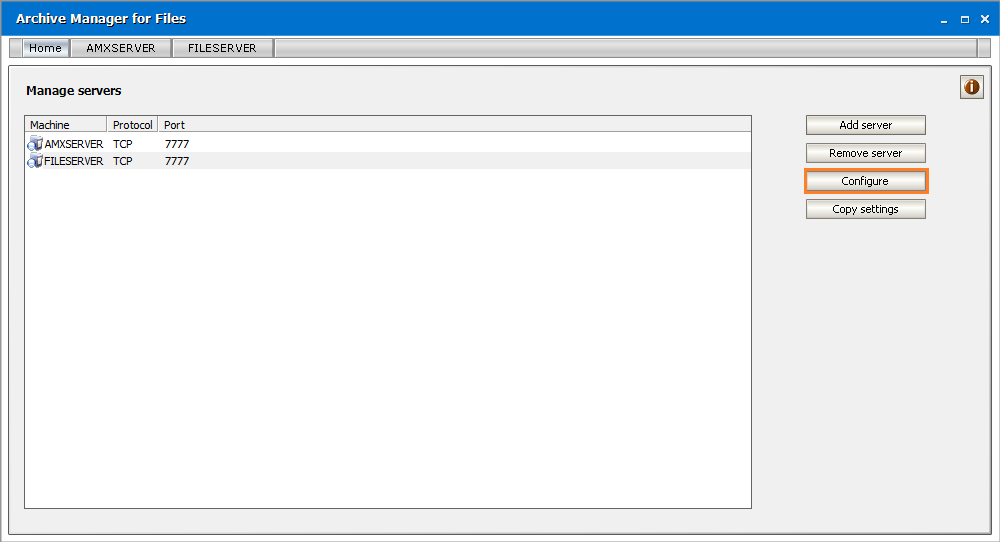
1.In the Archive Manager for Files window click on the Home tab. Select the desired file server in the list. Then click on the Configure button.
2.In the Connection settings window, change the network protocol by clicking on the button located at the right (select either HTTP or TCP).
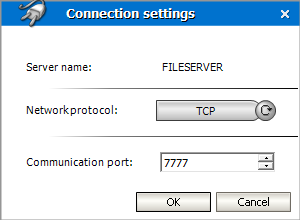
3.To change the communication port, simply click on arrows or enter a digit in the Communication port text box.
4.Click OK to confirm.
After adding an Archive Manager server (computer) in the list and upon specifying its connection settings, you may start managing it. To start managing it, click on its corresponding tab located on the upper bar. Sometimes, after clicking on the respective tab you might get a warning message (see the screenshot below). This should not happen normally. This means that the MAM FSA Remote Server Service is not running on the desired file server (the MAM FSA Remote Server Service is responsible for remote connection to the respective file server). Then you need to start this service on the remote server manually.

To make sure that MAM FSA Remote Server Service is started on the remote server, check it:
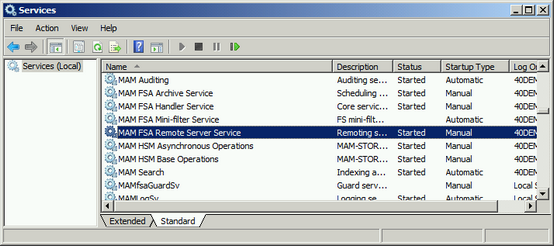
1.Click Start /Settings /Control Panel /Administration Tools /Services
2.Make sure that the Status column for the MAM FSA Remote Server Service is Started. If it is not started, then right-click that service and in the context menu select Start.
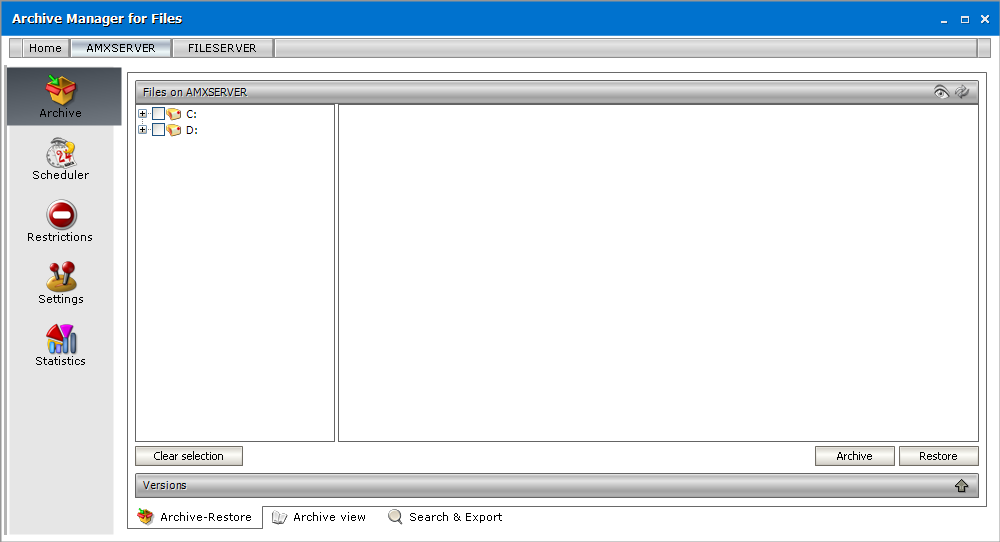
When the connection settings for the desired file server are set and the MAM FSA Remote Server Service is started there, you may click on the desired Archive Manager servers tab located on the upper bar to open that computer, i.e. to start managing it.
You will get the following interface displayed (including all disks on that computer listed in the left pane).
Restrictions
Under the Restrictions tab you may specify restrictions regarding RETRIEVING of archived files:
·Restricted Processes tab - processes which will not be allowed to retrieve archived files
·Backup Processes tab backup processes which will be able to backup archived files (shortcuts) but which will not be able to retrieve them
and restrictions regarding ARCHIVING:
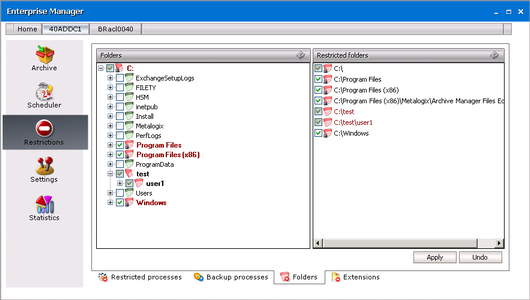
·Folders tab folders which are recursively or non-recursively excluded from archiving
·Extensions tab - file types which will not be included in archiving
IMPORTANT: Before any archiving (either manual or automated) please first specify your restriction-related settings. It is important to exclude certain folders from archiving, and that should be done first! - some files or folders are excluded from archiving by default (e.g. system folders) but you may want to exclude for instance all files residing under Local Settings; otherwise you may archive unintentionally even the unwanted ones.
Folders excluded by default can be seen after clicking on the Restrictions tab and then on the Folders tab. All folders excluded from archiving, either recursively or non-recursively, are displayed red. Recursive and non-recursive selection will be explained in detail later in this manual (see the section Folders tab).
Restricted processes tab
By clicking on the Restricted Processes tab, the following window will be displayed. On the right side (in the Restricted processes pane) you can see all processes which have been restricted to recover files. This list includes a standard list already specified within our software. This means that all files in this list are unable (i.e. they have been restricted) to automatically retrieve archived files. This list can, of course, be modified. It is necessary for instance to add to this list antivirus programs, which are capable of restoring files. The administrator may himself include additional files, simply by double clicking the three dots and then entering the respective file name (including its extension!), or by selecting from among running processes.
If desired, any of the restricted processes can be removed from the restricted list.
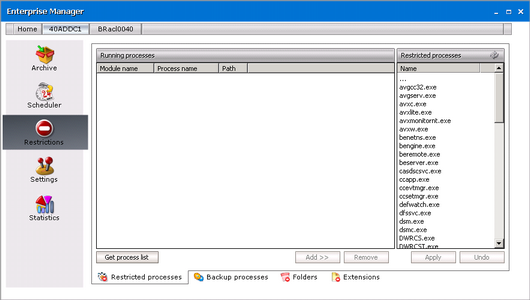
The left side (under Running processes) is empty, unless you click the Get process list button. After clicking on that button, a list of all processes currently running on that computer is displayed.
How to deactivate recovering of files by certain processes
In order to deactivate recovering of files by certain processes they need to be added among restricted ones. To do so, follow these steps:
1.On the Restrictions tab, click the Restricted Processes tab.
2.Click on the Get process list (
3.Select the desired ones and then click on the Add button.
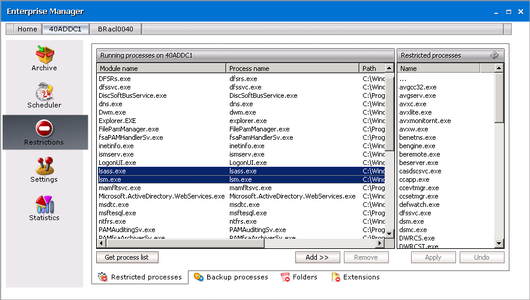
4.The selected files will be moved to the right side under Restricted processes. To confirm, click Apply.
NOTE: Individual running processes can be moved to the restricted list also by double clicking them. To remove a process from the Restricted processes list, simply select the desired one and then press the Remove button.
Backup processes tab
You may be using backup tools (e.g. NT Backup, Robocopy.exe or TSM) to do a backup of your files and folders. Together with other files, it can be requested to create a backup also from files which are archived and replaced with a shortcut file. In some cases, the backup processes may be retrieving archived documents while doing a backup of shortcuts. If you experience such behavior, mark these processes on the Backup processes tab.
Processes which are added to Backup processes will not be allowed to retrieve shortcuts. They will simply do a backup of files as well as shortcuts and these backed-up shortcuts will be fully functional.
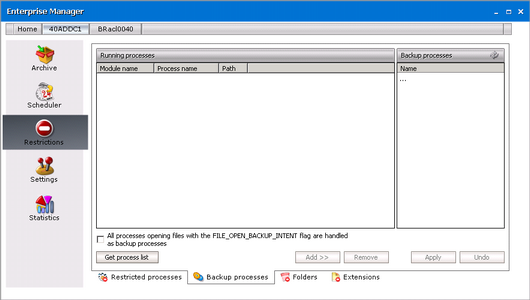
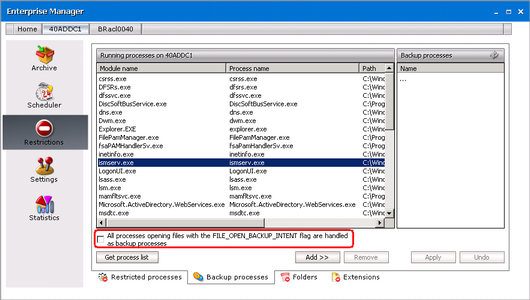
The Backup processes tab is divided to two panes. The left pane (under Running processes) is empty, unless you click the Get process list button. After clicking on that button, a list of all processes currently running on that computer is displayed.
On the right side (under Backup processes) you can see all processes which are handled as backup processes. They have been restricted to recover files but they are able to read the shortcut file. This means that all processes in this list are unable (i.e. they have been restricted) to automatically retrieve archived files. This list can, of course, be modified. The administrator may himself include additional files, simply by double clicking the three dots and then entering the respective process name (including its extension!), or by selecting from among running processes.
If desired, any of the restricted processes can be removed from the restricted list.
IMPORTANT: It is not necessary to select backup processes one by one. If you click All processes check box, then all processes opening files with the FILE_OPEN_BACKUP_INTENT flag will be handled as backup processes, i.e. they will not be allowed to retrieve documents. Instead, they will be able to create a backup from the shortcut file.
How to deactivate recovering of files by backup processes
In order to deactivate recovering of files by backup processes they need to be added among restricted ones. To do so, follow these steps:
1.On the Restrictions tab, click the Backup Processes tab.
2.Click on the Get process list (
3.Select the desired ones and then click on the Add button.
NOTE: Processes which are set as restricted processes on the Restricted processes tab cannot be added to backup processes and vice versa.
It is not necessary to select backup processes one by one. If you click All processes check box, then all processes opening files with the FILE_OPEN_BACKUP_INTENT flag will be handled as backup processes, i.e. they will not be allowed to retrieve documents.
4.The selected files will be moved to the right side under Backup processes. To confirm, click Apply.
NOTE: Processes can be moved to the Backup processes list also by double clicking them. To remove a process from the Backup processes list, simply select the desired one and then press the Remove button.