
Express Installation
Express installation installs Metalogix Archive Manager for Exchange on a standalone server with the full set of primary components: Archive Manager for Exchange, Archive Manager Search, Hierarchical Storage Manager (HSM) and ArchiveWeb. The server also contains the Archive Manager Database instance that contains the configuration databases for various features and components. If you do not have a dedicated file store, HSM uses the local hard drive for storing archived messages.
·Worksheet for this installation
·Steps to install Metalogix Archive Manager for Exchange
·Steps to verify the Express installation
Worksheet for this installation
The following information will be required through the installation process. Sample values are provided here as a guidance.
|
Item |
Description |
Example |
|
License Key |
The license key that you received from Quest. If you don't have a license key, contact your Quest representative. |
894K5-3M448-M544E-A594A-7K8Z7 (Sample only. This key is neither an active nor an expired license key) |
|
Archive manager for Exchange server |
The server where the Archive Manager for Files will be installed. |
AMXSERVER-X |
|
Installation folder |
Full path of the folder where the application files will be installed |
C:\Program Files (x86)\Metalogix |
|
HSM Store folder |
Full path of the folder that will contain the archived files |
C:\HSM |
|
Database Authentication method |
Type of database authentication: Integrated Windows Authentication or SQL Authentication |
Integrated Windows Authentication |
|
UserLogin |
Username if SQL Authentication is selected |
democorp\domadmin |
|
Password |
Database password if SQL Authentication is selected |
************** |
|
Database server |
The database serve instance name where the databases for Archive Manager for Files will be installed. |
AMXSERVER-X |
|
Superuser account |
Windows account that runs the Archive Manager for Exchange services. For the Express installation steps described in this guide, the superuser account is the Enterprise Administrator account. |
username: democorp\domadmin password: ************** |
Steps to install Metalogix Archive Manager for Exchange
1.Run the Metalogix Archive Manager Installation Package to extract the files to a local folder.
2.If the installer does not start immediately, run the MAMInstaller.exe from your install media folder. The Welcome window opens.
3.From the navigation panel on the left, click PLANNING. The Planning window opens.
4.Review the requirements and release notes. If necessary, visit the Quest website for more information.
5.From the navigation panel on the left, click INSTALLATION. The Server Installation window opens. Read the Software Transaction Agreement. If you wish to proceed, select the I accept the terms of the license agreement check box.
6.Click Next. The Installation Mode window opens.
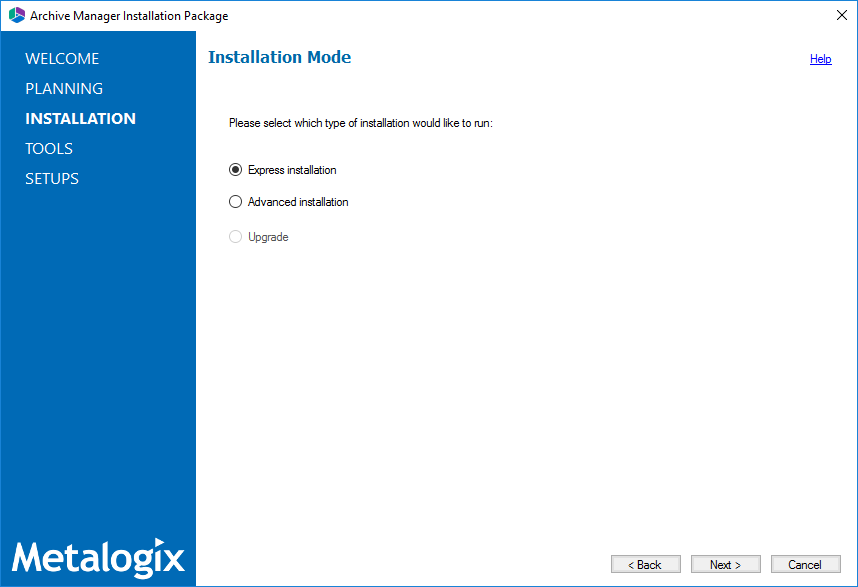
7.Select the Express installation option and click Next. The Installation Components window opens.
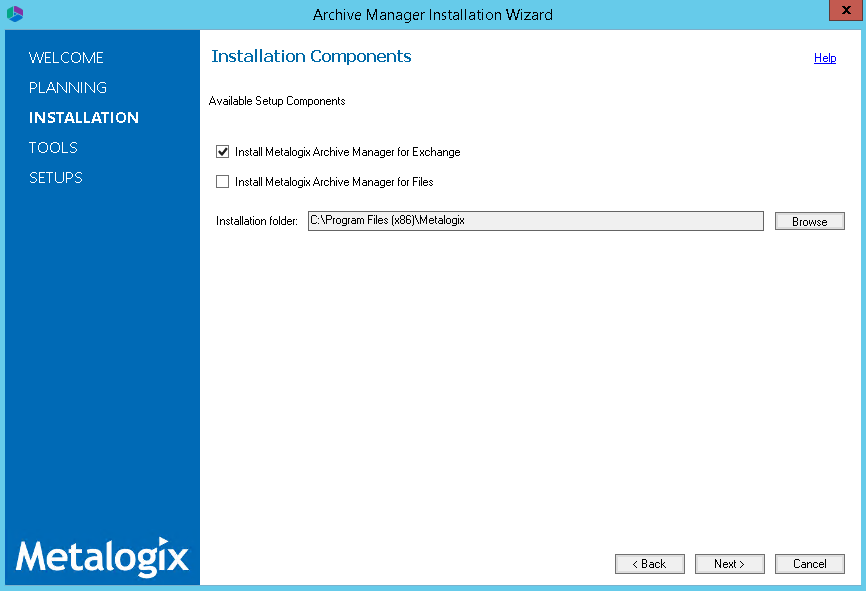
8.Select the Install Metalogix Archive Manager for Exchange check box. You can select Install Metalogix Archive Manager for Files check box as well if you want to install Metalogix Archive Manager for Files on the same server. For more information about express installation for Metalogix Archive Manager for Files, see the Metalogix Archive Manager for Files Quick Start Guide.
9.If you want to change the default installation folder, click Browse and select and existing folder.
10.Click Next. The Database Engine selection window opens.
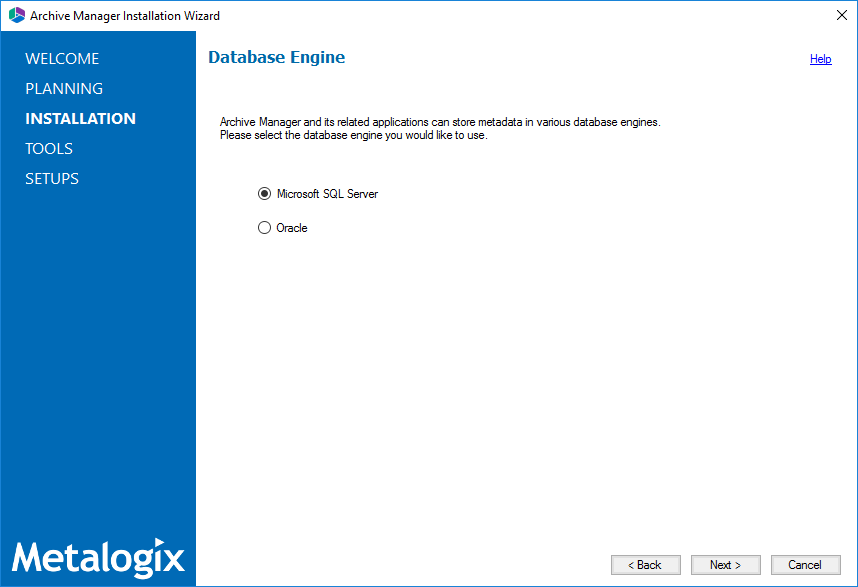
11.Select either Microsoft SQL Server (for on-premise MS SQL Database Server or Azure SQL Database) or Oracle.
12.Click Next. The Checking Prerequisites window opens.
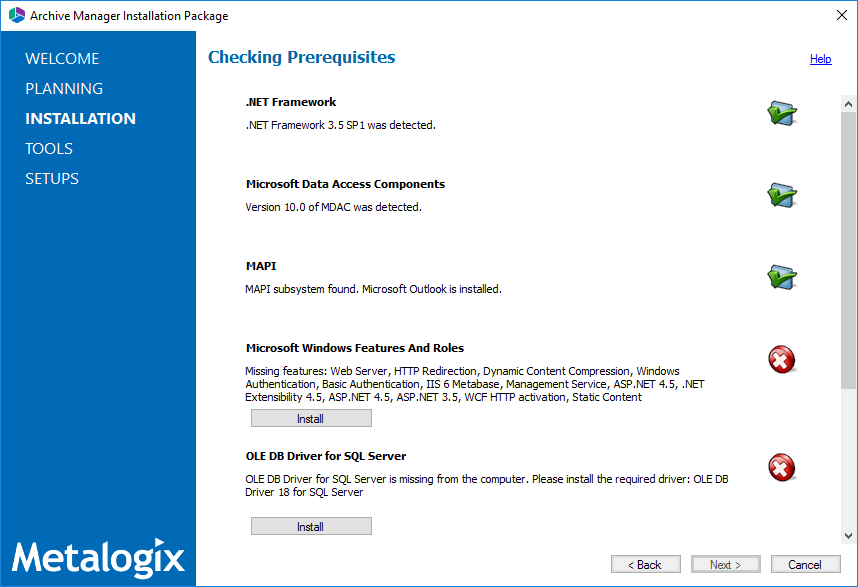
13.Notice that some prerequisites are missing and the Next button is deactivated. Click Install for each prerequisite to install the missing components. Scroll down to expose and install all the prerequisites.
14.Scroll down to the bottom of the window. Click Validate your license. The Activate License Key dialog appears. If you are connected to the internet, select Online activation or see Appendix for more license activation options.
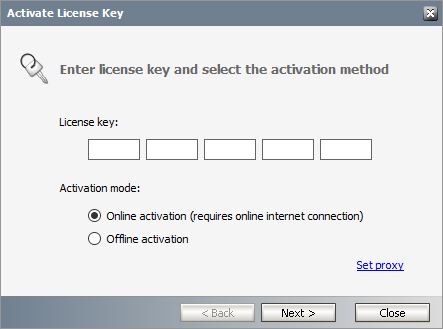
15.Click Next. When your license is activated, you will see a confirmation message and the license details. Click Finish to close the Activate License Key dialog. This completes the prerequisite checks.
16. In the Checking Prerequisites window, click Next. The Superuser Account window opens.
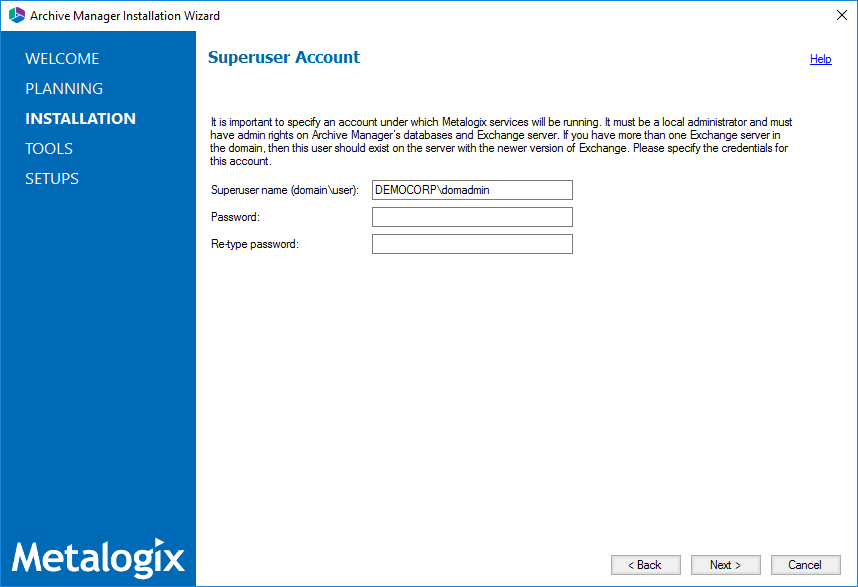
17.Specify the Superuser name and Password. Enter the password again in the Retype password field.
18.Click Next. The Database Server Connection window opens.
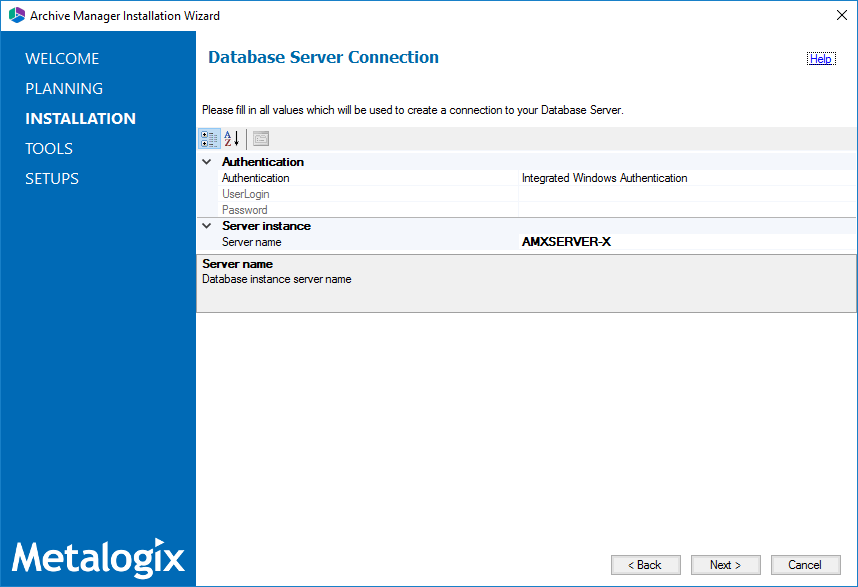
19.Specify the connection properties as explained below:
a.Authentication - the type of database authentication. From the drop down, select either Integrated Windows Authentication or SQL Authentication.
b.Password - password of the user (if SQL Authentication is selected)
c.UserLogin - user name (if SQL Authentication is selected)
d.Server name - name of the SQL Server. For example AMXSERVER-X
20.Click Next. The Hierarchical Storage Manager Settings window opens.
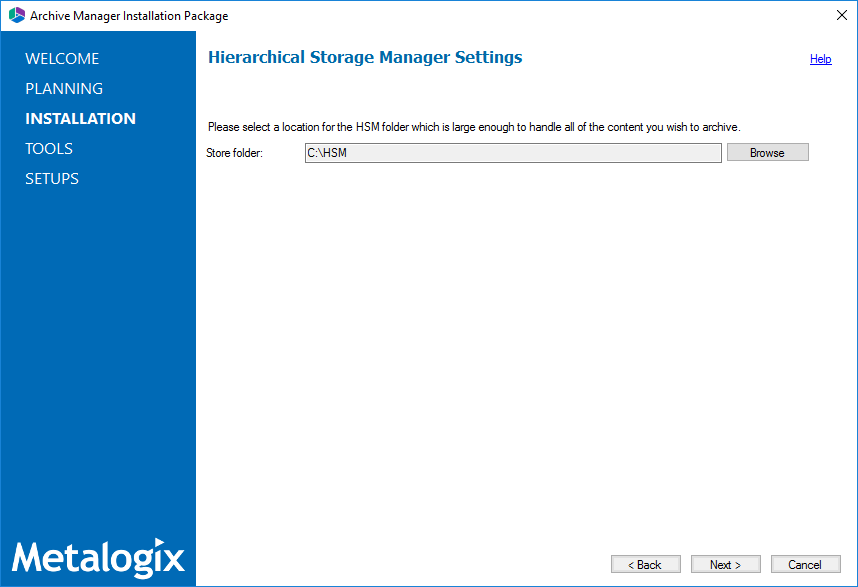
21.If you want to change the default folder, click Browse and select a location that has ample space to store archived files.
22.Click Next. The Firewall Settings window opens.
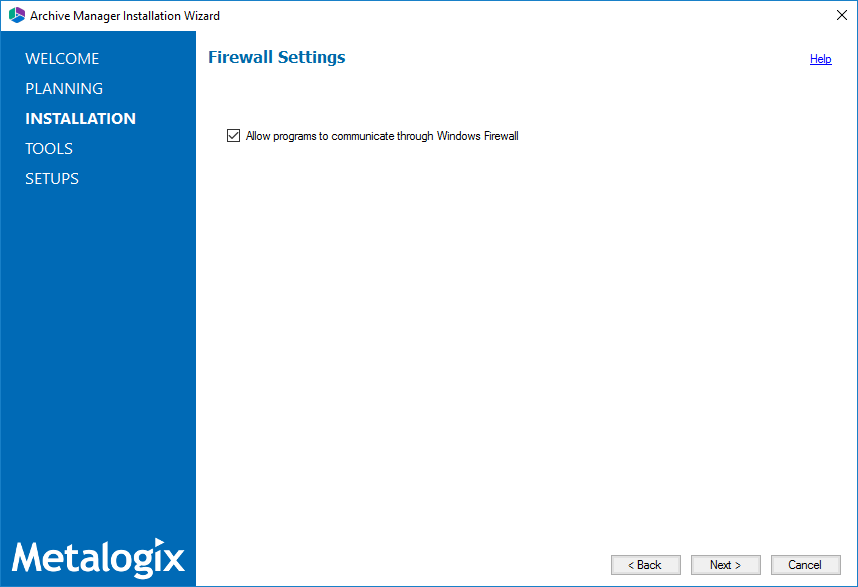
23.Select the Allow programs to communicate through Windows Firewall check box. Metalogix Archive Manager for Exchange components will be then able to communicate through the firewall.
24.Click Next. The Summary Installation window opens. The installation summary displays settings you have specified in previous steps. The versions indicated in the image below could be different.
a.Select Manage the Organizational Forms Library if your organization uses this public folder to share email templates. Otherwise, clear the check box.
b.Select the check box Start Metalogix Archive Manager for Exchange to open the Archive Manager for Exchange Administration Center (AMAC) when the installation completes.
25.Click Install to start the installation.
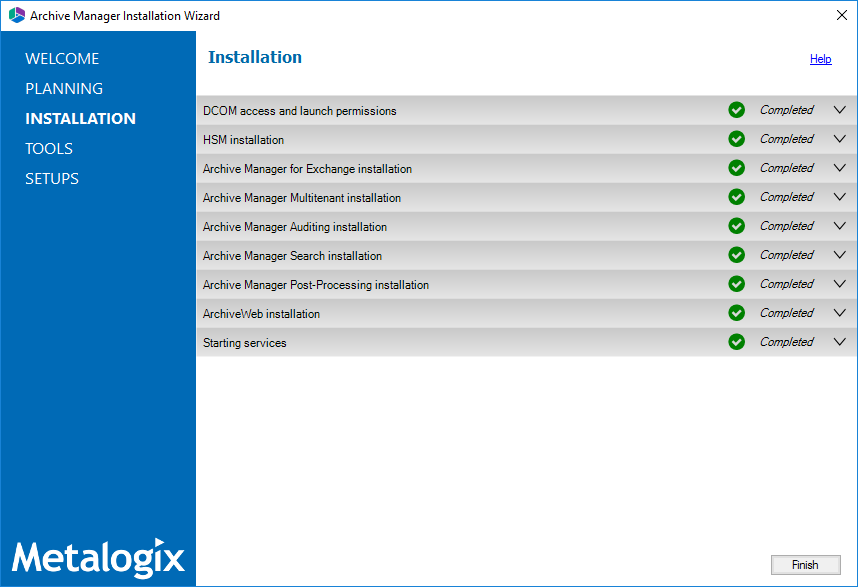
26.The installer proceeds to install all the components. If a component installer completes with a warning, expand the the row to view the warning(s).
27.Click Finish to complete the installation step.
Steps to verify the Express installation
The AMAC should open automatically if the check box Start Metalogix Archive Manager for Exchange was checked in the Summary Installation step of the installation wizard. To manually open the AMAC follow the steps described below:
1.Click Ctrl + Esc to display the list of windows programs.
2.Expand the Metalogix folder and click Archive Manager for Exchange.
3.The AMAC opens and the Address Book Wizard starts.
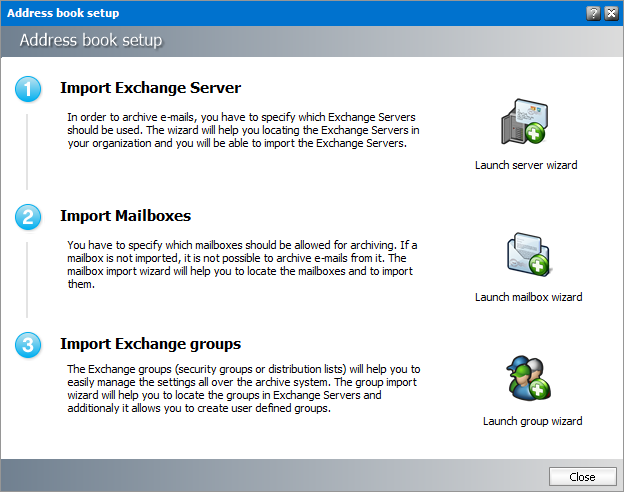
Address Book Setup
The Active Directory forest and domains store information about Microsoft Exchange servers, mailboxes, and other Microsoft Exchange-related objects in your organization. The Address Book Setup wizard helps you to import the Microsoft Exchange servers, mailboxes and groups into the Address Book Manager which keeps them in synch to facilitate email archiving.
When you complete the Express Installation, the AMAC opens and the Address Book Setup wizard starts.
In this topic:
·Options to start the Address Book Setup Wizard
·Importing Exchange Servers
oSteps to import on-premise Microsoft Exchange Servers
oSteps to import Microsoft Online
·Importing Mailboxes
|
|
NOTE: With the trial license you can import up to 5 mailboxes from a pre-existing or user-defined group. |

oSteps to import mailboxes from an on-premise Microsoft Exchange Server
oSteps to import mailboxes from Exchange Online
·Importing Groups
oSteps to import groups from on-premise Microsoft Exchange servers
oSteps to import groups from Exchange Online
oSteps to create user-defined groups
·Verifying Address Book setup
oSteps to verify the imported Microsoft Exchange servers
oSteps to verify the imported mailboxes
oSteps to verify the imported and user-defined groups
Options to start the Address Book Setup Wizard
You can start the Address Book Setup wizard in two ways as described in the steps below:
1.From the Tools menu, click Address Book Manager.

or, click the Address Book Manager icon from the toolbar.
2.If Microsoft Exchange servers, mailboxes or groups are not available in the Address Book Manager, the Address Book Setup wizard starts automatically
or
If Microsoft Exchange servers, mailboxes or groups are available, the Address Book Manager window opens. From the Setup menu, click Setup Wizard. The Address Book Setup wizard starts.
Steps to import on-premise Microsoft Exchange servers
1.From the Address Book Setup wizard, click Launch server wizard to initiate the server import process.
2.From the Select Exchange Server Type window, select Import Exchange Server.
3.Click Next. A list of Microsoft Exchange Servers that are accessible within your trusted domain will appear.
Select the servers that contain the mailboxes and folders you want to archive and then select the check boxes to set the permissions as described below:
a.Set Exchange server permissions for Metalogix service account - grants elevated rights to the superuser on each of the selected Microsoft Exchange Servers.
b.Set Public Folder permissions for Metalogix service account - grants OWNER permission to the Public folders.
4.Click Next. The Superuser's mailbox SMTP address window opens.
5.In the Superuser's mailbox SMTP address field, enter the email address of the superuser if not already filled in. You can change the email from the server Properties window.
6.Click Next. The Summary window opens that lists the on-premise servers that will be added.
7.Click Finish to start the import process. The Creating objects window opens. You can click Back to select more servers to add or remove some of the selected servers.
8.When the import process has completed, click Close.
Steps to import Microsoft Online
1.From the Address Book Setup wizard, click the Launch server wizard to initiate the server import process.
2.In the Select Exchange Server Type window, select Import Exchange Online.
Use Azure AD application - select his option to enable Metalogix Archive Manager for Exchange to access Exchange Online with the Exchange Web Services (EWS) protocol. You must register your application in Azure Active Directory. For more details, see Registering Metalogix in Azure AD for EWS.
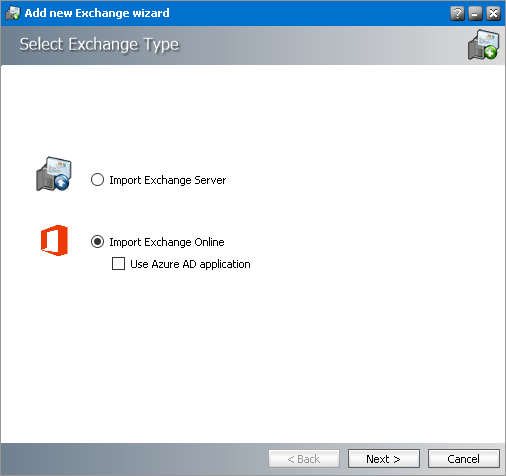
3.Click Next. The Credentials for Exchange Online window opens. Specify the information as described below:
a.Username - username of the administrator.
b.Password - password of the administrator.
c.Endpoint type - select from the following options:
·Worldwide endpoints - endpoints for worldwide Microsoft 365 subscriptions, which include the United States Government Community Cloud (GCC).
·U.S. Government DoD endpoints - endpoints for United States Department of Defense (DoD) subscriptions.
·U.S. Government GCC High endpoints - endpoints for United States Government Community Cloud High (GCC High) subscriptions.
If you selected from the previous step, you must specify the following information
a.Client ID - the Application (client) ID that you copied from Azure.
b.Client secret - the Secret ID that you copied from Azure.
c.Endpoint type - described above.
4.Click Next. The Available Exchange Servers window opens. Select the Office 365 instance. You can click Back to select more servers to add or remove some of the selected servers.
5.Set the permission as described below:
·Set Public Folder permissions for <Exchange server online superuser> - grants OWNER permission for the Public folders to the Exchange serve online superuser.
6.Click Next. The Summary window opens that lists the online Microsoft Exchange servers that will be added.
7.Click Finish to start the import process. The Creating object window opens.
8.When the import process has completed, click Close.
Steps to import mailboxes from an on-premise Microsoft Exchange Server
1.From the Address Book Setup wizard, click the Launch mailbox wizard to initiate the mailbox import process.
2.From the Exchange type selection window, select Import from Exchange On-Premise.
3.Click Next. The Mailboxes - search and select mailboxes to import window opens.
4.Click Search to return the list of all mailboxes across all on-premise servers available to the Address Book Manager. To reduce the list of mailboxes, you can specify a search term in the Look for Name search box. Only the initial letters of the mailbox Display Name can be specified, and wildcards are not supported. The search term is case-insensitive. For example, if you enter ni as the search term and click Search, the mailboxes that start with the letters ni will be returned in the search results list.
5.Select one or more mailboxes that you want to import.
|
|
NOTE: Mailboxes that are highlighted indicate that they already exist in the Address Book Manager. The list summary above the list of mailboxes will indicate how many mailboxes that you select are new, and how many already exist. If you select preexisting mailboxes, they will be updated during the import process. |
6. Click Next. The Summary window opens that lists the mailboxes from the on-premise Microsoft Exchange servers that will be imported.
7.Click Finish to start the import process. The Creating Object window opens. You can click Back to select more mailboxes to add or remove some of the selected mailboxes.
8.When the import process has completed, click Close.
Steps to import mailboxes from Exchange Online
1.From the Address Book Setup wizard, click the Launch mailbox wizard to initiate the mailbox import process.
2.From the Exchange type selection window, select Import from Exchange Online.
3.Click Next. The Exchange Online window opens. Select the desired Office 365 instance.
4.Click Next. The Mailboxes - search and select mailboxes to import window opens.
5.Click Search to return the list of all mailboxes across all on-premise servers available to the Address Book Manager. To reduce the list of mailboxes, you can specify a search term in the Look for Name search box. Only the initial letters of the mailbox Display Name can be specified, and wildcards are not supported. The search term is case-insensitive. For example, if you enter A as the search term and click Search, the mailboxes that start with the letter A will be returned in the search results list.
6.Select one or more mailboxes that you want to import.
|
|
NOTE: Mailboxes that are highlighted indicate that they already exist in the Address Book Manager. The list summary above the list of mailboxes will indicate how many mailboxes that you select are new, and how many already exist. If you select preexisting mailboxes, they will be updated during the import process. |
7.Click Next. The Summary window opens that lists the online Microsoft Exchange servers that will be added.
8.Click Finish to start the import process. The Creating Object window opens. You can click Back to select more mailboxes to add or remove some of the selected mailboxes.
9.When the import process has completed, click Close.
Steps to import groups from an on-premise Microsoft Exchange Server
1.From the Address Book Setup wizard, click the Launch group wizard to initiate the group import process.
2.From the Wizard type selection window, select Import Groups.
3.Click Next. The Exchange type selection window opens. Select Import form Exchange On-Premise.
4.Click Next. The Groups - search and select groups to import window opens.
5.Click Search to return the list of all groups across all on-premise servers available to the Address Book Manager. To reduce the list of groups, you can specify a search term in the Look for Name search box. Only the initial letters of the groups Display Name can be specified, and wildcards are not supported. The search term is case-insensitive. For example, if you enter D as the search term and click Search, the groups that start with the letter D will be returned in the search results list.
6.Select one or more groups that you want to import.
|
|
NOTE: Groups that are highlighted indicate that they already exist in the Address Book Manager. The list summary above the list of groups will indicate how many groups that you select are new, and how many already exist. If you select preexisting groups, all new mailboxes will also be imported. |
7.Click Next. The Group settings - default values window opens. Specify the settings which will be applied when the groups are imported now or synchronized in future with the Address Book Manager automatically or manually. The settings are described below:
a.Automatically import mailbox members - check this box to import all Active Directory accounts with a mailbox that are members of this group.
b.Advanced import settings - check this box if you intend to import subgroups and subgroup mailbox members. You can activate this setting only if you select the Automatically import mailbox members setting.
c.Import subgroups along with members - check this box to import existing subgroups of selected groups including its member mailboxes. This is the default setting.
d.Import only mailbox members without subgroups - check this box to import only member mailboxes from subgroups. These mailboxes will be added to mailboxes in the parent group in the Address Book Manager.
8.Click Next. The Summary window opens that lists the groups that will be added.
9.Click Finish to start the import process. The Creating Object window opens.
10.When the import process has completed, click Close.
Steps to import groups from Exchange Online
1.From the Address Book Setup wizard, click the Launch group wizard to initiate the group import process.
2.From the Wizard type selection window, select Import Groups.
3.Click Next. In the Exchange Type selection window, select Import from Exchange Online.
4.Click Next. The Exchange Online window opens. Select the desired online Microsoft Exchange server.
5.Click Next. The Groups - search and select groups to import window opens.
6.Click Search to return the list of all groups across all online servers available to the Address Book Manager. To reduce the list of groups, you can specify a search term in the Look for Name search box. Only the initial letters of the group Display Name can be specified and wildcards are not supported. The search term is case-insensitive.
|
|
NOTE: Groups that are highlighted indicate that they already exist in the Address Book Manager. The list summary above the list of groups will indicate how many groups that you select are new, and how many already exist. If you select pre-existing groups, all new mailboxes in those groups will also be imported. |
7.Select the groups that you want to import.
8.Click Next. The Group settings - default values window opens. Specify the settings which will be applied when the groups are imported now or synchronized in future with the Address Book Manager automatically or manually. The settings are described below:
a.Automatically import mailbox members - check this box to import all Active Directory accounts with a mailbox that are members of this group.
b.Advanced import settings - check this box if you intend to import subgroups and subgroup mailbox members. You can activate this setting only if you select the Automatically import mailbox members setting.
c.Import subgroups along with members - check this box to import existing subgroups of selected groups including its member mailboxes. This is the default setting.
d.Import only mailbox members without subgroups - check this box to import only member mailboxes from subgroups. These mailboxes will be added to mailboxes in the parent group in the Address Book Manager.
9.Click Next. The Summary window opens that lists the groups that will be added.
10.Click Finish to start the import process. The Creating objects window opens. You can click Back to select more groups to add or remove some of the selected groups.
11.When the import process has completed, click Close.
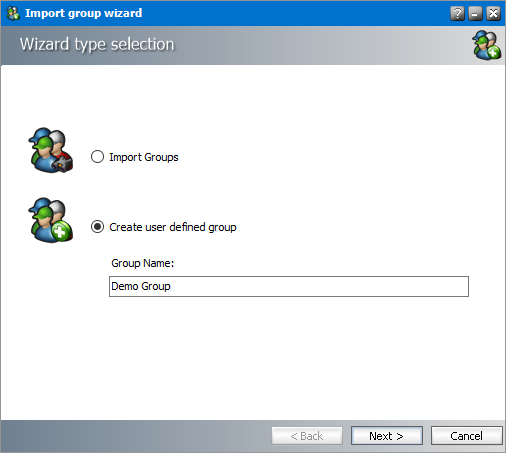
Steps to create user-defined groups
1.In the Import group wizard window, select Create user defined group. Enter a name for the group in the Group Name field.
2.Click Next. The User Defined Group - Add members to group window opens. By default, the on-premise Microsoft Exchange server is the source for the list of mailboxes and groups that can be added to the user-defined group. To use O365 Exchange servers as a source for mailboxes and groups, select Exchange Online.
3.Click Search to return the list of all mailboxes and groups. To reduce the list of mailboxes and groups, you can specify a search term in the Look for Name search box. Only the initial letters of the mailbox or group Display Name can be specified and wildcards are not supported. The search term is case-insensitive.
|
|
NOTE: If the Exchange Online check box is checked, only the online Microsoft Exchange servers will be used as the source. If the Exchange Online check box is unchecked, only on-premise Microsoft Exchange servers will be used as the source. Mailboxes and groups that are highlighted indicate that they already exist in the Address Book Manager. The list summary above the list of groups will indicate how many mailboxes and groups are available. |
4.Select one or more mailboxes and groups that want to add to the user-defined group. If you select one or more groups, all mailboxes in that group will also be add to the user-defined group during the import process.
5.Click Next. The Summary window opens that indicates the user-defined group that will be created.
6.Click Finish to start the group creation process. The Creating Object window opens. You can click Back to revise your selection of mailboxes and groups.
7.When the import process has completed, click Close.
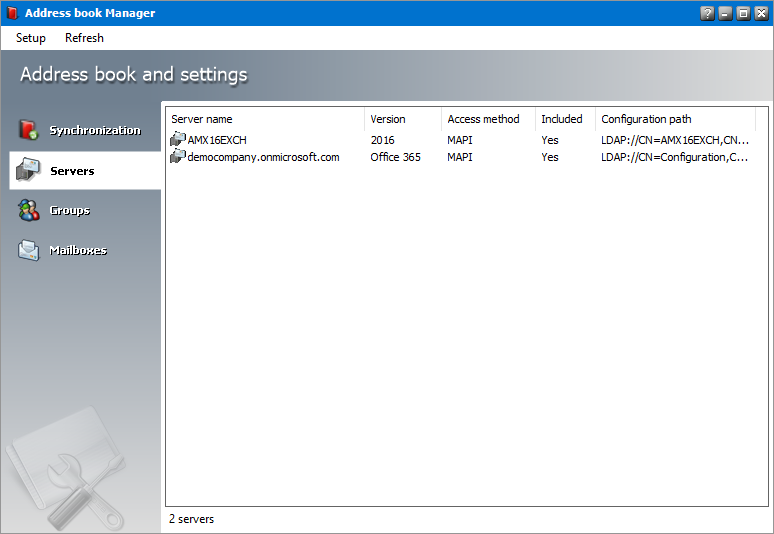
Steps to verify the imported Microsoft Exchange servers
1.If the Address Book Setup wizard is still open, click Close to exit the wizard.
2.Open the Address Book Manager.
3.Click the Servers tab and verify the imported servers in the list view.
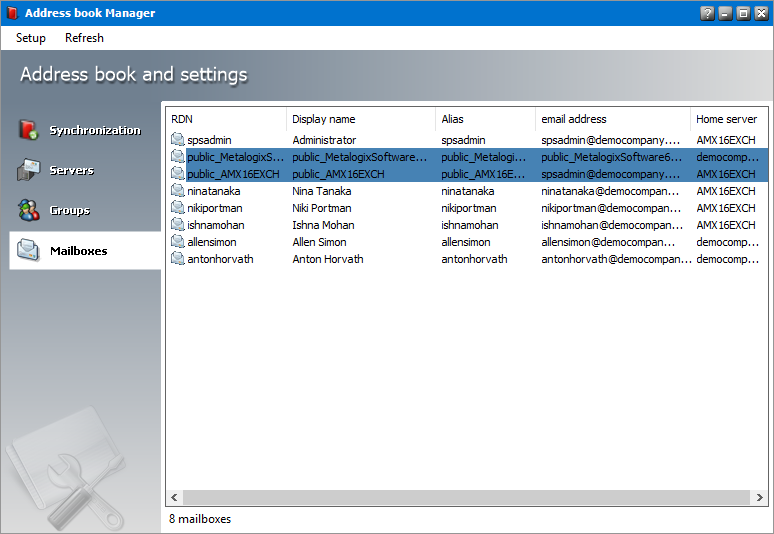
Steps to verify the imported mailboxes
1.If the Address Book Setup wizard is still open, click Close to exit the wizard.
2.Open the Address Book Manager.
3.Click the Mailboxes tab and verify the imported mailboxes in the list view.
|
|
NOTE: Mailboxes with names like public_<name-of-Microsoft-Exchange-server> also appear in the mailboxes list. These mailboxes are the public folders from the respective Microsoft Exchange server because Address Book Manager considers a public folder as a profile. These mailboxes are always highlighted in blue |
 so that you can distinguish them faster.
Steps to verify the imported and user-defined groups
1.If the Address Book Setup wizard is still open, click Close to exit the wizard.
2.Open the Address Book Manager
3.Click the Groups tab and verify that the imported Active Directory and user-defined groups appear in the list view as expected. User-defined groups are highlighted in green 
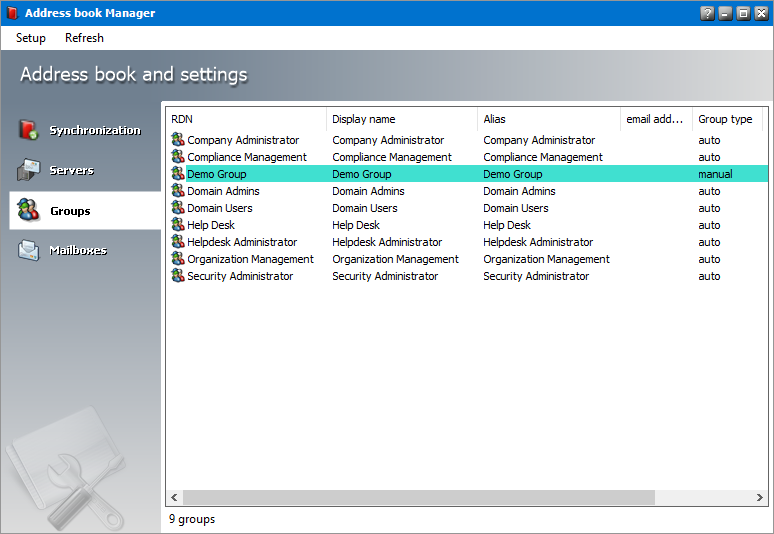
4.Select a group and right-click to open the context menu. Click Properties. The Properties window of the selected group appears.
5.Click the Members tab and verify that the list of mailboxes were imported as expected.
Enhancements
Metalogix Archive Manager for Exchange can be extended with optional components to enhance its capabilities.
Steps to install additional components
1.Run the Metalogix Archive Manager Installation Package to extract the files to a local folder.
2.From your install media folder, run the MAMInstaller.exe. The Welcome window opens.
3.From the navigation panel on the left, click SETUPS. The Setups window opens. Install one or more optional components:
·Archive Manager Universal Access Setup - allows mobile users, Mac users and Linux users to work with archived emails. For more information see the Universal Access Install Guide.
·Archive Manager OWA Extensions Setup - component that is installed on the Microsoft Exchange Server to provide Outlook Web Access to end-users. For more information see the Outlook Web Access Guide.
·Archive Manager SMTP Setup - allows processing of messages from an external email server (O365, Gmail, Exchange, etc.). For more information see the SMTP Guide.
·Archive Manager PST Gatherer Setup - automated extension to the PST importer feature. For more information see the PST Importer Guide.
·Archive Manager Outlook Addin <version> Setup - gives authorized users the ability to archive and restore emails in Outlook 2013 and above (x86 or x64). For more information see the Outlook Add-in Installation Guide.
Maintenance
There are three maintenance options offered in the installer for each component.
·Modify - helps you to change basic settings or constituent components.
·Repair - helps you to reinstall the component.
·Remove - helps you to uninstall the component.
The steps to modify the HSM component is described below as an example. All components use a similar maintenance wizard.
|
|
NOTE: For Express installations, it is recommended that you do not change any settings when you attempt to modify or repair a feature. If you intend to modify a feature, see the corresponding documentation which provides more information about the feature. |
Steps to modify the HSM component
1.Double-click the installer for the HSM component (for example, C:\Metalogix\Archive Manager Installation Package\HSM\HSM Setup.exe). The Welcome window of the HSM maintenance wizard appears.
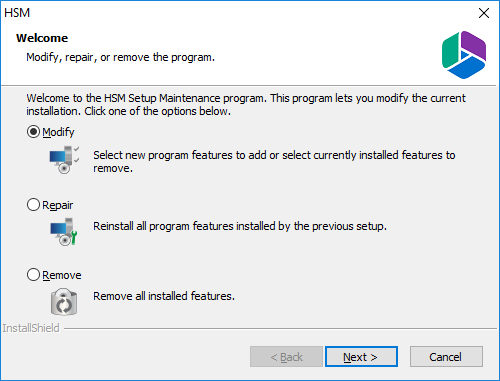
2.Choose Modify and click Next. The Select features window opens.
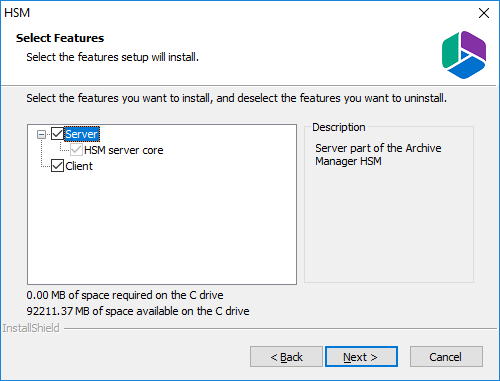
3.Click Next. The Logon Information window opens
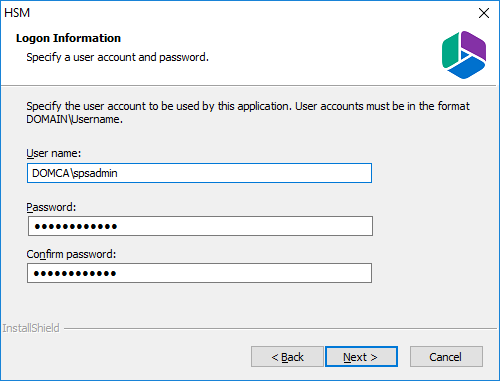
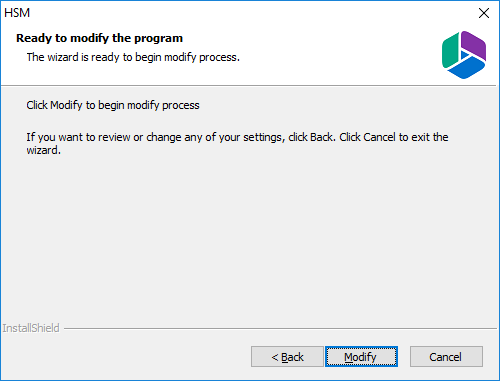
4.Enter the credentials in the Password and Confirm Password fields. Click Next. The Ready to modify the program window opens.
5.Click Modify to update the feature. The Maintenance Complete window opens.
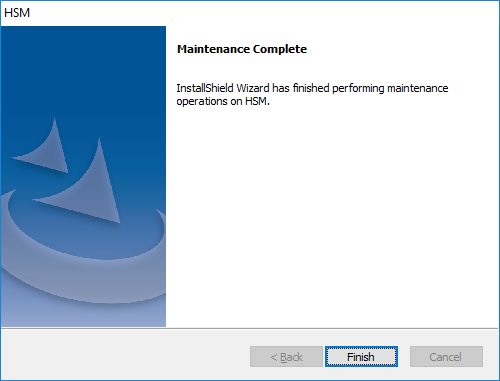
6.Click Finish to close the wizard and return to the upgrade wizard, or continue to upgrade other features.
|
|
NOTE: One or more services are stopped when modifications or repairs are performed. You must manually restart the services to ensure that all services have started. Steps to restart services 1.Click Ctrl + Esc to display the list of windows programs. 2.Expand the Metalogix folder. 3.Depending on the product you have installed, click Start Exchange Services or Start File Services or both (if you have installed both products). Predefined batch commands will automatically start the services. |