
Manage PST files
In this topic:
Deactivate automatic upload
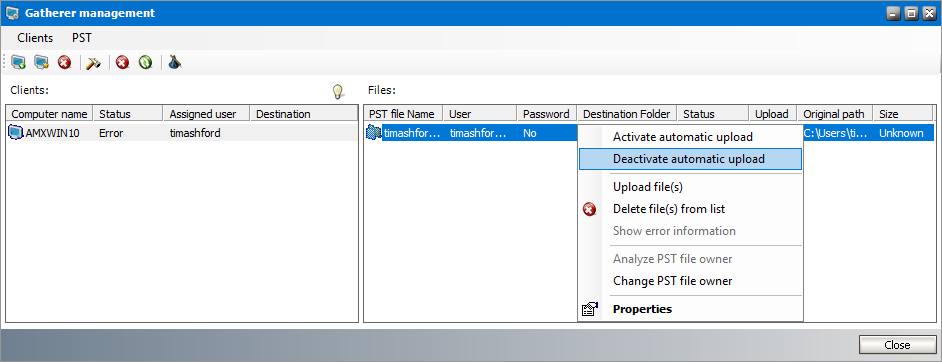
To prevent uploading a PST file :
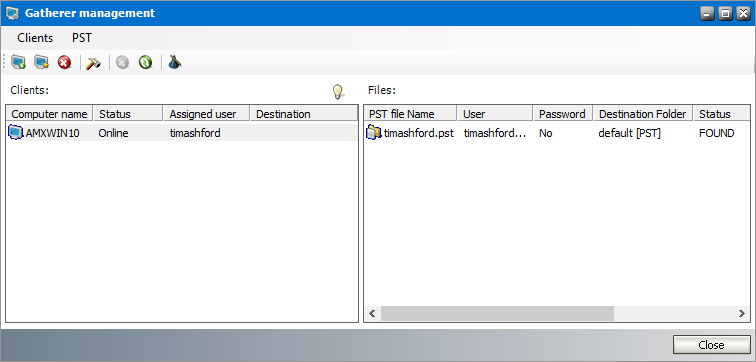
1.From the PST Importer menu click PST Gathering and then click Clients and PST files. The Gatherer management window opens.
2.Select a client from the Clients list. The PST files found by the PST Gatherer are displayed in the Files list.
3.Right-click a PST file and then select Deactivate automatic upload from the context menu. The status of the Upload column changes to No.
|
|
NOTE: Deactivated PSTs can be activated again. Right-click a deactivated PST file and then select Activate automatic upload from the context menu. The status of the Upload column changes to Yes. |

Modify PST Properties
To change properties of a PST file:
1.From the PST Importer menu click PST Gathering and then click Clients and PST files. The Gatherer management window opens.
2.Select a client from the Clients list. The PST files found by the PST Gatherer are displayed in the Files list.
3.Right-click a PST file and then select Properties from the context menu.
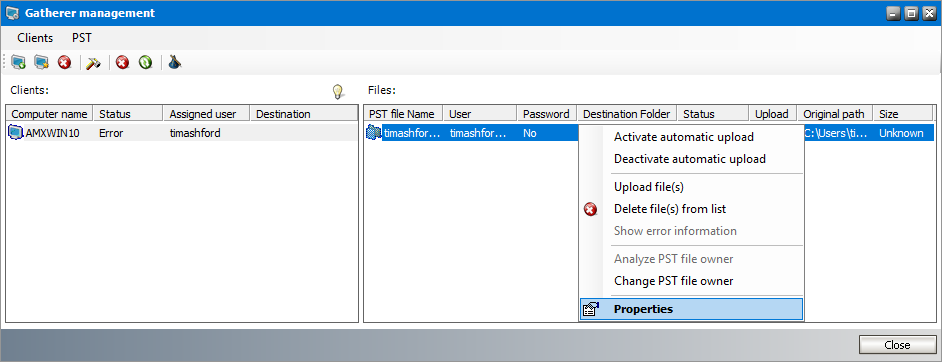
4. In the Properties window that opens, modify the properties as described below:
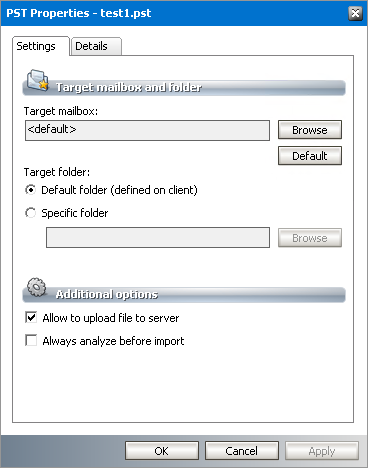
Settings tab
a.Target mailbox - sets a specific owner mailbox for the PST file. To change the target mailbox, click Browse to open the Select mailbox window and choose the new owner mailbox. Click Default to reset the mailbox to the default setting. You can also right-click the PST file and select the Change PST file owner from the context menu
b.Default folder - select this option to use the default folder.
c.Specific folder - select this option to define a specific target folder. Either type the mailbox folder name in the text box or use the Browse button to select a mailbox folder.
|
|
NOTE: If you intend to import more than one PST file to the same target mailbox, you can create unique root folders for each PST file by entering the special tags described below: a.%PSTNAME% - the folder name is the display name of the PST file. b.%PSTFILENAME% - the folder name is the file name (without extension) of the PST file For example, if Maya-2019.pst is the file name of the PST folder being imported and you enter PST Archive/%PSTFILENAME% in the Destination folder, then a folder hierarchy will be created under the destination mailbox root as PST Archive > Maya-2019. |
d.Allow to upload file to server - allows the PST file to be uploaded. If this check box is not checked the PST file will not be uploaded.
e.Always analyze before import - select this check box to use the Analyze function to identify a PST owner.
Details tab
a.If the PST file is password protected, enter the password in the Password field and re-enter the password in the Confirm password field.
5.Click OK to save the settings and exit the window or click Apply to save and continue.
Search for PSTs immediately
Searching for PST files on a specific client computer starts automatically at the start time specified for that specific computer. You can start searching for PST files immediately if necessary.
To start searching immediately:
1.From the PST Importer menu click PST Gathering and then click Clients and PST files.
2.In the Gatherer management window right-click the client you want to search. Select Tasks > Search from the context menu. Searching starts immediately.
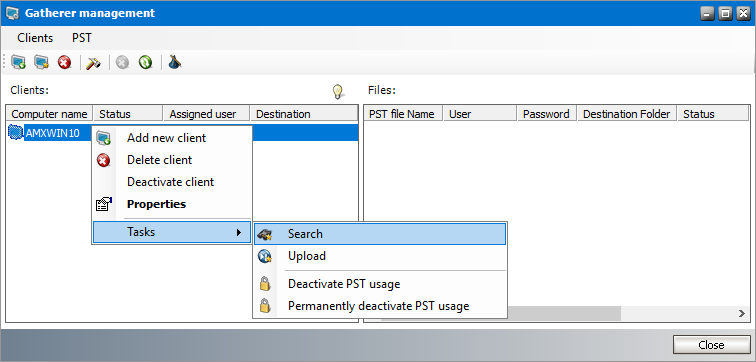
3.Click the Refresh icon in the toolbar to view the results in the Files list. It may take a while (maybe several minutes) to display the PST files as it depends on the number of disks that have to be searched through, their size, and the number of files that have to be screened.
|
|
NOTE: To clear the search results list when performing a new search, open PST Importer. The click Tools > Options to open the Options window. On the Default tab select the Clear existing list before a new search check box and save the setting. |