
Setup PST Gathering
Default values must be set for all client computers where PST files will be gathered. All default settings, such as default destination mailbox, default destination folder, start search time and duration, start upload time and duration must be defined because these settings are inherited by all client computers. Once defined they may be changed for any client computer as required.
In this topic:
·Steps to open the default settings window
·Steps to configure default ownership settings
·Steps to configure default search settings
·Steps to configure default upload settings
Steps to open the default settings window
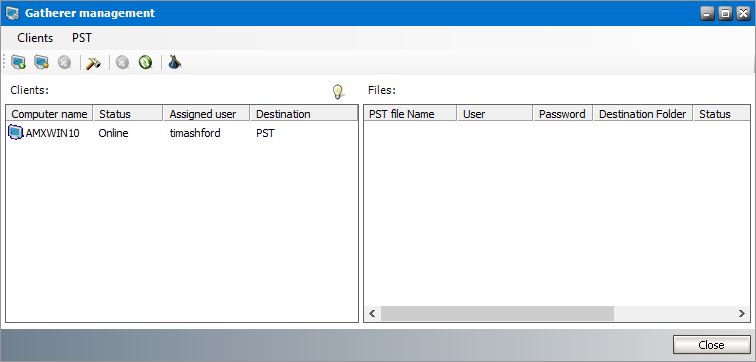
1.From the PST Importer menu click PST Gathering and then click Clients and PST files.

2.In the Gatherer management window click Clients from the menu and then click Default settings.
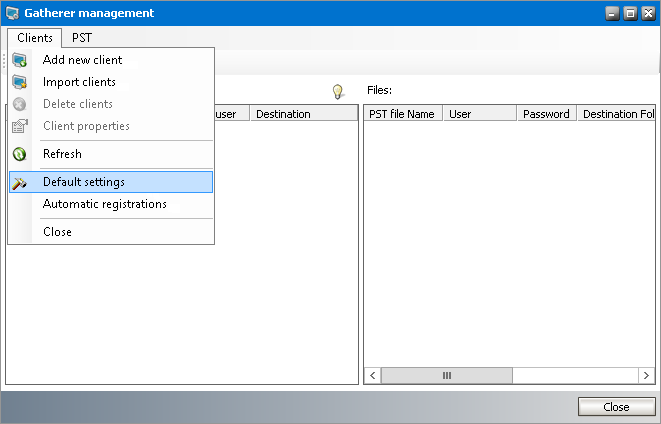
3.In the Default Client Properties window specify the defaults in the Ownership, Search, and Upload tabs as described below.
Steps to configure default ownership settings
1.Click the Ownership tab.
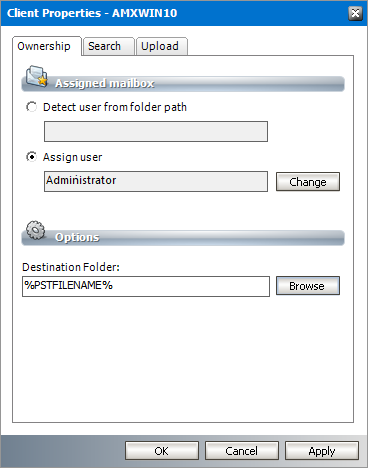
2.Specify the default values as described below:
Assigned mailbox
a.Detect user from folder path - this setting is used for specific client computers. It remains deactivated for default settings. See Modify client properties for more details.
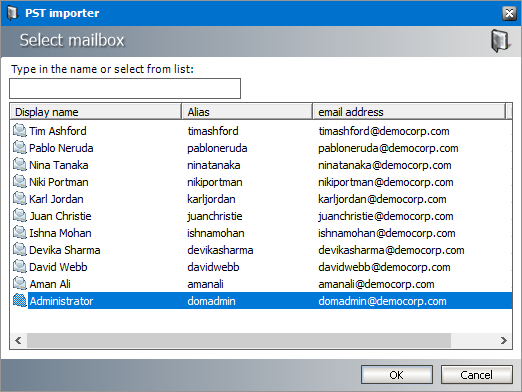
b.Assign user - Click Change to open the Select mailbox window and choose a default user for PST import. Typically this is the administrator.
Options
a.Destination folder - the root folder for all messages that are loaded from a PST file. If the folder does not exist in the destination mailbox, the folder will be created.
|
|
NOTE: If you intend to import more than one PST file to the same destination mailbox, you can create unique root folders for each PST file by entering the special tags described below: a.%PSTNAME% - the folder name is the display name of the PST file. b.%PSTFILENAME% - the folder name is the file name (without extension) of the PST file For example, if Maya-2019.pst is the file name of the PST folder being imported and you enter PST Archive/%PSTFILENAME% in the Destination folder, then a folder hierarchy will be created under the destination mailbox root as PST Archive > Maya-2019. |

3.Click OK to save the settings and close the window or click Apply to save and continue.
Steps to configure default search settings
1.Click the Search tab.
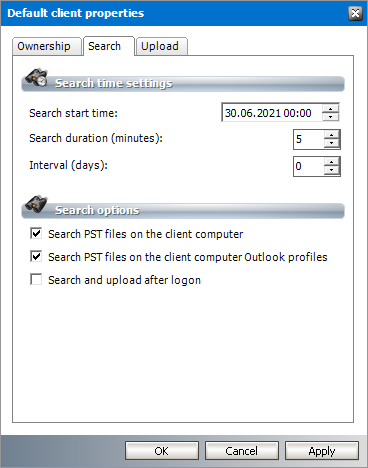
2.Specify the default values as described below:
Search time settings
a.Search start time - set the date and time in the format format is DD:MM:YYYY:hh:mm when the PST Gatherer should start searching for PST files. To change the values, select the date, month, year or time and then use the up or down buttons to increase or decrease the value.
b.Search duration (minutes) - set the desired period in minutes. Consider a longer time period for client computers where many PST files may reside because searching may take time. For example, if the set of folders is limited to a 1000 folders, set the duration to 5 minutes. If the set of folders exceeds 100,000, set a duration of 15-30 minutes.
c.Interval (days) - set the search frequency in days.
Search options
a.Search PST files on the client computer - select this check box to search for PST files in local drives and network shares.
b.Search PST files on the client computer Outlook profiles - select this check box to search through all Outlook profiles for PST files.
c.Search and upload after logon - select this check box to search for PST files immediately after a user logs in. PST files will be uploaded immediately after search.
|
|
NOTE: Search and upload will also be started at the time specified in the Search and Upload tabs. However, if the computer is turned off or not connected to the network at that time, no search or upload can be performed. If the above mentioned options are checked, the client will be searched when available. |
3.Click OK to save the settings and close the window or click Apply to save and continue.
Steps to configure default upload settings
1.Click the Upload tab.
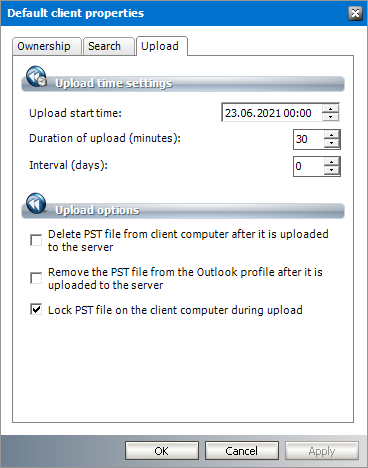
2.Specify the default values as described below:
Upload time settings
a.Upload start time - set the date and time in the format format is DD:MM:YYYY:hh:mm when the PST Gatherer should start uploading the PST files. To change the values, select the date, month, year or time and then use the up or down buttons to increase or decrease the value.
b.Duration of upload (minutes) - set the desired upload period in minutes. Consider a longer time period for client computers where many PST files may reside because uploading may take time.
c.Interval (days) - set the upload frequency in days.
|
|
NOTE: If uploading starts before searching begins, PST files gathered during the previous search are uploaded. |
Upload options
a.Delete PST file from client computer after it is uploaded to the server - select this check box to delete the PST files on the client computer after they are uploaded to the PST Importer server. Selecting this option ensures that no PST file is imported twice. No PST files will be lost because they will be moved to the PST Importer server and if the importing process is not completed, the file is not removed from the PST Importer server either.
b.Remove the PST file from the Outlook profile after it is uploaded to the server - select this check box to remove the PST file from the Outlook profile after being uploaded to the PST Importer server.
c.Lock PST file on the client computer during upload - select this check box to lock the PST files so that no other applications can use the files while they are being uploaded.
3.Click OK to save the settings and close the window or click Apply to save and continue.
Manage client computers
Client computers can be added to the Clients list in three different ways:
·manually one-by-one. See Add a new client.
·by automatic registration. See Register new clients.
·by importing with a comma separated file. See Import new clients.
Other client management topics:
Add a new client
To add a new client computer manually:
1.From the PST Importer menu click PST Gathering and then click Clients and PST files. The Gatherer management window opens.
2.Click on the Add New Client icon on the toolbar, or from the main menu click Clients and then select Add new client.
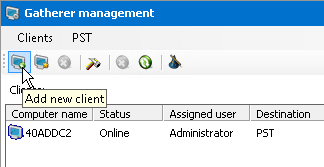
3.In the Add new client computer window enter NETBIOS name or the IP address of the client computer.
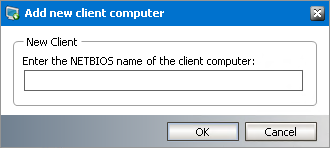
4.Click OK. The computer will be displayed in the Clients list.
|
|
NOTE: If the client computer cannot be added, the Status column of the Clients list displays ERROR. Check for the following typical issues: a.You entered an incorrect NETBIOS name or IP address. b.Client computer is turned off. c.PST Gatherer application or service on the client computer is not installed or not running. You can start the Gatherer service on the respective computer from C:\Program Files (x86)\Metalogix\MAM4Exchange\Tools\Start. |
Register new clients
Instead of adding client computers one-by-one, you may want to add them automatically by using the automatic registration as described below:
1.From the PST Importer menu click PST Gathering and then click Clients and PST files. The Gatherer management window opens.
2.From the main menu click Clients and then select Automatic registrations.

3.In the Registered clients window select the check boxes for each client computer that you want to add. You can click Check all to select all client computers.
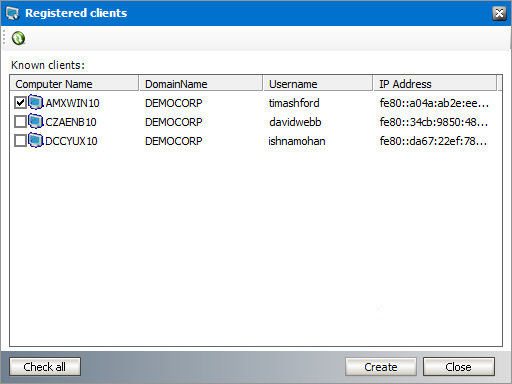
4.Click Create. The selected client computers will be added to the Clients list.
|
|
NOTE: If the client computer cannot be added, the Status column of the Clients list displays ERROR. Check for the following typical issues: a.Client computer is turned off. b.PST Gatherer application or service on the client computer is not installed or not running. You can start the Gatherer service on the respective computer from C:\Program Files (x86)\Metalogix\MAM4Exchange\Tools\Start. |