
Working with search results
The results of the simple or advanced search are displayed in the search result list. You can preview a message by selecting it. The message is then displayed in a preview pane just below the grid.

|
|
NOTE: To search in journal mailboxes: If a user has Journal permission set in ArchiveWeb and Journal access granted through Archive Manager > Tools > Mailbox rights manager, then the user can search through their own emails in the Journal, where it is present as a kind of recipient (sender, recipient). |

Actions
1.Click the MENU link to display the actions that available for the email. Users may see the full set or a partial set of actions depending on the permissions granted to the user.
·Download as MSG file downloads the email in specified format
·Download as EML file download the email in specified format
·Restore - restores the selected email
·Restore to - restores the selected email to a desired location
·Reply - opens Reply dialog
·Reply All - opens the Reply all dialog
·Forward - opens the Forward dialog
·Print - email can be printed.
When you select more than one item in search result list and click the MENU link, the the following actions appear. Users may see the full set or a partial set of actions depending on the permissions granted to the user.
·Export to ZIP - allows export
·Restore - restores the selected emails
·Restore to - restores the selected emails to a desired location.
2.Click Select all rows to open the Search Operations menu. The actions available are described below
·Export to ZIP - exports all the emails in the search result list as a compressed ZIP file.
a.The confirmation dialog opens. Click Yes to proceed.
b.The Export to ZIP dialog opens. Select the checkbox ZIP password if you want to secure the ZIP file. Then enter a password and click and click OK.
c.The Export to ZIP dialog opens. You can click Click here to go to the download link to open the Tasks window and click the download link to access the ZIP file.
·Restore - one or more archived emails can be restored to their original location. This is useful when a user has deleted an email that was archived and would like to restore it from the archive again.
a.The confirmation dialog opens. Click Yes to proceed.
b.The Restore dialog opens. You can click Click here to open the Tasks list to open the Tasks window and view the progress of the restoration task.
·Restore to - one or more archived emails can be restored to another location.
a.The confirmation dialog opens. Click Yes to proceed.
b.The Destination folder dialog opens. Select the folder where you want to restore the selected emails. Then click Proceed.
c.The Restore To dialog opens. You can click Click here to open the Tasks list to open the Tasks window and view the progress of the restoration task.
3.Click Clear selection to reset the selected emails in the search result list.
4.Click tasks at the top right-hand corner of the search result pane to open the Tasks window. You can view all the tasks here.
Addendum
In some cases it is not possible to install the Metalogix Archive Manager with PowerShell. Information pop-up dialog will be displayed:

The application Metalogix Archive Manager was not possible to install with PowerShell. Please, add the application into your store from the Exchange Admin Console.
Manual adding of Metalogix Archive Manager addin in Exchange Admin Center (EAC) is required in these scenarios. To do so, follow these steps:
1.Log in to the Archive Manager for Exchange Server
2.Open the EAC by using a URL such as the following:
https://<exchange server>/ecp/?p=installed
3.Log on to the Exchange server by using a valid user name and password.
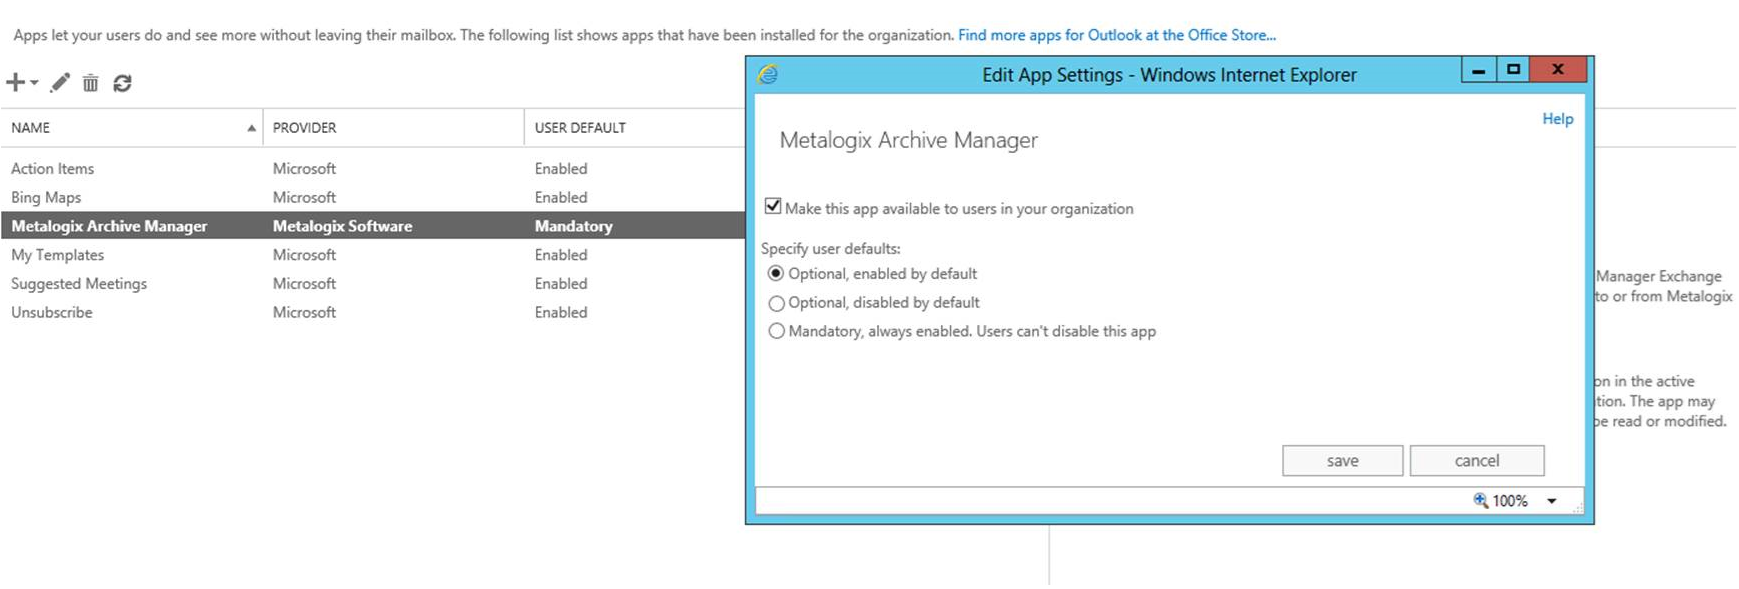
4.Navigate to Organization / Apps.
5.Select the plus sign (+) to add a new extension.
6.From the drop-down list, select Add from file
7.Browse to the file path:
C:\Program Files \ Metalogix \ MAM4Exchange \ Web \ exchangePamOwaNetWeb \ exchangePamOwaNet.xml
and then select Install.
8.Double click the added Metalogix Archive Manager app in the list. In the pop-up dialog make sure that the Make this app available... option is checked. Then activate the application by selecting either the Optional, enabled by default option or Mandatory, always enabled option. Finally click Save.
After you install the mail extension, you can sign out of the EAC and return to the respective Outlook rich client to test the extension. Alternatively, without signing out of the EAC, you can continue to use Outlook Web App or OWA for Devices to test the extension. To do this, select the user name in the upper-right corner of the window, and select My Mail to switch to your email to test the extension.