
Create a Group Policy Object
To create a Group Policy object (GPO) in MS Windows Server 2012 / 2012 R2 / 2016 / 2019 with which to distribute the software package:
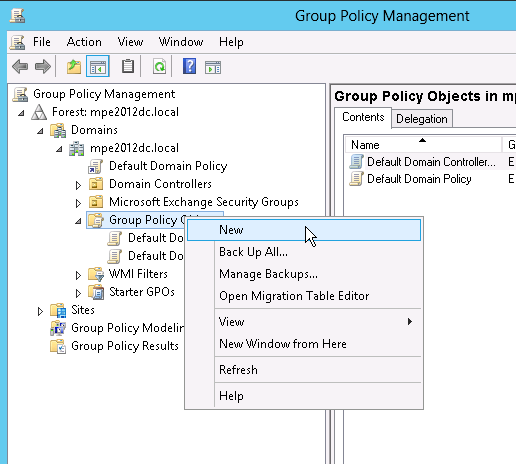
1.Start Group Policy Management.
2.In the console tree, expand your domain.
3.Expand context menu on Group Policy Object, and then click New.
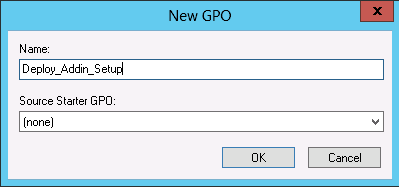
4.Create a new policy (for example: Deploy_Add-in_Setup).
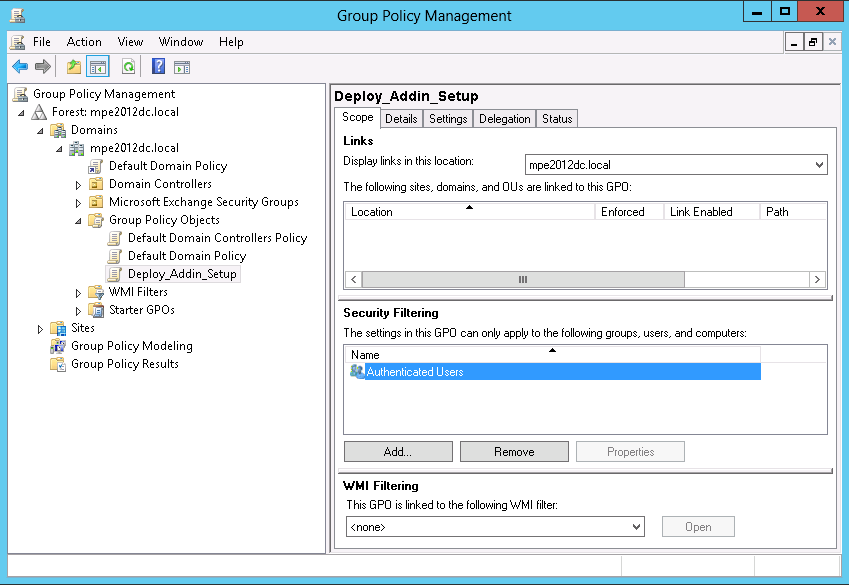
5.Set security filtering for this policy to select groups or users to which you want to apply this policy.
|
|
NOTE: The default settings automatically includes Authenticated User as default group, which allows to apply this policy for all valid domain users.. |

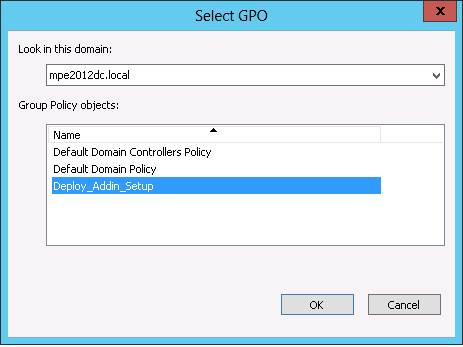
6.Link newly created policy to your domain (right-click your domain and select Link an Existing GPO...)
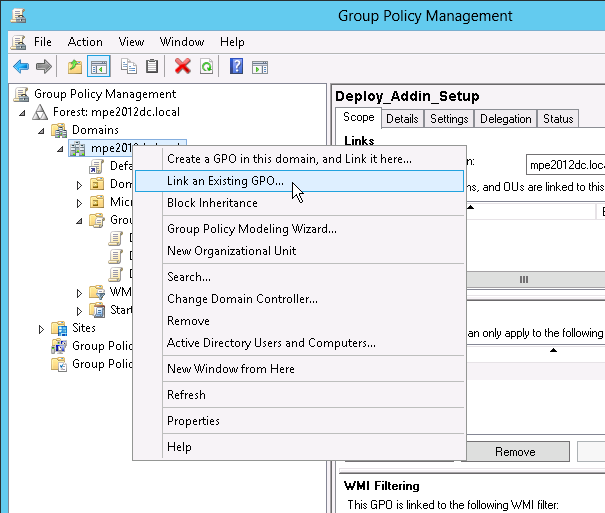
7.Select the GPO you created.
|
|
NOTE: It is not required to link a GPO for the whole the domain; you may create your own organization unit (OU) and apply the software distribution only for this OU. |
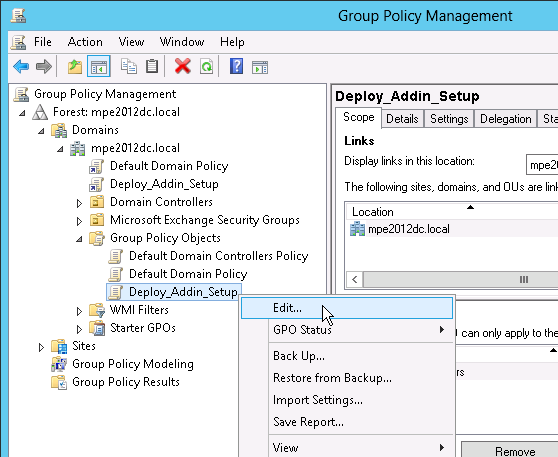
8.Expand context menu on newly created policy, and click on Edit to distribute Archive Manager Outlook Archive Manager Outlook Addin Setups by this policy.
|
|
NOTE: This opens a Group policy Management Editor. |
Assigning Addin Installer.msi
You can assign an Archive Manager Outlook Addin Setup.msi distribution to users. If you assign the program to a user, it is installed when the user logs on to the computer. When the user first runs the program, the installation is finalized. Combination of custom ADM template, with assigning Archive Manager Outlook Addin Setup.msi method is recommended for users with limited privileges (see also the part Change archive-retrieve server names by ADM template). When you use assigning software method to install Archive Manager Outlook Archive Manager Outlook Addin Setup to a user's system, the installation runs with elevated privileges (e.g. system permissions) that bypass the user's limited permissions.
MS Windows Server 2012 / 2012 R2 / 2016 / 2019
To assign a program to users that are logging on to one of these workstations:
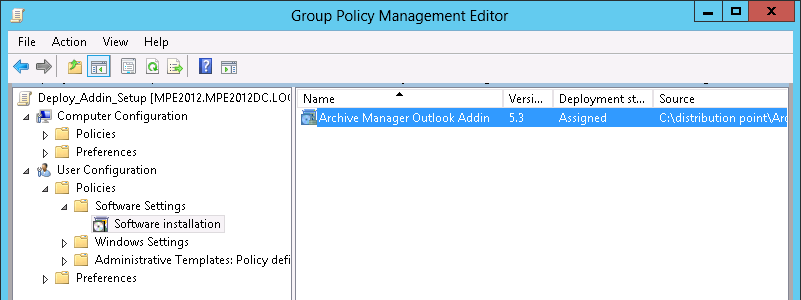
1.Expand context menu on newly created policy, and click edit to open Group Policy Management Editor.
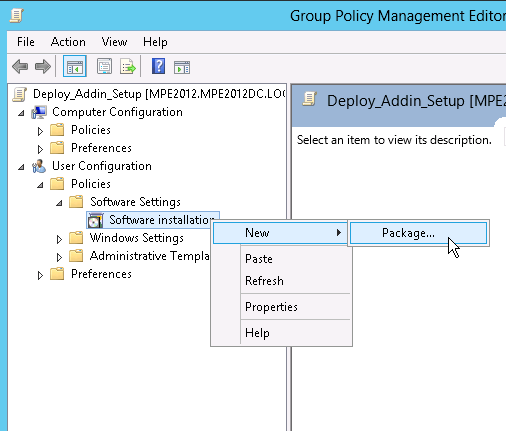
2.Under User Configuration, expand Software Settings.
3.Right-click Software installation, point to New, and then click Package.
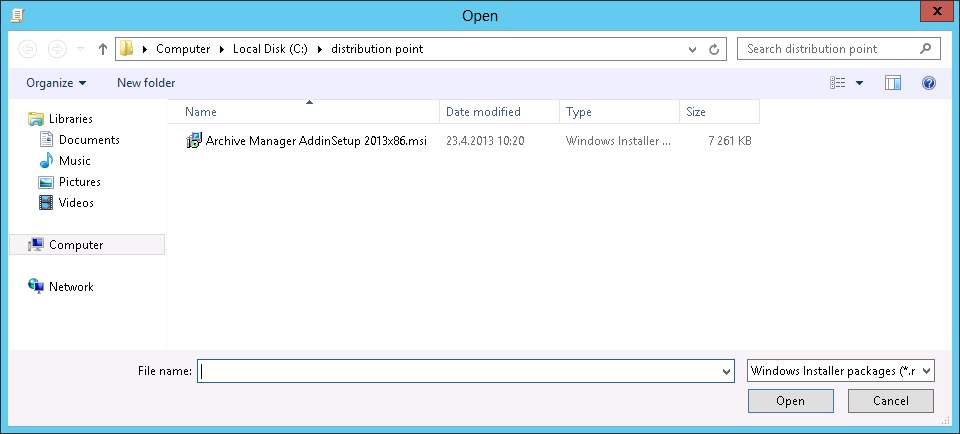
4.In the Open dialog box, type the full Universal Naming Convention (UNC) path to the shared folder (distribution point, described above) that contains the Archive Manager Outlook Archive Manager Outlook Addin Setup MSI package. For example, \\file server\share\Archive Manager_Archive Manager Outlook Addin Setup.msi.
5.Select Add-in setup (Archive Manager Outlook Addin Setup.msi) and click Open. Do not browse to the location. Ensure that you use the UNC path to the shared folder.
6.Click Assigned, and then click OK. The package is listed in the right pane of the Group Policy window.
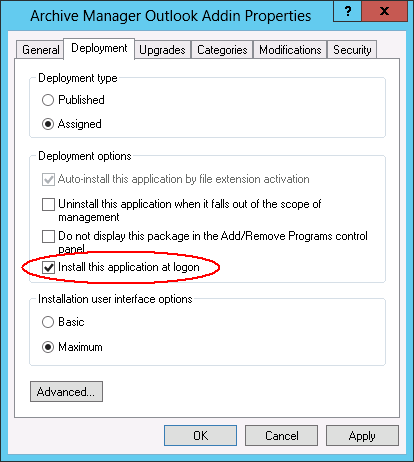
7.Click on assigned package, and then click Properties. From the Deployment type section select Assigned and from the Deployment options section select Install this application at logon.
8.Close the Group Policy Management Editor. When selected user log on the client computer, the managed software package will be automatically installed.
9.Verify that the Archive Manager Outlook Add-in was installed correctly by inspecting the Add or Remove Programs on client computers.
|
|
NOTE: Check event viewer for install status, look for similar descriptions: Changes to software installation settings were applied successfully. Or The assignment of application Archive Manager Outlook Add-in from policy Archive Manager Add-in succeeded. |
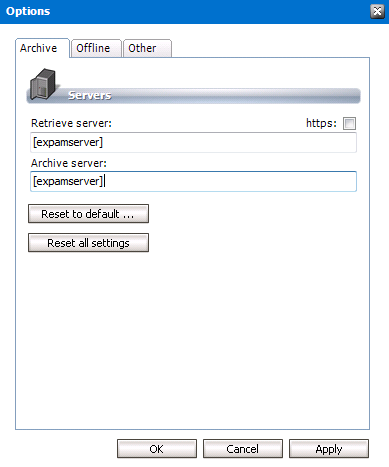
10.Open Microsoft Outlook. from the Archive Manager menu select Options. Type the name of the archive and retrieve servers there.
|
|
NOTE: There is another possibility to set archive and retrieve server name for Archive Manager Add-in, using GPO administrative template (ADM template). By using the Administrative Template sections of the GPO you can deploy modifications and user (called HKEY_CURRENT_USER in the registry) portions of the Registry of computers that are influenced by the GPO. These changes will be affected, when the user logs on to computer. For more details, see the part Change archive-retrieve server names by ADM template. |
|
|
NOTE: After the changes are applied, open Archive Manager Addin menu > Info and click reconnect. Outlook 2013-2019 supports reading Archive Manager Outlook Add-in from HKEY_LOCAL_MACHINE. Archive Manager Outlook Add-in is deployed to all users on a machine by registering it under HKLM\Software\WOW6432Node\Microsoft\Office\Outlook\Add-ins, which means that Archive Manager Outlook Add-in will be loaded during startup of every Office application. |
Modifying add-in properties
Using the Administrative Template sections of the Object Editor, you can deploy modifications to user (HKCU) portions of the Registry of computers targeted by your Group Policy Object (GPO). All you need to do is to link your GPO to the appropriate site, domain, or organizational unit (OU) and let Group Policy processing do its job. The administrative templates do not themselves modify the Registries of the target computers--all they do is creating the GUI elements in the Object Editor that let you configure Registry settings for computers targeted by your GPO.
Custom templates for Archive Manager Outlook Archive Manager Outlook Addin Setup can manage archive and retrieve server settings for selected users. These changes will take an effect, when the user logs on to the computer. Combination of custom templates, with assigning Archive Manager Outlook Addin Setup.msi method is recommended for users with limited privileges.
The following sections describe the process for MS Windows Server 2012 / 2012 R2 / 2016 / 2019.
Creating an ADMX Files
Registry-based policy settings (located under the Administrative Templates category in the Group Policy Object Editor) are defined using a standards-based, XML file format, known as ADMX files. These new files replace ADM files, which used their own markup language.
Unlike ADM files, ADMX files are not stored in individual GPOs by default; however, this behavior is supported for less common scenarios. For domain-based enterprises, administrators can create a central store location of ADMX files accessible by anyone with permission to create or edit GPOs.
ADMX files are divided into language-neutral (ADMX) and language-specific (ADML) resources, available to all Group Policy administrators. These factors allow Group Policy tools to adjust their UI according to the administrator's configured language. Add-ing a new language to a set of policy definitions is achieved by ensuring that the language-specific resource file (ADML) is available. All ADMX files are authored as one language neutral file (.admx) and a set of language-dependent files that will be localized for all supported languages (.adml).
Steps to create a language-neutral (ADMX) file
The language-neutral file, .admx, determines the number and type of policy settings and their location by category in the Group Policy Object Editor display.
1.Start Notepad or any text editor to create your template.
2.Create an Archive Manager Outlook Add-in.ADMX file. For example:
<policyDefinitions revision="1.0" schemaVersion="1.0">
<policyNamespaces>
<target prefix="fullarmor" namespace="FullArmor.Policies.DA2B2B72_B85C_4D69_8B2B_C24939A38BF7" />
<using prefix="windows" namespace="Microsoft.Policies.Windows" />
</policyNamespaces>
<supersededAdm fileName="" />
<resources minRequiredRevision="1.0" />
<supportedOn>
<definitions>
<definition name="SUPPORTED_WindowsXP" displayName="$(string.SUPPORTED_WindowsXP)" />
</definitions>
</supportedOn>
<categories>
<category name="ID_OutlookAdd-inCategory" displayName="$(string.ID_OutlookAdd-inCategory)" />
</categories>
<policies>
<policy name="ID_OutlookAdd-inPolicy" class="User" displayName="$(string.ID_OutlookAdd-inPolicy)" explainText="$(string.ID_OutlookAdd-inPolicy_Help)" presentation="$(presentation.ID_OutlookAdd-inPolicy)" key="Software\Metalogix\PAM4Exchange Outlook Add-in">
<parentCategory ref="ID_OutlookAdd-inCategory" />
<supportedOn ref="SUPPORTED_WindowsXP" />
<elements>
<text id="ID_RetrieveServer" key="Software\Metalogix\PAM4Exchange Outlook Add-in" valueName="RETRIEVESERVER" />
<text id="ID_ArchiveServer" key="Software\Metalogix\PAM4Exchange Outlook Add-in" valueName="ARCHIVESERVER" />
</elements>
</policy>
</policies>
</policyDefinitions>
Steps to create a language-resource (ADML) file
The language resource files, .adml, provide the language specific information needed by the language neutral file. The language neutral file will then reference specific sections of the language resource file in order for the Group Policy Object Editor to display a policy setting in the correct language.
1.Start Notepad or any text editor to create your template.
2.Create an Archive Manager Outlook Add-in.ADML file. For example:
<policyDefinitionResources revision="1.0" schemaVersion="1.0">
<displayName>
</displayName>
<description>Custom ADMX template for Archive Manager Outlook Add-in setup can manage archive and retrieve server settings for selected users. These changes will take an effect, when the user logs on to the computer. Combination of custom ADMX template, with assigning Archive Manager Outlook Addin Setup.msi method is recommended for users with limited privileges. </description>
<resources>
<stringTable>
<string id="ID_OutlookAdd-inCategory">Archive Manager Outlook Add-in</string>
<string id="ID_OutlookAdd-inPolicy">Set Archive, Retrieve servers</string>
<string id="ID_OutlookAdd-inPolicy_Help">Custom ADMX template for Archive Manager Outlook Add-in setup can manage archive and retrieve server settings for selected users. These changes will take an effect, when the user logs on to the computer. Combination of custom ADMX template, with assigning Archive Manager Outlook Addin Setup.msi method is recommended for users with limited privileges. </string>
<string id="SUPPORTED_WindowsXP">At least Microsoft Windows XP Professional or Windows Server 2003 family</string>
</stringTable>
<presentationTable>
<presentation id="ID_OutlookAdd-inPolicy">
<textBox refId="ID_RetrieveServer">
<label>Retrieve server name</label>
<defaultValue>
</defaultValue>
</textBox>
<textBox refId="ID_ArchiveServer">
<label>Archive server name</label>
<defaultValue>
</defaultValue>
</textBox>
</presentation>
</presentationTable>
</resources>
</policyDefinitionResources>