
Simple Foldering Store
This is a basic store similar to Windows Explorer where sub-folders are created under the specified path.
To create a store:
1.Open the Configuration tool from Start > Metalogix > Archive Manager Configuration or C:\Program Files (x86)\Common Files\PAM\PAMConfig\PAMConfig.exe
2.Select HSM from the features panel.
3.Click the Stores tab.
4.Click New Store from the Stores section. The Create a new Media Store wizard starts.
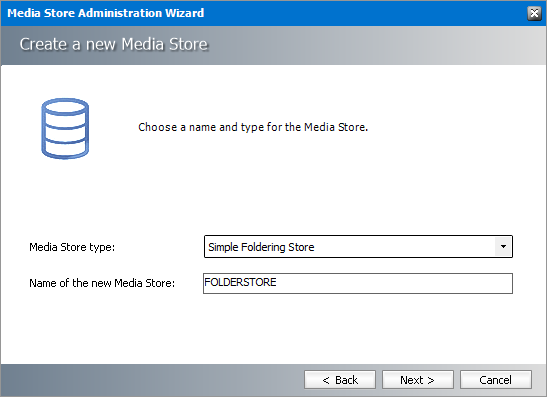
Enter the information as described below:
a.Media Store Type - select Simple Foldering Store from the drop down list.
b.Name of the new Media Store - enter a unique name for this store.
5.Click Next. The Media Store Administration Wizard step for the Simple Foldering Store opens.
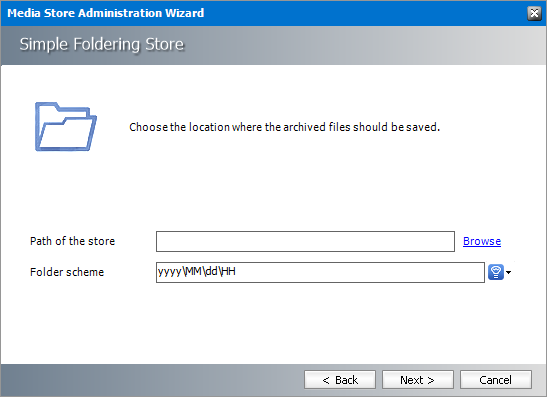
Enter the information as described below:
a.Path to the store - Click Browse to locate the local root folder.
b.Filename prefix - a unique prefix that you can create for each item stored in the folders. To construct a date type prefix, click 
6.Click Next.

Enter the information as described below:
a.Relative speed of the store - the relative speed of this store compared to other stores.
b.Use HSM Cache for read operations - select this check box to allow HSM to use its internal cache to copy files during read operations.
c.Write protection (mark as read only) - not supported for this store type.
d.Re-create service for this Media Store - not supported for this store type.
7.Click Finish.
8.Restart HSM services.
9.Verify that the media store appears in the Stores section.
10.Create a Schema for this media store.
EMC Centera
To create a store:
1.Open the Configuration tool from Start > Metalogix > Archive Manager Configuration or C:\Program Files (x86)\Common Files\PAM\PAMConfig\PAMConfig.exe
2.Select HSM from the features panel.
3.Click the Stores tab.
4.Click New Store from the Stores section. The Create a new Media Store wizard starts.
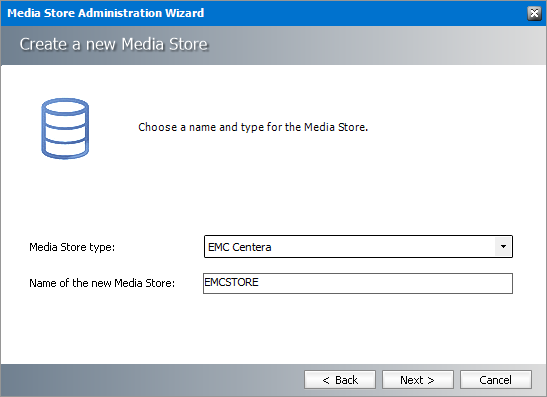
Enter the information as described below:
a.Media Store Type - select EMC Centera from the drop down list.
b.Name of the new Media Store - enter a unique name for this store.
5.Click Next. The Media Store Administration Wizard step for EMC Centera opens.
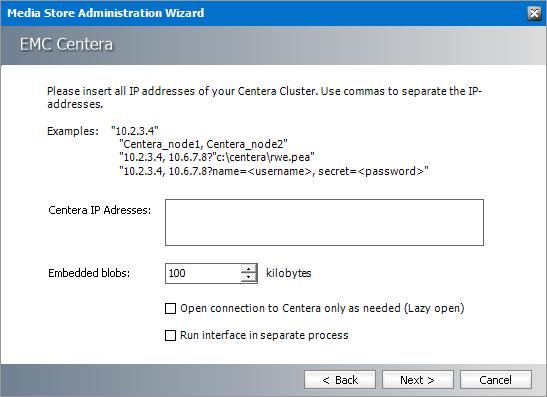
Enter the information as described below:
a.Centera IP Addresses - Insert all IP addresses of your Centera Cluster. Use commas to separate IP addresses.
b.Embedded blobs - When a file is stored two files are created internally - one XML file which contains the meta-data and a second file for the data itself. This means that each file that is stored, increments the file-count on Centera by two. If you store lots of small files, Centera can run out of a file-count before it runs out of disk space. With these settings multiple files upto the specified size are collated and embedded in the meta-data file and the data is saved as a base 64 encoded data.
c.Open connection to Centera as needed (Lazy open) - Select this check box to open the Centera connection at the very last moment possible. This is done by the Centera SDK itself and is a setting recommended by EMC.
d.Run interface in separate process - Select this check box to let the Centera instance run in its own process. That way, two different connections to Centera won't affect each other. If a connection is broken, it can be restarted without the need to restart HSM.
6.Click Next.

Enter the information as described below:
a.Relative speed of the store - the relative speed of this store compared to other stores.
b.Use HSM Cache for read operations - select this check box to allow HSM to use its internal cache to copy files during read operations.
c.Write protection (mark as read only) - not supported for this store type.
d.Re-create service for this Media Store - not supported for this store type.
7.Click Finish.
8.Restart HSM services.
9.Verify that the media store appears in the Stores section.
10.Create a Schema for this media store.
IBM-Tivoli
To create a store:
1.Open the Configuration tool from Start > Metalogix > Archive Manager Configuration or C:\Program Files (x86)\Common Files\PAM\PAMConfig\PAMConfig.exe
2.Select HSM from the features panel.
3.Click the Stores tab.
4.Click New Store from the Stores section. The Create a new Media Store wizard starts.
Enter the information as described below:
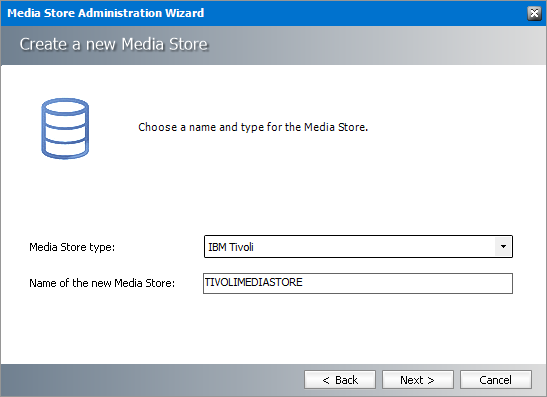
a.Media Store Type - select IBM Tivoli from the drop down list.
b.Name of the new Media Store - enter a unique name for this store.
5.Click Next. The Media Store Administration Wizard step for IBM Tivoli opens.
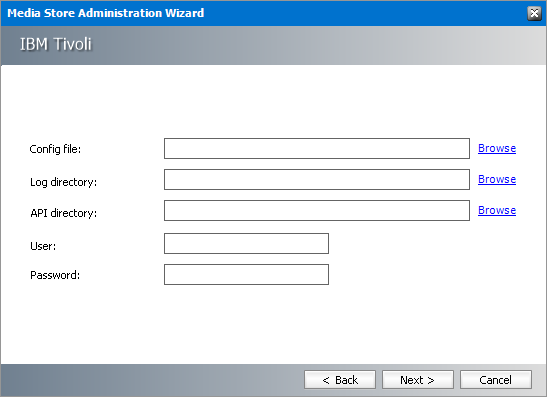
Enter the information as described below:
a.Config file - Click Browse to locate the configuration file (extension OPT) for the IBM Tivoli storage manager (TSM).
b.Log directory - Click Browse to locate the log directory where HSM will log TSM activity.
c.API directory - Click Browse to locate the folder where the TSM API (32-bit) is installed.
d.User - Username to access the TSM instance.
e.Password - Password to access the TSM instance.
6.Click Next.

Enter the information as described below:
a.Management class - Specify the management class that determines how the TSM server manages the backup versions of the objects being backed up.
b.Properties - Enter the properties supported by TSM. The only setting which is mandatory for HSM is the -ENABLEARCHIVERETENTION property if data retention is used. If HSM uses more Tivoli Storage Managers, each storage configuration must also contain the -TCPSERVERADDRESS property to specify TSM sever address (e.g. -TCPSERVERADDRESS=TSM1)
c.Node - Specify the container where the data will be stored.
d.Deactivate Data Retention - Do not select this check box if your TSM system requires data-retention (e.g. DR550). Select this check box if:
·you do not have a license or if you just store media on a tape and you do not need the protection.
·your TSM instance does not support Data Retention.
e.Run interface in separate process - Select this check box to let the TSM instance run in its own process. That way, two different connections to TSM won't affect each other. If a connection is broken, it can be restarted without the need to restart HSM.
7.Click Next.
Enter the information as described below:
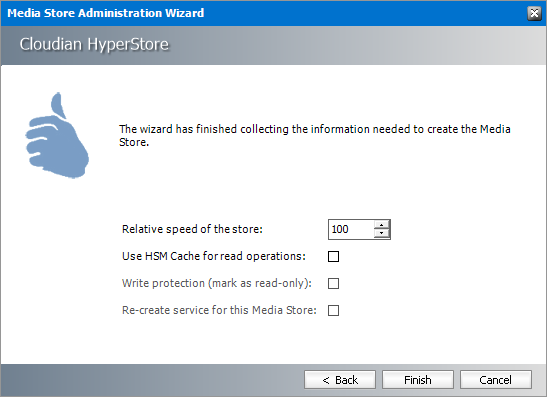
a.Relative speed of the store - the relative speed of this store compared to other stores.
b.Use HSM Cache for read operations - select this check box to allow HSM to use its internal cache to copy files during read operations.
c.Write protection (mark as read only) - not supported for this store type.
d.Re-create service for this Media Store - not supported for this store type.
8.Click Finish.
9.Restart HSM services.
10.Verify that the media store appears in the Stores section.
11.Create a Schema for this media store.
HP Integrated Archive Platform
To create a store:
1.Open the Configuration tool from Start > Metalogix > Archive Manager Configuration or C:\Program Files (x86)\Common Files\PAM\PAMConfig\PAMConfig.exe
2.Select HSM from the features panel.
3.Click the Stores tab.
4.Click New Store from the Stores section. The Create a new Media Store wizard starts.

Enter the information as described below:
a.Media Store Type - select HP Integrated Archive Platform from the drop down list.
b.Name of the new Media Store - enter a unique name for this store.
5.Click Next. The Media Store Administration Wizard step for the HP Integrated Archive Platform opens.
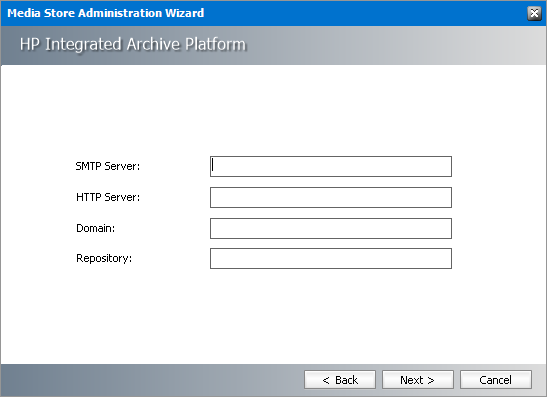
Enter the information as described below:
a.SMTP Server - SMTP server name.
b.HTTP Server - HTTP server name.
c.Domain - Domain name of the HP Integrated Archive Platform server.
d.Repository - Container configured in HP Integrated Archive Platform instance where the files will be stored.
6.Click Next.

Enter the information as described below:
a.Relative speed of the store - the relative speed of this store compared to other stores.
b.Use HSM Cache for read operations - select this check box to allow HSM to use its internal cache to copy files during read operations.
c.Write protection (mark as read only) - not supported for this store type.
d.Re-create service for this Media Store - not supported for this store type.
7.Click Finish.
8.Restart HSM services.
9.Verify that the media store appears in the Stores section.
10.Create a Schema for this media store.