
Modify the Exchange server throttling policy
Exchange Server uses client throttling policies to track the bandwidth that each user consumes, and restricts bandwidth limits as necessary. Metalogix Archive Manager for Exchange needs more resources than the allowed limit, so the throttling policy must be changed for the superuser.
To change the throttling policy in the Exchange server (for example, AMXEXCH), open the Exchange Management Shell and run the following commands:
New-ThrottlingPolicy AMXEXCH
Set-ThrottlingPolicy AMXEXCH -EwsCutoffBalance Unlimited -EwsMaxBurst Unlimited -EwsMaxConcurrency Unlimited -EwsMaxSubscriptions Unlimited -EwsRechargeRate Unlimited -RcaMaxConcurrency Unlimited -RcaCutoffBalance Unlimited -RcaMaxBurst Unlimited -RcaRechargeRate Unlimited -CpaMaxConcurrency Unlimited -CpaCutoffBalance Unlimited -CpaMaxBurst Unlimited -CpaRechargeRate Unlimited
Set-Mailbox "mamadmin@democorp.com" -ThrottlingPolicy AMXEXCH
Setup the Organizational Forms Library
Metalogix Archive Manager for Exchange stores email templates in a system folder called the Organizational Forms Library. The templates are used to display archived emails to end users. Before you can create the Organizational Forms Library folder in your Exchange server, you must first create a public folder mailbox. Public folder mailboxes contain the hierarchy information as well as the content for public folders. The first public folder mailbox that you create in the organization is the primary hierarchy mailbox, which automatically sets up two folders: the IPM_SUBTREE and the NON_IPM_SUBTREE. An Organizational Forms Library is a system folder that is stored in the public folder called the EFORMS REGISTRY which is a sub-folder of the NON_IPM_SUBTREE system folder. There can be several forms libraries, one for each language.
In this topic:
·Steps to create a public folder mailbox
·Steps to create the public folder Organization Forms Library
·Steps to add the superuser as the owner of the Organizational Forms Library
·Verify that the superuser has access to the Organizational Forms Library
Steps to create a public folder mailbox
|
|
NOTE: This must be a primary hierarchy mailbox which is the first public folder mailbox in the organization and hosts the primary hierarchy. The primary hierarchy is the only writable copy of the hierarchy. |

1.Open the Exchange Administrative Center (EAC) with your exchange administrator credentials.
2.Navigate to Public folders > Public folder mailboxes, and then click the new public folder mailbox icon +
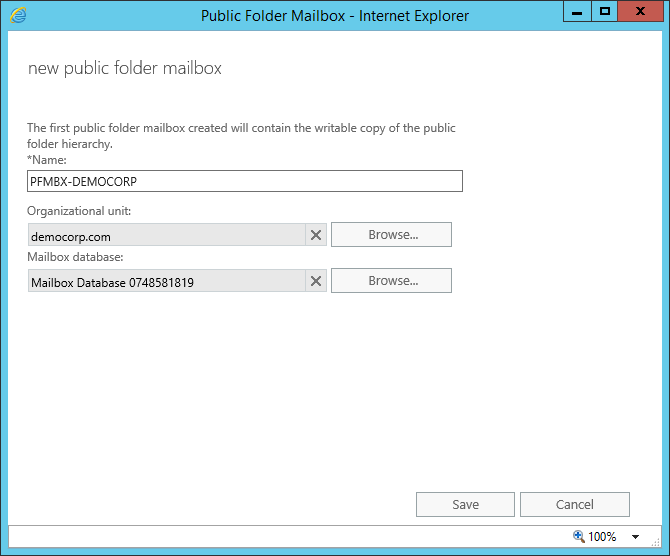
3.In the new public folder mailbox window that opens, enter the following information:
a.Name: Enter the name for the public folder mailbox. For example, enter PFMBX-DEMOCORP
b.Organizational unit: Click Browse to select the location in the Active Directory where the mailbox object is created. If you don't select an organizational unit, the public folder mailbox will be created in the default container for mailboxes.
c.Mailbox database: Click Browse to select the mailbox database where the mailbox is created. If you don't select a mailbox database, it will be automatically assigned.
4.Click Save.
5.Verify that the mailbox appears in the public folder mailbox list.
Steps to create the public folder Organization Forms Library
1.In Exchange Server, open the Exchange Management Shell.
2.To create a new public folder in the NON_IPM_SUBTREE directory that's named Organizational Forms Library, run the following command:
New-PublicFolder -Path "\NON_IPM_SUBTREE\EFORMS REGISTRY" -Name "Organizational Forms Library"
3.To set the locale ID on the folder that you created, run the following command:
Set-PublicFolder "\NON_IPM_SUBTREE\EFORMS REGISTRY\Organizational Forms Library" -EformsLocaleID EN-US
4.To determine the correct locale ID to use, see Languagecode Field.
Steps to add the superuser as the owner of the Organizational Forms Library
1.In Exchange Server, open the Exchange Management Shell.
2.To add the superuser as the owner of the Organizational Forms Library folder so that the superuser ca publish or create forms in the library, run the following command:
3.Add-PublicFolderClientPermission "\NON_IPM_SUBTREE\EFORMS REGISTRY\Organizational Forms Library" -User mamadmin@democorp.com -AccessRights Owner
|
|
NOTE: If you're not sure about the name of the Organizational forms library in your company, the following command can be used. It will owner rights to the child objects under EFORMS REGISTRY: Get-PublicFolder -Identity "\NON_IPM_SUBTREE\EFORMS REGISTRY" -GetChildren | Add-PublicFolderClientPermission -User mamadmin@democorp.com -AccessRights Owner |
4.Wait some time for replication to occur until the super-user is assigned owner rights to the Organizational Forms library.
Verify that the superuser has access to the Organizational Forms Library
1.Open Outlook with the superuser account.
2.Click Home / New Items / More Items / Choose Form.
3.In the Look in down-drop box verify that the Organizational Forms Library exists.
Prepare the Application Servers
In this topic:
For the Archive Manager Database server (AMXDB)
See the System Requirements and About User Accounts chapters for preparing database servers.
For the HSM and Search server (AMXHSM)
·Steps to download the install media
·Steps to install the prerequisites
For the Archive server (AMXSERVER-A)
·Steps to download the install media
·Steps to install the prerequisites
·Steps to assign DCOM access and launch permissions
·Steps to install Microsoft Outlook
For Retrieve server (AMXSERVER-R)
·Steps to download the install media
·Steps to install the prerequisites
·Steps to assign DCOM access and launch permissions
·Steps to install Microsoft Outlook
|
|
TIP: We recommend completing all these tasks using the installer account. |
Steps to install the prerequisites
These steps are optional and are included if you want to install them yourself. The installer verifies prerequisites.
1.Log in with the credentials of the local administrator.
2.Open PowerShell as an Administrator.
3.To install the recommended windows roles and features for individual components that may be distributed across other servers run the following PowerShell commands:
Archive Manager for Exchange (for Archive and Retrieve servers)
Install-WindowsFeature -Name Web-Server, Web-Http-Redirect,
Web-Dyn-Compression, Web-Windows-Auth, Web-Basic-Auth,
Web-Metabase, Web-Mgmt-Service, RSAT-AD-PowerShell,
NET-Framework-45-Features, NET-Framework-45-ASPNET,
Web-Net-Ext45, Web-Asp-Net45, NET-WCF-Services45, Web-Asp-Net
HSM
Install-WindowsFeature -Name Web-Server, NET-Framework-Features
Search
Install-WindowsFeature -Name NET-Framework-Features
ArchiveWeb
Install-WindowsFeature -Name NET-WCF-HTTP-Activation45, Web-Server,
Web-Static-Content, Web-Http-Redirect, Web-Stat-Compression,
Web-Dyn-Compression, Web-Windows-Auth, Web-Basic-Auth
|
|
NOTE: These PowerShell commands are compatible with a Window 2016 operating system. Please refer to the System Requirements chapter to modify the script for other supported Windows operating systems or install them manually. |
4.Install the database drivers. For Microsoft SQL Server, the database driver is available in the folder <installation folder>\Archive Manager Installation Package\Install.
5.Install the redistributable packages required for your operating system. These files are available in the folder <installation folder>\Archive Manager Installation Package\Install.