Creating a new retention category
Steps to create a new retention category
1.On the View menu click Manager.
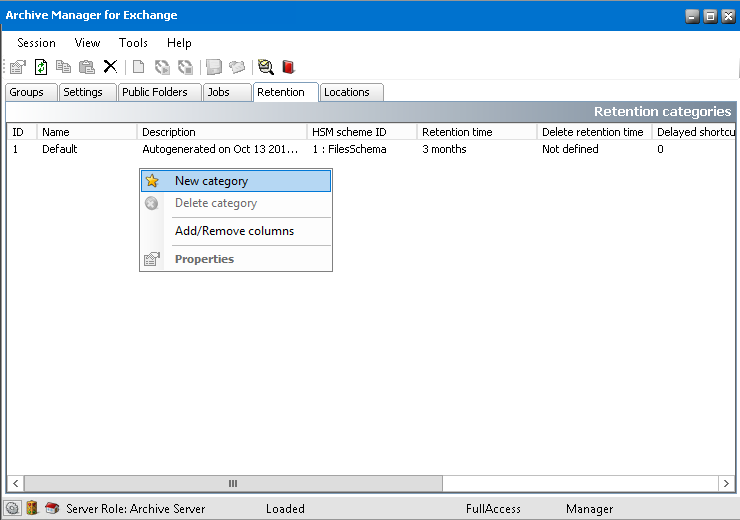
2.Click on the Retention tab.
3.Right-click inside the list view, select New category from the context menu and navigate through the wizard as follows:
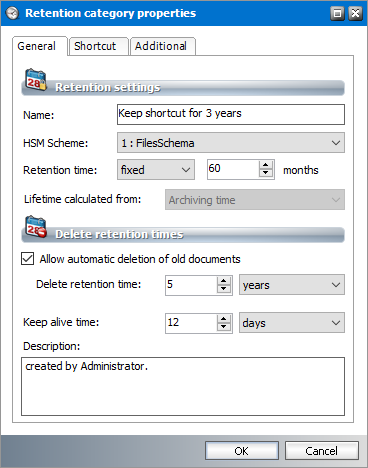
4.Basic settings window pops-up. Enter the name for your retention category in the Category name text box (e.g. Keep shortcut for 3 years).
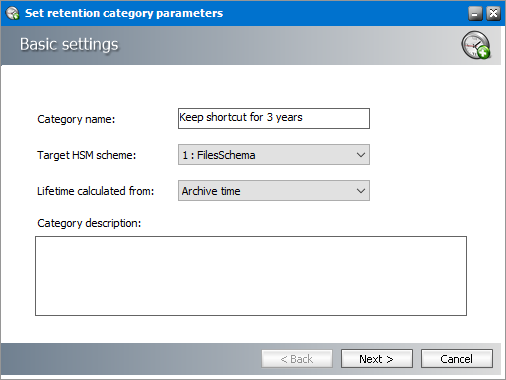
5.In the Target HSM scheme dropdown box choose the target scheme which will be used for archiving. In the HSM system you may define different HSM Schemas, which are virtual categories for documents. (One HSM Schema has been created at installation of Archive Manager for Exchange and you may have created more HSM Schemas during the setup of Archive Manager for Exchange, each with a particular number assigned to it.)
6.In the Lifetime calculated from dropdown box you can choose from two options Archive time and Receive time; i.e. you can define here the starting point from which the all the retention related times should be calculated. Either it will be the time when the item gets archived (Archive time) or it will be the items Received time.
7.In the Category description text box fill in a short description of the new category.
8.Click Next.
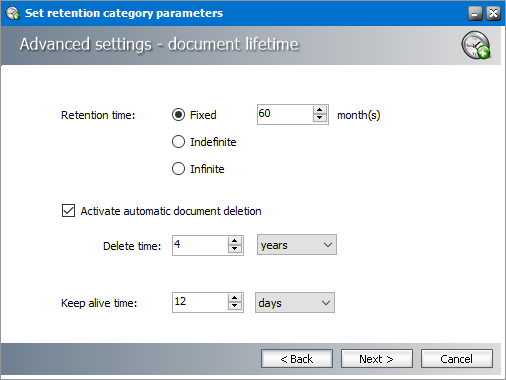
9.In the Document lifetime window specify your settings.
It is strongly recommended paying very much attention to these settings as they define the time period for which the emails are archived.
Set the Retention time. During this period none of the emails in the HSM store archived via this retention category can be removed from the archive. It is possible to select:
·Fixed period (set the desired period)
·Indefinite period (the retention time is not set specifically but can be defined later)
·Infinite period (retention is everlasting)
Select Activate automatic document deletion check box and specify Delete time if you want to COMPLETELY DELETE an archived emails whose retention time has elapsed from the HSM Store after a defined time.
|
|
NOTE: Activate automatic document deletion option applies to emails which are not marked for deletion. |

By specifying the Keep alive time you set the time period for which the email, deleted after its retention time has elapsed, will be still kept in the HSM Store. Just use the arrows to set the time or directly overwrite it. Delete and Keep alive time can be set in days, months or years.
|
|
NOTE: The Delete time cannot be smaller than the Retention time. Pay due attention to these crucial settings as here you set the time for which emails exist in the archive. |
10.Click Next.
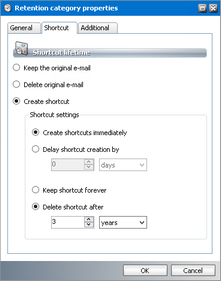
11.In the Shortcut lifetime window you can choose from three options:
a.Keep the original e-mail select this option, should you wish to archive email and not to modify it in any way. In this case no shortcut will be created and the whole email will reside in the MS Microsoft Exchange Server. In the Archive view on the Mailbox tab such item will be displayed with the following icon:


b.Delete original e-mail select this option, should you wish to delete all original email from the MS Microsoft Exchange Server immediately after its archiving. No shortcut is created and the email is not accessible from the users mailbox. In the Archive view such item is displayed as lost.
c.Create shortcut select this option, should you wish to replace the original email with a shortcut after archiving and thus make it accessible for the user and save the space on MS Microsoft Exchange Server at the same time.
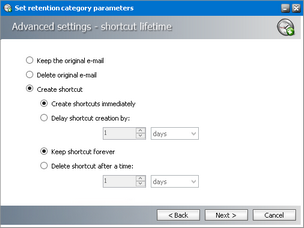
In case you have selected the Create shortcut option, further settings become available and you can adjust shortcut behavior to meet your needs. You can choose if the shortcut creation will follow immediately after archiving of the email (Create shortcut immediately radio button) or will be delayed for the specified period of time (Delay shortcut creation by radio button) when e.g. Blackberry users will be able to view their attachments. While no shortcut is created, the email is displayed in the Archive view with the following icon:
Moreover, you can decide whether you want to keep the shortcut in the users mailbox until the user deletes it (Keep shortcut for ever option) or the shortcut will be deleted automatically after the defined time (Delete shortcut after a time option).
12.Click Next.
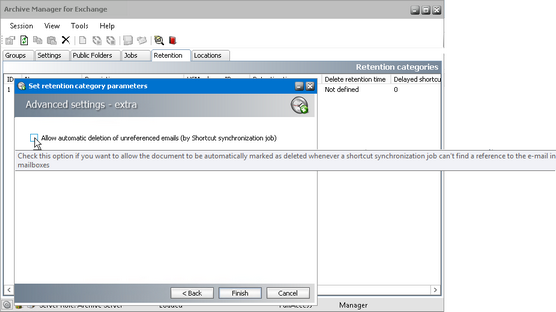
13.Extra settings window pops-up. If the Allow automatic deletion of unreferenced emails check box is selected, emails archived via this category will be marked for deletion whenever the Shortcut Sync job cannot find the reference to the emails in any of the users mailboxes. If the check-box is not selected, Shortcut Sync job will not marked eventual "lost items for deletion (see the section "Shortcut Sync job).
Example:
I.Emails are archived by a retention category with Allow automatic deletion of unreferenced emails checked and shortcuts are left in the Microsoft Exchange Server
II.You delete shortcuts from Microsoft Exchange (either by removing the shortcuts manually in a mailbox, or by deleting a folder in Outlook that contains shortcuts etc.) → emails become "lost items
III.You run the Shortcut Synchronization Job → lost items are marked for deletion
|
|
CAUTION: If the items were archived with 0 retention time and with Allow automatic deletion of unreferenced emails allowed, the Shortcut Synch Job deletes them COMPLETELY. |

IV.Items marked for deletion are deleted from archive when their Retention (and Keep alive) time elapses and you run the Delete Files job
|
|
IMPORTANT: Items marked for deletion still reside in the HSM Store but cannot be restored using Archive Manager for Exchange, e.g. on the Archive tab. |
14.Click Next to finish the creation of the new retention category.
Changing the settings of a retention category
To change the settings of an existing retention category:
1.Double-click the selected retention category to open the Retention category properties window (or right-click it to open its context menu and select Properties).

2.On the respective tabs specify your new settings for the retention category. On the General tab you can change the name, HSM Scheme, retention time, keep alive time as well as allow automatic deletion of old documents and modify related Delete retention time. Click Apply and OK.
3.Shortcut settings can be modified on the Shortcut tab. Click Apply and OK to apply the new settings.
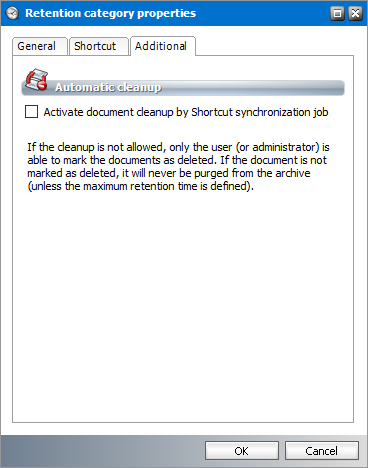
4.On the Additional tab set the shortcut synchronization behavior if the Activate document clean-up by Shortcut synchronization job check box is selected, emails archived via this category will be marked for deletion (or completely deleted if their retention time is 0) whenever the Shortcut synchronization job cannot find the reference to the emails in any of the users mailboxes. If the check box is not selected, Shortcut synchronization job will not mark them.
5.Click Apply and OK to apply your settings.
How to customize retention categories list view
After right-clicking any retention category on the Retention tab, the context menu appears.
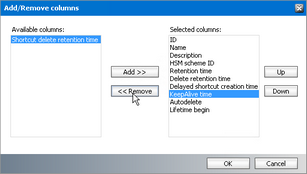
·Add/Remove columns click it in case you want to add or remove columns from the list view. Add/Remove columns window opens. To add/remove a column, select the desired one from the Available columns/Selected columns list. Then click on the Add/Remove button.
To change the order of the selected columns click the one you want to move and use the Up and Down buttons. Click OK.
·Delete category retention category can be deleted only if nothing was archived via this retention category
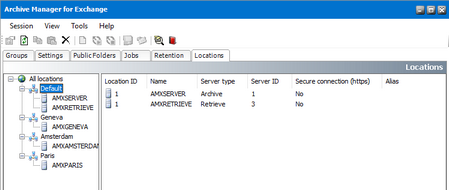
Locations tab
For better performance and to secure load balancing Archive Manager for Exchange provides you with the possibility to install several Archive Manager servers even in several locations (for more information on Archive Manager locations and server roles see the section "General tab).
After you have:
1.installed your Archive Manager servers
2.assigned the servers their server roles on the Tools /Options/Server settings tab
You should:
3.register the servers as Archive/Retrieve severs here on the Locations tab of the Archive Manager for Exchange.
|
|
NOTE: If you have only ONE Archive Manager server installed, you do not need to register it. |
It needs to be mentioned that only the right pane of the Locations tab is active for adding, editing or deleting. Left pane has been reserved for information purposes.
Registering Archive/Retrieve sever
To register a new server:
1.In Manager view open the Locations tab.
2.Expand the All locations node in the left pane of the window.
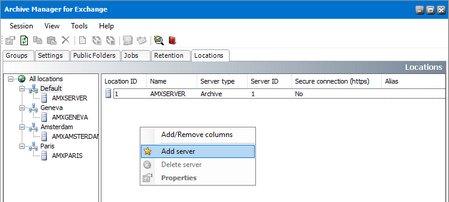
3.Select the location where you want to add the new server. Then right-click and select Add server to location from the context menu.
4.In the New location server properties window enter the information as described below:
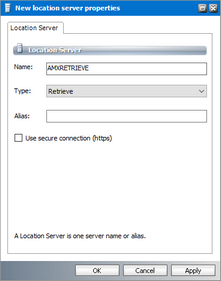
a.Name - Name of the server.
b.Type - Choose from the following server types: Archive, Retrieve or PST Importer.
c.Alias - Enter the FQDN name of the server. Required if you use https for communication.
d.User secure connection (https) - Select this option if you use https for communication.
|
|
NOTE: If users are using Outlook Addin make sure that they can access the entered location server. If users are using a proxy server, make sure that the location server is accessible through the proxy. If your environment uses https for communication and ArchiveWeb or OWA to access archived items, the following settings must be configured: ·The site bindings and SSL Settings for the location server certificate must be configured. ·The AM for Exchange service URL property for ArchiveWeb must be configured to use https. See the ArchiveWeb Guide for more information. ·The Archive ManagerExchangePamWS URL property for OWA must be configured to use https. See the OWA Guide for more information. ·In the Location server properties window, the Alias must be specified and the Use secure connection (https) check box must be selected. |
5.Click Apply, then OK. The new server will appear in the right pane of the Locations tab.
|
|
NOTE: To delete the server from the list just right-click it in the left pane and select Delete server from the location option in the context menu. |
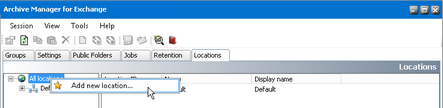
To add a new location:
1.In Manager view click on the Locations tab.
2.Expand the All locations node in the left pane of the window to see the all locations and its servers.
3.Right-click the All locations and select the Add new location option.
4.In the New location properties window enter the name and display name in the respective text boxes. You can change the location ID as well.
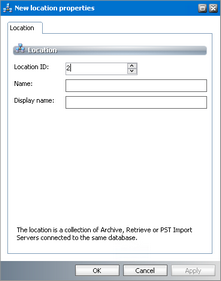
5.Click Apply, then OK.
|
|
NOTE: To add a new server to the new location follow the steps described earlier in this chapter. To delete/edit a location, right-click it and select Delete location /Properties in the context menu. |
Status view
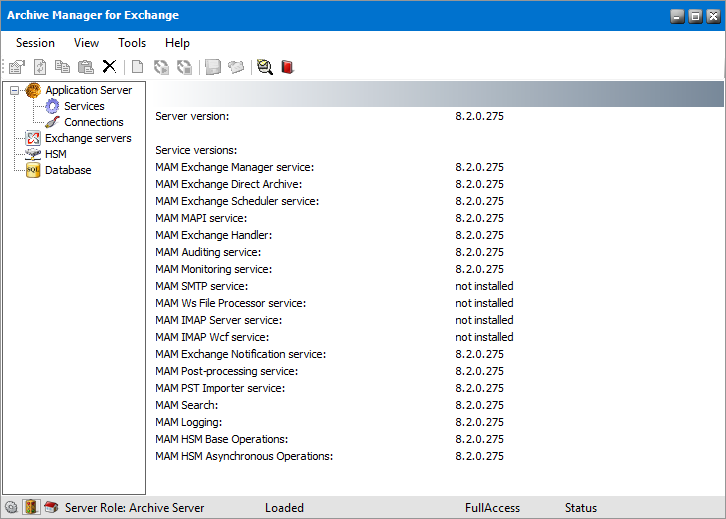
Status view is displayed by clicking Status on the View menu. By clicking on different nodes in the left pane of the Status view you will display information on current version of Archive Manager for Exchange, logged-on users, status of services, database, HSM Store etc.
By clicking on the Application Server node in the left pane you will display some detailed information about the current version, as shown below:
By clicking on the Services node in the left pane you will see all Archive Manager for Exchange services and their status.

Services can be restarted by clicking on the Restart button. You can use the Stop button (

By clicking on the Connections node in the left pane you will display current connections and logins. Here you can find out access rights etc.
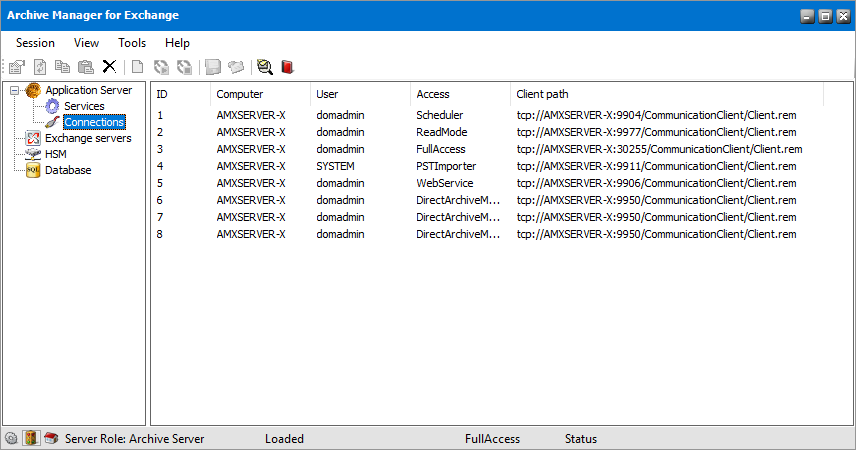
Archive Manager for Exchange can run on several computers in parallel and can communicate with several MS Microsoft Exchange servers.
By clicking on the Microsoft Exchange servers node a list of synchronized MS Microsoft Exchange servers will be displayed, including the number of threads.
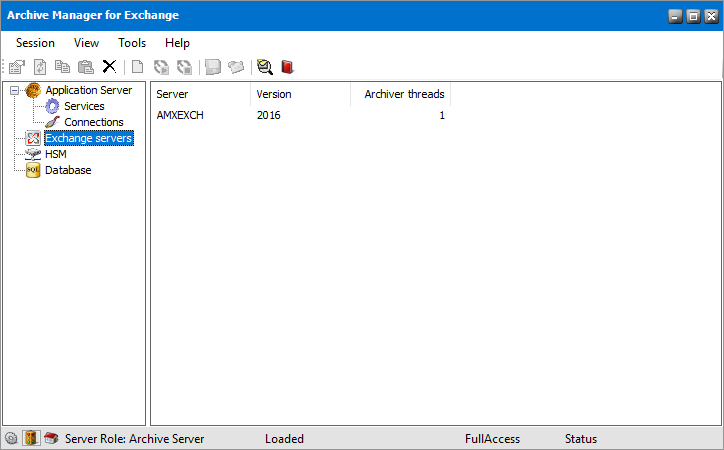
To change the number of threads, double-click a desired Microsoft Exchange server. In the Threads window simply set the number of threads to be processed in one cycle. The higher the number, the less number of cycles you have it however slows down the system. An optimal number is from 15 to 20.

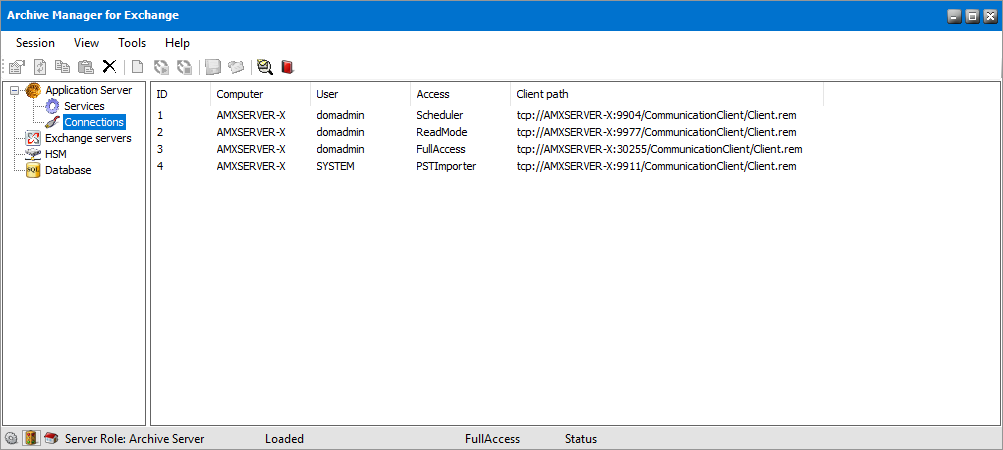
If you, for instance, set the number of threads to 4 and click OK.
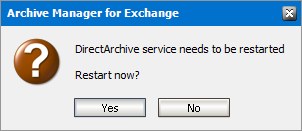
Click Yes to restart the service. Then by clicking on the Connections node, 4 entries will be displayed (see the following figure).
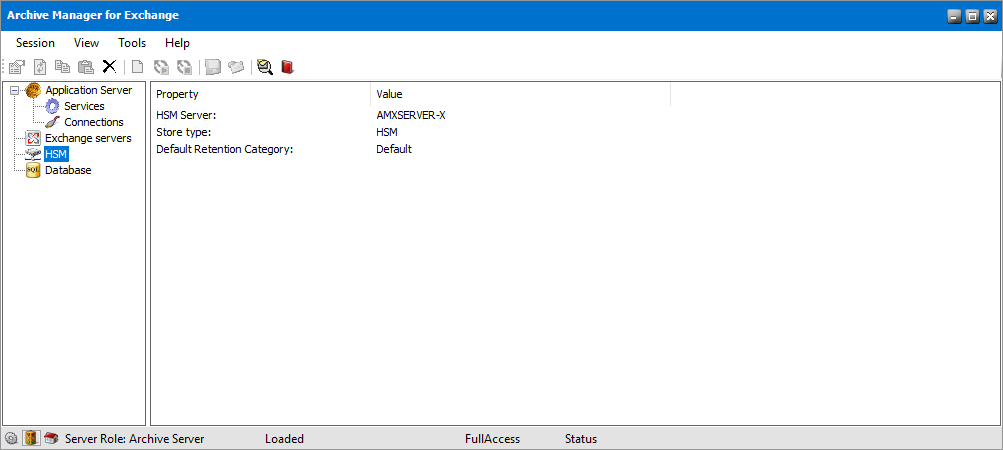
By clicking on the HSM node you will retrieve some information on your HSM store type, HSM/Archive Manager Server and the ID of the default Retention Category. This is for informative purposes only.
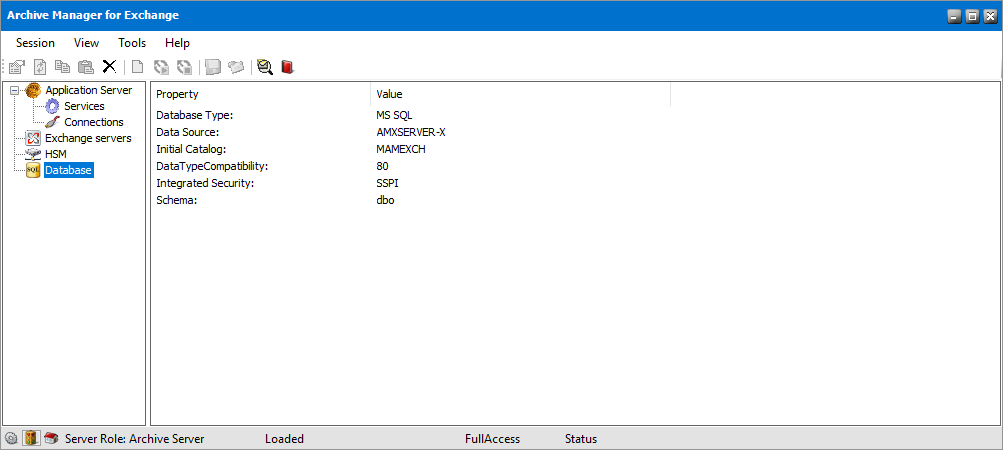
By clicking on the Database node some information about the database in use will be displayed. This information is taken from the DB Config tool.