
Shortcut templates
When an email is archived, usually (depending on settings) just a shortcut is left behind in the Microsoft Exchange server. Administrator can configure shortcuts according to the company needs and define how the shortcuts should be displayed in the users Outlook preview.
Shortcut layout and type is specified through shortcut templates. There can be various shortcut templates defined for different users/groups. For instance, Mac users may need specific shortcuts.
This node is reserved for shortcut template creation. Different types of templates can be created. It is possible to configure maximal shortcut size, the format of the message body and create attachment links reachable from the preview pane of Outlook/OWA.
Shortcut templates created on this tab can then be assigned to groups or users on the Shortcut template assignment node, e.i. the user/groups archived emails will have the defined configuration.
|
|
NOTE: One of the shortcut templates can be selected as a global template in the Shortcut tab from Tools/Options/Archive Settings. This template will then be used in cases when no other template settings are applied. As default it is the Default template. |

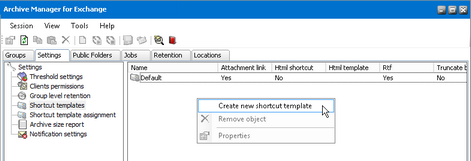
To create a new shortcut template select the Shortcut templates node. Then right-click inside the main pane and from the context menu select Create new shortcut template.
Before specifying settings for shortcuts it is important to think over how the shortcut (archived email) should look like. Consider your priorities and intentions as well as expectations of the users. For instance, if it is vital to keep the shortcuts small, you will want to truncate the body text and not to keep formatted body text. On the other hand, you may want users to be able to read the emails in the preview pane (no body-text truncating) and also to access attachments from the preview pane (e.g. Create links for attachments option) etc. - read further about possible options.
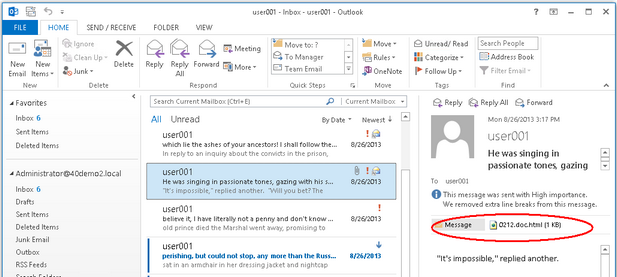
As default (i.e. when no settings are specified on this tab) the Archive Manager archiving processes replace the email on MS Microsoft Exchange with the shortcut that includes the header and the body of the archived email. Therefore, the Outlook Preview is able to display the archived items while the Attachments field is left empty. The attachment is included in the message when the email is retrieved from the archive by double-click.
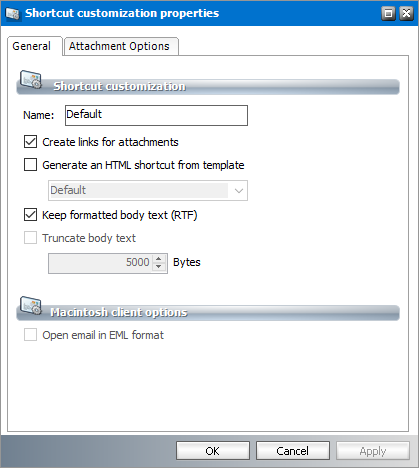
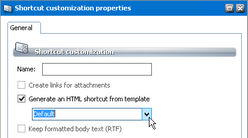
You can set the format of the shortcut as well. Check the Generate an HTML shortcut from template check box to create shortcuts in HTML format. The HTML shortcut includes also links for attachments, so there is no need to activate Generate an HTML shortcut from template and Create links for attachments at the same time.
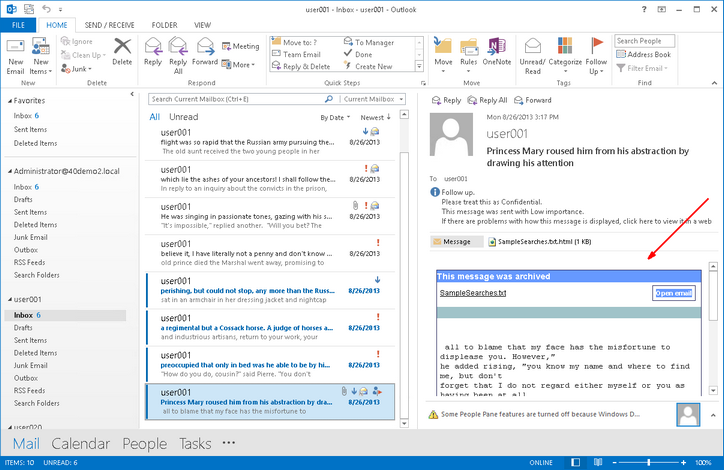
Fig. Default HTML shortcut in the Outlook preview pane
Choose your desired HTML shortcut template from the down-drop box under the Generate an HTML shortcut from template. If you have not created any template yet, there is just the Default one. You can create your own templates to customize the HTML shortcuts design. For more information see How to create a customized HTML shortcut template .
When the message is archived, its header and body are kept in the MS Microsoft Exchange Server as default, no matter what size they are. Only attachments are removed. Should you wish to allocate just fixed size for every archived email and in this way save even more space on your MS Microsoft Exchange, check the Truncate body text check box. In the Bytes text field enter the MAXIMAL size of the shortcut left on the MS Microsoft Exchange Server. The message body will be truncated, if it is bigger than the specified size.
|
|
NOTE: Remember that in the Preview pane of Outlook user can see only the shortcut left on the MS Microsoft Exchange Server and the Outlook Find feature can search also only in this shortcut |
If you check the Keep formatted body text (RTF) check box, the formatted text of shortcut will not be altered.
If the Keep formatted body text (RTF) is not checked, only the plain text message body will be kept.
|
|
NOTE: The Keep formatted body text (RTF) and the Truncate body text options are mutually exclusive. So are Keep formatted body text (RTF) and Generate an HTML shortcut from template. After changing settings on this tab, you may want to apply them not only to new shortcuts which will be created from now on, but also to shortcuts which were created previously. To do so, you have to run the Repair shortcut command on a group, mailbox or folder where these new settings should apply to previously created shortcuts. |
The settings under Entourage options apply for Entourage users as well as other email clients (e.g. mobile clients). Check the Open email in EML format so that users will be able to open archived emails from the preview pane.
Attachments
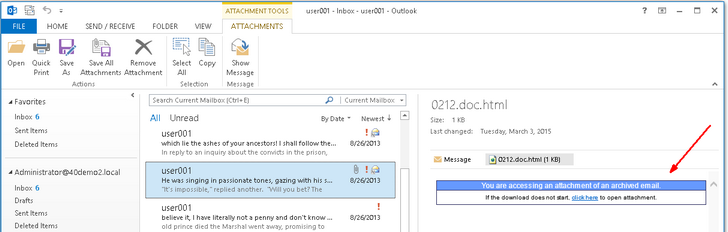
To make the attachment accessible from the Preview pane, check either the Create links for attachments or Generate an HTML shortcut from template check box and configure links creating on the Attachment Options tab as described further. The HTML link available in the Outlook/OWA Preview will be created. It will bear the name of the attachment with an .html extension as shown below.
When clicked, the following info panel may be displayed. Click the link to download the attachment from the Archive Manager server.
If you plan to use attachment links in shortcuts you need to configure the settings on the next tab (Attachment Options tab).
The settings are as follows:
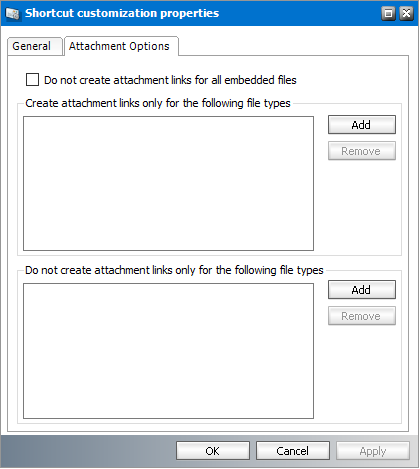
·Do not create attachment links for all embedded files - Links will not be created on the shortcut for embedded files.
·Create attachment links only for the following file types: Click the Add button to add any file types to display its link on the shortcut.
·Do not create attachment links only for the following file types: Click the Add button to exclude file types from being displayed as links on the shortcut
|
|
NOTE: The Create links for attachments option must be selected in the General tab. You can use only one of the two options: Create attachment links only for the following file types or Do not create attachment links only for the following file types. If you use either one, the other option will be deactivated. |
Shortcut template assignment
When an email is archived, usually (depending on settings) just a shortcut is left behind in the Microsoft Exchange server. Administrator can configure shortcuts according to the company needs and define how the shortcuts should be displayed in the users Outlook preview.
Shortcut layout and type is specified through shortcut templates. These templates are created under Shortcut templates node (see the previous section).
Different users/groups can have different shortcut templates assigned on this tab.
|
|
NOTE: Default shortcut template can be specified also on the Tools/Options/Archive settings/Shortcut tab. If the default shortcut template is changed here it is changed also on that tab and vice versa. |
To assign a group/user specific shortcut template:
1.Right-click inside the main pain. From the context menu select Add group/Add mailbox.
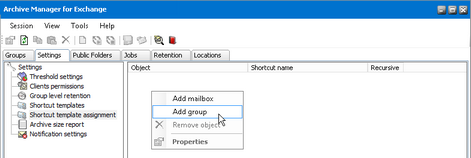
2.In the pop-up dialog select the desired group/user in the listview and click OK.
3.The group/user will be displayed in the listview with default settings specified. To adjust the settings right-click the group/user and from the context menu select Properties.
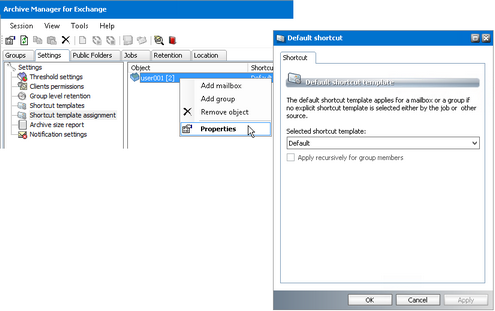
4.In the pop-up window select the desired template from the downdrop box. If applicable you can check the Apply recursively for group members check box to apply it also for possible subgroups. Then click Apply.
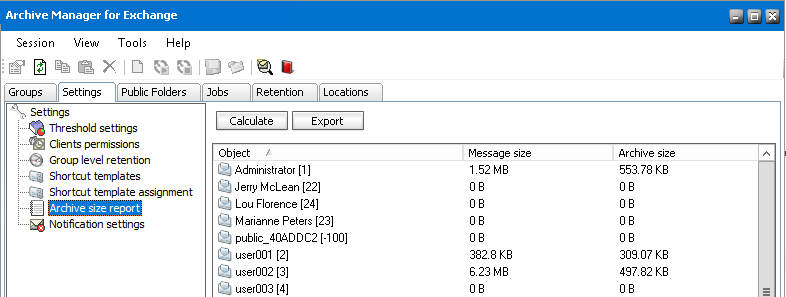
Archive size report
From time to time, administrators may need to know the status of users mailboxes, just to get an overview of the entire size of mailboxes in the HSM store. For that purpose they may easily create reports containing all relevant data.
When clicking on the Archive size report tab for the first time there will be no mailboxes displayed.
To display all mailboxes, click Calculate. The list of mailboxes will be displayed in the right pane, including message size, archived size, archived size uncompressed, shortcut size, and the limit of mailboxes as well. Mailboxes can be sorted simply by clicking on the respective column headers (Object, Message size, Archive size, Archive size uncompressed, Shortcut size, and Limit).
|
|
NOTE: The size of delayed shortcuts is not calculated in the Shortcut size column. |
To get an overview, create a report by clicking Export. The Export Wizard window will open with three options to choose from: All mailboxes, Filtered mailboxes, or Distribution lists with members, depending on whether you want to create a report including all the mailboxes, only filtered mailboxes, or distribution lists with members only. Detailed explanation is given in subsequent section.
How to create a report for all mailboxes, filtered mailboxes and distribution list
To get an overview of the HSM store, create a report by following these steps:
1.In Manager view, click on the Settings tab, and then on the Report tab.
2.Click on the Export button to create a report. On the first page of the Export Wizard, select:
a)All mailboxes option and then click Next.
b)Filtered mailboxes option and then click Next.
c)Distribution lists with members option and then click Next.

i.If you have selected All mailboxes option, go to step 3.
ii.If you have selected Filtered mailboxes option, then:
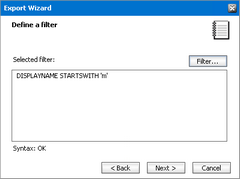
In the Define a filter window that opens simply click on the Filter button to either create a filter or select an already created one listed in the Selected filter list-box.
In the Filter window that pops up:
·either select an already existing filter in the Select filter dropdown box and then click OK;
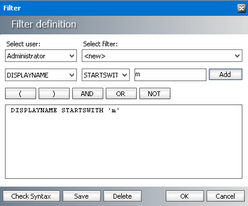
·or create your own by choosing RDN/ALIAS/DISPLAYNAME/EMAILADDRESS in the first dropdown menu, =/STARTSWITH/ENDSWITH/CONTAINS in the second dropdown menu, and entering text in the text box next to the Add button.
Then click on the Add button. If you want to combine some other conditions, simply use brackets and logical operators and confirm by clicking Add.
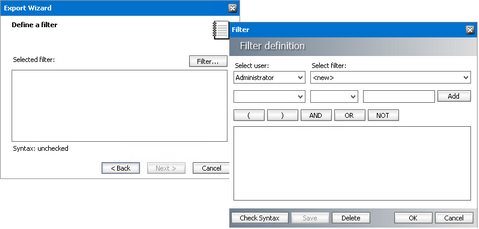
The resulting filter will be displayed in the text box below. To check the syntax, simply click on Check Syntax. Click Save to give this newly created filter a name, and confirm by clicking OK.
The resulting filter will be displayed in the Selected filter list box. Click Next and proceed to step 3.
iii.If you have selected Distribution lists with members option, then:
On the next page of the Export Wizard you may select the desired groups for your report. Simply select appropriate items in the Available Distribution lists list box and click the left-to-right arrow button. The respective items will subsequently be moved to the Use these DLs in this order list box.
·To include all groups, click on the left-to-right double-arrow button.
·To remove some of the groups and have them not included, select the respective item in the Use these DLs in this order list box and then click on the right-to-left arrow button.
·With the Move up and Move down buttons simply organize your report to your needs. Groups will be displayed in the report (Excel sheet) exactly in the order as specified in the Use these DLs in this order list box.
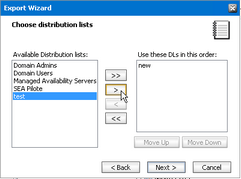
When you are satisfied with the list of groups listed in the Use these DLs in this order list box, proceed by clicking Next.
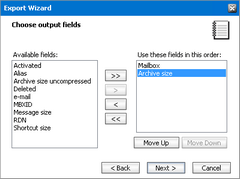
3.On the Choose output fields page in the Export Wizard you can select fields for your report. Simply select the desired item in the Available fields list box and click the left-to-right arrow button. The item will subsequently be moved to the Use these fields in this order list box.
·If you want to include all the fields in the report, click on the left-to-right double-arrow button.
·If you want to remove some of the fields and have them not included in the report, then select the respective item in the Use these fields in this order list box and then click on the right-to-left arrow button.
·With the Move up and Move down buttons simply organize your report to your needs. They will be displayed in the report (Excel sheet) exactly in the order as specified in the Use these fields in this order list box.
When you are satisfied with the selection of fields and their order, proceed by clicking Next.
4.On the next page you may specify the name of the exported file and the place it should be saved to. Just enter the path and appropriate name in the Select output file text box; or click on the Browse button to select the appropriate folder.
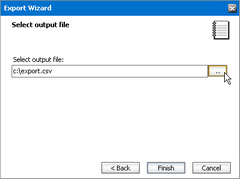
5.Then click Finish to see the full path displayed, including file-name.
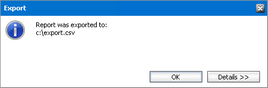
6.By clicking on the Details button, the details will be displayed. Click OK.
7.Having created the report, open it directly from the place you saved it to. (In our example from C:\export.csv)
|
|
NOTE: If the data in the report (Excel sheet) is contained in only one column, check if a proper delimiter has been set on the Others tab (see the "Others tab). |