
Create Rules
An InTrust real-time monitoring rule is a logical structure that is used to constantly analyze event flow, which is created by the InTrust agent on the monitored computer. As a result of the analysis, the rule either triggers further actions or does nothing.
If the rule detects the condition that it is designed for, this means that the rule is matched. In this case, possible actions are as follows:
-
Sending alerts
-
Running a program
-
Running a script
-
Launching an InTrust task
-
Setting an audit policy
-
Sending an SNMP trap
Every rule is implemented in XML with embedded scripts. The XML code for a rule has three distinct sections:
-
Parameter descriptions
This section describes rule parameters. Rule parameters are displayed in the user interface so that you can set their values with interactive controls. They are stored as variables for use in the matching script. The terms "parameter" and "argument" can be used interchangeably.
-
Optional pre-filtering script
This script filters events for matching. It minimizes the number of events the rule has to process by filtering out anything that the matching process does not have to consider. The script helps reduce bandwidth and optimize performance.
-
Matching script
This script processes pre-filtered data and either returns event records or does nothing depending on input. Event records are passed on to the InTrust framework and can be used in real-time monitoring alerts. Returning event records means that the matching process was successful, and InTrust takes all actions associated with a matched rule.
For details about the structure of a rule, see Rule Structure.
To create a real-time monitoring rule
-
Expand Real-Time Monitoring | Rules.
-
Right-click the necessary rule group and select New Rule.
-
In the New Rule Wizard that starts, select a data source type.
-
Select one of the predefined rule templates or the Custom Rule option.
-
Complete the wizard.
There are three ways to create a rule with the wizard, as follows:
-
Using a predefined template
-
Using a custom REL-based template
-
Using a custom ECMAScript-based template
Predefined templates cover most real-time monitoring situations. In addition, if a predefined template does something similar to what you need, but you want the rule's behavior to differ slightly, you can use the predefined template and edit the resulting rule later.
REL (rule expression language) is a built-in language designed specially for creating rules. For example, rules created using predefined templates are XML structures with embedded REL code.
REL and ECMAScript are both used for the same purpose, but have very different ideologies. The following table shows the pros and cons of each rule creation method.
| METHOD | ADVANTAGES | DISADVANTAGES |
|---|---|---|
|
Predefined templates |
|
|
|
Custom REL-based templates |
|
|
|
Custom ECMAScript-based templates |
|
|
For the matching script, it makes a difference where matching occurs—on the InTrust server side or on the agent side.
Matching on the server side enables you to use the local resources of the InTrust server, such as libraries and applications. Matching on the agent side lets you use the resources of the target computer and get additional information associated with collected data, if necessary. In either case, shared network resources are available to rules.
The following are examples of where server-side and agent-side rules can be useful:
-
Server side: depending on what events come in from a certain computer, you can look for related events on any other monitored computer to create complex alerts.
-
Agent side: you can easily create a rule for members of computer local administrative groups on a target computer.
Importing and Exporting Rules
You may want to make only minor changes to an existing rule. You may also want to use your own text file-based rule template instead of the custom rule wizard. In these situations, the import and export features of InTrust come in handy.
To export a rule to an XML file for further customization, right-click the rule in InTrust Manager and select Export.
To import a customized rule, use the InTrustPDOImport command-line utility, which is located in the <InTrust_installation_folder>\InTrust\Server\ADC\SupportTools folder on the InTrust Server computer.
See Also
Rule Structure
A real-time monitoring rule has the following XML structure:
<?xml version="1.0" encoding="utf-8" ?>
<rule type="REL" version="1.0" language="jscript">
<arguments>
<argument usedefault="true" name="sample_arg" description="" class="Text">
<value>sample_arg_value</value>
<default description="descr">
sample default value
</default>
</argument>
...
</arguments>
<prefilter>
...
</prefilter>
<body>
...
<parameter name="sample_arg"/>
...
</body>
</rule>
The <rule> tag pair encloses the entire rule and has the following attributes:
-
type
This attribute should always be "REL".
-
version
This attribute specifies the version of the scripting language used in the rule. For both languages, the current version is 1.0.
-
language
This attribute set whether or not the rule is ECMAScript-based or not. For ECMAScript-based rules it should be "jscript".
The <rule> tag pair encloses the following:
-
<arguments> tag pair
-
optional <prefilter> tag pair
-
<body> tag pair
Specifying Arguments
The <arguments> tag pair contains definitions of rule arguments and sets their default values. Inside the pair, each argument is represented by an <argument> tag pair with the following attributes:
-
name
The name of the argument. Use this name in the rule script to get the argument value.
-
description
Description of the argument. This attribute is optional. If specified, the description is displayed in the user interface.
-
class
Class, or data type, of the argument. This is a mandatory attribute. Supported classes are listed further on.
-
usedefault
Binary attribute specifying where the rule gets the argument value. If true, the value specified in the <default> tag pair is used. Otherwise, the value from the <value> tag pair is used. This attribute is optional. If you do not supply it, the value from the <value> tag pair is used.
Inside the <argument> tag pair, specify the following tag pairs:
-
<value>
The current value of the argument.
-
<default>
The value that is used if the argument is left unchanged. The <default> tag has an optional description attribute. Use this attribute to make the default value descriptive in the user interface.
Compare the following snippet of code and the way the user interface represents it in the rule properties on the Matching tab:
...
<arguments>
<argument name="Users" class="List" usedefault="true">
<default description="Any user">"*"</default>
<value>"Homer","Marge","Bart","Lisa","Maggie"</value>
</argument>
<argument name="Groups" class="List" usedefault="false">
<default description="Any group">"*"</default>
<value>"*\Administrators","Power Users"</value>
</argument>
<argument name="Time Period" class="DateTimeRange">
<value>"0/00/0 00:05:00"</value>
</argument>
</arguments>
...
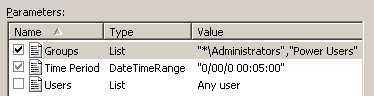
Notice that the check box next to the Users parameter is cleared, and the default value is used for the parameter. The value itself is not shown, but replaced with a description. The Groups parameter also has a default value, but it is not used in this case.
For details about supported parameter types, see Customizable Parameters.
Pre-Filtering
Use this section for server-side rules, for which this section is executed first on the agent side and then, if matching occurs, on the server side. If an event is matched during pre-filtering, then matching continues in the <body> section.
For agent-side rules, this section is ignored.
Enclose the script within the <prefilter> tag pair.
Matching
Specify the matching script within the <body> tag pair. Your script should do the following:
-
Use REL or ECMAScript syntax to describe the situation you are watching out for.
-
If the situation occurs, pass on the corresponding event.
-
If the situation does not occur, do nothing.
Matching in REL
If your rule uses REL, an expression defines whether the rule is matched, and represents the event record at the same time.
Matching in ECMAScript
If the rule uses ECMAScript, then the script should perform condition testing. In a typical situation, if the result of the test is true, the script should match the event that is passed to it. If the result is false, the script should execute a return statement.
The following three functions are essential for ECMAScript-based rule matching:
-
OnEvent()
This function identifies the incoming event so that the rule can work with it. The argument of the function is the object that represents the incoming event. -
match()
Call this function when condition testing yields true, and use the same argument as in OnEvent(). This ensures that you pass on the same event record that you tested for. This is the preferred use of match(), although you can deviate from this practice and modify event fields if necessary. -
print()
Use this function to debug your scripts. It outputs the values of its arguments to a trace file (ADCTRACE_RELMatcher*) if the tracing level is set to at least 30.
The trace file is written only if tracing is enabled. The RELMatcher setting in the adctracer.ini file controls tracing for this component. For details about tracing configuration, see InTrust Server Tracing.
|
|
Note: Rules are XML structures, so rule processing involves XML parsing. Script embedding can introduce two types of errors: XML code errors (preventing you from saving the code) and script code errors (causing the rule to fail). Mind that the actual script code to be executed is generated as a result of XML parsing. When typing or pasting script code inside the <prefilter> or <body> tag pairs, remember that the resulting code must be valid XML. Use metacharacters instead of characters that might break XML markup. On the other hand, make sure that the script code comes out as expected after the parsing. For more information about XML syntax, see http://www.w3.org/TR/REC-xml/#syntax. |

Examples
The following are examples of InTrust rule definitions in ECMAScript and REL.
ECMAScript
<rule type="REL" version="1.0" language="jscript">
<arguments>
<argument usedefault="false" name="IncludeFiles" description="Specify files that will be monitored by this rule. Note: you can use path masks." class="List">
<value>"*"</value>
<default description="">
default
</default>
</argument>
<argument usedefault="false" name="ExcludeFiles" description="Specify files that will be explicitly excluded from monitoring. Note: you can use path masks." class="List">
<value>"/etc/syslog.conf"</value>
<default description="">
default
</default>
</argument>
</arguments>
<prefilter>
</prefilter>
<body>
function MatchFile( strFileName, arrFileMasks )
{
print( "Matching file name:" + strFileName );
for( i = 0; i < arrFileMasks.length; ++ i )
{
var strMask = arrFileMasks[i];
print( "mask=" + strMask );
strMask = strMask.replace( /\\/g, "\\\\" );
strMask = strMask.replace( /\./g, "\\." );
strMask = strMask.replace( /\?/g, "." );
strMask = strMask.replace( /\*/g, ".*" );
print( "regexp=" + strMask );
var re = new RegExp( strMask, "g" );
if( null != re.exec( strFileName ) )
{
print( "file name matched" );
return true;
}
}
print( "file name is not matched" );
return false;
}
function OnEvent( e )
{
if( "TextFileModified" == e.Action )
{
print( e.Action );
var arrTextFiles = new Array( <parameter name="IncludeFiles"/> );
var arrExceptTextFiles = new Array( <parameter name="ExcludeFiles"/> );
if( !MatchFile( e.FileName, arrExceptTextFiles )
&& MatchFile( e.FileName, arrTextFiles ) )
{
match( e );
}
}
}
</body>
</rule>
Note the use of XML markup in the definition of the arrTextFiles and arrExceptTextFiles variables. This is not valid ECMAScript. However after the rule is parsed, the markup is substituted for the values of the relevant rule parameter, producing valid code.
REL
<?xml version="1.0"?>
<rule type="REL" version="1.0">
<arguments>
<argument name="AdmRightsList" class="List" description="A list of administrative user rights">
<value>"SeLoadDriverPrivilege", "SeBackupPrivilege", "SeDebugPrivilege", "SeRemoteShutdownPrivilege", "SeIncreaseQuotaPrivilege", "SeManageVolumePrivilege", "SeAuditPrivilege", "SeSecurityPrivilege", "SeTakeOwnershipPrivilege", "SeTcbPrivilege", "SeSystemtimePrivilege"</value>
</argument>
<argument name="Group List" class="List" description="A list of groups for managing user rights in an organization">
<value>"Administrators", "Account Operators", "Domain Admins", "Group Policy Creator Owner", "Enterprise Admins"</value>
</argument>
</arguments>
<prefilter>
(EventID = 608 or EventID = 609)
and striequ( Source, "security" );
</prefilter>
<body>
(EventID = 608 or EventID = 609)
and striequ( Source, "security" )
and in( String1, "wi", array(<parameter name="AdmRightsList"/>) )
and not member_of( strcat( String4, "\\", String3 ), array(<parameter name="Group List"/>), true );
</body>
</rule>
Script Response Actions
Response actions are defined for real-time monitoring rules. These actions are performed when rules are matched. InTrust provides the following response action types:
-
Execute script
-
Execute command
-
Run InTrust task
-
Send SNMP trap
-
Set audit policy
The "Execute script" response action type lets you define and perform your own actions that are not implemented by other response action types.
The script you use can do whatever you need, and it can be in whichever valid language you choose. The scope of the script's actions is defined by the object model available to it.
To configure a custom scripted response action
-
Create a new script object in the Configuration | Advanced | Scripts node of the InTrust Manager snap-in.
-
Supply a script that this object must contain.
-
Define and set parameters for the script.
-
Add an "Execute script" response action to the necessary rule, and add the new script object to it.
-
In the response action properties, establish a correspondence between the values that the rule returns and the parameters of the script.
The configuration objects in this brief scenario are explained in the following two subsections.
For details about InTrust script objects, see InTrust Script Objects.
"Execute Script" Response Action
Before using your custom script as a response action, you must ensure that the rule passes the correct data to it. The parameter list in the properties of the response action determines what values the rule makes available for use in response action scripts.
To specify parameters that the rule must expose
-
Make sure that the necessary script object exists, and its parameters are configured correctly.
-
Open the properties of the rule you need.
-
On the Response Actions tab of the properties dialog box, click Add, and add the script object.
When you complete the wizard that starts, the response action properties dialog box opens on the Settings tab. -
On the Settings tab, use the Edit button to specify what values (fixed or dynamic) the rule passes to the script.

Parameters for the list are read from the script object that you selected. At this stage, you assign values to existing script parameters.