
Introduction
Metalogix Archive Manager for Exchange is a comprehensive solution to consolidate, preserve, and retrieve your organization's emails from Microsoft Exchange Servers. This guide describes the information available to monitor and manage your deployment, the options, actions, and processes that you can leverage to archive emails, and the powerful search capability to locate and manage the archives.
Managing the deployment
Whether you have a single-instance or a load-balanced distributed deployment with multiple archive and retrieval servers, managing their health is centralized in the Archive Manager for Exchange Administration Center (AMAC). The AMAC gives you full control of automated archival jobs for user mailboxes and public folders, Microsoft Exchange Server synchronization, compression, retention and threshold settings for mailboxes and groups, and a host of other controls to fine-tune the solution to the needs of your organization.
Email archiving
When emails are archived with Archive Manager for Exchange, emails on the Microsoft Exchange Server or Office 365 are replaced by a shortcut. The original email and all its versions are stored in configurable external data stores. When you activate the Single Instance Store (SIS), duplicate copies of emails going to multiple users are automatically removed during the archival process. As a result, large amounts of corporate storage space is saved, dependency on PST files is eliminated and your Microsoft Exchange Server retains its stability by eliminating the unnecessary data.
Advanced search and eDiscovery
With the powerful search capability of the AMAC, you can retrieve emails on demand. You can conduct focused searches by name, date range, and specific words, and export the results for review. You can put selected groups of data on legal hold, or suspend them from disposition policies.
The Metalogix Archive Manager for Exchange solution offers a variety of installable features and extensions that simplify the collection, storage, availability, and protection of your organization's data.
PST protection and elimination
The PST Gatherer is an extension that complements the PST Importer feature to help you collect, upload, and archive PST files. Emails are safely archived and available on-demand even when working remotely and without changing the end users Outlook folder structure. You can eliminate corrupted files, password-protected files, and islands of information. For more information see the PST Importer Administration Guide.
Lifecycle management
You can capture, route, store, restore and manage archived emails externally with the Hierarchical Storage Management (HSM) archive engine. HSM automatically controls the retention policy of archived emails. The HSM engine can control a large range of external stores like DVD, CD-ROM, HDD, tape, SAN, Jukebox systems, EMC Centera, NetApp, JVC, and many other on-premise or cloud-based data storage solutions. You can move emails to cheaper locations as their relevance changes and keep the option of deleting old messages unless they are on legal hold. For more information see the Hierarchical Storage Management (HSM) Guide.
Disaster management and high availability
You can archive messages in parallel to multiple locations in real-time and provide a backup of the archive on-the-go. With HSM, you can quickly retrieve archived emails from either location and activate continuous off-site replication for deploying data disaster recovery, so end-users are covered in the event of an outage.
Online on-demand access
With ArchiveWeb installed, you can work with archived emails even if the Microsoft Exchange Server is unavailable. When you install the Outlook AddIn for your users, they can archive and restore their emails on the go. For more information see the MS Outlook Addin User Guide. With the Archive Manager Outlook Web Access (OWA) support emails are available to users online. For more information see the OWA Installation Guide. Also, mobile users, Mac users, and Linux users can work with archived emails when the Archive manager Universal Access extension is installed. For more information see the Universal Access Installation Guide.
About the Administration Center
The Archive Manager for Exchange Administration Center (AMAC) provides you with all the information available to monitor and manage your deployment, the options, actions, and processes that you can leverage to archive and work with emails, and a powerful search capability to locate and manage the archives.
In this chapter:
·Help
You can start the AMAC in two ways:
1.Login to the Archive Manager for Exchange server.
Unless you added and granted the necessary permission to additional users, you must login as the superuser to access the AMAC. A superuser account is a windows account with enterprise administrator privileges to work with the Archive Manager for Exchange administration tools, run services, manage databases, and manage extensions. It also has elevated privileges to interact with the on-premise or online Microsoft Exchange servers.
If the Archive Manager for Exchange server is connected to Office 365, you must login as the superuser.
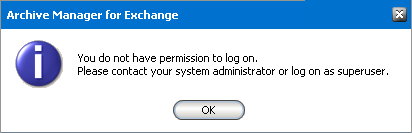
You can grant logon permissions to additional users from the Tools > Options > User Roles tab. For more information see Tools, Options and Settings. If you attempt to start the AMAC while logged on as another user without sufficient rights, a notification dialog appears which informs you that your user does not have enough permission to log on.
2.Go to Start > Programs > Metalogix and click Archive Manager for Exchange.
or
Go to C:\Program Files (x86)\Metalogix\MAM4Exchange\Applications\EnterpriseManager and click PamEnterpriseMan.exe
3.The AMAC opens and the Manager view is displayed.
Via Archive Manager for Exchange administrator can connect to and administer also other Archive Manager servers, if such are installed. To do so, on the Session menu click Connect to server. New window pops-up. Switch to Remote host and enter the name of the server you want to connect to in the Server name combo box. Then click OK.
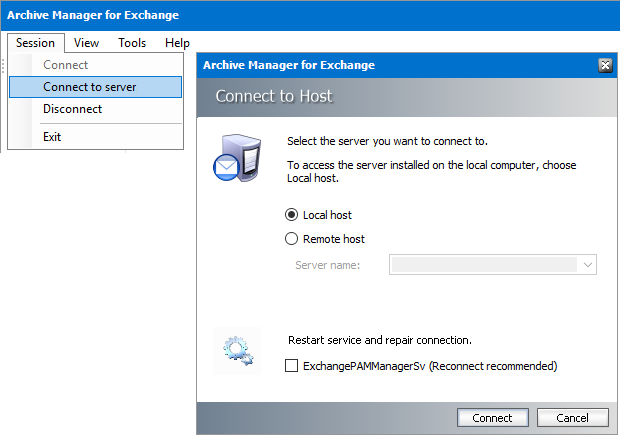
To access the server installed on the local computer, switch to Local host and click OK.
There are three views in the AMAC:
·Manager view - default view that provides you with all the capabilities to manage your deployment.
·Status view - provides the information to monitor and your deployment and start or stop services.
·Archive view - provides a full range of manual archival and retrieval features for mailboxes and public folders.
There are three ways to open or move between these views:
1.Use the following keyboard keys
·CTRL-1 for the Manager view.
·CTRL 2 for the Status view.
·CTRL 3 for the Archive view.
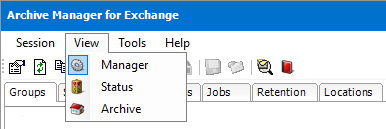
2.Open the View menu and select Manager, Status, or Archive
3.Click the respective icons in the lower left corner of the AMAC.
|
|
NOTE: AMAC can run in Full Access or Read-only mode. In the read-only mode the configuration is locked, but archive management through the Archive view is not affected. So in read-only mode you can manually archive and restore emails, but the settings cannot be changed. |

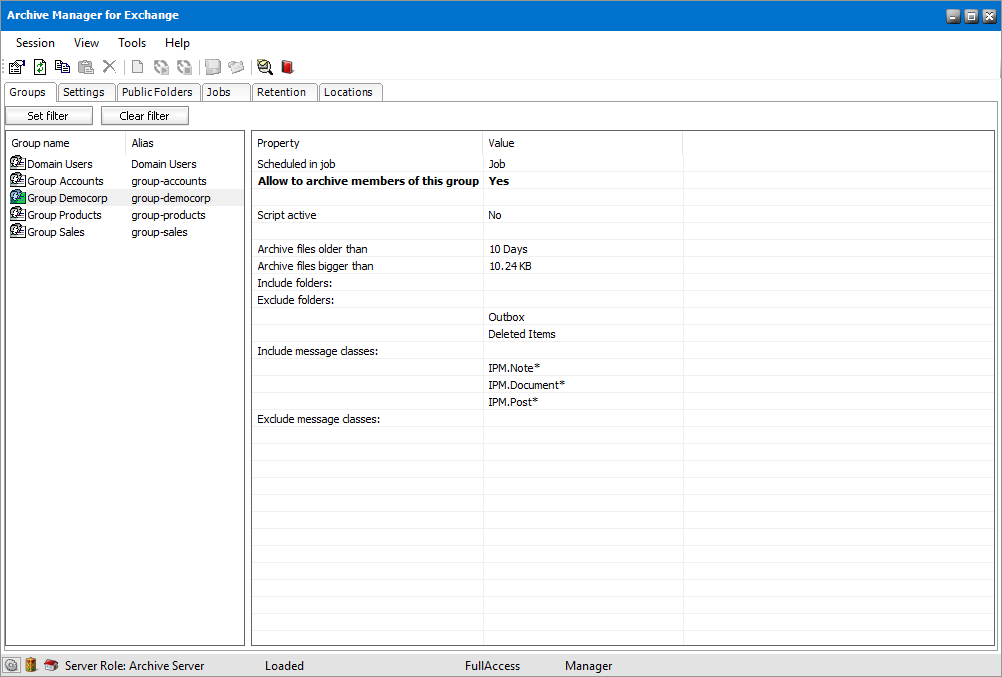
This is the default view. It is used to configure the automated archiving of mailbox user groups or public folders with jobs, scheduling jobs, configuring archive settings and manage the locations of several Archive Manager for Exchange servers in a distributed deployment. The image below displays the default Groups tab that helps you manage settings for various user groups. Notice that some groups are displayed in green. The green color indicates that the mailboxes of group members have been activated for automated archiving. For more information see Manager view.
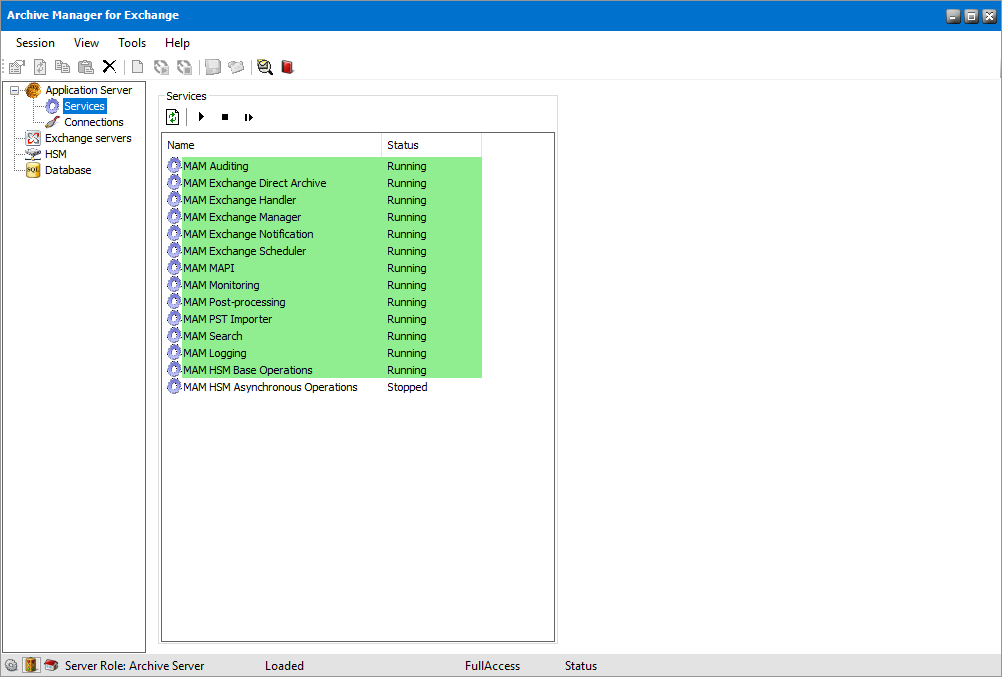
The Status view displays information about the critical components of your deployment like the the status of the Archive Manager for Exchange services, logged on users, the Hierarchical Storage Management (HSM) engine and the database. For more information see Status view.
This view is reserved for manual archiving or restoration of mailbox and public folder items. When you restore email items, the original item and its versions are retrieved from the archive store and copied to the Microsoft Exchange server. For more information see Archive view.

The toolbar provides set of smart icons for standard commands and functions. Smart icons are activated when you need to invoke a specific function in a specific view (e.g. Manager view, Groups tab, and others).

|
Image |
Name |
Description |
|
|
Properties |
If you want to check or define specific criteria for group archiving, just select the respective group on the Groups tab and click the Properties icon to open its Properties window. In the Properties window you may set your criteria on the respective General, Scheduler, Folders, Classes and the Script tabs. (See the section "Setting criteria for group archiving) If you want to check or define specific criteria for public folders, just select the respective public folder on the Public folders tab in Manager view and click on the Properties icon to open its Properties window. In the Properties window that is displayed you may set your criteria on the respective General, Scheduler, Classes, and the Script tabs. (See the section "Public folders tab) |
|
|
Refresh |
By clicking on this icon you will refresh the screen so that it is updated following the recently completed instruction. |
|
|
Copy settings |
By using this icon you may easily copy one group or public folder settings. |
|
|
Paste settings |
By using this icon you may easily paste one group or public folder copied settings to another. |
|
|
Remove |
This icon can be used for instance for removing mailboxes or groups from full-text search on the Settings tab in Manager view. In general, it is used for removing objects from different tabs under the Settings tab in Manager view, or for removing objects from the Jobs tab. |
|
|
Create new job |
Accessible from the Jobs tab in Manager view. By clicking on this icon you may create a new job simply by entering its specifications in the Job Settings window. |
|
|
Schedule job |
Accessible from the Jobs tab in Manager view. When a job is stopped you may schedule it easily by clicking on the Schedule job icon. |
|
|
Stop job |
Accessible from the Jobs tab in Manager view. When a job is scheduled you may stop it easily by clicking on the Stop job icon. |
|
|
Archive |
Accessible on the Mailboxes tab as well as Public folders tab in Archive view. This icon is used for manual archiving of individual emails, groups, folders, mailboxes etc. Just select the desired item and click on the Archive icon on the toolbar. The Archive options window opens and you can select the retention category under which the chosen item will be archived. |
|
|
Restore |
Accessible on the Mailboxes tab as well as Public folders tab in Archive view. This icon is used for the manual restoring of individual emails, groups, folders, mailboxes etc. Just select the desired item and click on the Restore icon on the toolbar. In the Restorer options window click on the Accept button. Archived mail will be restored and the respective shortcuts will be replaced with previous icons. |
|
|
Advanced search |
Accessible in all three views. If you need to search for some information in the archive, simply use the Search in archive icon on the toolbar (see further). |
|
|
Show legend |
Accessible in the Archive view. When you click this icon, the legend dialog pops up displaying all kinds of icons that you can see on the tabs of Archive view and the explanation for the icons. |
|
|
Address Book Manager |
Opens the Address Book Manager which synchronizes servers, groups and mailboxes with Archive Manager for Exchange (see the section "Address book Manager). |


This menu provides the administrative tools, options and settings to manage the application and preferences for the AMAC. The list of menu options are summarized below. For more information see Tools, Options and Settings.
·Mailbox Rights Manager - manages user access rights for the ArchiveWeb feature. ArchiveWeb is used for viewing and working with archived emails over the internet and includes full-text searching. For more information see Mailbox Rights Manager.
·Check Mailboxes - this command lets you check mailbox connections to the Microsoft Exchange Server. For more information see Check Mailboxes.
·Create folders - this wizard helps you create Outlook folders for your users. For more information see Create folders
·Export tasks - manages the export of items from the result set of the advanced search in the AMAC or ArchiveWeb, to a mailbox or PST file. For more information on how to export found items see Advanced Search.
·Statistics - helps the administrator get an overview of the number of items archived during specific hours, days, weeks, months, or years. For more information see Statistics.
·Address Book Manager - manages the synchronization of your servers, groups, mailboxes and their permissions with the Active Directory. For more information see Address Book Manager.
·Options and Settings - opens the configuration windows for configuring AMAC preferences. For more information see Options and Settings.
The Help option on the menu bar provides access to different information dialogs and assistance features.
The options in this menu are described below:
·About provides information about the current Archive Manager for Exchange version.
·License provides information about your license, its limit and the expiration date.
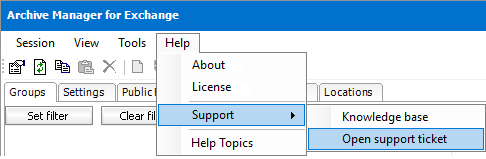
·Support provides a link to the Knowledge base articles on the Quest website. You can click the Open support ticket which directs you to the online support portal where you can submit a support request.
·Help Topics opens the Metalogix Archive Manager for Exchange Administration Guide.
Tools, Options and Settings
This chapter describes the administration tools, options and settings to manage the application, synchronization and preferences for the AMAC.
·Administration Tools
Mailbox Rights Manager
The Mailbox Rights Manager is a tool to manage the access rights for designated administrators of ArchiveWeb. Privileged users can use ArchiveWeb for viewing and working with archived emails over the internet and includes full-text searching. Archived mailboxes and folders are visible in ArchiveWeb even if the Microsoft Exchange Server or Office 365 is unavailable.
|
|
NOTE: You must synchronize the mailboxes and folders before you use the Mailbox Rights Manager tool. This will ensure that mailbox and folder permissions are available and applicable to ArchiveWeb. For more information about synchronization see Synchronizing Address Book Manager. To manage rights with the Mailbox Rights Manager tool, the logged in user must have the Modify Mailbox Permission role set to Allow. User roles are assigned in the Tools > Options > User Roles tab. |
About Mailbox Rights Manager
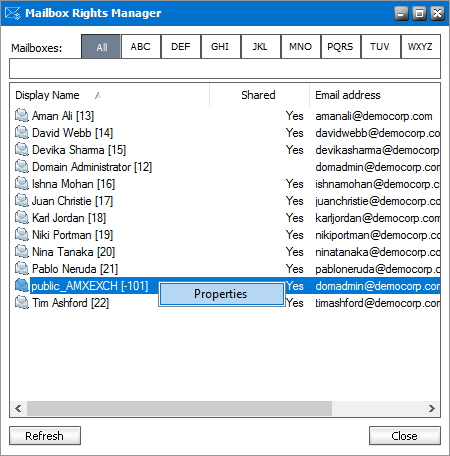
1.From the Tools menu, click Mailbox Rights Manager. The Mailbox Rights Manager window opens.
2.Click any tab to view the list of mailboxes by the preset alphabetical filter. The All tab is the default preset filter that returns all mailboxes
or
Enter the name of a mailbox in the search field below the tabs. You can also enter one or more letters to search for all mailboxes that contain the letters. Wildcards are not allowed.
|
|
NOTE: The Mailbox Rights Manager for individual mailboxes can also be opened from the Address Book Manager > Mailboxes tab where you right-click the mailbox from the list view and select Permissions. |
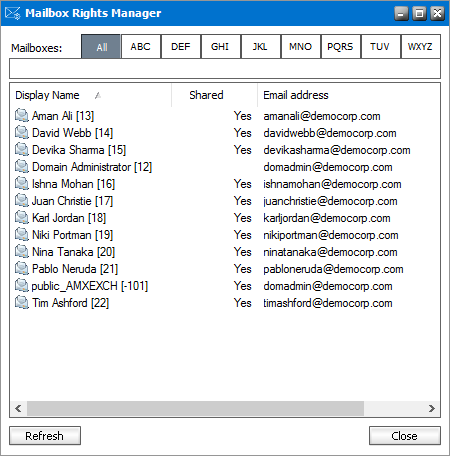
The list columns are described below:
a.Display Name - the display name of the synchronized mailboxes available to the tool.
b.Shared - indicates whether or not a listed mailbox is accessible to the logged in user. Yes indicates the logged in user has been granted rights to the mailbox. A blank value indicates the mailbox is either not shared or belongs to the logged in user. In the figure above, the logged in user is the domain administrator. Since the logged in user cannot assign access rights to their own mailbox, the value is blank.
c.Email address - the email address of the synchronized mailbox.
3.Click the Refresh button to reload the search result or click Close to exit the window.
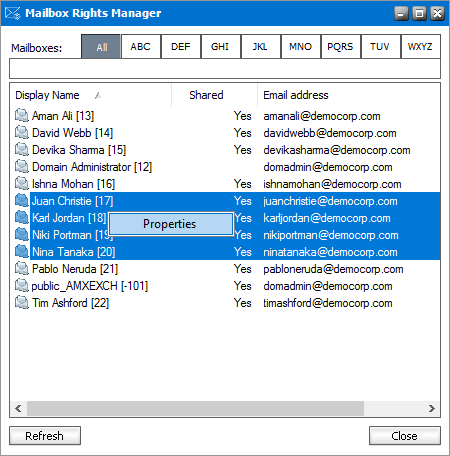
Steps to grant access rights to mailboxes
1.Open the Mailbox Rights Manager.
2.Locate one or more mailboxes that you want to share with the users through ArchiveWeb.
3.Select a single mailbox or press ctrl on your keypad and select multiple mailboxes that you want to share.
4.Right-click the selection and click Properties from the context menu.
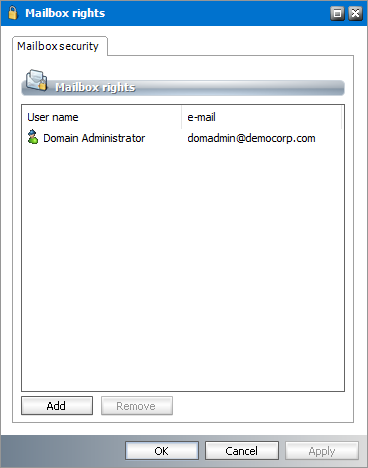
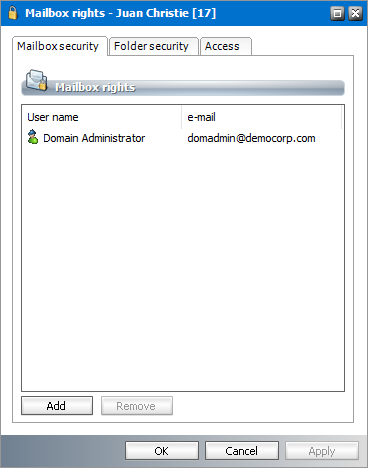
5.The Mailbox Rights window opens. If you selected multiple mailboxes, the Mailbox Rights window opens and displays the the Mailbox security tab. If you selected multiple mailboxes, you will see additional tabs that are explained later in this topic. To share the rights to mailboxes, only the Mailbox security tab is relevant. If the mailbox was previously shared, the list of all users who have the rights to the mailbox(es) will be listed.
|
Figure a. Only the mailbox security tab appears when multiple mailboxes are selected |
Figure b. Additional tabs appear when a single mailbox is selected |
6.To grant rights to additional users, click Add. The Select mailbox window opens.
7.Select one or more users who will be granted the rights to the mailbox(es). Then click 

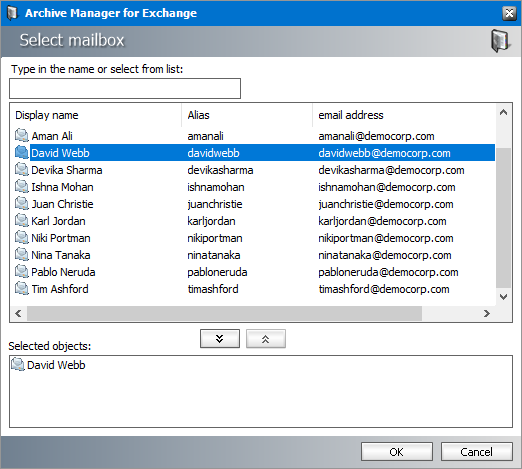
8.Click OK to grant the rights to the users who are listed in the Selected objects list.
9.Verify that the additional users were granted the rights to share the selected mailbox(es). When mailboxes are shared using the Mailbox Rights Manager tool, the users that are granted the rights appear in bold font. If a mailbox was shared through permission settings in the Microsoft Exchange Server or Office 365, the users appear in normal font.

10.To revoke access rights to a mailbox, select a user from the Mailbox rights list and click Remove.
11.Click OK to close the window.
Steps to grant access rights to mailbox folders
1.Open the Mailbox Rights Manager.
2.Locate the mailbox that you want to share with the users through ArchiveWeb.
3.Select a mailbox and right-click the selection. Then click Properties from the context menu. The Mailbox Rights window opens. The window title indicates the mailbox name and the mailbox identifier.
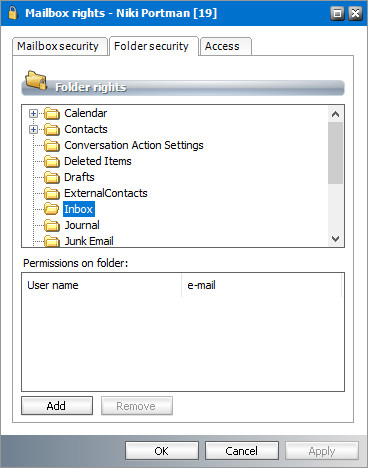
4.Click the Folder security tab.
5.Select the folder that you want to share with other users. Only one folder can be selected at a time.
6.To grant rights to additional users, click Add. The Select mailbox window opens.
7.Select one or more users who will be granted the rights to the folder and click
8.Click OK to grant the rights to the users who are listed in the Selected objects list.
9.Verify that the additional users were granted the rights to share the selected folder. When a folder is shared using the Mailbox Rights Manager tool, the users that are granted the rights appear in bold font. If a folder was shared through permission settings in the Microsoft Exchange Server or Office 365, the users appear in normal font. The shared folder is indicated with a green folder icon.
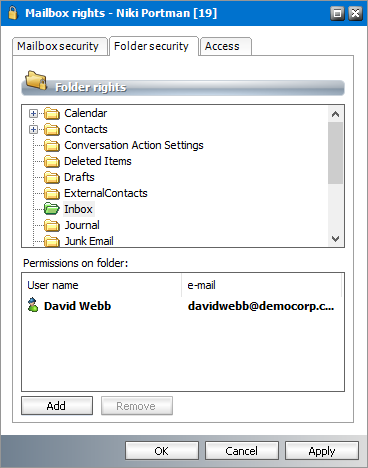
10.To grant the same permission to all subfolders, right-click the folder and click Apply to subfolders from the context menu.
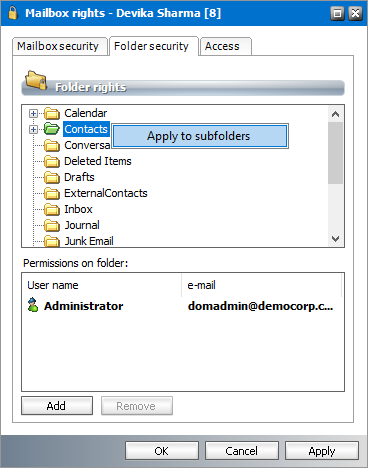
11.Verify the result and click OK to close the window.
Steps to grant access rights to public folders
1.Open the Mailbox Rights Manager.
2.Locate the public folder mailbox that contain the public folders you want to share with the users through ArchiveWeb.
3.Select the public folder mailbox and right-click the selection. Then click Properties from the context menu. The Mailbox Rights window opens. The window title indicates the mailbox name and the mailbox identifier.
4.Click the Folder security tab.
5.Select the public folder that you want to share with other users. Only one folder can be selected at a time. A green icon indicates that a public folder has been shared.
6.To grant rights to additional users, click Add. The Select mailbox window opens.
7.Select one or more users who will be granted the rights to the mailbox(es) and click
8.Click OK to grant the rights to the users who are listed in the Selected objects list.
9.Verify that the additional users were granted the rights to share the selected folder.

10.To grant the same permission to all subfolders, right-click the folder and click Apply to subfolders from the context menu.
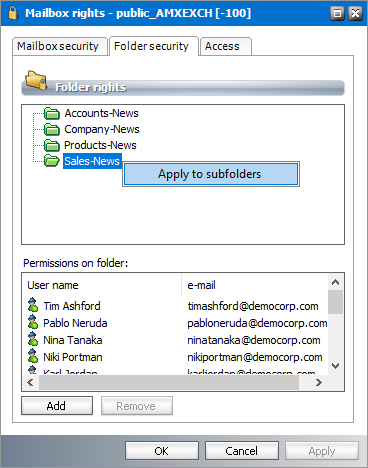
11.Click OK to close the window.
Steps to view the access rights of a user
1.Open the Mailbox Rights Manager.
2.Locate the user and right-click the selected mailbox. Then click Properties from the context menu. The Mailbox Rights window opens. The window title indicates the mailbox name and the mailbox identifier.
3.Click the Access tab to view all the mailboxes and folders that are shared with this user.
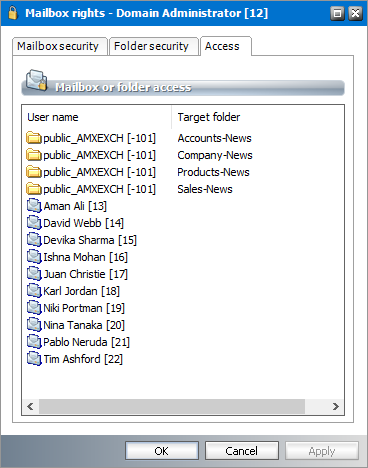
4.Click OK to close the window. If you click Cancel the window closes and any changes you may have made in other tabs that were not saved will be rejected.