In this topic:
|

|
NOTE: The Accounts and User Data migration workspace is common for the Accounts, Mailbox and OneDrive migration services, and the Desktop Agents. |
Dashboard
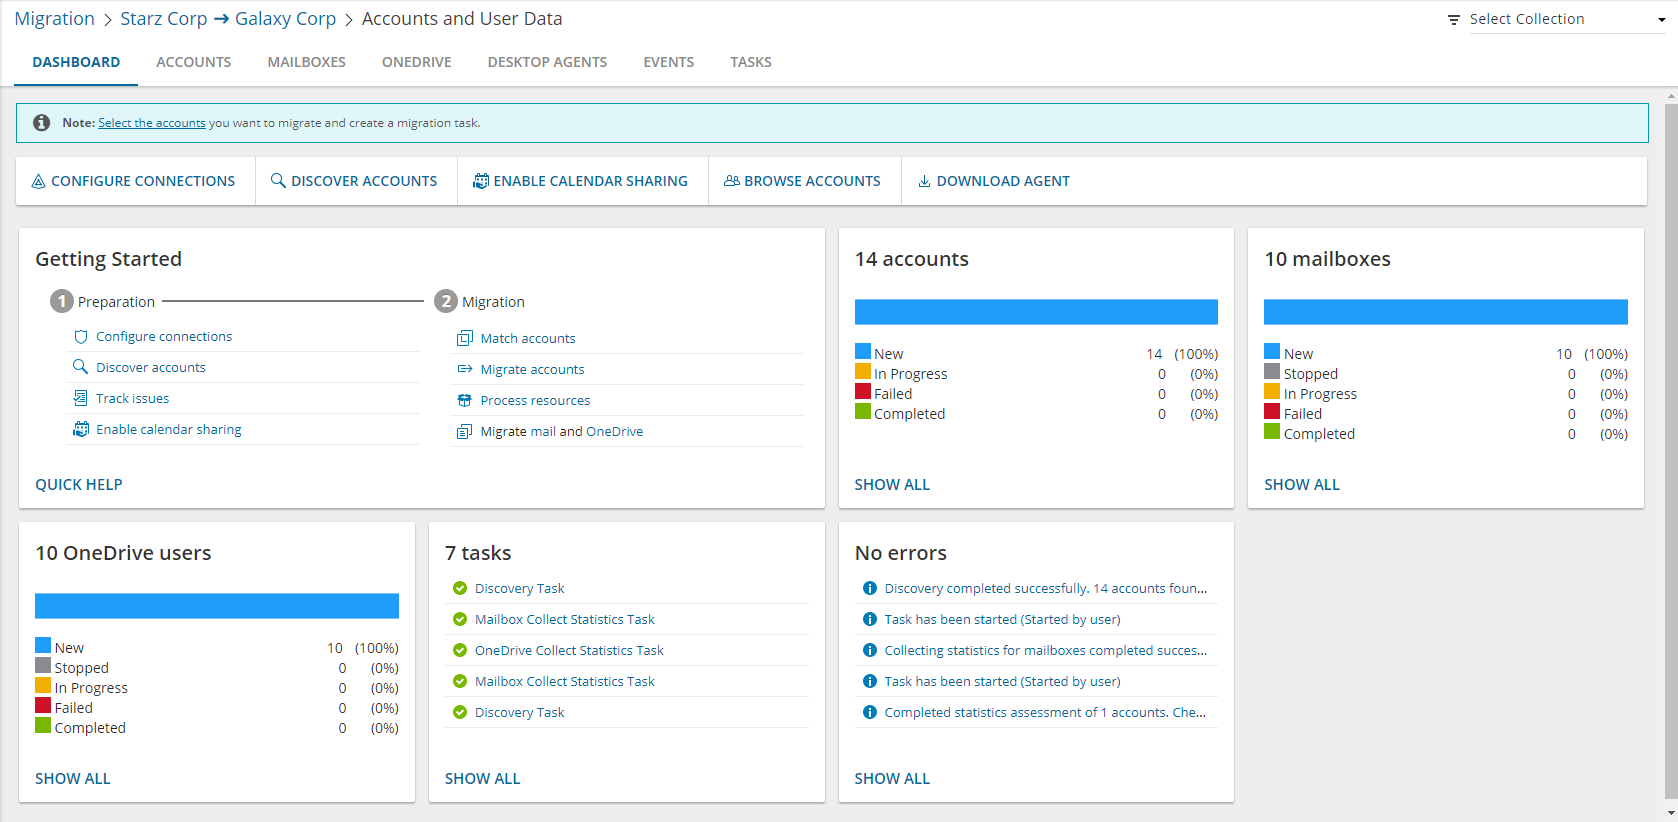
The components of the dashboard are as described below:
Notification panel - presents relevant information and shortcuts to migration activities.
Dashboard Menu - contains the following links to common activities in the migration process.
- Configure connections - You can configure granular permissions for the source and target tenants in addition to advanced configurations such as concurrent PowerShell connections and custom EWS URL specification. For more information see .Configuring Connections
- Discover accounts - Starts the New Account Discovery Task wizard to collect information about accounts in the source tenant. For more information see Discovering Accounts.
- Enable calendar sharing - Starts the New Calendar Sharing Task wizard to allow users to retrieve calendar availability information after migration. For more information see Calendar Sharing.
- Browse accounts - Opens the Accounts List view where you can search and filter for accounts, and manage all the account migration activities. For more information see
- Download agent - Allows you to download a lightweight user desktop application (update agent) for users workstations that is needed to complete a migration project.
Dashboard Tiles
- Getting Started - Presents quick start links to the various actions for preparing and migrating accounts.
- Accounts - Presents a summary of the accounts in various migration states. Click Show All to open the Accounts List view to inspect the accounts.
- Mailboxes - Presents a summary of the mailboxes in various migration states. Click Show All to open the Mailboxes List view to inspect the mailboxes.
- OneDrive - Presents a summary of users with OneDrive in various migration states. Click Show All to open the OneDrive List view to inspect the OneDrive information.
- Tasks - Displays the five most recent tasks that were completed in the Accounts and User Data migration workspace. The title displays the total number of tasks. Click Show All to open the Tasks List view.
- Events - Displays the five most recent events that were completed in the Accounts and User Data migration workspace. The title displays the total number of events. Click Show All to open the Events List view .
Accounts List View
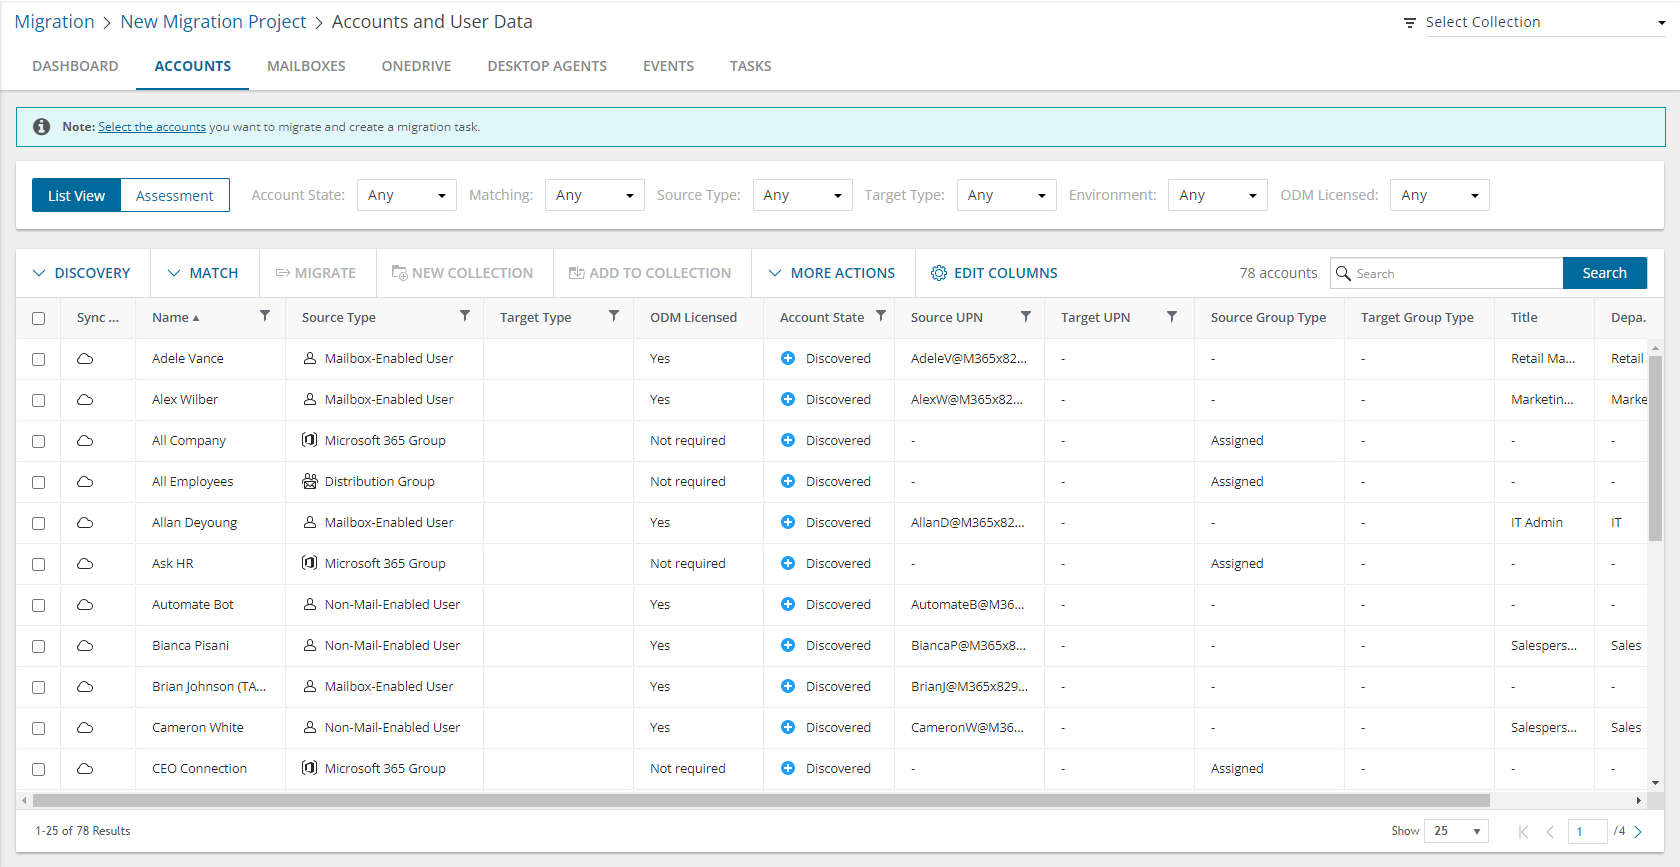
The Accounts List View is comprised of the following components:
Notification panel - presents relevant information and shortcuts to migration activities.
Filter panel - consists of predefined filters for the Accounts List view and tabs to switch between the Accounts List view and the Assessment view. SeeFiltering for more information about working with filters. The predefined filters are:
- Account State - returns a list of Accounts by specific state values. See Account State column description in the List View below for a list of values.
- Matching - returns a list of Accounts by source accounts that are matched with a target account. Valid values are Any, Matched and Not matched.
- Source Type and Target Type - search by specific account types as defined in Active Directory.
- Any
- User accounts like Guest, Mailbox-enabled, Mail-enabled and Non-mail-enabled.
- Resource mailboxes like Equipment, Room, Scheduled and Shared.
- Groups like Distribution, Mail-enabled-security, Microsoft 365 Group - Dynamic, Microsoft 365 - Assigned, Security - Dynamic, Security - Assigned, Teams - Dynamic and Teams - Assigned.
- Environment - returns a list of Accounts by location of the Active Directory with which the account is synchronized. Valid values are Synced with Active Directory (synchronized with on-premise Active Directory) and In Cloud (synchronized with Azure Active Directory). This filter corresponds to the Sync Status column in the Accounts list.
- ODM Licensed - returns a list of Accounts by license utilization. Valid values are Yes, No, Not required.
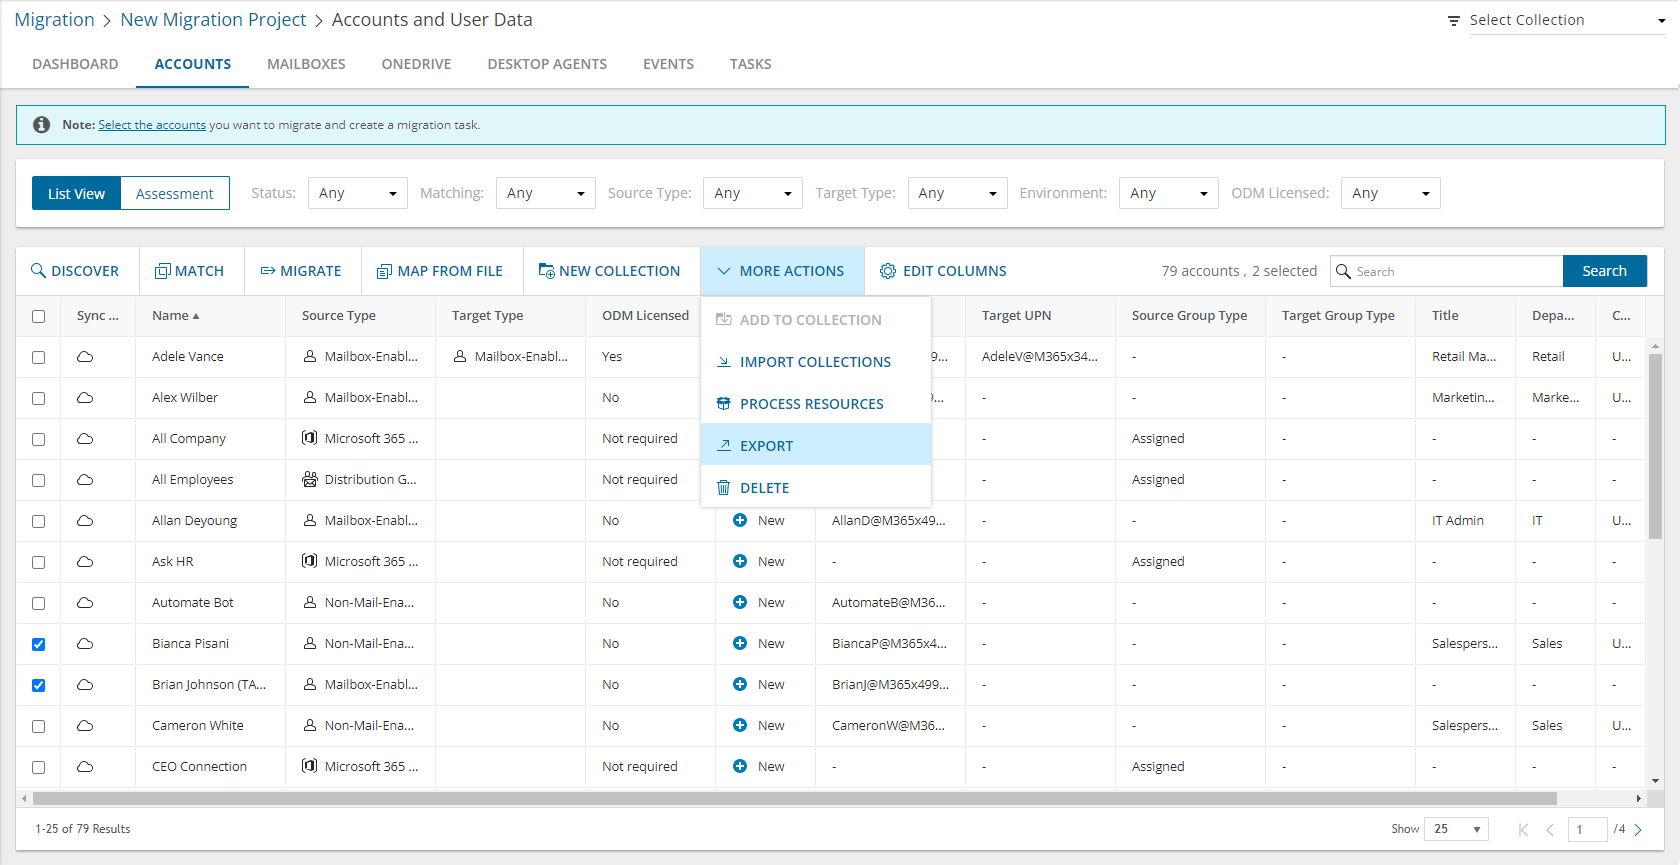
List View Actions Menu - contains links to account migration activities and the search box. Each action is explained in greater detail in subsequent topics. See Searching for more information about working with the search box.
List View - displays information about accounts in the source tenant and the migration status of each account. Some columns are hidden by default. Use Edit Columns to show or hide columns in the list. The columns are as described below:
|
|
NOTE: If you don't see the Sync Status or object description in the Type column, rerun the account discovery task as indicated in the Notification panel. |
- Sync Status - indicates whether the account is synchronized with the on-premise Active Directory or Azure Active Directory. The tool tip displays the status value.
- Name - name of the account
- Source Type - account type defined in Microsoft Active Directory for the source tenant. The account type can be one of the following:
- Any
- User accounts like Guest, Mailbox-enabled, Mail-enabled and Non-mail-enabled.
- Resource mailboxes like Equipment, Room, Scheduled and Shared.
- Groups like Distribution, Mail-enabled-security, Microsoft 365 Group, Security Group, Teams.
- Target Type - account type defined in Microsoft Active Directory for the target tenant. The account type can be one of the following:
- Any
- User accounts like Guest, Mailbox-enabled, Mail-enabled and Non-mail-enabled.
- Resource mailboxes like Equipment, Room, Scheduled and Shared.
- Groups like Distribution, Mail-enabled-security, Microsoft 365 Group, Security Group, Teams.
- ODM Licensed - indicates whether or not an On Demand Migration license has been consumed when the migration task is started. Values are Yes, No, Not required.
- Status - status of the most recent task that was run for this account. Valid values are New, Stopped, In Progress, Failed and Completed. The Status column displays a progress bar that tracks the update for each account when the Matching and Migration tasks are running.
- Account State - tracks the state of the account migration from source to target tenant. The column values are as follows:
| Discovered |
Account has been discovered in the source tenant. |
| Matching |
Account is being matched. |
| Match failed |
Account matching failed |
| Matched |
Account has been successfully matched. |
| Migrating |
Migration of this object has started. |
| Migration failed |
Migration did not succeed |
| Migration stopped |
Migration canceled by the user |
| Migrated with Issues |
Migration completed with errors. |
| Migrated |
Migration is complete and successful. |
- Source UPN - User Principal Name (UPN) of the source account.
- Target UPN - User Principal Name (UPN) of the target account.
- Source Group Type - group membership type in the source tenant. Valid values are Assigned or Dynamic.
- Assigned - indicates that members are manually added or removed from the group.
- Dynamic - indicates that users are added or removed dynamically once the membership rules are defined.
- Target Group Type - group membership type in the target tenant. Valid values are Assigned or Dynamic.
- Assigned - indicates that members are manually added or removed from the group.
- Dynamic - indicates that users are added or removed dynamically once the membership rules are defined.
- Title - Job title of the user account. Does not apply to group accounts.
- Department - department of the user account. Does not apply to group accounts.
- Country - country of the user account. Does not apply to group accounts.
- City - city of the user account. Does not apply to group accounts.
Accounts Assessment
Contains summary reports about the discovered data to analyze your domain structure and track potential problems, misconfiguration, and risks that might adversely affect the migration. For more information see Assessment.
Account Details
When you select an account from the List View, the Account Detail pane opens. The information in the pane is described below:
- Source Email - email address of the selected account in the source tenant.
- Target Email - email address of the selected account in the target tenant.
- Collections - list of collections that contain the selected account.
- Status - status of the selected account. Valid values are New, In Progress, Failed and Completed.
- Events - count of the events that occurred during account processing through one or more tasks.
- Tasks - list of tasks invoked for the selected account.
You can re-configure connections from the account migration Dashboard as described below.
To configure connections for source and target tenants:
- Log in to Quest On Demand and choose an organization if you have set up multiple organizations.
- From the navigation pane, click Migration to open the My Projects list.
- Create a new project or open an existing project.
- Click Accounts. The Accounts and User Data Dashboard opens.
- Click Configure Connections from the Accounts and User Data Dashboard ribbon.
- From the Configure Connection wizard select the source or target tenant that you want to configure and click Edit.
- Target tenant only: Grant optional feature permissions
To activate the ability to provision OneDrive accounts in the target tenant using another Azure user account that has the SharePoint Administrator role, enter the credentials as required.
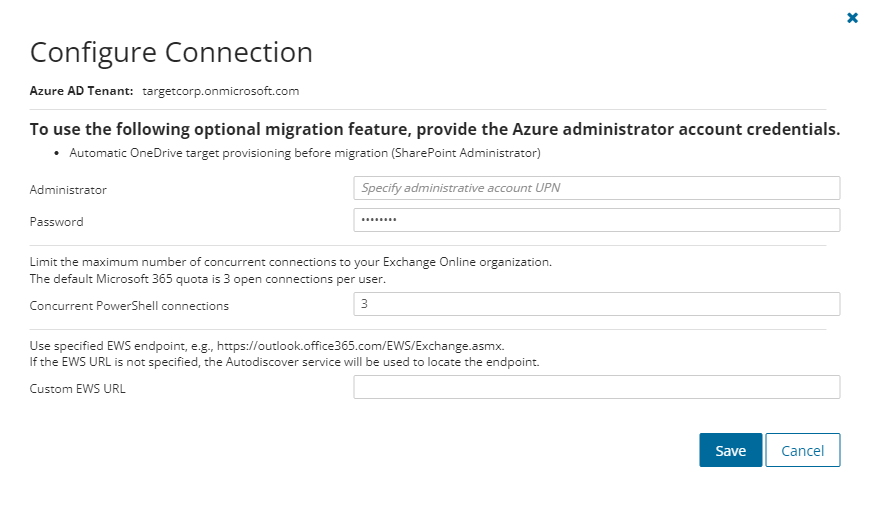
- Concurrent PowerShell connections
You can increase Concurrent PowerShell connections settings to speed up the concurrent tasks completion or set the value in case of editing of the migration projects that have been created in previous versions of the On Demand Migration. The default Microsoft 365 quota is 3 open connections per user.
|

|
Caution: Do not exceed the maximum number of concurrent PowerShell connections allowed for your organization to avoid throttling issues. To increase the maximum number of allowed concurrent connections open a support ticket with Microsoft. |
- Specify custom EWS URL
Specify custom EWS endpoint for connecting to Exchange Web Services (EWS), if you do not want to use EWS endpoint located by the Auto-discover service automatically.
- Click Save to commit your changes.
- When both source and target connections are configured, click Finish.
Discovering accounts is a critical first step before a migration to enumerate, update and retrieve relevant information about accounts from the source tenant. The discovery task collects the necessary account data and statistics on connected mailboxes from your source tenant to avoid misconfiguration and prevent possible issues.
|
|
NOTE: Account discovery is deactivated if basic migration consents are missing from either the source or the target tenant.
If there are user or group accounts from a previous discovery task that you don't want anymore, you can manually delete the accounts from the Accounts list (Accounts tab > List View). If there are changes to an account from a previous discovery, the account will be updated if the account is rediscovered by the task. |
In this topic:
Discovering all accounts automatically
- Log in to Quest On Demand and choose an organization if you have set up multiple organizations.
- From the navigation pane, click Migration to open the My Projects list.
- Create a new project or open an existing project.
- From the Accounts tile on the project dashboard click Open. The Accounts and User data migration workspace opens.
- Open the Accounts tab . From the List View menu, click Discovery and then select Discover All. The New Account Discovery Task wizard starts.
- Step 1: Notification
- Send notification email once the task is completed - select this option to send a notification email when a discovery task completes.
- Only in a case of failure - Select this option to send the email if the discovery task fails to complete successfully.
- Recipients - enter the email address of the recipients of this email. You can specify multiple recipient email addresses separated by semicolon.
- Click Next.
- Step 2: Schedule
- Choose from one of three options to schedule the task. The scheduler will be activated only after you complete the task wizard.
- Run now - task runs immediately.
- Run later - task must be started manually.
- Schedule - task will be started at a future date and time entered in the corresponding calendar field.
- Click Next.
- Step 3: Summary
- Verify the task specifications as described below:
- Name - name of the task. You can specify a custom name. Default name is Account Discovery Task.
- Source tenant - name of the source tenant in this project.
- Discover Type - discovery option that is selected. Value is set to All.
- Scheduled start - date and time when the task will start. Now indicates that the task will start immediately.
- Click Back to revise or review a previous step or click Finish to complete the task wizard. The task will start as scheduled.
The migration task is created. You can track its progress from the Tasks tab, view the summary on the Dashboard or monitor alerts and notifications from the Events tab. When the discovery task is complete, a summary about the accounts discovered in the source tenant is available on the project dashboard.
Discovering accounts from a file
When you have a large set of accounts but you want to discover a subset of those accounts, the CSV file lets you specify the accounts (users and Microsoft 365 groups) that you want to discover and ignore the rest. You can then use this file in the New Account Discovery Task wizard.
To prepare the CSV file:
- Log in to the Microsoft 365 admin center (https://admin.microsoft.com) with the credentials of your source tenant administrator.
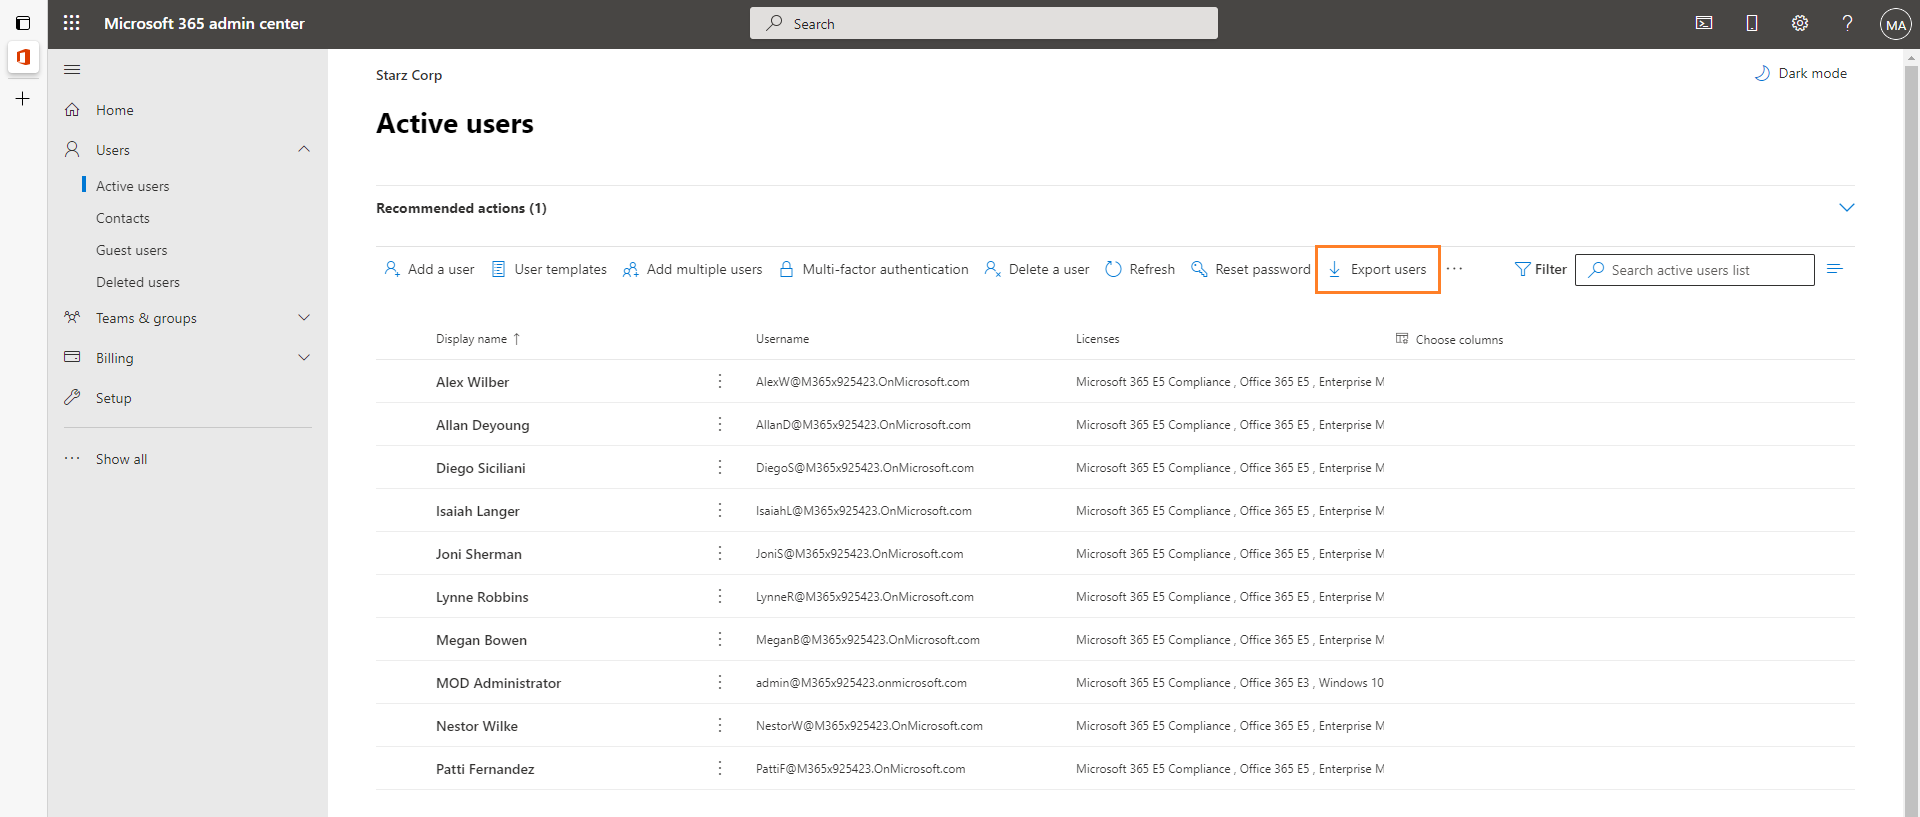
- Export Users:
- From the navigation pane, click Active users.
- If needed, you can filter the set of users that you want to export. Then click Export. A Users_<timestamp>.csv file will be downloaded to your computer.
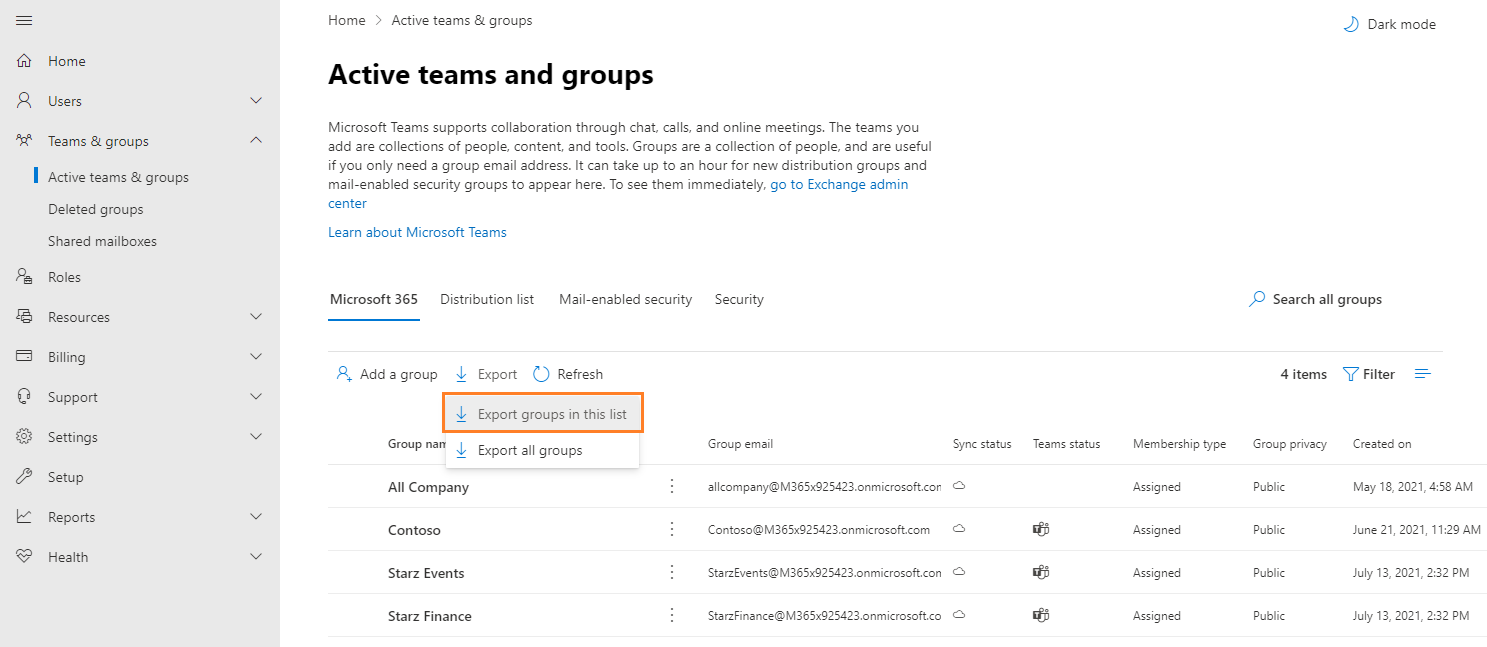
- Export Groups:
- From the navigation pane, click Active teams and groups.
- Select the Microsoft 365 tab in the Active teams and groups page.
- If needed, you can filter the set of groups that you want to export. Click Export and then click Export groups in this list. A Groups.csv file will be downloaded to your computer.
- Create a new CSV file and add the user accounts and groups with accounts you want to discover. You can use any of the two formats shown below:
|
|
NOTE:
- You can download a CSV template for either of the two formats when you start the New Account Discovery Task wizard and click Download Example File from the Discovery Options step.
- CSV file names with non-ASCII characters are not supported.
|
Format 1
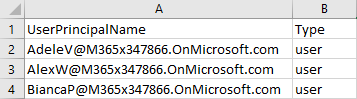
UserPrincipalName - Column header for the login name for a user account based on the Internet standard RFC 822. Do not use a mail nickname or proxy address.
Format 2

ObjectId - Column header for the globally unique identifier (GUID) of the user or group object. When you use ObjectId as the column header, you must specify object GUIDs only. You cannot specify UPNs.
Type - Column header for the type of account: user or Microsoft 365 group.
- Save the CSV file. You may rename the file if needed.
To run the account discovery task:
- Log in to Quest On Demand and choose an organization if you have set up multiple organizations.
- From the navigation pane, click Migration to open the My Projects list.
- Create a new project or open an existing project.
- From the Accounts tile on the project dashboard click Open. The Accounts and User data migration workspace opens.
- Open the Accounts tab . From the List View menu, click Discovery and then select Discover From File. The New Account Discovery Taskwizard starts.
- Step 1: Discovery Options
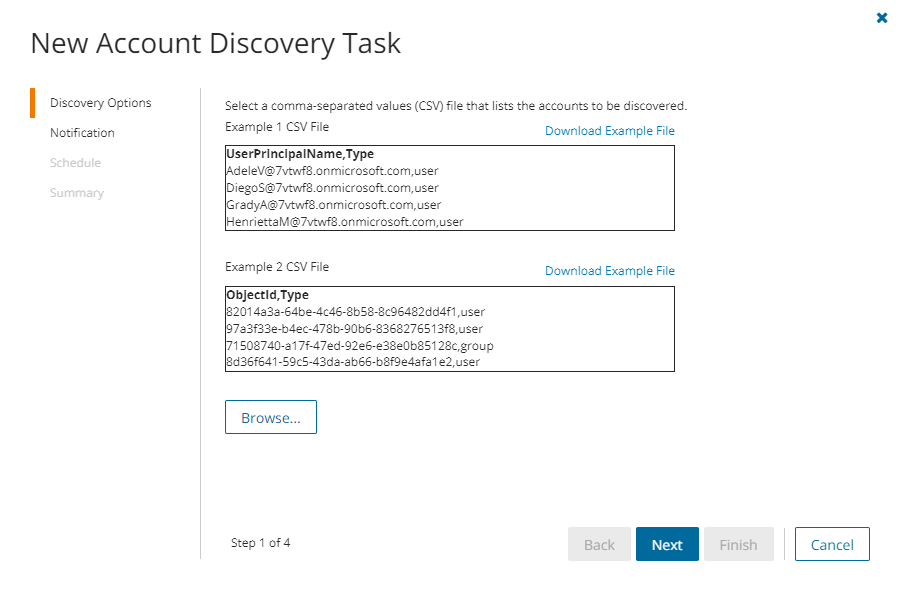
- Click Browse to choose the comma-separated values (CSV) file that contains the lists of user accounts and group identifiers.
- Click Next.
- Step 2: Notification
- Send notification email once the task is completed - select this option to send a notification email when a discovery task completes.
- Only in a case of failure - Select this option to send the email if the discovery task fails to complete successfully.
- Recipients - enter the email address of the recipients of this email. You can specify multiple recipient email addresses separated by semicolon.
- Click Next.
- Step 3: Schedule
- Choose from one of three options to schedule the task. The scheduler will be activated only after you complete the task wizard.
- Run now - task runs immediately.
- Run later - task must be started manually.
- Schedule - task will be started at a future date and time entered in the corresponding calendar field.
- Click Next.
- Step 4: Summary
- Verify the task specifications as described below:
- Name - name of the task. You can specify a custom name. Default name is Account Discovery Task.
- Source tenant - name of the source tenant in this project.
- Discover Type - discovery option that is selected. Value is set to Using CSV file.
- Scheduled start - date and time when the task will start. Now indicates that the task will start immediately.
- Click Back to revise or review a previous step or click Finish to complete the task wizard. The task will start as scheduled.
The migration task is created. You can track its progress from the Tasks tab, view the summary on the Dashboard or monitor alerts and notifications from the Events tab. When the discovery task is complete, a summary about the accounts discovered in the source tenant is available on the project dashboard.
Discovering accounts from a file using security groups
When you need to limit an application's access to a specific set of mailboxes, use this option to include the security groups in a CSV file. You can then use this file in the New Discovery Task as described in this topic to discover the accounts from the source tenant. Application access policies can be assigned to these discovered groups to restrict access to the group members only.
To prepare the CSV file:
- Log in to the Microsoft 365 admin center (https://admin.microsoft.com) with the credentials of your source tenant administrator.
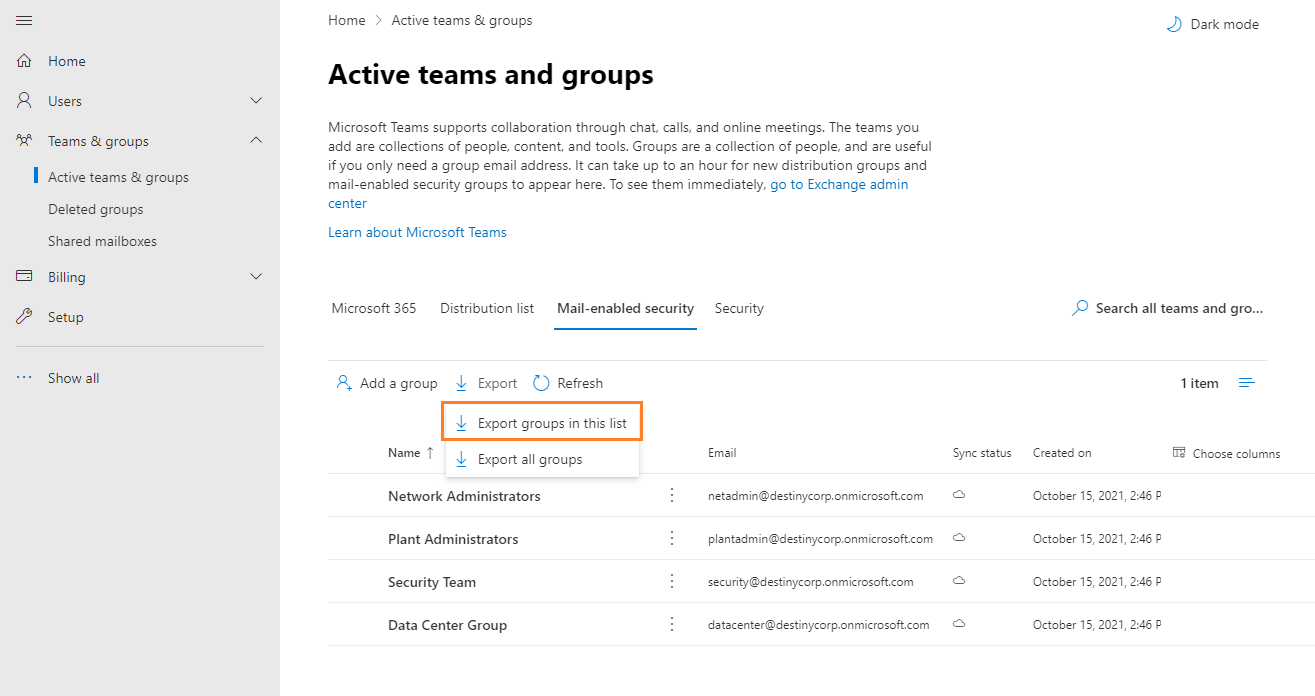
- Export Security Groups:
- From the navigation pane, click Teams and groups.
- Select the Mail-enabled security tab in the Active teams and groups page.
- If needed, you can filter the set of groups that you want to export. Click Export and then click Export groups in this list. A Groups.csv file will be downloaded to your computer.
- Create a new CSV file and add the email ids of the security groups with the member accounts you want to discover.
|
|
NOTE:
- You can download a CSV template when you select Discover From Security Groups and start the New Account Discovery Task wizard.
- CSV file names with non-ASCII characters are not supported.
|
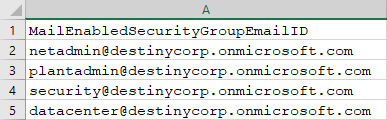
MailEnabledSecurityGroupEmailID - Column header for email IDs of the security groups.
- Save the CSV file that you created.
To run the account discovery task:
- Log in to Quest On Demand and choose an organization if you have set up multiple organizations.
- From the navigation pane, click Migration to open the My Projects list.
- Create a new project or open an existing project.
- From the Accounts tile on the project dashboard click Open. The Accounts and User data migration workspace opens.
- Open the Accounts tab . From the List View menu, click Discovery and then select Discover From Security Groups. The New Account Discovery Taskwizard starts.
- Step 1: Discovery Options

- Click Browse to choose the comma-separated values (CSV) file that contains the list of email IDs of the security groups.
- Create application access policy for provided groups - select this option to create an application access policy for groups when it is necessary to restrict access to group members only, when migrating account mailboxes . The new application access policy can take up to 30 minutes to take effect on Azure groups. For more information see Limiting application permissions to specific Exchange Online mailboxes.
- Click Next.
- Step 2: Notification
- Send notification email once the task is completed - select this option to send a notification email when a discovery task completes.
- Only in a case of failure - Select this option to send the email if the discovery task fails to complete successfully.
- Recipients - enter the email address of the recipients of this email. You can specify multiple recipient email addresses separated by semicolon.
- Click Next.
- Step 3: Schedule
- Choose from one of three options to schedule the task. The scheduler will be activated only after you complete the task wizard.
- Run now - task runs immediately.
- Run later - task must be started manually.
- Schedule - task will be started at a future date and time entered in the corresponding calendar field.
- Click Next.
- Step 4: Summary
- Verify the task specifications as described below:
- Name - name of the task. You can specify a custom name. Default name is Account Discovery Task.
- Source tenant - name of the source tenant in this project.
- Discover Type - discovery option that is selected. Value is set to Using Mail-enabled Security Group(s).
- Scheduled start - date and time when the task will start. Now indicates that the task will start immediately.
- Click Back to revise or review a previous step or click Finish to complete the task wizard. The task will start as scheduled.
The migration task is created. You can track its progress from the Tasks tab, view the summary on the Dashboard or monitor alerts and notifications from the Events tab. When the discovery task is complete, a summary about the accounts discovered in the source tenant is available on the project dashboard.
Refreshing Selected Accounts
For all source and target accounts , the task will refresh the UPN, Primary Email Address and Object Type of selected accounts. The task will not modify the migration state of the accounts.
To start the refresh task:
- Log in to Quest On Demand and choose an organization if you have set up multiple organizations.
- From the navigation pane, click Migration to open the My Projects list.
- Create a new project or open an existing project.
- From the Accounts tile on the project dashboard click Open. The Accounts and User data migration workspace opens.
- Open the Accounts tab . From the List View menu, click Discovery and then select Refresh Selected Accounts. The New Refresh Selected Accounts Task wizard starts.
- Step 1: Notification
- Send notification email once the task is completed - select this option to send a notification email when a discovery task completes.
- Only in a case of failure - Select this option to send the email if the discovery task fails to complete successfully.
- Recipients - enter the email address of the recipients of this email. You can specify multiple recipient email addresses separated by semicolon.
- Click Next.
- Step 2: Schedule
- Choose from one of three options to schedule the task. The scheduler will be activated only after you complete the task wizard.
- Run now - task runs immediately.
- Run later - task must be started manually.
- Schedule - task will be started at a future date and time entered in the corresponding calendar field.
- Click Next.
- Step 3: Summary
- Verify the task specifications as described below:
- Name - name of the task. You can specify a custom name. Default name is Refresh Selected Accounts Task.
- Source tenant - name of the source tenant in this project.
- Discover Type - discovery option that is selected. Value is set to Refresh Selected.
- Scheduled start - date and time when the task will start. Now indicates that the task will start immediately.
- Click Back to revise or review a previous step or click Finish to complete the task wizard. The task will start as scheduled.
Reviewing the Account Discovery Task
- Open the Tasks tab.
- Select the account discovery task that you want to review.
- In the task details pane that opens, the information presented is as described below:
- Type - Type of the task. The type is Discovery Task.
- Created - Date and time when the task was created.
- Modified - Date and time when the task was last updated.
- State - State of the task.
- Last Operation - The action that was most recently performed in this task.
- Schedule - Date and time when the task started. Now indicates that the task started immediately after the task was created.
- Accounts (number) - The number of accounts that were selected for matching and the number of accounts passing through the various states of the task from New to Completed..
- Events (number) - Number indicates the count of events that the task encountered. The values indicate the type of the events and the event count for each type.
Reviewing the Account Discovery Task Events
- Open the Tasks tab.
- Select the account discovery task for which you want to review the events.
- In the task details pane that opens, click Events (number). The Events tab opens with a filtered list of events for the selected task.
- Select an event that you want to review. In the task details pane that opens, the information presented is as described below:
- Object - name of the account object if applicable.
- Task - name of the task.
- Time - date and time when the event occurred.
- Category - type of task. For account discovery tasks, the category is Discover.
- Summary - a descriptive statement about the event.
You are now ready for the Assessment.