Use the SharePoint contents tab to migrate SharePoint objects like sites, lists, web, members, retention policies and InfoPath forms. You can migrate an entire site or initiate a granular or incremental migration. You can navigate through SharePoint site objects and identify any site objects that failed to migrate.
Incremental migration
Incremental migration (or remigration) is typically used to synchronize and repair lists in the target tenant. When a list is remigrated, the contents of the list in the source and target tenants are compared. Missing items in the target are restored and items that are updated in the source since the previous migration will be incrementally migrated.
- All child lists can be repaired and refreshed during migration of sites and webs.
- Lists in the Migrated with Issues state will be repaired if the Refresh list items option is selected for the migration task.
- Lists is in the Migrated state do not need to be repaired, and only an incremental migration will be done.
|
|
NOTE: The change token used by the migration service for incremental migration remains active for 60 days. It is recommended to perform an incremental migration every 50 days to make sure the change token remains active. |

In this topic:
Migrating Record Center Retention Policies and InfoPath Forms
Migrating Record Center Retention Policies and InfoPath Forms requires a SharePoint token to be associated with the migration project to allow access to the Microsoft retention policy and InfoPath form APIs.
To associate a SharePoint token with the migration project using PowerShell:
- Download the PowerShell module and connect to ODM PowerShell to get the project id. See Appendix A: Working with PowerShell for more details.
- Get the project workloads (Accounts, Teams, SharePoint, Public Folders)
Get-OdmProjectWorkload -Project 'Elf813YBfQYAK6Q42Kun'
- Select the Id for the SharePoint project workload as the context
Select-OdmProjectWorkload -ProjectWorkloadId 'tH8u5nsB-aY5ES3q6NyZ'
- Get the SharePoint connection token
Set-OdmSpConnectionToken -ConnectionType target - In the credentials window that opens, enter the On Demand credentials (typically the On Demand administrator)
NOTE:
- Token is stored in the SharePoint project
- Token expires in 2-3 days. We recommend that you refresh the token after 2 days if you expect your migration to run for longer periods.
- Start the migration task. See Starting a SharePoint migration task for details.

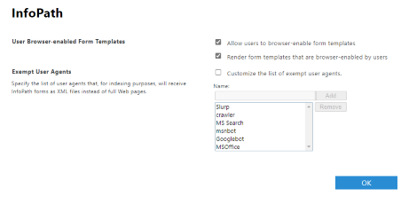
To migrate tenant level settings:
- Log in to the SharePoint admin center of your target tenant.
- Go to More Features > InfoPath.
- Copy the information over from your source tenant.
Starting a SharePoint migration task
Any discovered SharePoint object where Provision state = Discovered, can be migrated including sites, lists (including individual lists) and webs (root and child webs). All children of the object selected for migration will be migrated.
|
|
Caution: Don’t start the migration before the discovery task is finished because migrated objects could be incorrectly processed. |

|
|
NOTES:
|
To start a SharePoint migration task:
- Log in to Quest On Demand and choose an organization if you have set up multiple organizations.
- From the navigation pane, click Migration to open the My Projects list.
- Create a new project or open an existing project.
- From the project Dashboard click Open in the SharePoint tile.
- Click the SharePoint Contents tab.
- Select the sites to migrate. You can select multiple sites.
- Click Migrate. The New SharePoint Migration Task wizard opens.
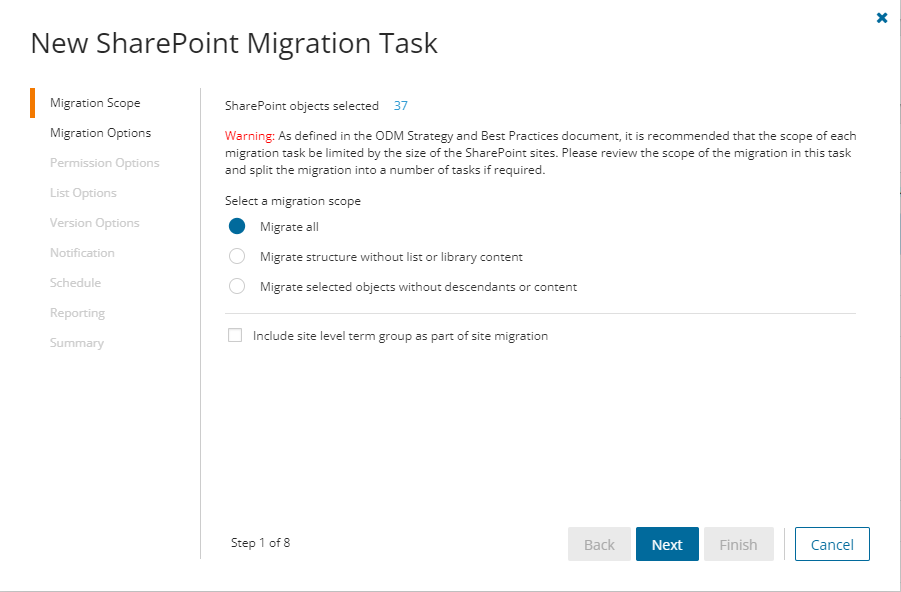
- Step 1: Migration Scope
- Choose a migration scope as described below:
- Migrate all - select this option to migrate the selected objects including any descendants or content associated with these objects.
- Migrate structure without list or library content - select this option to limit the scope of the migration to the full site structure like Site, Members (users and groups), Webs and Lists. List items will not be migrated.
- Migrate selected objects without descendants or content - select this option to migrate only the selected objects. Any descendants or content associated with these objects will be ignored.
- Select Include site level term group as part of site migration to add site level metadata to the Global Term Store. The Global Term Store must be migrated before you can use this option, otherwise an error will be logged as an event. For more information, see Migrating the Global Term Store.
- Click Next.
- Choose a migration scope as described below:
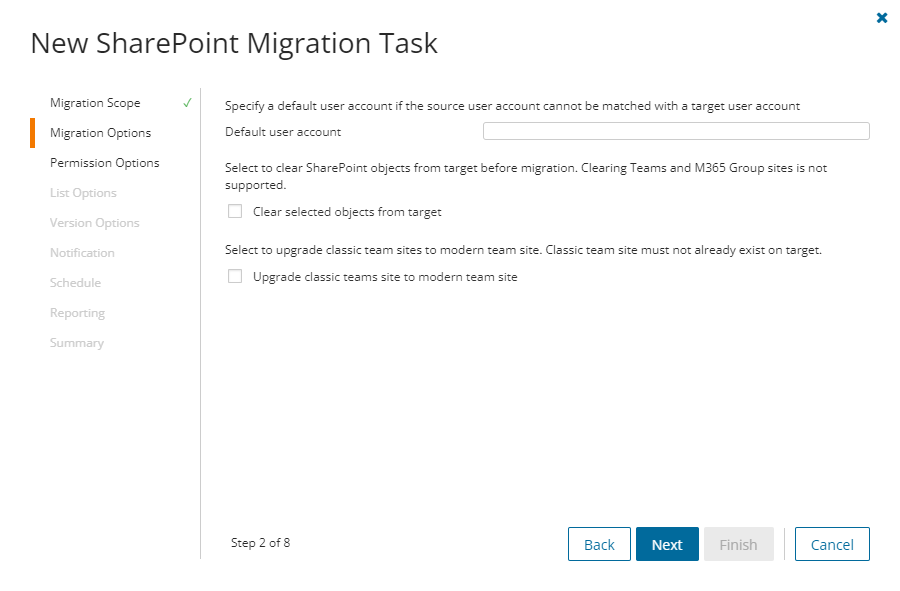
- Step 2: Migration Options
- Configure the migration options as described below:
- Default user account - Specify a default user account if the source user account cannot be matched with a target user account.
- Clear selected objects from the target - Select this option to delete the selected SharePoint objects that already exist on the target before being migrated. Clearing of Group site collections is not supported and will be skipped to keep the association with Microsoft 365 Groups and Teams.
- Upgrade classic team sites to modern team sites - Select this option to upgrade classic team sites to modern team sites. If the classic team site does not exist on the target, create the site using the modern team site.
- Click Next.
- Configure the migration options as described below:
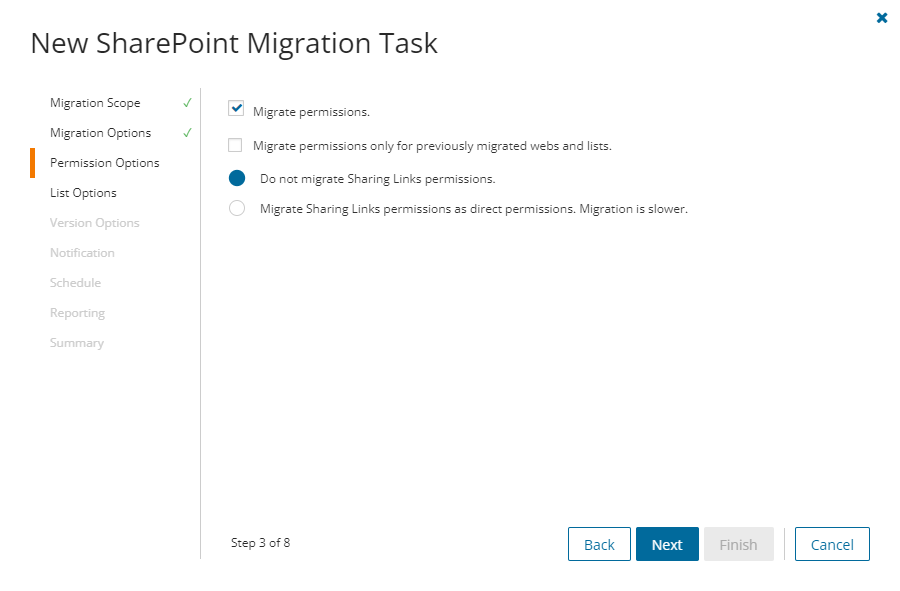
- Step 3: Permission Options
- Select how Sharing Links permissions are migrated. Direct permissions are always migrated.
- Migrate permissions - select this option so that unique permissions associated with web, list and list items are migrated. If you clear this option all other options in this step are deactivated and permission migration is prevented. When permissions are not migrated, the permissions for new migrations of web, list and list items, that are not already on the target tenant, will be inherited from its parent. The permissions will not be changed for migrations of content that was already migrated to the target tenant.
- Migrate permissions only for previously migrated webs and lists - select this option to migrate permissions for webs and lists only. Permissions will be merged with any existing permissions on the target tenant. List item permissions are not migrated with this option because list item permissions cannot be migrated separately from the list item. To re-migrate list items and its permissions, re-migrate the whole list without selecting this option. Selected objects must be in a migrated or migrated with issues state for this option work.
- Do not migrate Sharing Links permissions - select this option to ignore Sharing Links permissions.
- Migrate Sharing Links permissions as direct permissions. Migration is slower - select this option to migrate Sharing Links permissions. These permissions will be migrated as direct permissions. The conversion and migration of Sharing Links permissions takes more time to migrate.
- Click Next.
- Select how Sharing Links permissions are migrated. Direct permissions are always migrated.
- Step 4: List Options
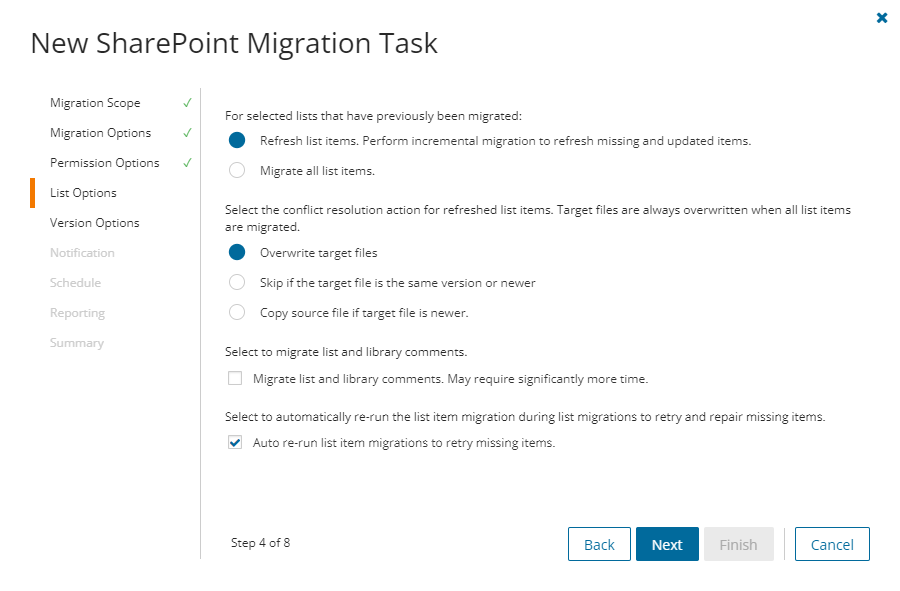
This step applies to specific lists selected for migration from the SharePoint Contents list view.
- Choose from the following options to determine how changes to selected list items that were previously migrated should be remigrated:
- Refresh list items - an incremental migration is performed to repair and update the target list with missing or new items.
- Migrate all list items - all list items are remigrated.
- Choose a conflict resolution option.
NOTE:
- Conflict resolution rules are applied only to lists that have been previously migrated.
- Conflict resolution rules will not be applied if the Migrate all list items list option is selected in the previous step. All files in the target tenant will be overwritten if all files are migrated.
- Conflict resolution rules will not be applied to Site Pages and Site Assets system libraries.
- Overwrite target files - all migrated files in the target tenant will be overwritten. Migration is fastest with this option selected.
- Skip if target list item is the same version or newer - ignore list items in the target tenant with the same or newer version. If the item does not exist in the target tenant, a copy of the source item will be migrated.
- Create a copy if target list item is the same version or newer - preserve the list item in the target tenant with the same or newer version and migrate a copy of the source item. When you choose this option, you must choose from one of the following file suffix options: _Copy, _Source, _Older, _Backup, and _1.
- Migrate list and library comments - select this option to include list and library comments in the migration task. A large number of list and library comments increase task processing time.
- Auto re-run list item migrations to retry missing items - select this option to automatically re-run the list item migration during list migrations to retry and repair missing items.
- Click Next.
- Choose from the following options to determine how changes to selected list items that were previously migrated should be remigrated:
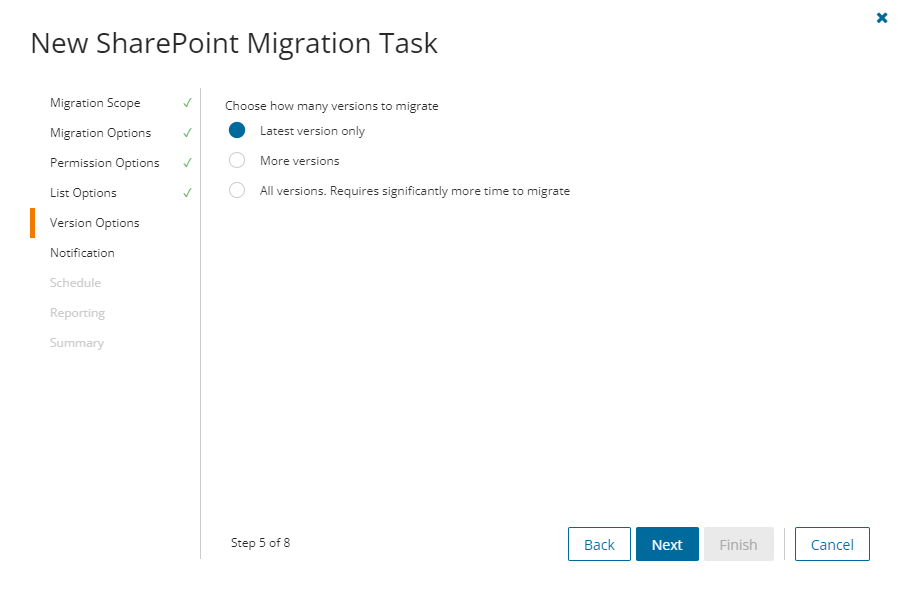
- Step 5: Version Options
- Specify the versions of the SharePoint files to migrate. These options are relevant only if the Migrate all option is selected in the Migration Scope step.
NOTE: When you select a conflict resolution option and a version option, you should expect the following behavior:
Overwrite target files - the file is replaced with the file and version history from the source based on the version settings.
Skip if target list item is the same version or newer - the target file is not changed, but new items migrated will follow versions settings.
Create a copy if target list item is the same version or newer - the copy is migrated using the version settings.
Each site has its own version history of its files and each change to a file is saved with a new version. Select from the following migration options to determine how SharePoint file versions should be migrated:
- Latest version only - This is the default selection. The most recent version of the file will be migrated. All other versions will be ignored.
- More versions - Additional versions of a file will be migrated based on the options described below. Large version sets take a significantly long time to migrate.
- Number of versions - The maximum number of version to migrate. The available choices are: 2, 5, 10, 30, 60, 90 and 365. When you specify the number of versions, additional options can be selected.
- Latest version and preceding versions - The version count includes the latest version and the preceding versions in chronological order restricted to the Size Limit of the latest version. For example, if you choose to migrate 5 versions, then the most recent version and 4 preceding versions will be migrated as long as the most recent version does not exceed the selected size limit specified.
- Latest version and daily latest from preceding days - The version count includes the latest version and the latest version from each preceding day restricted to the Size Limit of the latest version. For example, if there are many versions of a site and you choose to migrate 5 versions, then the most recent version and the latest version from each of the 4 preceding days will be migrated as long as the most recent version does not exceed the selected size limit specified.
- Size limit - This setting is available if the Latest version and preceding versions or the Latest version and daily latest from preceding days option is selected. By default, the size limit is 80 MB. You can configure the size limitation by selecting from one of the possible values in the dropdown list. If the size of the latest file version exceeds the selected size limit, the latest version will be migrated and previous versions will be ignored. If the size of the latest file version does not exceed the selected size limit, then the file and its versions will be migrated based on your selection between Latest version and preceding versions or Latest version and daily latest from preceding days.
- Number of versions - The maximum number of version to migrate. The available choices are: 2, 5, 10, 30, 60, 90 and 365. When you specify the number of versions, additional options can be selected.
- All Versions - The latest version of the file will be migrated, and all previous versions of the file will be migrated if the latest version does not exceed a specified size limit. This option requires significantly more time to migrate all the versions.
- Size limit - This setting is available if the All Versions option is selected. By default, the size limit is 80 MB. You can configure the size limitation by selecting from one of the possible values in the dropdown list. If the size of the latest file version exceeds the selected size limit, the latest version will be migrated and previous versions will be ignored. If the size of the latest site version does not exceed the selected size limit, then the file and its versions will be migrated.
- Click Next.
- Specify the versions of the SharePoint files to migrate. These options are relevant only if the Migrate all option is selected in the Migration Scope step.
- Step 6: Notification
- Send notification email once the task is completed - select this option to send a notification email when a discovery task completes.
- Only in a case of failure - Select this option to send the email if the discovery task fails to complete successfully.
- Recipients - enter the email address of the recipients of this email. You can specify multiple recipient email addresses separated by semicolon.
- Click Next.
- Send notification email once the task is completed - select this option to send a notification email when a discovery task completes.
- Step 7: Schedule
- Choose from one of three options to schedule the task. The scheduler will be activated only after you complete the task wizard.
- Run now - task runs immediately.
- Run later - task must be started manually.
- Schedule - task will be started at a future date and time entered in the corresponding calendar field.
- Priority - select a priority from the dropdown for the objects scheduled for migration with this task . Values are: Highest, High, Medium, Low and Lowest. The default priority is Medium. If the system is busy, the objects are queued (Migration state = Queued). When the system accepts new migration work, objects are taken from the queue based on the assigned priority and age in the queue.
- Click Next.
- Choose from one of three options to schedule the task. The scheduler will be activated only after you complete the task wizard.
- Step 8: Reporting
Select the check box Generate detailed report of migration errors to generate a migration error report when you run the New SharePoint Migration Task wizard.
You can download the report from the Reports tab of the SharePoint workspace by clicking the Download link in the Error Log column. If there are no migration errors, a download link is not available. Error reports are retained for 30 days. After 30 days the download link is replaced with the label Expired and you can no longer download the report. For more information about error reports, see Reports.
- Step 9: Summary
- This step lists the following configured options for this task.
- Name - Specify a name for the task. The default name is Migrate SharePoint Contents Task.
- SharePoint objects selected - number of SharePoint objects selected for migration.
- Migration Scope - selected migration scope.
- Include site level term groups from Term store - whether or not the site level term group from the Term store should be included in the migration.
- Default target user - UPN of the default target user if the source user cannot be matched to a target user.
- Clear selected objects from target - whether or not the target site collection are deleted if it exists is the target tenant.
- Upgrade classic team sites - whether or not classic team sites are migrated to modern team sites.
- Migrate permissions - whether permissions are migrated or migrated objects will inherit permissions from their parent.
- Migrate permissions only - whether or not permissions are migrated for previously migrated webs and lists.
- Migrate Sharing Links permissions - how Sharing Links permissions are migrated.
- List migration - choice between migration of all list items or migration of incremental changes with a refresh.
- Conflict Resolution migration action - how version conflicts are resolved. Indicates the suffix if a copy of migrated list items are created.
- Migrate list and library comments - whether or not list and library comments should be migrated.
- Migrate list item and document versions - version option selected.
- Scheduled start - expected start time of the task.
- Reporting - option to collect and retain data for report generation.
- Priority - the priority of this task.
- Click Back to change configurations if necessary or click Finish to save and start the task as scheduled.
- This step lists the following configured options for this task.