
Cost by department
Viewing licenses
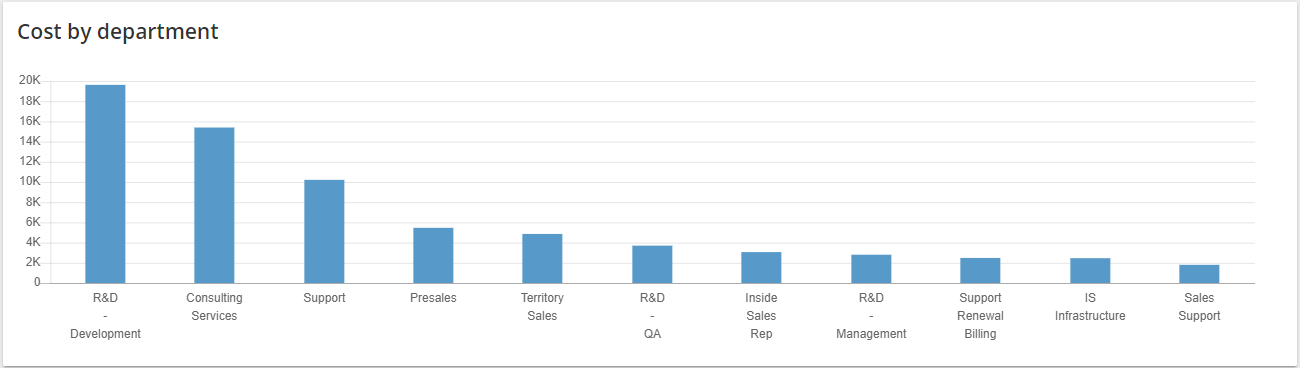
When you select Licenses in the left navigation panel, data for all licenses is shown by default. Information about the number of purchased licenses, number of assigned licenses, purchased costs, assigned costs, number of expired licenses, and number of licenses that will expire soon are shown.
You have the option to export the displayed data to a file in .csv (comma separated values) format. for further analysis. For details. see Exporting data to .csv format .
If you have added custom attributes and you are viewing licenses for a single tenant, you have the option of grouping the licenses by custom attribute. For details about adding custom attributes, see Adding custom attributes .
If you click Conflicts on the top menu bar, you can see the users that have licenses that contain duplicated services, On the Conflicts page, you can also filter by user, AD account status, license activity, and product.
About filtering license data
When you click Licenses in the left navigation panel., you could use the FILTER option to filter the displayed licenses using specific criteria. You can click + at the end of the first row and select All of (and) or Any of (or) to add an additional filter rule. To remove an individual filter rule, click X beside the rule.
|
• |
You can use ADD NEW CLAUSE GROUP to further refine the data. |
|
• |
To remove all filters, click CLEAR ALL. |
For example, you could filter licenses to show only paid licenses or free licenses.
|
1 |
Click FILTER to open the filter builder. |
|
2 |
In the first field, select Purchased Cost in the filter list. |
|
3 |
In the second field, select does not equal. |
|
4 |
In the third field, enter 0 as the value. |
|
1 |
Click FILTER to open the filter builder. |
|
2 |
In the first field, select Purchased Cost in the filter list. |
|
3 |
In the second field, select equals. |
|
4 |
In the third field, enter 0 as the value. |
If you click a column heading, you can sort the column by ascending or descending values.
|
1 |
Click FILTER to open the filter builder. |
|
2 |
In the first field, select License from the filter list. |
|
3 |
In the second field, select contains. |
|
4 |
In the third field, enter Power BI as the value. |
The page displays only licenses that have Power BI as part of the license name. You can click + at the end of the first row and select All of (and) or Any of (or) to add an additional filter rule. To remove an individual filter rule, click X beside the rule.
For details about adding custom attributes, see Adding custom attributes .
|
1 |
Click the arrow beside Group By. |
|
2 |
Select BU. |
To remove grouping from the Licenses page, you can select None in the list of custom attributes.
After you have grouped the license information by a custom attribute, you can further filter the data by the custom attribute as well. In filters, custom attributes are displayed in italics for easy identification.
Viewing conflicting licenses
When you click Conflicts on the menu bar, you can see the users that have licenses that contain duplicated services, which can result in unnecessary costs. You can use the Conflicts page to determine if one of the conflicting licenses is unnecessary.
You can display only the services that are different (not conflicting) by moving the Display Common Services toggle to the left.
You can use the EDIT COLUMNS option to update the table by selecting the columns that you want to include.