Chat now with support
Chat with Support

Recovery Manager for AD Forest Edition 10.1 - User Guide

Overview Getting started
Permissions required to use Recovery Manager for Active Directory Recovery Manager Console Getting and using help Configuring Windows Firewall Using Computer Collections Managing Recovery Manager for Active Directory configuration Licensing
Backing up data
Permissions required for the Backup operation Managing Backup Agent Using a least-privileged user account to back up data Using Managed Service Accounts Active Directory backups vs Windows System State backups Creating BMR and Active Directory backups Using the Backup Wizard Retrying backup creation Enabling backup encryption Backing up AD LDS (ADAM) Backing up cross-domain group membership Backing up distributed file system (DFS) data Backup scheduling Setting performance options Setting advanced backup options Using Forest Recovery Agent Unpacking backups Using e-mail notification Viewing backup creation results
Restoring data
Getting started with Active Directory recovery Managing deleted or recycled objects Restoring backed up Active Directory components Integration with Change Auditor for Active Directory Using granular online restore Restoring AD LDS (ADAM) Selectively restoring Active Directory object attributes Restoring objects in an application directory partition Restoring object quotas Restoring cross-domain group membership Performing a restore without having administrator privileges Reports about objects and operations Using complete offline restore Offline restore implications Restoring SYSVOL authoritatively Performing a granular restore of SYSVOL Recovering Group Policy Restoring data from third-party backups Using the Extract Wizard Restoring passwords and SID history
Full Replication Consolidating backup registration data Monitoring Recovery Manager for Active Directory Recovering an Active Directory forest
Forest recovery overview Deploying Recovery Manager for Active Directory Forest Edition (Disaster Recovery Edition) Permissions required to use Forest Recovery Console Forest Recovery Console Managing a recovery project Recovery methods Phased recovery Managing Forest Recovery Agent Rebooting domain controllers manually Resetting DSRM Administrator Password Purging Kerberos Tickets Managing the Global Catalog servers Managing FSMO roles Manage DNS Client Settings Configuring Windows Firewall Developing a custom forest recovery plan Backing up domain controllers Assigning a preferred DNS server during recovery Handling DNS servers during recovery Forest recovery approaches Deciding which backups to use Running custom scripts while recovering a forest Overview of steps to recover a forest Viewing forest recovery progress Viewing recovery plan Viewing a report about forest recovery or verify settings operation Handling failed domain controllers Adding a domain controller to a running recovery operation Selectively recovering domains in a forest Recovering SYSVOL Deleting domains during recovery Resuming an interrupted forest recovery Recovering read-only domain controllers (RODCs) Checking forest health Collecting diagnostic data for technical support
Using Management Shell Creating virtual test environments Using Recovery Manager for Active Directory web portal Appendices
Frequently asked questions Best practices for using Computer Collections Technical characteristics Best practices for creating backups Best practices for creating backups for forest recovery Best practices for recovering a forest Descriptions of recovery or verification steps Ports Used by Recovery Manager for Active Directory Forest Edition (Disaster Recovery Edition) Backup Wizard Online Restore Wizard Online Restore Wizard for AD LDS (ADAM) Group Policy Restore Wizard Repair Wizard Extract Wizard Events generated by Recovery Manager for Active Directory Descriptions of PowerShell commands
Add-RMADBackup Add-RMADCollectionItem Add-RMADFEComputer Add-RMADReplicationConsole Add-RMADStorageServer Backup-RMADCollection Close-RMADFEProject Compare-RMADObject Convert-RMADBackup ConvertTo-RMADRecycledObject Create-RMADStorageManagementAgentSetup Expand-RMADBackup Export-RMADBackup Export-RMADFERecoveryCertificate Export-RMADFEResult Get-RMADBackup Get-RMADBackupAgent Get-RMADBackupInfo Get-RMADBackupObject Get-RMADBackupSecurityStatus Get-RMADCollection Get-RMADCollectionItem Get-RMADDeletedObject Get-RMADFEComputer Get-RMADFEConsole Get-RMADFEDnsCache Get-RMADFEDomain Get-RMADFEEvent Get-RMADFEGlobalOptions Get-RMADFEOperation Get-RMADFEPersistenceConnection Get-RMADFEProject Get-RMADFERecoveryAgent Get-RMADFESchedule Get-RMADGlobalOptions Get-RMADLicenseInfo Get-RMADObject Get-RMADReplicationConsole Get-RMADReplicationSchedule Get-RMADReplicationSession Get-RMADReplicationSessionItem Get-RMADReportObject Get-RMADReportObjectAttributes Get-RMADReportObjectChildren Get-RMADReportSession Get-RMADSession Get-RMADSessionItem Get-RMADSessionItemEvent Get-RMADStorageServers Import-RMADBackup Import-RMADFERecoveryCertificate Install-RMADBackupAgent Install-RMADFERecoveryAgent New-RMADCollection New-RMADFEProject New-RMADFERecoveryMedia New-RMADSchedule Open-RMADFEProject Publish-RMADBackupSecurityStatus Remove-RMADBackup Remove-RMADBackupAgent Remove-RMADCollection Remove-RMADCollectionItem Remove-RMADFEComputer Remove-RMADFERecoveryAgent Remove-RMADFESchedule Remove-RMADReplicationConsole Remove-RMADReplicationSchedule Remove-RMADReplicationSession Remove-RMADStorageServer Remove-RMADUnpackedComponent Rename-RMADCollection Restore-RMADDeletedObject Restore-RMADDomainController Restore-RMADObject Resume-RMADFERecovery Save-RMADFEProject Set-RMADCollection Set-RMADFEComputer Set-RMADFEDnsCache Set-RMADFEDomain Set-RMADFEGlobalOptions Set-RMADFEPersistenceConnection Set-RMADFERecoveryMode Set-RMADFESchedule Set-RMADGlobalOptions Set-RMADReplicationConsole Set-RMADReplicationSchedule Start-RMADFERecovery Start-RMADFEVerification Start-RMADReplication Start-RMADReportViewer Stop-RMADFEWorkflow Update-RMADBackupAgent Update-RMADFEProject Update-RMADLicense

Step 4: Verify virtual machine creation settings

In this step, you verify the virtual machine creation settings specified for each source computer to ensure they are correct. If any issues are found, you are prompted to fix them. You cannot proceed with the virtual test environment creation until you resolve all errors encountered during the verification. Also, you must resolve or ignore the encountered warnings, if any.

To verify the settings in your project
  • In the Active Directory Virtual Lab console, click the Verify Settings button and wait for the verification to complete.

Once the verification completes, you can view its results in a dialog box that opens automatically. If any issues are found during the verification, this dialog box looks similar to the following:

Resources/Images/pic_StepByStep.png

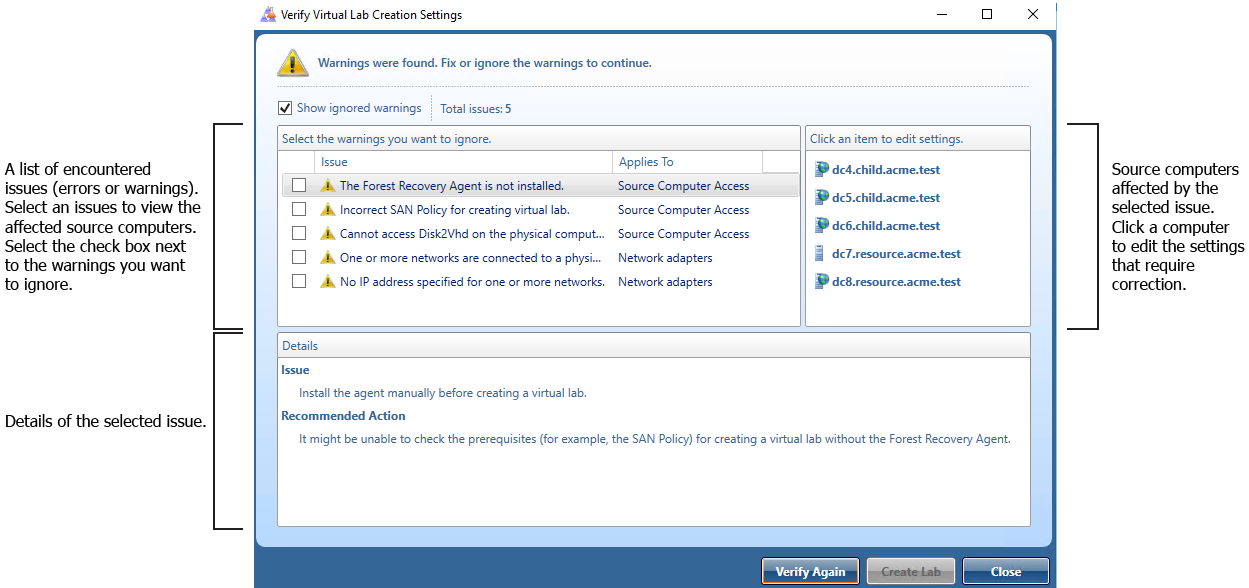
After resolving or ignoring the issues found, click the Verify Again button in this dialog box to re-run the verification operation on the virtual lab project. If the issues have been resolved successfully, the Create Lab button becomes available and you can proceed with the virtual lab creation.


Step 5: Start virtual test environment creation

To start the virtual environment creation
  • In the Verify Virtual Lab Creation Settings dialog box, click the Create Lab button.

    Alternatively, you can click the Create Lab button on the Toolbar in the Active Directory Virtual Lab console.

    To view the virtual machine creation progress for a source computer, select that computer in the List of source computers, and then click the Events tab.

NOTE

If the creation of a virtual machine fails, we recommend that you retry the last operation on the source computer: In the List of Source Computers, right-click the source computer, and then click Retry Last Operation.

In the created virtual test environment, all network adapters are disabled to prevent possible conflicts with the source Active Directory forest. Before enabling network adapters, ensure your virtual test environment is properly isolated from the source forest.

Persistence of the ADVL console

This feature is supported only for Microsoft SCVMM 2012 R2 and VMware environments.

If you close the ADVL console during the creation of the virtual environment, the session can be resumed if it was interrupted on the following steps (see the Events tab):

  • Convert source machine to virtual machine

  • Wait for other virtual machines to be created

To resume the creation of the virtual environment, reopen the ADVL project.


Step 6: Enable network adapters

After the virtual test environment has been successfully created, the Active Directory Virtual Console automatically displays a dialog box that prompts you to enable network adapters in the created test environment. In that dialog box, click Enable if you want to enable the network adapters now or click Cancel if you want to enable them manually later.


Using Recovery Manager for Active Directory web portal


Related Documents

The document was helpful.

Select Rating

I easily found the information I needed.

Select Rating