
7.1 Installing Integration for Notes FreeBusy on the Domino Coexistence Server
7.1 Installing Integration for Notes FreeBusy on the Domino Coexistence Server
The FreeBusy components for the Domino Coexistence server are installed separately from the BTCal components. Follow the steps below to install Integration for Notes FreeBusy:
-
Confirm the Domino Coex server has been stopped
-
Run the Notes Integration FreeBusy.exe as Administrator
-
On the installation wizard screen, click Next:
-
Review the Software License Agreement and if you agree click Yes to continue:
-
On the Verify notes.ini path for the FreeBusy Domino server screen, browse to the location of the Notes.ini file that will be modified for the Domino instance and click Next
The default paths in steps 5 and 6 in the installer may not match your environment. Confirm they are pointing to the correct location and modify if necessary. -
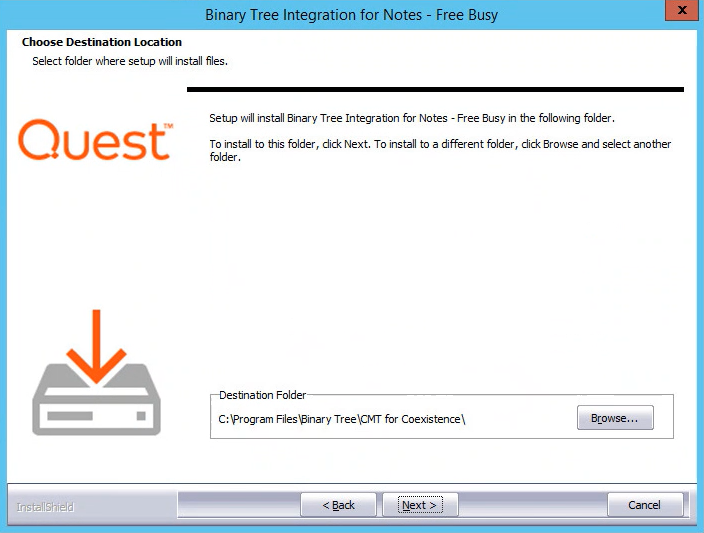
On the Confirm Domino Directories screen, confirm the Domino Program Directory and Domino Data Directory paths for the Domino Server instance you are using to install Free/Busy; modify, if necessary; and click Next:


|
|
|


-
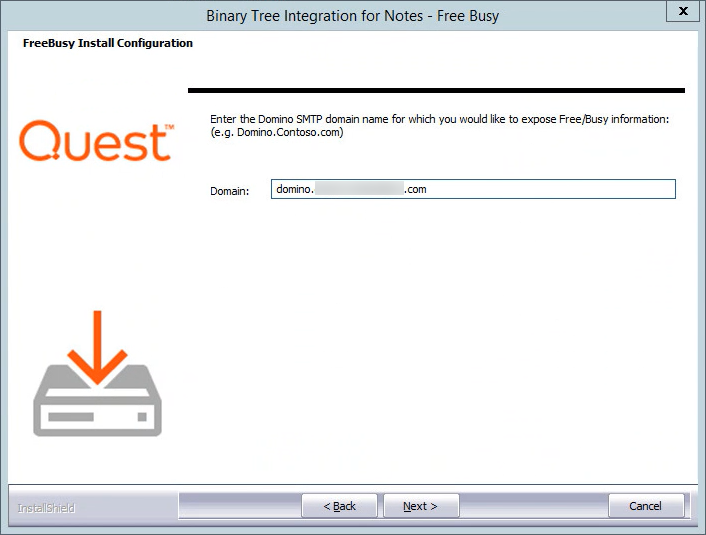
On the FreeBusy Install Configuration screen, enter the Domino SMTP domain name you would like to expose Free/Busy information for; click Next:
-
On the Ready to Install the Program screen, click Install to begin the installation:
-
The progress of the installation will be displayed on the Setup Status screen
-
On the Edit notes.ini screen, select one of the following options:
-
Let Setup modify the notes.ini file – (Default) Recommended for first time installing Integration for Notes FreeBusy
-
Save the required changes to a notes.ini alt file – Select if you want to manually update an existing Notes.ini file from a previous installation; this is recommended if you are reinstalling or repairing FreeBusy, and wish to manually update the existing entries
-
Do not make any changes – Selecting this option is not recommended
Click Next:
-
-
If you selected Let Setup modify the notes.ini, click OK in the resulting dialog box; changes to the Notes.ini file will take effect when the Domino server is restarted:
-
When installation is complete, the Installation Wizard Complete screen appears; click Finish:


Section 8. Create and Configure the Domino Databases
Section 8. Create and Configure the Domino Databases
7.1 Installing Integration for Notes FreeBusy on the Domino Coexistence Server
The FreeBusy components for the Domino Coexistence server are installed separately from the BTCal components. Follow the steps below to install Integration for Notes FreeBusy:
-
Confirm the Domino Coex server has been stopped
-
Run the Notes Integration FreeBusy.exe as Administrator
-
On the installation wizard screen, click Next:
-
Review the Software License Agreement and if you agree click Yes to continue:
-
On the Verify notes.ini path for the FreeBusy Domino server screen, browse to the location of the Notes.ini file that will be modified for the Domino instance and click Next
The default paths in steps 5 and 6 in the installer may not match your environment. Confirm they are pointing to the correct location and modify if necessary. -
On the Confirm Domino Directories screen, confirm the Domino Program Directory and Domino Data Directory paths for the Domino Server instance you are using to install Free/Busy; modify, if necessary; and click Next:
|
|
|
-
On the FreeBusy Install Configuration screen, enter the Domino SMTP domain name you would like to expose Free/Busy information for; click Next:
-
On the Ready to Install the Program screen, click Install to begin the installation:
-
The progress of the installation will be displayed on the Setup Status screen
-
On the Edit notes.ini screen, select one of the following options:
-
Let Setup modify the notes.ini file – (Default) Recommended for first time installing Integration for Notes FreeBusy
-
Save the required changes to a notes.ini alt file – Select if you want to manually update an existing Notes.ini file from a previous installation; this is recommended if you are reinstalling or repairing FreeBusy, and wish to manually update the existing entries
-
Do not make any changes – Selecting this option is not recommended
Click Next:
-
-
If you selected Let Setup modify the notes.ini, click OK in the resulting dialog box; changes to the Notes.ini file will take effect when the Domino server is restarted:
-
When installation is complete, the Installation Wizard Complete screen appears; click Finish:
Section 8. Create and Configure the Domino Databases
8.1 Sign the btws.nsf Database
8.1 Sign the btws.nsf Database
Locate the btws.nsf database in the Domino Coex server’s Data Directory and sign it with either the server’s ID or an ECL signing ID.
8.2 Create Mail Router Mailbox
8.2 Create Mail Router Mailbox
If the mail router mailbox (btexchange.box) does not already exist, create it on the server using the mail router Mail Router Mailbox mailbox.ntf template also found in the Domino Coex server’s Data Directory server:
-
Launch IBM Notes
-
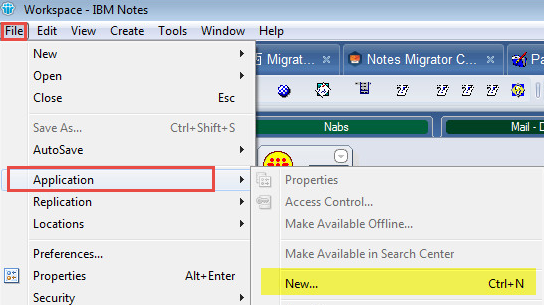
Click File | Application | New
-
In the New Application dialog box:
-
Select the Domino Coex server in the Server field
-
Enter BT Exchange Mailbox in the Title field
-
The File Name is auto-populated based on the Title name; we recommend keeping it as is
-
Click Show advanced templates
-
Select the Mail Router Mailbox (mailbox.ntf) template to create a new mail router mailbox
-
Click OK
-

Section 9. Modify the Notes.ini File
The Notes.ini file can be updated either by editing it manually or by issuing an appropriate set config command on the Domino Server’s Console. When editing Notes.ini parameters, the total length of the Keyword=Value string cannot exceed 256 characters.