
Section 6. Configure Integration for Notes FreeBusy in Exchange or Office 365
5.5 FreeBusy Person Document
-
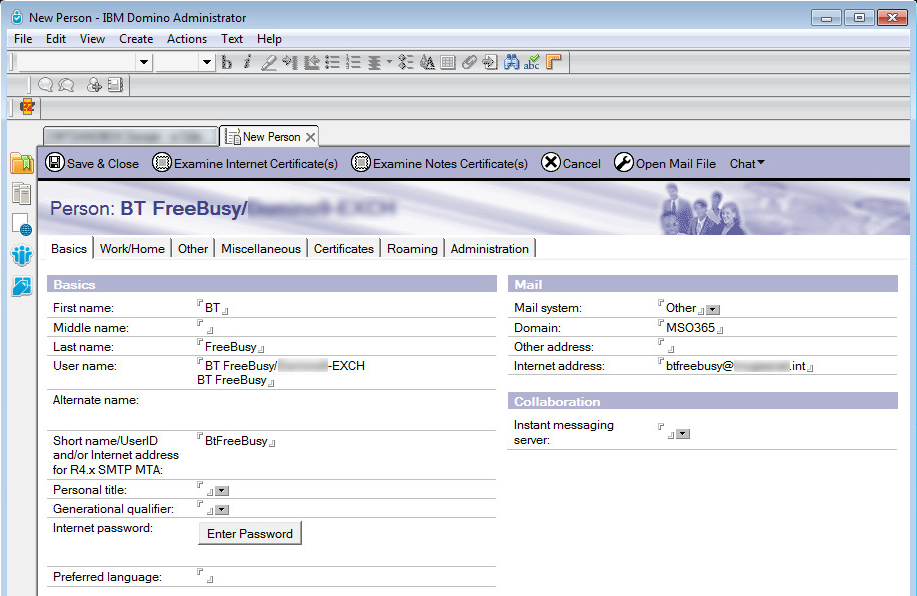
Create a new Person Document using the field values shown in the table below. This Person Document does not need a Notes ID or mailbox, so it is not necessary to create it via the normal Notes registration process. Save and close the document when complete.
|
Field |
Value |
|
First name |
BT |
|
Last name |
FreeBusy |
|
User name |
BT FreeBusy/<DominoOrgName (e.g. “Domino20-EXCH”)> BT FreeBusy |
|
Short name |
BtFreeBusy |
|
Mail system |
Other |
|
Domain |
<DominDomain>-EXCH or MSO365 |
-
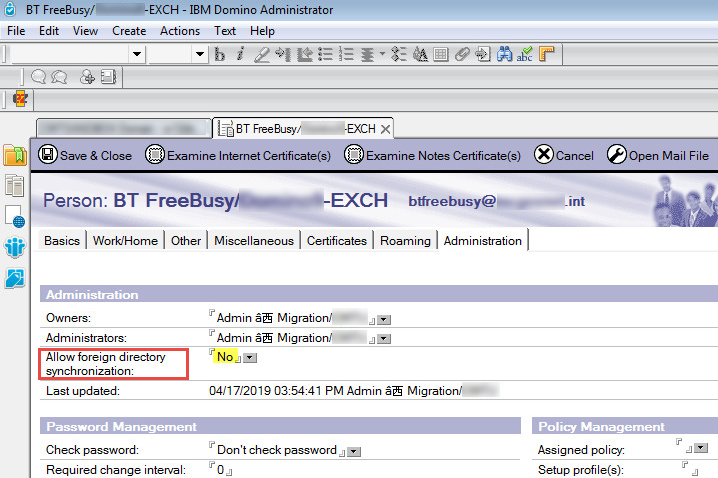
Re-open the newly created BT FreeBusy Person Document and click the Edit Person button
-
Navigate to Administration tab and change the Allow foreign directory synchronization field value to No:
-
Save and close the document
|
|
|
|
|
|

Section 6. Configure Integration for Notes FreeBusy in Exchange or Office 365
The last step before installing FreeBusy involves configuring Office365 or Exchange to route FreeBusy traffic from Exchange to Domino. For detailed instructions on the necessary changes, scroll to or click on the environment that matches your own:
6.1 Office 365 (O365)
|
|
This information should be found in the Administrator Pre-Install Checklist. |
6.1 Office 365 (O365)
6.1 Office 365 (O365)
The administrator performing the configuration must have access to the following:
-
The Exchange Management Console or the Exchange Azure Management Console (depending upon the environment)
-
The customer tenant with an administrative level tenant account
|
|
|
Perform the following prerequisite steps from the O365 client tenant interface:
-
Log into the customer’s O365 tenant and navigate to the Exchange Administration section - https://login.microsoftonline.com/
-
Navigate to the Recipients section in the Exchange Online Administration Center (Admin Center); check under Contacts to be sure that the users appear as “Mail users” under the Contact Type column with the correct External Email Address (Target Address)
If using PowerShell, execute the following commands to connect to O365:
|
PowerShell |
|
$Cred = Get-Credential “admin@tenant.onmicrosoft.com” $Session = New-PSSession -ConfigurationName Microsoft.Exchange -ConnectionUri https://ps.outlook.com/powershell/ -Credential $Cred -Authentication Basic –AllowRedirection Import-PSSession $Session Import-Module msonline Connect-MsolService -Credential $Cred |
6.1.1 Enable Organization Customization
Run the following commands to verify Organization Customization and, if necessary, enable it:
-
If Organization Customization has not already been enabled or you are not sure, run the following command to enable it:
|
PowerShell |
|
Enable-OrganizationCustomization
|
|
|
|
-
Once you are sure that Organization Customization has been enabled, run the following command to create an availability configuration; the address at the end of this command must be the alias or SMTP address of the proxy account setup in the tenant:
|
PowerShell |
|
New-AvailabilityConfig -OrgWideAccount btFreeBusy@tenant.onmicrosoft.com
|
6.1.2 Creation of the FreeBusy Proxy Account
Use the following PowerShell commands to create an account that will be used to make Availability Service requests from the Domino environment:
|
PowerShell |
|
New-MsolUser -UserPrincipalName btFreeBusy@tenant.onmicrosoft.com –DisplayName “FreeBusy Proxy Account” –Firstname “FreeBusy” –LastName “Proxy” –ForceChangePassword $false –Password “{enter complex password}” -PasswordNeverExpires $true |
6.1.3 Configure the Availability Address Space
Lastly, run the commands below to create the Availability Address Space using the FreeBusy tenant account; the two highlighted items below should be replaced with your btFreeBusy account and your Autodiscover/Endpoint Reference (EPR) URL:
|
PowerShell |
|
$a = get-credential "btFreeBusy@tenant.onmicrosoft.com" Add-AvailabilityAddressSpace -AccessMethod OrgWideFB -ForestName domino.domain.com -TargetAutodiscoverEpr 'https://autodiscover.domino.domain.com/autodiscover/autodiscover.xml' -Credentials:$a |
|
|
Get-AvailabilityAddressSpace -Identity Contoso.OnMicrosoft.com |
This concludes all of the steps required for routing SMTP mail to and from the O365 environment with the Domino Coexistence server. If an on-premises Exchange server is not being configured, skip to the Section 7. Install FreeBusy for Domino section.
6.2 On-Premises Exchange
6.2 On-Premises Exchange
Section 6.2 details a typical approach to configuring FreeBusy in an on-premises Exchange environment.
The following prerequisites are required to configure FreeBusy in on-premises Exchange:
-
The account used for the configuration:
-
Has access to the Exchange Admin Center and the Exchange Management Shell
-
Was granted the Organizational Management role in the Exchange Admin Center
-
-
Unless specifically described in this document, the default configuration values will be used
6.2.1 Creation of the FreeBusy Proxy Account
Create a mail account that will be used to make Availability Service requests from the Domino environment
|
PowerShell |
|
New-MsolUser -UserPrincipalName btFreeBusy@YourExchangeDomain.com –DisplayName “FreeBusy Proxy Account” –Firstname “FreeBusy” –LastName “Proxy” –ForceChangePassword $false –Password “{enter complex password}” -PasswordNeverExpires $true |
6.2.2 Configure the Availability Address Space
During installation (covered in Section 7. Install FreeBusy for Domino), an additional setup step to run a provided command in the Exchange Management Shell is presented. This command sets the Availability Address Space in Exchange for the Domino user so Free/Busy requests are sent to Domino.
If this setup step has not already been performed, run the command below (the same command presented during installation) in the Exchange Management Shell:
|
PowerShell |
|
$a = get-credential "btFreeBusy@YourSMTPDomain.com" Add-AvailabilityAddressSpace -AccessMethod OrgWideFB -ForestName Domino.YourSMTPDomain.com -TargetAutodiscoverEpr 'https://autodiscover.domino.YourSMTPDomain.com/autodiscover/autodiscover.xml' -Credentials:$a |

The value domino.<YourSMTPDomain> matches the Targetaddress domain value of the Domino users in Active Directory. The btFreeBusy@YourSMTPDomain.com matches the Exchange Mail Namespace/SMTP Domain from the Administrator Pre-Install Checklist.
Section 7. Install FreeBusy On the Domino Coex Server
The Integration for Notes | CMT FreeBusy.exe installation package must be installed on the Domino Coexistence server and Windows Coexistence server.
For a list of known limitations, please refer to the Integration for Notes FreeBusy Known Limitations document.
For the Domino and Exchange install requirements refer to the Integration for Notes BTCal FreeBusy Requirements document.
Section 7. Install FreeBusy On the Domino Coex Server
6.2 On-Premises Exchange
Section 6.2 details a typical approach to configuring FreeBusy in an on-premises Exchange environment.
The following prerequisites are required to configure FreeBusy in on-premises Exchange:
-
The account used for the configuration:
-
Has access to the Exchange Admin Center and the Exchange Management Shell
-
Was granted the Organizational Management role in the Exchange Admin Center
-
-
Unless specifically described in this document, the default configuration values will be used
6.2.1 Creation of the FreeBusy Proxy Account
Create a mail account that will be used to make Availability Service requests from the Domino environment
|
PowerShell |
|
New-MsolUser -UserPrincipalName btFreeBusy@YourExchangeDomain.com –DisplayName “FreeBusy Proxy Account” –Firstname “FreeBusy” –LastName “Proxy” –ForceChangePassword $false –Password “{enter complex password}” -PasswordNeverExpires $true |
6.2.2 Configure the Availability Address Space
During installation (covered in Section 7. Install FreeBusy for Domino), an additional setup step to run a provided command in the Exchange Management Shell is presented. This command sets the Availability Address Space in Exchange for the Domino user so Free/Busy requests are sent to Domino.
If this setup step has not already been performed, run the command below (the same command presented during installation) in the Exchange Management Shell:
|
PowerShell |
|
$a = get-credential "btFreeBusy@YourSMTPDomain.com" Add-AvailabilityAddressSpace -AccessMethod OrgWideFB -ForestName Domino.YourSMTPDomain.com -TargetAutodiscoverEpr 'https://autodiscover.domino.YourSMTPDomain.com/autodiscover/autodiscover.xml' -Credentials:$a |
The value domino.<YourSMTPDomain> matches the Targetaddress domain value of the Domino users in Active Directory. The btFreeBusy@YourSMTPDomain.com matches the Exchange Mail Namespace/SMTP Domain from the Administrator Pre-Install Checklist.
Section 7. Install FreeBusy On the Domino Coex Server
The Integration for Notes | CMT FreeBusy.exe installation package must be installed on the Domino Coexistence server and Windows Coexistence server.
For a list of known limitations, please refer to the Integration for Notes FreeBusy Known Limitations document.
For the Domino and Exchange install requirements refer to the Integration for Notes BTCal FreeBusy Requirements document.