
Creating SharePoint Online Hyper Backup
The following is an overview on how to create a Full Backup.
|
|
NOTE: ·It is recommended that the Metalogix application is installed under an account that has Local Administrator rights. ·It is recommended that the computer hosting the Metalogix application is not configured to Restart with Updates or go into Sleep Mode. Both options may interrupt running backups. ·As with any Backup solution, it is strongly recommended that you thoroughly test the solution in a non-production environment prior to running any operations against your production data. Make note of all backed up and restored objects, their behavior, the process itself, scheduled operations as well as the results. If at any time you have additional questions about objects and functionality, please open a ticket with support for additional information. |

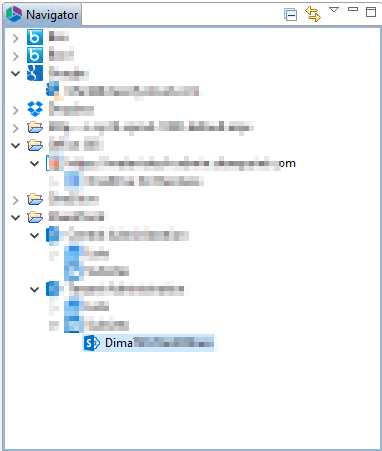
1.Go to the Backup Tab in the Metalogix Essentials for Office 365 menu.

2.From the Navigator pane select the Site Collection, site or sub-site that you would like to backup. Selecting the site from the Navigator pane prior to running the backup is optional, but this process will auto-populate the URL into the configuration wizard. Alternatively, you can skip to the next step and manually enter the SharePoint site URL into the appropriate field within the wizard.
3.In the Ribbon select the To Local Storage or the To Cloud Storage button. The Wizard will open to begin the configuration of your backup job.
§The To Local Storage option will save the backup project to a local or shared path within your network. Local Read/Write permissions will be required for the location selected.
§The To Cloud Storage option will save the backup project to your cloud storage account in either Amazon S3 or Azure Containers. Your account and key will be required. For more information about the Cloud Storage options, please see Connecting to Cloud Storage.

4.In the backup wizard enter a name for your backup project and select which Service you wish to configure. The following example will be using a SharePoint Online site collection for backup, however the configuration options for OneDrive for Business and Exchange Online can be found in the respective locations: Creating an Exchange Online Mailbox Backup, Creating an Office 365 Group Backup, and Creating a OneDrive for Business Backup
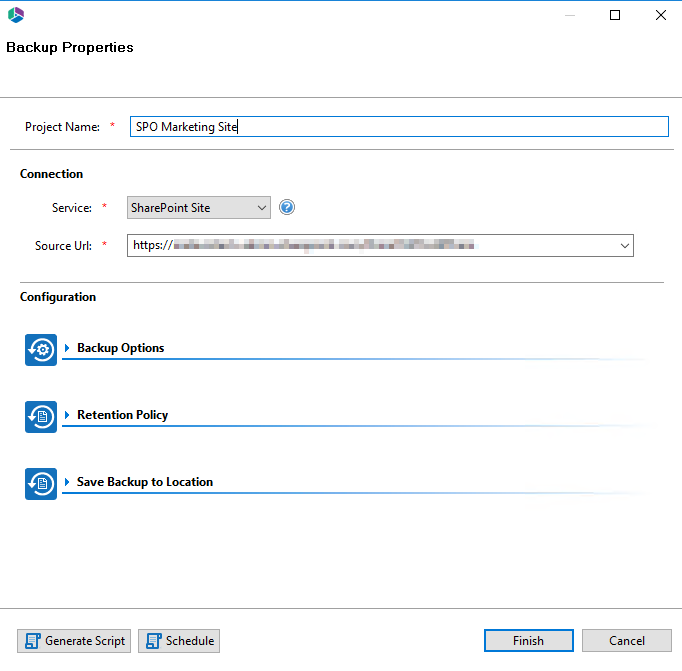
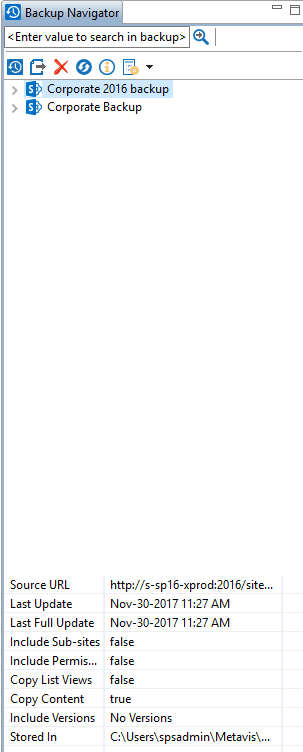
5.SharePoint site backups can be configured with the following options:
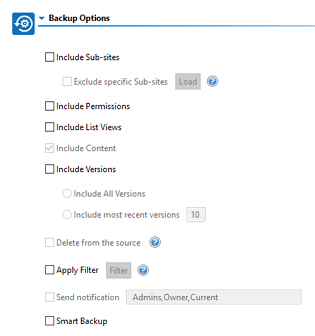
Backup Options
Include Sub-sites - this option will include all sub-sites (including their user created lists and content) of the parent site as defined in the project's previous Site URL field.
|
|
NOTE: ·Hidden lists, system lists (i.e. Galleries, Workflow History, User Information List and others not visible in the Site Contents section of SharePoint) and Apps are not included in the backup of any sites. ·The Backup operation is only designed to backup sites, user created lists, content (versions and metadata), user created custom views and SharePoint permissions (site, list and item). All other SharePoint objects, settings and configuration are not currently supported. Be sure to thoroughly test both the backup and restore of these objects in a non-production environment before deploying to production and contact Support with any questions or issues. ·Although aspx Pages are included in Backups, there have been occasions where web parts are missing or incorrectly assigned to the wrong zone after restore. Please be sure to thoroughly test any business critical pages to ensure they are backed up and restored properly in a non-production environment and contact Support with any questions or issues. |
Exclude specific Sub-sites - this option will exclude all sub-sites that are specified in the loaded CSV file. To create this CSV file, simply enter the name of the sub-site which you wish to exclude from the backup, click the Load button and then select this file.
Include Permissions - this option will include SharePoint site, list, and item level permissions from each uniquely permissioned object.
Include List Views - this option will include any custom create list views.
|
|
NOTE: this does not include customized InfoPath Forms or views that were modified using SharePoint Designer. |
Include Versions - this option will allow you to specify how many versions of each item to include with the backup. If left unchecked, no versions will be included, if "Include All Versions" is selected then all versions will be included. If "Include Most recent versions" is selected then only the number of versions specified will be included, starting with the most recent and working backwards (major and minor versions are included).
Apply Filter - this option will allow you to customize a filter to include/exclude content based on metadata.
Smart Backup - This functionality is only available for Hyper Backups, which can only be performed for OneDrive and SharePoint sites. This feature aids users in saving space on storage. It uses the MD5 algorithm to scan backup files and excludes duplicates. The MD5 message-digest algorithm is used as a checksum to verify data integrity. If the checksum for files is the same, Essentials will save only one file instead of storing two equal files. Click here for more information on Smart Backups.
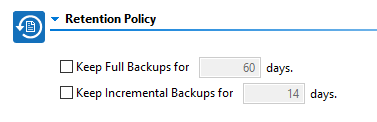
Retention Policy
Keep Full Backups - if configured, this will specify how long the software will retain any Full backups that were created in this project. The retention purge will occur at the start of the next run or scheduled backup update for each project which contains a configured retention policy.
Keep Incremental Backups - if configured, this will specify how long the software will retain any Incremental or Differential backups that were created in this project. The retention purge will occur at the start of the next run or scheduled backup update for each project which contains a configured retention policy.
Save Backup to Location
Save to - this option will determine if the backup project is stored on your local storage (local or network path) or within your cloud storage provider (Amazon S3 or Azure)
Location - this field will display the full path to the location where the backups will be stored. Click the Ellipsis button to the right to configure this location.

6.Press Finish to start the Backup.
|
|
NOTE: Backups can be scripted or scheduled. Please refer to the scheduling or scripting sections for additional information. |
Updating SharePoint Online Hyper Backup
Once a Backup exists, users can create updates by capturing a full or incremental snapshots of their SharePoint environment. Here are the basic guidelines for this process:
1.Select a SharePoint Online Backup project from the Backup Navigator panel.
2.From the Ribbon (or right-click menu for the selected backup) select the Update Backup option. This will generate the Update Backup Properties screen.
3.A user may select one of several options for the update:
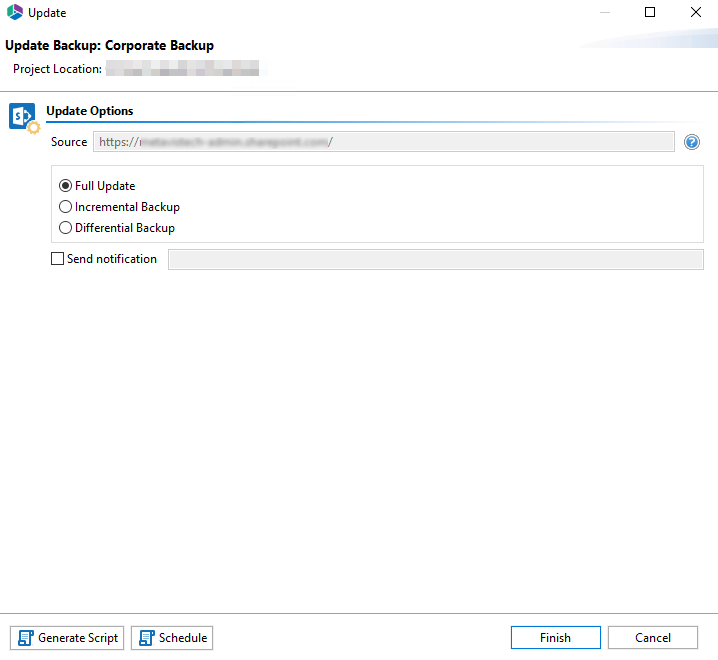
Full Update - this will create a full snapshot of your currently configured backup project.
Incremental Backup - this will capture only the changes in your backup project since the last update, regardless if that update was Full or Incremental. In this scenario a user could create a series of Backups containing data changes for a specific time period.
Differential Backup - this will capture all the changes in your backup project since the last full Backup, even if other incremental Backups have been created in the interim.
Send Notification - Enter a specific user email address. For two or more, separate each email address with a comma.
4.Press Finish to update the Backup now or choose the Schedule button to configure a Windows Task Scheduler task to schedule the update backup (See the Scheduling Backup Jobs section for more information).
Restoring SharePoint Online Hyper Backup
There are a variety of ways to perform a restore of a SharePoint backup, based on your specific needs. This section will review the various components of a backup which can be restored and the ways in which to do so.
Restore a Site from Specific Backup
The following are instructions for restoring a SharePoint site (in-place restore only) from a specific backup:
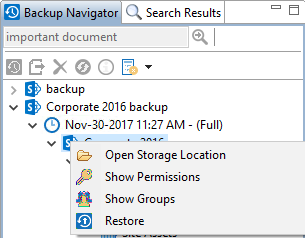
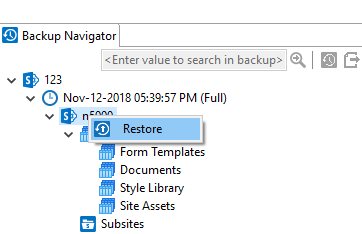
1.Navigate to the backup and select a site to restore.
2.You can access the Restore wizard by either right-clicking on the selected site or list and selecting the "Restore" option.
Or you can access the Restore Wizard by selecting "To Original Location" in the Restore section of the Ribbon.

3.When prompted, select "yes" that you do want to restore the backup to its original location. Then select whether you would like to send notification.
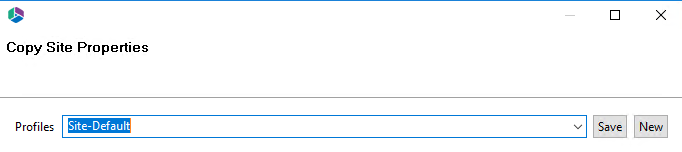
4.The Copy Site Properties wizard will now be generated.
5.In the wizard you can choose to create a new Profile or use the Site-Default profile.
6.You can choose from the following configuration options:
Site Collection options

|
|
NOTE: ·Site Collection options would be available only if site collection does not exist. Otherwise this section would not be available. ·Enter new site collection URL is not supported. |
Tenant Central Admin URL enter the Admin Portal URL for Office 365 where site collection must be restored
Site Collection Admin- enter user name (user@contoso.com) who would be site collection admin for restored site collection
Site Collection Quota - enter quota for restored site collection.
Site Copy Options
Include Sub-Sites - Enable this option to include all sub-sites of the current site in this operation.
Include Site Permissions - This option will copy source site permissions to the target site. If the source site permissions are inherited, then the target site permissions will also be set to inherited. If the source site permissions are unique, these unique permissions will be copied to the target site.
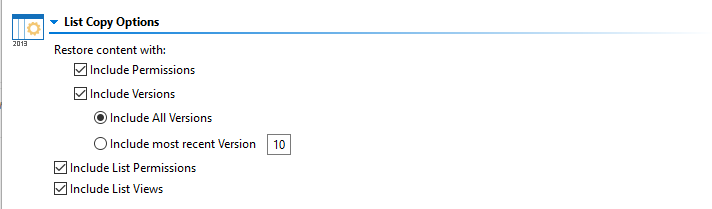
List Copy Options

|
|
NOTE: Restore would be with all lists, list settings, content types, columns and content |
Include Permissions - copy the permissions associated with the content within this list/library
Include Versions - copy the version of the content included within the list/library. You can specify if you would like to include all versions of the content, or whether you would like to include the most recent number of specified versions of the content.
Include List Permissions - select this option to copy the site permissions.
Include List Views - select this option if you would like to copy the number of views of the site.
Advanced Options
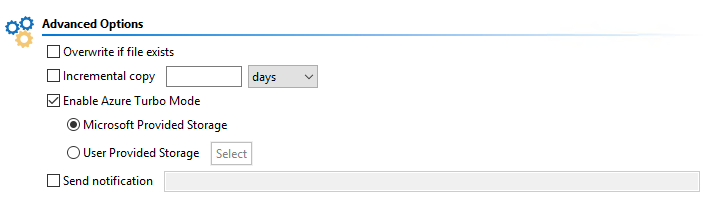
Overwrite if file exists - In a version library, selecting the "Overwrite if File Exists" option does not overwrite the files already in SharePoint. SharePoint will append these to the list as new versions.
Incremental Copy - Incremental or delta migrations are an important and powerful option for large or ongoing projects and migration validation. Once enabled this option will migrate new, modified or versioned content from the source to the destination, capturing changes made by users during the previous migration.
The value entered into the "Last" field will limit the amount of content examined to the time period specified, starting at present time.
To perform an incremental migration, enter the amount of time to include and select the appropriate time period in days, weeks or months. Incremental migration is designed to be used in scenarios where the destination is not being modified.
To perform a delta migration, enter zero in the field and select days as the time period. Delta migration is designed to be used in scenarios where both the source and destination may be modified during the course of the migration. Please note that a delta migration compares dates between source and destination to determine which content to include, so it will take more time to process than an incremental migration.
|
|
NOTE: The Overwrite if File Exists parameter will be disabled if this option is selected. |
| Enable Azure Turbo Mode - When enabled, this option utilizes Microsoft's SharePoint Online Migration API to increase the migration performance and throughput. A recommendation for optimal use of this API is larger sets of data; the more content, the better the throughput. Because this API uses Azure storage as a staging area for the migration, it requires that you provide an Azure storage location. The options are to either utilize Microsoft supplied storage or to provide your own Azure storage location. If you wish to use your own Azure account, you must provide both the Azure Account Name as well as the corresponding Access Key. If you cannot supply this information, please search our online Knowledge Base, User Manual, or contact Support for additional information before proceeding or consider using the Microsoft Supplied Storage option. For more information please see the Azure Turbo Mode section. |
| Send Notifications - provide an email to which notifications will be sent regarding the progress of the Backup Restore. |
7.Once you have configured all your settings, click Finish.
|
|
NOTE: By default the restore process will put all the content, metadata, site/list structure, permissions and other supported objects back into the original backup location. |