
Export Data
The ability to export data is available within the Export section of the ribbon. Reports that contain a visual graph and an analysis list are exported to PDF format, while reports that contain just an analysis list are exported to a CSV file. The Export to Excel function can export all reports into a multiple worksheet Excel file with sub and trending data.
|
|
NOTE: Dashboards cannot be exported. |

Exporting to PDF
To export a visual report to a PDF file do the following:
1.First select and load the report.
2.Press the Export to PDF button located in the ribbon.
|
|
NOTE: "Export to PDF" is not an available option for any of the Dashboard reports. |

Export to CSV
To export an analysis only report to a CSV file do the following:
1.Select and load the report you wish to export.
2.Press the Export to CSV button located in the reports section of the ribbon.

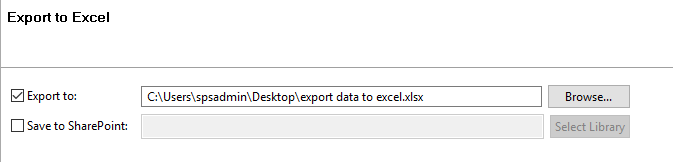
Export to Excel
To export all the analysis data into a single, multi-worksheet Excel file (*.xlsx) do the following:
1.Click the the Export to Excel option located in the ribbon.

2.In the Export to Excel window, select whether you want to export to a local location, or save to SharePoint - and then select the respective location or library.
3.Configure the options for which data to include within the reports.
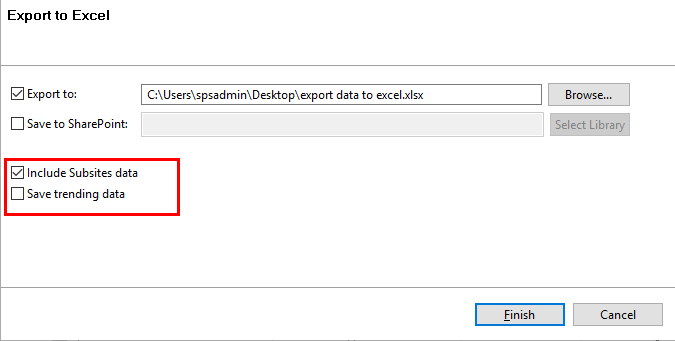
4.Click Finish to begin the export process.
Actions
Beyond just reporting and visualizing the data, Administrator provides a full assortment of real-time actions. Some actions are performed against your selected location (i.e. change version settings) while others may be used to trigger a separate operation within Essentials, like scheduling a Backup job.
The list of available Actions is determined by the license key, so some of the Actions described below may not be included in your version. For example, if you want to run a deeper security report, then Essentials Security Manager needs to be included in your license.
Actions can be run from either the Analysis portion of any report or by simply right clicking on that location in the Administrator project. Some Actions also support multi-select so you can run it once against several objects or locations.
Administrators list of Actions include:
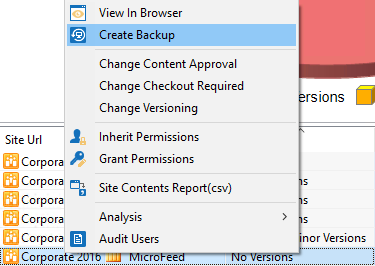
·View in Browser: This will open your default Internet Browser and load your selected location.
·Create Backup (when licensed): Essentials Backup will open and pre-populate the URL with the site selected. See the Backup section for additional information.
·Change Content Approval: Select one or more lists and change the Content Approval setting to either Yes or No.
·Change Checkout Required: Select one or more lists and change the Checkout Required setting to either Yes or No.
·Change Versioning: Select one or more lists and change the Versioning setting to either No Versions, Create Major Versions, or Create Major and Minor Versions.
·Inherit Permissions (when licensed): Select one or more lists and set inheritance to "Inherit Permissions" or "Stop Inheriting Permissions" from the parent. If you select "Stop Inheriting Permissions" this will remove any unique permissions from the selected lists. See the Essentials Security Manager section for additional information.
·Grant Permissions (when licensed): Select one or more lists and the Grant Permissions window will open. From here, you can grant choose to Add users to a SharePoint group, or Grant users permissions directly to users or groups across the selected locations. This will make permissions unique on any location that currently inherits from their parent. See the Essentials Security Manager section for additional information.
·Site Content Reports (when licensed): The Site Content Report dialog will open, pre-populate with the selected Site URL and allow for the creation of a content inventory report.
·Analysis
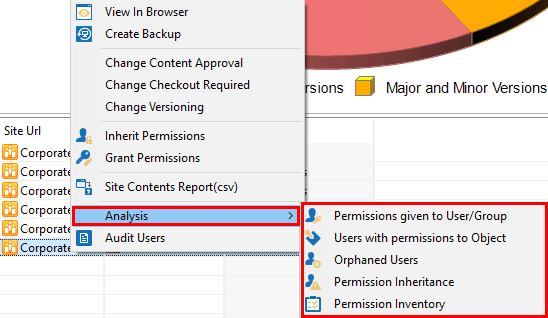
o Permissions given to User/Group (when licensed): A real-time security report is run against the defined user or group. See the Essentials Security Manager section for additional information.
oUsers with permissions to Object (when licensed): A real-time security report is run detailing all users who have access to this selected object. See the Essentials Security Manager section for additional information.
oOrphaned Users (when licensed): A real-time security report is generated detailing the list of all orphaned users in this location. See the Essentials Security Manager section for additional information.
oPermission Inheritance (when licensed): A real-time security report is run displaying a list of all inherited or unique permissions within this location. See the Essentials Security Manager section for additional information.
oPermission Invenotry (when licensed): A real-time secrutiy report that details permissions related to the selected site collection, site or OneDrive for Business. Permission options include site, list and item permissions, inherited objects as well as group membership.
·Audit Users: Allows you to audit your list of users for a specified site within a specified date range.
·Administrator
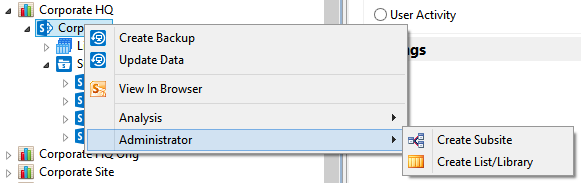
oCreate Subsite: Select one or more sites from the Admin project navigator to create new, identical sub-sites in these locations. Note: This option is only available in the Navigator pane.
oCreate List/Library: Select one or more sites from the Admin project navigator to create new, identical lists or libraries in these locations. Note: This option is only available in the Navigator pane.
Available Reports
This menu provides a quick and easy way to generate a number of different visualizations of the collected data. The menu consists of several sections which can be opened or closed by clicking on the header.
Please select the appropriate link below to read a list of available reports.
SharePoint and OneDrive for Business Reports
Office 365 License Reports
Each section displays the current list of available reports that you can view by selecting the radio button next to the dashboard or report that you wish to load. A description of each report can be found below.
·License Allocation: Displays the allocation of total vs consumed vs available Office 365 license by plan. Use the Plan selector in the upper left to switch between available plans.
·License Distribution by User: Displays the distirbution of Assigned vs Disabled for each user in the selected Plan and Service. Use the selector in the upper left to switch between the available plans and services. Quick Actions are available on the selected users to Update License or Audit this user.
|
|
NOTE: Service Manager license required for Quick Actions. |
·License Distribution by Service: Displays a list of users who have been assigned a license to this service. Use the selector in the upper left to switch between the available plans. Quick Actions are available on the selected users to Update License or Audit this user.
|
|
NOTE: Service Manager license required for Quick Actions. |
·License Distribution by Department: Displays the number of licenses of the selected Service which have been assigned to a member of each department. The department is read from the User's profile. Use the selector in the upper left to switch between the available plans and services. Quick Actions are available on the selected users to Update License or Audit this user.
|
|
NOTE: Service Manager license required for Quick Actions. |
·License Distribution by Service in Department: Displays the allocation of Office 365 licenses to all users of the selected Department. Use the selector in the upper left to switch between the available plans and departments. Quick Actions are available on the selected users to Update License or Audit this user.
|
|
NOTE: Service Manager license required for Quick Actions. |